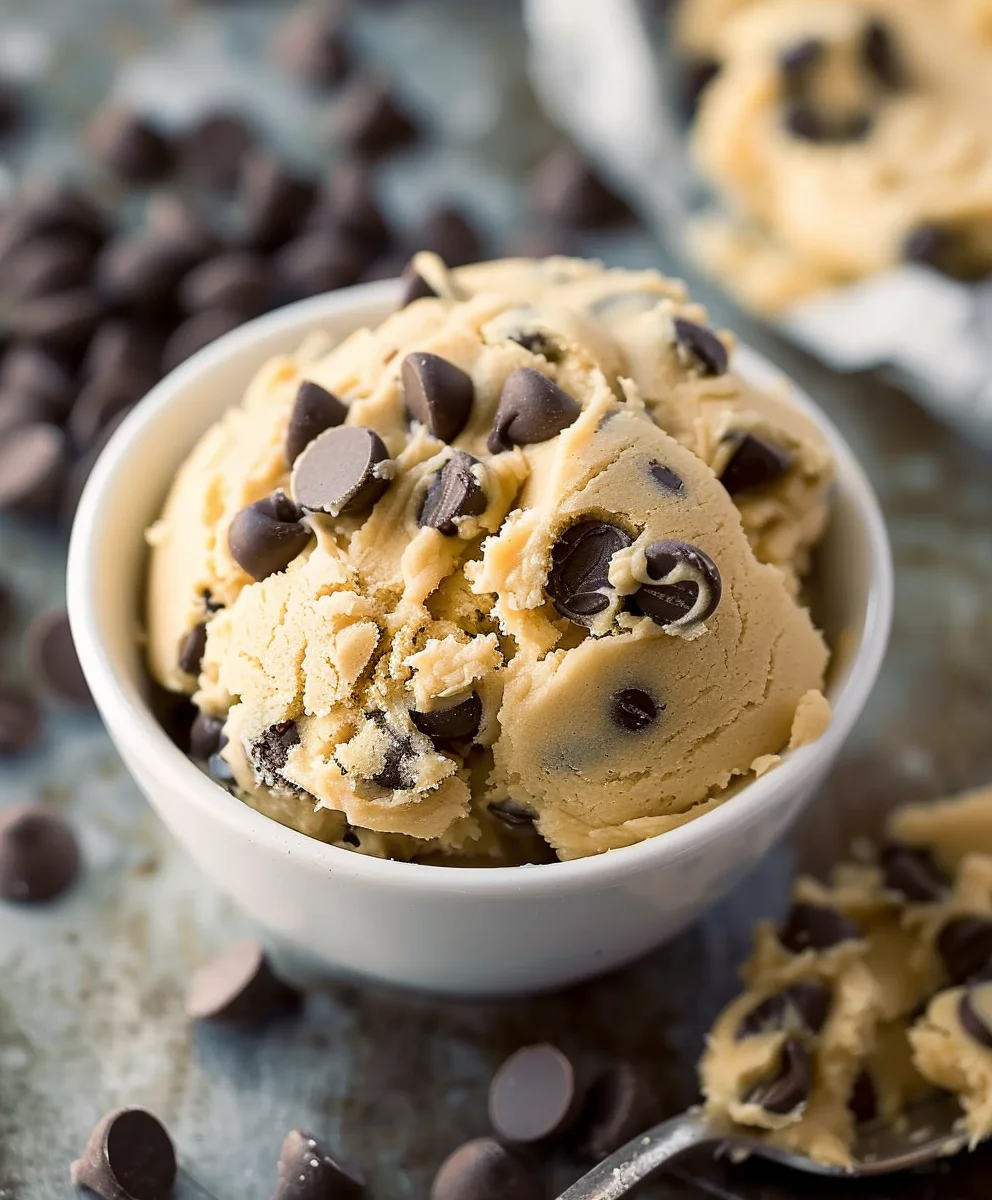
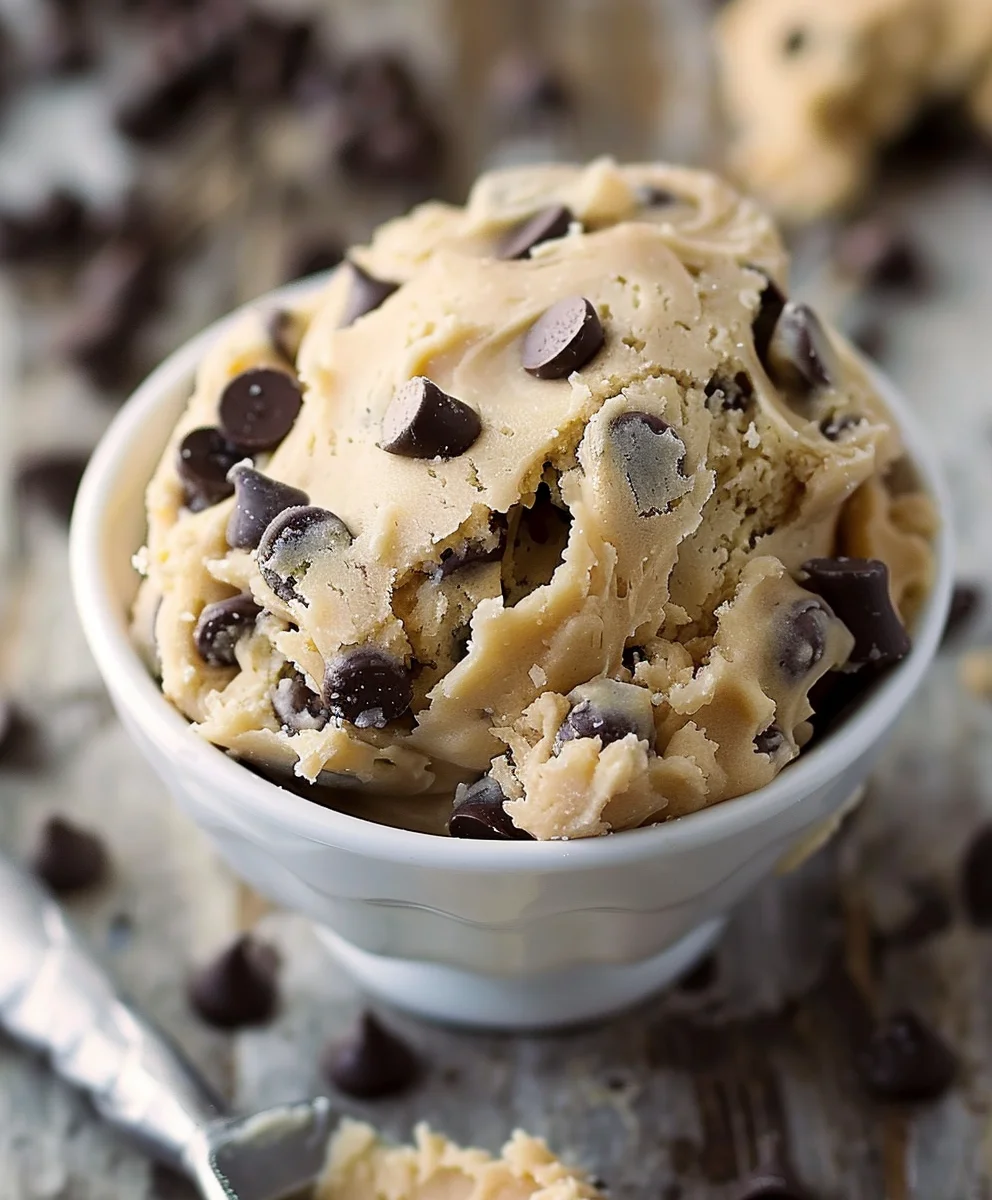
Edible Cookie Dough Recipe – who hasn’t harboured that delightful, secret desire to simply grab a spoon and dive headfirst into a bowl of unbaked cookie dough? That irresistible urge, free from the worry of raw eggs or flour, is exactly what we are celebrating today. For generations, the joy of tasting that perfect, sweet, and buttery concoction before it even touched the oven has been a beloved, albeit slightly illicit, pleasure.
The cultural significance of edible cookie dough truly blossomed as a clever culinary innovation, transforming a tempting indulgence into a perfectly safe, guilt-free treat. It addresses a universal craving, allowing us to recapture that nostalgic childhood dream of endless cookie dough without any concerns. People simply adore this dish for its incredible, rich sweetness and the melt-in-your-mouth texture of real chocolate chips. It’s the ultimate comfort food, offering instant gratification with its creamy, dreamy consistency.
The sheer convenience of having a dessert ready in minutes, with absolutely no baking required, makes it a true game-changer for spontaneous sweet cravings or easy entertaining. It’s pure, unadulterated cookie bliss, and today, I am thrilled to share my foolproof Edible Cookie Dough Recipe that guarantees all the flavour and fun, completely safe for everyone to enjoy by the spoonful!

Ingredients:
- 1 cup (120g) all-purpose flour: This is the base of our delicious edible cookie dough. Make sure it’s standard all-purpose flour, as we’ll be heat-treating it for safety.
- 1/2 cup (113g) unsalted butter, softened to room temperature: Room temperature butter is absolutely crucial for achieving that perfectly creamy, light texture when we mix it with the sugars. If it’s too cold, it won’t cream properly; too warm, and your dough might be greasy.
- 1/4 cup (50g) granulated sugar: For sweetness and a touch of crispness.
- 1/2 cup (100g) packed light brown sugar: This is where a lot of that classic cookie dough chewiness and rich molasses flavor comes from. Make sure it’s packed tightly for accurate measurement.
- 2 tablespoons milk (any kind – dairy or non-dairy): Just a splash of milk helps to bring the dough together, giving it that perfect, moist consistency without adding eggs. I often use whole milk, but almond or oat milk works beautifully too.
- 1 teaspoon vanilla extract: A staple in almost any cookie recipe, vanilla extract adds warmth and depth of flavor that is simply essential for an authentic edible cookie dough experience. Don’t skimp on good quality vanilla!
- 1/4 teaspoon salt: Salt is a flavor enhancer that balances the sweetness of the sugars and really makes all the other flavors pop. It’s a small but mighty ingredient!
- 1/2 cup (85g) chocolate chips (mini or regular, semi-sweet preferred): What’s cookie dough without chocolate chips? I love using semi-sweet, but feel free to experiment with milk chocolate, dark chocolate, or even white chocolate chips! Mini chocolate chips are fantastic because you get more chocolate in every spoonful, but regular sized ones are perfectly fine too.
Preparation Phase 1: Heat-Treating the Flour
- Understand the Importance of Heat-Treating: Before we dive into mixing, the absolute most critical step for making safe, edible cookie dough is heat-treating your all-purpose flour. Raw flour can sometimes contain harmful bacteria, like E. coli, which are destroyed by heat. Since we won’t be baking this dough, we need to ensure the flour is safe to consume raw. This step is non-negotiable for a truly safe and enjoyable “Edible Cookie Dough Recipe”.
-
Choose Your Method for Heat-Treating: You have a couple of reliable options for heat-treating flour, and both are quite simple. I’ll walk you through both the microwave method and the oven method, so you can pick whichever works best for you and your kitchen setup.
Microwave Method for Heat-Treating Flour:
- Prepare for Microwaving: Place your 1 cup (120g) of all-purpose flour into a microwave-safe bowl. Make sure the bowl is large enough that the flour isn’t piled up too high, as we want even heating.
- Microwave in Short Bursts: Microwave the flour on high power for 30-second intervals. After each interval, carefully remove the bowl from the microwave and stir the flour thoroughly with a spoon. This stirring is crucial because microwaves heat unevenly, and we want to ensure all parts of the flour reach the necessary temperature. You’ll repeat this process, stirring after each 30-second burst, until the flour’s temperature reaches 160°F (71°C). This typically takes about 1 minute 30 seconds to 2 minutes 30 seconds, depending on your microwave’s wattage.
- Check the Temperature: To be absolutely certain your flour is safe, use an instant-read thermometer to check its internal temperature. Insert the thermometer into various spots in the flour to ensure consistent heating. If it hasn’t reached 160°F (71°C), continue microwaving in 15-second bursts, stirring and checking the temperature after each, until it does. This temperature check is vital for food safety.
Oven Method for Heat-Treating Flour:
- Preheat Your Oven: Preheat your oven to 300°F (150°C). This lower temperature allows for more gentle and even heating of the flour without scorching it.
- Spread the Flour Evenly: Spread your 1 cup (120g) of all-purpose flour in a thin, even layer on a baking sheet. A standard rimmed baking sheet works perfectly for this. The thinner the layer, the more evenly and quickly it will heat.
- Bake Until Safe: Place the baking sheet with the flour into the preheated oven. Bake for approximately 5 to 7 minutes. Around the 5-minute mark, give the flour a gentle stir to promote even heating.
- Verify Temperature: Just like with the microwave method, it’s imperative to confirm the flour has reached a safe temperature. Use an instant-read thermometer to check that the flour has reached 160°F (71°C). If it hasn’t, return it to the oven for another minute or two, then recheck.
- Cool the Heat-Treated Flour Completely: Regardless of which heat-treating method you chose, once your flour has reached 160°F (71°C), remove it from the heat source. Transfer the flour to a clean, dry bowl or spread it back out on the baking sheet to cool down completely. It is absolutely crucial that the flour is completely cool before you add it to your wet ingredients. If you add warm flour, it will melt your butter and create a greasy, runny dough, which is definitely not what we’re aiming for in this fantastic “Edible Cookie Dough Recipe”! Give it at least 15-20 minutes, or even longer, to ensure it’s fully cooled to room temperature. You can even pop it in the fridge for a few minutes if you’re in a hurry, just ensure it’s not cold enough to harden your butter when mixed.
Preparation Phase 2: Mixing the Wet Ingredients
- Cream the Butter and Sugars: In a large mixing bowl, place your 1/2 cup (113g) of softened unsalted butter, 1/4 cup (50g) of granulated sugar, and 1/2 cup (100g) of packed light brown sugar. Using an electric mixer (either a stand mixer with the paddle attachment or a hand mixer), beat these ingredients together on medium speed. You want to cream them until the mixture is light, fluffy, and significantly paler in color. This process usually takes about 2 to 3 minutes, but continue until you no longer feel the gritty texture of sugar crystals against the side of the bowl as much. This creaming step incorporates air into the mixture, contributing to the dough’s pleasant texture. Scrape down the sides of the bowl with a spatula occasionally to ensure everything is evenly combined.
- Add Milk and Vanilla: Once your butter and sugars are beautifully creamed, add the 2 tablespoons of milk and 1 teaspoon of vanilla extract to the bowl. Continue to beat on medium speed for another 30 seconds to 1 minute, until these liquid ingredients are fully incorporated into the butter mixture. The mixture might look a little curdled at first, but keep mixing until it comes back together and appears smooth. Again, remember to scrape down the sides of the bowl to ensure every bit is well-mixed and ready for the next step in our “Edible Cookie Dough Recipe”.
Preparation Phase 3: Combining and Finishing the Edible Cookie Dough
- Incorporate the Heat-Treated Flour: Now for the moment of truth! With your electric mixer on low speed, gradually add the completely cooled, heat-treated flour to the wet ingredients in the bowl. I like to add it about a third at a time, mixing briefly after each addition until just combined, before adding the next portion. It’s important to mix only until the flour streaks have disappeared and the dough comes together. Do not overmix at this stage! Overmixing can develop the gluten in the flour, which we don’t want in edible cookie dough as it can make it tough instead of tender and smooth. The goal is a uniform, pliable dough. Scrape down the bowl one last time to ensure no dry pockets of flour remain.
- Stir in the Chocolate Chips: Once your dough is smoothly combined, it’s time for the best part! Add your 1/2 cup (85g) of chocolate chips to the bowl. Using a sturdy spatula or a wooden spoon, fold the chocolate chips into the dough until they are evenly distributed throughout. This is a gentle folding motion, not aggressive mixing, to ensure the texture of the dough remains perfect and the chocolate chips are nicely nestled within. Feel free to be generous here – if you love chocolate, a little extra never hurts this delightful “Edible Cookie Dough Recipe”!
- Taste and Adjust (Optional but Recommended!): Take a small spoonful of your freshly made edible cookie dough. Taste it! Is it sweet enough for your liking? Is there a good balance of flavors? This is your chance to make any minor adjustments. You might add a tiny pinch more salt if you feel it’s too sweet, or a splash more milk if you desire a slightly softer consistency. However, generally, following this recipe will give you a perfectly balanced and delicious edible cookie dough right from the start.
Storage and Serving Suggestions
-
Storing Your Edible Cookie Dough: Once your delicious edible cookie dough is ready, you’ll want to store it properly to keep it fresh and safe. Transfer the dough to an airtight container. This will prevent it from drying out and absorbing any unwanted odors from your refrigerator.
- Refrigeration: The edible cookie dough will keep wonderfully in the refrigerator for up to 1 week. Before serving it straight from the fridge, you might want to let it sit at room temperature for 10-15 minutes to soften slightly, making it easier to scoop and enjoy that perfect texture.
- Freezing: For longer storage, you can absolutely freeze this edible cookie dough! Scoop the dough into small balls (like traditional cookie dough) and place them on a parchment-lined baking sheet. Freeze until solid (about 1-2 hours), then transfer the frozen dough balls to a freezer-safe bag or container. It will last in the freezer for up to 3 months. When you’re ready to enjoy, simply thaw the desired amount in the refrigerator overnight or on the countertop for an hour or two.
-
Creative Ways to Enjoy Your Edible Cookie Dough: While eating it straight from the spoon is undeniably satisfying (and my personal favorite way!), there are so many other fantastic ways to enjoy this versatile “Edible Cookie Dough Recipe”:
- Classic Spoonfuls: The simplest and most direct path to happiness. Grab a spoon and dive in!
- Ice Cream Topping: Crumble or scoop spoonfuls of edible cookie dough over your favorite bowl of ice cream. It adds incredible texture and a burst of flavor. It’s particularly amazing with vanilla, chocolate, or coffee ice cream.
- Milkshake Booster: Blend a few scoops into a vanilla or chocolate milkshake for an extra decadent, thick, and chunky treat.
- Dessert Dip: Serve it in a bowl with graham crackers, pretzels, apple slices, or vanilla wafers for a fun and interactive dessert dip. This is always a hit at gatherings!
- Brownie or Cake Layer: Press a layer of edible cookie dough onto a cooled brownie or cake before frosting for an added surprise layer of deliciousness. Just make sure your base dessert is completely cooled.
- Cupcake Filling or Topping: Use small amounts as a delicious surprise filling inside cupcakes, or soften it slightly and pipe it as a unique frosting.
- Mix-in Extravaganza: Feel free to customize your edible cookie dough with other mix-ins! Consider adding sprinkles for a festive touch, mini M&M’s, chopped nuts (like pecans or walnuts), toffee bits, or even crushed Oreos. The possibilities are truly endless, making this “Edible Cookie Dough Recipe” incredibly adaptable to your personal preferences.
No matter how you choose to enjoy it, this safe and scrumptious edible cookie dough is sure to be a delightful treat!
Conclusion:
Oh, my goodness, if there’s one treat that consistently brings a smile to everyone’s face, it’s truly the pure, unadulterated joy of cookie dough. And this particular recipe? It’s not just good; it’s an absolute game-changer. I honestly believe that once you try this, you’ll wonder how you ever lived without it. The magic lies in its perfect balance of sweetness, its wonderfully tender texture, and the undeniable fact that you can enjoy every single spoonful without a moment’s hesitation or worry. No more sneaking spoonfuls from the raw cookie dough bowl while glancing over your shoulder – this creation is designed for pure, guilt-free pleasure, celebrating that nostalgic flavor we all adore. It’s incredibly easy to whip up, demanding minimal effort for maximum reward, making it the ideal candidate for a spontaneous treat, a quick dessert for unexpected guests, or simply a comforting indulgence after a long day. The rich, buttery notes combined with your favorite mix-ins create a symphony of flavors and textures that is genuinely irresistible. This isn’t just a recipe; it’s an experience, a celebration of childhood joy and grown-up convenience rolled into one delightful package.
What truly elevates this treat from a simple snack to a culinary essential is its incredible versatility. Seriously, don’t limit yourself to just eating it straight from the bowl (though, let’s be real, that’s often the best way!). Imagine taking this glorious concoction to the next level. For starters, think about how it can transform other desserts. A generous scoop nestled atop a warm brownie, melting slightly and adding a creamy, chewy contrast, is pure heaven. Or consider it as an unexpected, delightful filling for cupcakes – a surprise center that elevates a simple cake to something truly special. You could even roll it into small balls, chill them, and then dip them in melted chocolate for decadent truffles that look fancy but are surprisingly simple to make. Don’t forget the classic pairing with ice cream; whether you swirl it into a homemade batch or simply dollop it over a store-bought pint, it adds an incredible layer of texture and flavor that makes every bite exciting. We’re talking about taking an already fantastic dessert and making it even more extraordinary, all thanks to this brilliant base.
The serving possibilities genuinely feel endless, allowing your creativity to shine. Serve it in cute mini ramekins with a tiny spoon and a sprinkle of sea salt for a sophisticated touch, or pile it high in a sundae glass with whipped cream, hot fudge, and extra sprinkles for an over-the-top indulgence. Create miniature cookie dough sandwiches by pressing a small amount between two thin cookies, like chocolate wafers or graham crackers, for a delightful bite-sized treat. For a truly unique dessert, you could even layer it into parfaits with fruit, yogurt, or granola for a surprisingly satisfying breakfast-meets-dessert experience. On a hot day, imagine blending a spoonful or two into a creamy milkshake – it adds body, flavor, and those delightful little chewy bits that make a milkshake truly memorable. The point is, this isn’t a one-trick pony; it’s a dessert chameleon, ready to adapt to whatever craving or occasion arises.
And let’s talk about variations, because this is where the fun really begins! While the classic chocolate chip version of this Edible Cookie Dough Recipe is a timeless winner, don’t hesitate to experiment with different mix-ins. Swap out the chocolate chips for white chocolate chunks, butterscotch chips, or even mini M&M’s for a burst of color and different flavor profiles. Feeling nutty? Add chopped pecans, walnuts, or even toasted almonds for extra crunch and depth. For the ultimate indulgence, crumble in some crushed Oreos, pretzel pieces for a sweet and salty twist, or toffee bits for a rich, buttery caramel note. You could even play with the base flavor itself! Imagine a peanut butter edible cookie dough, rich and creamy, perhaps with chocolate chips, or a decadent double chocolate version with cocoa powder added to the base for intense chocolate lovers. A red velvet option, with a touch of cocoa and red food coloring, could be incredibly festive and delicious. The beauty is that the core recipe is so robust and forgiving, it encourages you to play around and discover your own signature combinations, truly making it your own.
So, what are you waiting for? I wholeheartedly encourage you to roll up your sleeves, gather your ingredients, and give this incredible recipe a try. It’s simple, it’s satisfying, and it delivers on every single promise of deliciousness. Once you’ve experienced the pure joy of a spoonful (or three!) of this perfectly safe and utterly delicious creation, you’ll be hooked, just like I am. Don’t keep this secret to yourself! After you’ve whipped up your batch and indulged in its glorious goodness, I would absolutely love to hear about your experience. Did you stick to the classic? Did you create a wild and wonderful variation? What were your favorite mix-ins or serving suggestions? Share your photos, your triumphs, and your delightful stories with us. Your feedback and creativity inspire us all. Get ready to embark on a deliciously doughy adventure – you won’t regret it!
Edible Cookie Dough Recipe
This irresistible Edible Cookie Dough Recipe allows you to safely indulge in the nostalgic joy of eating raw cookie dough, free from raw eggs or flour concerns. It’s a quick, no-bake treat that satisfies sweet cravings with its rich, creamy texture and delicious chocolate chips.
Ingredients
-
1/2 cup unsalted butter, softened
-
1/2 cup brown sugar, packed
-
1/4 cup granulated sugar
-
3 tablespoons milk (whole milk preferred)
-
1/2 teaspoon vanilla extract
-
1 1/3 cups all-purpose flour, heat-treated
-
1/4 teaspoon salt
-
3/4 cup chocolate chips
Instructions
-
Step 1
Heat-treat all-purpose flour to 160°F (71°C) using a microwave (stirring every 30 seconds for 1.5-2.5 minutes) or oven (300°F/150°C for 5-7 minutes). Let cool completely. -
Step 2
In a large bowl, cream softened butter with brown sugar and granulated sugar using an electric mixer until light and fluffy (2-3 minutes). -
Step 3
Beat in milk and vanilla extract until fully incorporated and smooth. -
Step 4
Gradually add the cooled, heat-treated flour and salt to the wet ingredients, mixing on low speed until just combined and no flour streaks remain. Do not overmix. -
Step 5
Fold in chocolate chips with a spatula until evenly distributed. Taste and adjust sweetness/consistency if desired. -
Step 6
Serve immediately, or store in an airtight container in the refrigerator for up to 1 week, or freeze for up to 3 months. Let frozen dough thaw before enjoying.
Important Information
Nutrition Facts (Per Serving)
It is important to consider this information as approximate and not to use it as definitive health advice.
Allergy Information
Please check ingredients for potential allergens and consult a health professional if in doubt.