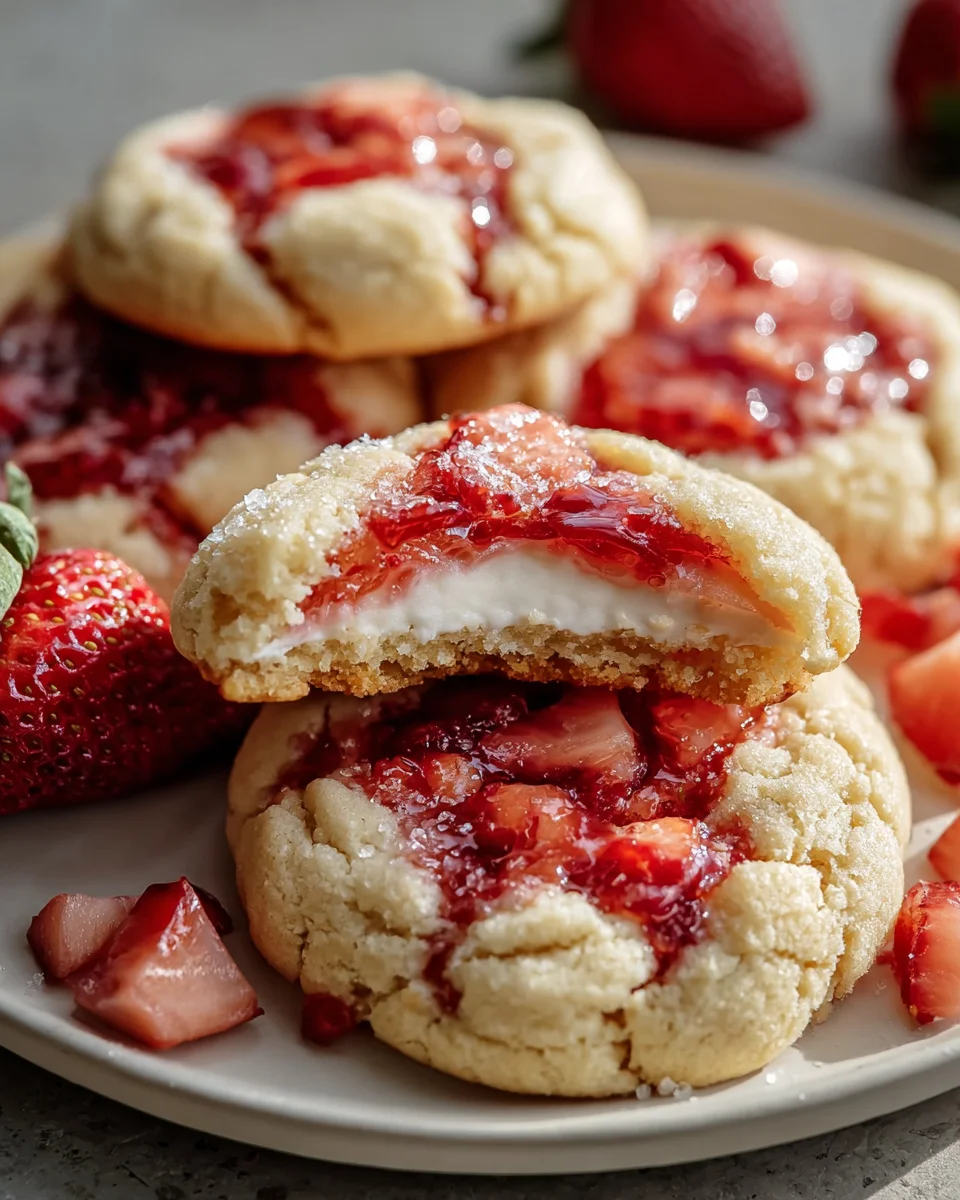
Strawberry Cheesecake Cookies are about to revolutionize your dessert world. Have you ever wished you could enjoy the luscious, creamy decadence of a classic strawberry cheesecake in a convenient, bite-sized form? Well, your culinary dreams are about to come true! I’m thrilled to share a recipe that perfectly encapsulates the beloved flavors of that iconic dessert into a delightful cookie.
While traditional cheesecakes boast a rich history dating back to ancient Greece, the ingenious idea of transforming it into a cookie is a modern marvel, born from a desire to make indulgence more accessible and utterly irresistible. People adore these cookies not just for their stunning appearance, but for the harmonious blend of sweet strawberries, tangy cream cheese, and a tender, chewy cookie base. Every bite offers that familiar cheesecake magic, but with the added joy of a handheld treat.
Prepare to fall in love with these Strawberry Cheesecake Cookies – they are truly a showstopper for any occasion, combining elegance with pure comfort. They offer the perfect balance of sweetness and a refreshing tang, making them an instant favorite for potlucks, parties, or simply a cozy evening indulgence.

Ingredients:
-
For the Strawberry Swirl:
- 1 ½ cups fresh strawberries, hulled and finely diced (approximately 8-10 ounces). I always reach for the ripest, most fragrant strawberries available for the absolute best flavor in our “Strawberry Cheesecake Cookies.”
- ¼ cup granulated sugar. This helps to sweeten the strawberries naturally and encourages them to release their beautiful juices as they cook.
- 1 tablespoon fresh lemon juice. A little splash of lemon juice is magical; it brightens the overall strawberry flavor and adds a lovely subtle tang.
- 1 teaspoon cornstarch. This is our secret weapon for thickening the swirl, ensuring it stays beautifully contained within the cookie without making it soggy.
- 1 tablespoon cold water. Used to create a smooth cornstarch slurry, preventing lumps in our delicious swirl.
-
For the Cheesecake Cookie Dough:
- 4 ounces (½ block) cream cheese, softened completely to room temperature. This is the star ingredient that gives our “Strawberry Cheesecake Cookies” that signature tangy, creamy cheesecake flavor and super soft texture.
- ½ cup (1 stick) unsalted butter, also softened to room temperature. It’s crucial for both the cream cheese and butter to be truly soft for a smooth, emulsified dough – no cold lumps allowed!
- ¾ cup granulated sugar. Provides the primary sweetness and contributes to the cookie’s tender crumb.
- ¼ cup packed light brown sugar. I love brown sugar in cookies because it adds a wonderful depth of molasses flavor and helps keep the cookies incredibly moist and chewy.
- 1 large egg, at room temperature. Just like the dairy, a room temperature egg incorporates much more smoothly into the batter.
- 1 teaspoon pure vanilla extract. Please, use good quality vanilla! It truly enhances all the flavors in these “Strawberry Cheesecake Cookies.”
- 2 ¼ cups all-purpose flour. For best results, I always recommend spooning your flour into the measuring cup and then leveling it off. This prevents over-measuring, which can lead to dry cookies.
- 1 teaspoon baking powder. This is our primary leavening agent, giving our cookies a lovely lift and tenderness.
- ½ teaspoon salt. A pinch of salt is vital for balancing the sweetness and making all the other flavors pop. Don’t ever skip it!
-
For the Optional Vanilla Glaze:
- 1 cup powdered sugar, sifted. Sifting is a small step that makes a big difference, ensuring a lump-free, smooth glaze.
- 2-3 tablespoons milk or heavy cream. Start with 2 tablespoons and add more in tiny increments until you achieve your desired drizzly consistency.
- ½ teaspoon pure vanilla extract. More vanilla is always a good idea, especially in a glaze that will complement our “Strawberry Cheesecake Cookies.”
Preparing the Strawberry Swirl – The Heart of Your Strawberry Cheesecake Cookies
- Prepare the Strawberries: First things first, let’s get that vibrant strawberry swirl ready to infuse our “Strawberry Cheesecake Cookies” with incredible fruity flavor. Take your 1 ½ cups of fresh strawberries, hull them carefully, and then dice them quite finely. I find that smaller, more uniform pieces not only release more flavor during cooking but also create a smoother, more appealing swirl, which is exactly what we’re aiming for in every bite.
- Cook the Strawberries: In a small, non-reactive saucepan, combine your finely diced strawberries, ¼ cup of granulated sugar, and 1 tablespoon of fresh lemon juice. Give the mixture a good stir with a spoon to ensure everything is well distributed. Place the saucepan over medium heat on your stovetop. As the mixture heats up, you’ll notice the strawberries beginning to soften and release their natural juices. The sugar will also start to dissolve, creating a beautiful, glossy liquid. Continue to cook, stirring occasionally to prevent sticking and ensure even cooking, for about 5 to 7 minutes. You’re looking for the strawberries to become significantly tender and the liquid in the pan to thicken into a lovely, syrupy consistency. Don’t worry if there are still some small chunks of strawberry present; these actually add a wonderful textural element and a burst of fresh fruit to the finished swirl.
- Create the Cornstarch Slurry: While your strawberries are gently simmering and transforming, in a very small separate bowl, whisk together your 1 teaspoon of cornstarch with 1 tablespoon of cold water. Whisk vigorously until you have a completely smooth slurry, ensuring there are absolutely no lumps remaining. This slurry is a crucial component; it will effectively thicken our strawberry mixture without imparting any starchy flavor, leaving us with a pure, fruit-forward swirl that is essential for our “Strawberry Cheesecake Cookies.”
- Thicken the Swirl: Once your strawberry mixture is bubbly and the fruit is tender, remove it from the heat for a moment. Give your cornstarch slurry one last quick whisk to ensure it’s well-mixed, then pour it directly into the saucepan with the strawberries. Immediately return the saucepan to medium heat and continue stirring continuously. Keep stirring for another 1 to 2 minutes. As the mixture heats back up, you’ll observe it starting to thicken quite dramatically before your eyes. It will transform into a glossy, jam-like consistency. Once it’s thick enough to generously coat the back of a spoon, you know it’s ready. Remove the saucepan from the heat immediately. This thickening step is super important for the structural integrity of your “Strawberry Cheesecake Cookies” and is key to preventing the swirl from making your cookies soggy.
- Cool Completely: Transfer the thickened strawberry swirl from the saucepan to a small, clean, heatproof bowl. To prevent a “skin” from forming on the surface as it cools, press a piece of plastic wrap directly onto the surface of the swirl. Now, this next step is absolutely critical and cannot be rushed for successful “Strawberry Cheesecake Cookies”: you need to let the strawberry swirl cool completely. And I mean, completely! The best way to achieve this is to pop it into the refrigerator for at least 1-2 hours, or ideally, even overnight. This chilling period ensures the swirl is thoroughly cold and firm. A warm or even slightly warm swirl will unfortunately melt into your delicate cookie dough during assembly and baking, causing a big, sticky mess and ruining the distinct visual and textural appeal of your “Strawberry Cheesecake Cookies.” Your patience truly will be rewarded here.
Crafting the Perfect Cheesecake Cookie Dough for Your Strawberry Cheesecake Cookies
- Cream the Wet Ingredients: In the large bowl of a stand mixer fitted with the paddle attachment (or if you prefer, a large mixing bowl with an electric hand mixer), combine your 4 ounces of softened cream cheese and ½ cup (1 stick) of softened unsalted butter. It’s truly essential that both of these are at room temperature to ensure they cream together smoothly and evenly. Beat these ingredients together on medium speed for about 2-3 minutes. You’re aiming for a mixture that is incredibly light, wonderfully fluffy, and significantly paler in color. During this process, make sure to scrape down the sides and bottom of the bowl frequently with a rubber spatula to ensure that everything is thoroughly well incorporated and no pockets of uncreamed butter or cream cheese remain. Properly creaming the butter and cream cheese is the fundamental foundation for achieving the ultra-soft, tender, and cakey texture that defines these “Strawberry Cheesecake Cookies.”
- Add Sugars: Now, it’s time to introduce the sweetness. Add the ¾ cup of granulated sugar and ¼ cup of packed light brown sugar to your creamy mixture in the bowl. Continue beating on medium speed for another 2-3 minutes. As you beat, the mixture will become even lighter and fluffier, and the sugars will begin to dissolve into the fats. You should notice a significant increase in the volume of the mixture at this stage, indicating that air is being incorporated, which contributes to the cookies’ light texture. Once again, don’t forget to pause and scrape down the sides of the bowl to ensure uniform mixing and prevent any sugar crystals from lingering on the edges.
- Incorporate Egg and Vanilla: Carefully crack your 1 large egg into the bowl, ensuring it is at room temperature. Beat on medium speed until the egg is fully incorporated into the mixture, which usually takes about 30 seconds to a minute. Once the egg is blended, add the 1 teaspoon of pure vanilla extract. Continue to beat for another 30 seconds or so, just until the vanilla is evenly distributed throughout the dough. The aroma emanating from your mixer at this point will be simply divine, offering a delightful preview of the deliciousness of your upcoming “Strawberry Cheesecake Cookies.”
- Combine Dry Ingredients: In a separate, medium-sized bowl, whisk together your 2 ¼ cups of all-purpose flour, 1 teaspoon of baking powder, and ½ teaspoon of salt. Whisking these dry ingredients together thoroughly before adding them to the wet mixture is a small but important step. It ensures that the leavening agent (baking powder) and the salt are evenly distributed throughout the flour. This prevents any pockets of unmixed ingredients, which could lead to an uneven texture or taste in your baked cookies.
- Gradually Add Dry to Wet: With your mixer set to the lowest speed, begin to gradually add the combined dry ingredients to the wet ingredients in the stand mixer bowl. Add the flour mixture about a third at a time, mixing only until just combined after each addition. It’s absolutely crucial not to overmix the dough at this stage. Overmixing develops the gluten in the flour too much, which can unfortunately result in cookies that are tough, dense, and less tender – exactly the opposite of the soft, chewy “Strawberry Cheesecake Cookies” we are aiming to create. Stop mixing as soon as you no longer see any visible streaks of dry flour in the dough. A few tiny flour specks are perfectly fine; err on the side of under-mixing rather than over-mixing.
- Chill the Dough – A Key Step for Perfect Strawberry Cheesecake Cookies: Once your dough is mixed, cover the bowl tightly with plastic wrap and refrigerate the cookie dough for at least 1 hour, or for even better results, preferably 2-3 hours. This chilling step serves several vital purposes. Firstly, it allows the fats (butter and cream cheese) to firm up again, which significantly prevents the cookies from spreading too much in the oven, helping them maintain their shape. Secondly, chilling gives the flour ample time to fully hydrate, leading to a more tender, flavorful, and cohesive cookie. Finally, a chilled dough is much firmer and easier to handle, scoop, and shape when it’s time to assemble your “Strawberry Cheesecake Cookies.” Seriously, do not skip this chilling step! It’s a game-changer for achieving that perfect “Strawberry Cheesecake Cookies” texture and shape.
Assembling and Baking Your Irresistible Strawberry Cheesecake Cookies
- Preheat Oven and Prepare Baking Sheets: Once your cookie dough has sufficiently chilled in the refrigerator and your strawberry swirl is thoroughly cooled to a firm, jam-like consistency, it’s time to get ready for baking! Preheat your oven to 375°F (190°C). While the oven comes to temperature, take two large baking sheets and line them with either parchment paper or silicone baking mats. This crucial step prevents the cookies from sticking to the pan and also ensures more even baking and easy cleanup.
- Scoop the Dough: Using a 1.5 to 2-tablespoon cookie scoop (or if you don’t have a scoop, a well-rounded tablespoon will work just fine), scoop out portions of your chilled cookie dough. I always try to keep the scooped dough balls roughly uniform in size. This consistency is important because it ensures that all your “Strawberry Cheesecake Cookies” bake evenly and are done at approximately the same time. Place the scooped dough balls about 2 inches apart on your prepared baking sheets, allowing ample space for them to spread slightly during baking without touching each other.
- Create the Well for the Swirl: Now for the artistic part! With your clean thumb or, for a more precise indentation, the back of a small measuring spoon (a ½ teaspoon or 1 teaspoon works perfectly), gently make an indentation in the very center of each cookie dough ball. You’re aiming to create a nice, shallow well that will cradle that delicious strawberry swirl. Be careful not to press all the way through the dough to the baking sheet; you just want to create a secure little pocket.
- Add the Strawberry Swirl: This is where the magic truly comes together for your “Strawberry Cheesecake Cookies”! Spoon about ½ to 1 teaspoon of the completely cooled strawberry swirl directly into the indentation you just created in each cookie dough ball. Exercise a bit of caution here: it’s better to underfill slightly than to overfill. If you add too much swirl, it might bubble out excessively during baking and potentially make the cookies a bit messier. A controlled amount ensures a beautiful presentation and a perfectly balanced flavor in every “Strawberry Cheesecake Cookie.”
- Bake Your Strawberry Cheesecake Cookies: Carefully transfer the baking sheets to your preheated oven. Bake for approximately 10 to 14 minutes. Please remember that baking times can vary quite a bit depending on the specifics of your oven (some run hotter or cooler than others), so it’s always wise to keep a close eye on your cookies. You’re looking for the edges of the cookies to be lightly golden brown, but the centers should still appear soft, slightly puffed, and perhaps even a little bit underbaked. This characteristic is key to achieving that wonderfully soft and chewy interior that makes “Strawberry Cheesecake Cookies” so irresistible. If you’re baking multiple trays at once, it’s a good practice to rotate them halfway through the baking time to ensure even cooking and browning. And a very important reminder: do not overbake! Overbaked “Strawberry Cheesecake Cookies” will lose their desirable soft, chewy texture and become dry and crumbly.
- Initial Cooling on Baking Sheets: Once baked to perfection, carefully remove the baking sheets from the oven. Allow the “Strawberry Cheesecake Cookies” to cool undisturbed on the hot baking sheets for about 5 minutes. This brief cooling period is quite important; it allows the cookies to set up a bit more, firming up enough so that they won’t crumble or break when you attempt to transfer them. During this time, the residual heat in the baking sheet will also continue to cook the centers of the cookies slightly, contributing to their perfect texture.
Cooling and Finishing Touches – The Grand Finale for Your Strawberry Cheesecake Cookies
- Transfer to a Wire Rack: After the initial 5-minute cooling period on the baking sheets, carefully use a thin spatula to transfer the “Strawberry Cheesecake Cookies” to a wire rack. Arrange them in a single layer on the rack to cool completely. Allowing them to cool on a wire rack is essential because it ensures proper air circulation all around the cookies, including the bottom. This prevents them from becoming soggy on the underside due to trapped steam and promotes even cooling, resulting in a cookie with a consistent texture throughout.
- Prepare the Optional Vanilla Glaze (if using): While your delicious “Strawberry Cheesecake Cookies” are cooling down, you have the perfect opportunity to whip up that delightful vanilla glaze, if you choose to add it (and I highly recommend it!). In a small mixing bowl, combine the 1 cup of sifted powdered sugar, ½ teaspoon of pure vanilla extract, and an initial 2 tablespoons of milk or heavy cream. Whisk all these ingredients vigorously with a fork or a small whisk until the mixture is completely smooth and free of any lumps. If you find the glaze is too thick for drizzling, add a tiny bit more milk or cream – literally ¼ teaspoon at a time – whisking thoroughly after each addition until you reach your desired drizzling consistency. If, conversely, it ends up being too thin, simply whisk in a little more sifted powdered sugar until it thickens up. The ideal consistency should be thick enough to cling to a spoon but thin enough to drizzle easily in an appealing pattern over the cookies.
- Glaze Your Strawberry Cheesecake Cookies: Once the “Strawberry Cheesecake Cookies” are completely cool to the touch (this is important, as warm cookies will melt the glaze), it’s time for the final touch! Using a spoon, drizzle the vanilla glaze artfully over the top of each cookie. For a more controlled and professional look, you can also transfer the glaze to a piping bag with a very small tip or even a zip-top bag with one corner snipped off. This glaze adds not only an extra layer of sweetness but also a beautiful visual appeal, making these “Strawberry Cheesecake Cookies” truly special and irresistible.
- Allow Glaze to Set: Let the glazed cookies sit undisturbed for about 15-20 minutes, or until the glaze has fully set and hardened slightly. This prevents smudging and ensures your beautiful presentation remains intact.
- Serve and Store: Your stunning “Strawberry Cheesecake Cookies” are now ready to be devoured! They are absolutely best enjoyed the same day they are baked for peak freshness, optimal flavor, and the perfect soft, chewy texture. If you happen to have any leftovers (which is rare in my house!), store them in an airtight container. They will keep well at room temperature for up to 3 days, or in the refrigerator for up to 5 days, especially if you live in a warm, humid climate or if your glaze contains fresh dairy. If you need to store them in layers, I recommend placing a piece of parchment paper or wax paper between each layer to prevent sticking. Enjoy your wonderfully delicious homemade “Strawberry Cheesecake Cookies”! They’re truly a delightful treat and absolutely worth every bit of effort.
Conclusion:
As we wrap up our delightful journey through this recipe, I truly hope you’re as excited as I am about these incredible treats. We’ve discovered a dessert that transcends the ordinary, bringing together the best of two beloved classics into one irresistible bite. These aren’t just any cookies; they are a revelation, a testament to how simple ingredients can create something truly extraordinary. Imagine biting into a soft, chewy cookie, immediately greeted by the luscious creaminess of cheesecake, perfectly balanced by the sweet, slightly tart burst of fresh strawberries. It’s a flavor profile that is both comforting and sophisticated, making it an absolute showstopper for any occasion, big or small. The beautiful thing about this recipe is its surprising ease. Despite delivering such a complex and satisfying taste, the process itself is wonderfully straightforward, meaning even novice bakers can achieve spectacular results. You’re not just baking cookies; you’re crafting an experience, a moment of pure culinary bliss. Each one is a miniature work of art, vibrant with color and brimming with exquisite taste. It’s truly a must-try for anyone who appreciates a dessert that is both innovative and deeply satisfying, offering a delightful twist on familiar flavors.
Why These Strawberry Cheesecake Cookies Are a Game Changer
What makes these Strawberry Cheesecake Cookies so utterly compelling? It’s the perfect harmony of textures and tastes. The cookie base itself is tender and rich, providing the ideal canvas for the creamy cheesecake swirl that’s baked right in. Then, the fresh strawberries burst with a natural sweetness and a hint of tang, cutting through the richness beautifully. This isn’t just a cookie with a cheesecake flavor; it’s a cookie that embodies cheesecake, delivering that signature tangy, sweet, and incredibly smooth sensation in a portable, bite-sized form. They are incredibly versatile too, perfect for a cozy evening at home with a cup of tea, elegant enough for a sophisticated dessert platter at a dinner party, or a delightful addition to a picnic basket on a sunny afternoon. The sheer joy of seeing your loved ones’ faces light up after their first bite is an reward in itself, proving that sometimes, the simplest pleasures are truly the best. These cookies don’t just satisfy a sweet tooth; they create a memorable moment, a little slice of happiness that everyone can appreciate.
Serving Suggestions and Creative Variations
Now that you’ve got a batch of these glorious cookies, let’s talk about how to enjoy them to the fullest! While they are absolutely divine on their own, especially when slightly warm, there are countless ways to elevate your experience. Try serving them alongside a scoop of vanilla bean ice cream for an extra decadent treat, allowing the cold creaminess to perfectly complement the warm, fruity cookie. For a lighter touch, a dollop of fresh whipped cream and a sprinkle of chopped pistachios or toasted almonds would add both elegance and a delightful crunch. For a charming afternoon tea, pair them with a light Earl Grey or a fragrant floral herbal infusion, allowing the subtle notes of the tea to enhance the cookie’s rich flavors. Feeling adventurous? Consider a few creative variations for your next batch. You could swap out the strawberries for other berries like raspberries, blueberries, or even a mix of summer berries, adjusting the sweetness to your liking. A drizzle of melted white chocolate or a sprinkle of fresh lemon zest over the finished cookies would add another layer of flavor and visual appeal, making them even more Instagram-worthy. For a truly indulgent twist, you could even add a tiny swirl of your favorite fruit jam, such as raspberry or cherry, into the cream cheese mixture before baking, creating an even more intense fruit explosion. Imagine a seasonal version with cranberries for the holidays, or a tropical mango-lime cheesecake cookie for a summer gathering! The possibilities are truly endless once you master this fantastic base recipe, allowing you to customize them for any taste or occasion.
So, what are you waiting for? I wholeheartedly encourage you to step into your kitchen and give this Strawberry Cheesecake Cookies recipe a try. Trust me, it’s a baking adventure you won’t regret embarking on. The satisfaction of pulling a tray of these golden, fragrant beauties from the oven is unparalleled, and the joy of sharing them with friends and family is even greater. Don’t be shy about experimenting with the suggestions I’ve offered, or even coming up with your own unique twists. Baking is an art, and every creation is a personal expression of love and creativity. Once you’ve made them, I would absolutely love to hear about your experience. Did you make any fun substitutions? How did your loved ones react? Please, share your stories, your photos, and your triumphs in the comments below! Your feedback and creativity inspire me and our whole community of baking enthusiasts. Let’s celebrate the magic of homemade treats together, one delicious cookie at a time. Happy baking, and I can’t wait to see what delicious creations you come up with!
Strawberry Cheesecake Cookies
Luscious, creamy, and convenient Strawberry Cheesecake Cookies that perfectly encapsulate the beloved flavors of classic strawberry cheesecake in a delightful cookie form.
Ingredients
Instructions
Important Information
Nutrition Facts (Per Serving)
It is important to consider this information as approximate and not to use it as definitive health advice.
Allergy Information
Please check ingredients for potential allergens and consult a health professional if in doubt.