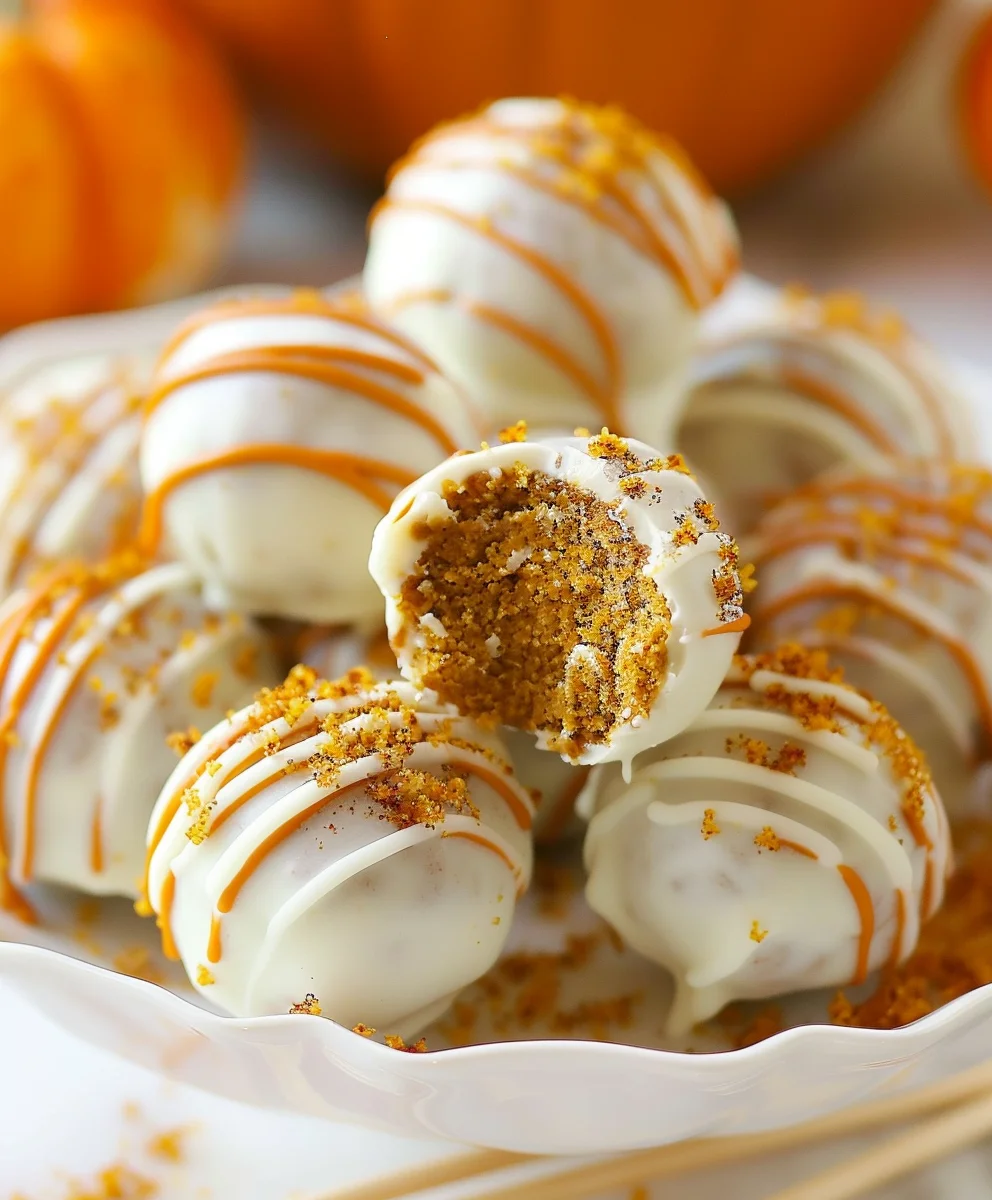
Pumpkin Spice Cake Pops Truffles. Ah, the very name conjures up images of crisp autumn air, cozy sweaters, and the comforting aroma of fall spices. I am so excited to share with you a recipe that perfectly encapsulates the spirit of the season in one delightful, bite-sized package. Forget the struggle of slicing a whole cake; these little gems offer all the decadent flavor without the fuss. While pumpkin spice has a long history of warming our palates, from traditional pies to lattes, transforming it into these adorable truffles brings a modern, playful twist to a beloved classic.
Why Everyone Loves This Seasonal Treat
People absolutely adore these for their irresistible combination of moist, spiced cake crumbs blended with a creamy frosting, all enrobed in a luscious coating. It’s the ultimate handheld indulgence that makes entertaining a breeze or simply elevates your afternoon treat. The rich, aromatic blend of cinnamon, nutmeg, ginger, and cloves, coupled with the sweet pumpkin, creates a symphony of flavors that is truly unmatched. Prepare to fall in love with making and sharing these exquisite Pumpkin Spice Cake Pops Truffles – they’re guaranteed to be a hit at any gathering or a perfect homemade gift!

Ingredients:
- For the Pumpkin Spice Cake:
- 1 box (about 15.25 ounces) pumpkin spice cake mix (I love using a good quality one, it makes things so much easier!)
- 1 cup pumpkin puree (not pumpkin pie filling, just pure, unadulterated pumpkin!)
- ½ cup vegetable oil (or canola oil, a neutral oil works best)
- 3 large eggs (at room temperature, if possible, for better incorporation)
- 1 teaspoon pure vanilla extract (a little extra vanilla always boosts the flavor profile)
- ½ teaspoon ground cinnamon (even if your mix has some, a little extra never hurts for that authentic pumpkin spice aroma)
- ¼ teaspoon ground nutmeg (just a pinch to complement the cinnamon)
- For the Cream Cheese Frosting:
- 1 block (8 ounces) full-fat cream cheese, softened (Philadelphia is my go-to for its creamy texture)
- ½ cup (1 stick) unsalted butter, softened
- 3-4 cups powdered sugar, sifted (depending on your desired sweetness and consistency)
- 1 teaspoon pure vanilla extract
- Pinch of salt (to balance the sweetness)
- For the Coating and Decoration:
- 24 ounces white candy melts or high-quality white chocolate, chopped (I prefer candy melts for ease of melting and coating, but good white chocolate offers a superior taste)
- 2 tablespoons coconut oil or vegetable shortening (optional, for thinning the coating if needed, but only use a tiny bit!)
- Pumpkin-themed sprinkles, autumn-colored sprinkles, or a dusting of cinnamon sugar (for that extra festive touch!)
- Optional: A few ounces of dark chocolate or orange candy melts for drizzle decoration.
Preparing Your Delicious Pumpkin Spice Cake
This first stage is all about creating the foundational cake that will eventually transform into our glorious Pumpkin Spice Cake Pops Truffles. While you could bake a cake from scratch, using a good quality cake mix is a fantastic shortcut that still yields incredible results, especially when we doctor it up a little. It saves time and ensures a consistent, moist crumb every time, which is exactly what we need for perfect truffles!
- Preheat and Prepare: Start by preheating your oven to 350°F (175°C). Take out a 9×13 inch baking pan and grease it thoroughly, then lightly flour it. This step is crucial to prevent your cake from sticking, making it easy to remove later. If you want to be extra careful, you can line the bottom with parchment paper after greasing, especially if you’ve had sticking issues in the past. I always err on the side of caution here, because a stuck cake is a sad cake.
- Combine Dry Ingredients: In a large mixing bowl, empty the contents of your pumpkin spice cake mix. Now, here’s where we elevate it. Add the extra ½ teaspoon of ground cinnamon and ¼ teaspoon of ground nutmeg directly into the dry mix. Give it a good whisk to ensure these spices are evenly distributed. This little trick intensifies that warm, cozy pumpkin spice flavor that we’re absolutely craving.
- Add Wet Ingredients: To the spiced cake mix, add your 1 cup of pumpkin puree, ½ cup of vegetable oil, 3 large eggs, and 1 teaspoon of pure vanilla extract. Using pumpkin puree instead of water, which many box mixes call for, is my secret weapon for an unbelievably moist and flavorful cake. It also contributes to the vibrant color! Make sure your eggs are at room temperature; they incorporate better into the batter and lead to a lighter, fluffier cake.
- Mix the Batter: Using an electric mixer on medium speed, beat the ingredients together for about 2 minutes. Start on low speed to avoid a “flour cloud” until everything is just combined, then increase to medium. Scrape down the sides of the bowl with a rubber spatula halfway through to ensure all ingredients are fully incorporated and there are no dry pockets at the bottom. You’re looking for a smooth, homogenous batter that is thick and rich. Do not overmix! Overmixing develops the gluten too much, which can lead to a tough cake, and we want our truffles to be wonderfully tender.
- Bake the Cake: Pour the prepared batter evenly into your greased and floured 9×13 inch baking pan. Gently tap the pan on your counter a few times to release any large air bubbles. Place it in the preheated oven and bake for 28-32 minutes, or until a wooden skewer or toothpick inserted into the center comes out clean or with just a few moist crumbs attached. Every oven is a little different, so keep an eye on it after the 25-minute mark. The top should be golden brown and spring back lightly when touched.
- Cool Completely: Once baked, remove the cake from the oven and place it on a wire rack to cool in the pan for about 10-15 minutes. After this initial cooling, carefully invert the cake onto the wire rack to finish cooling completely. This is a critical step! Your cake must be completely cool before you proceed; otherwise, the frosting will melt and create a greasy, messy texture for your truffles instead of the delightful crumb we are aiming for. This usually takes at least 1-2 hours, or you can even bake it the day before and let it cool overnight. Patience is a virtue, especially in baking!
Crafting the Cream Cheese Frosting (or Preparing Store-Bought)
While a good quality store-bought cream cheese frosting can certainly work in a pinch for these Pumpkin Spice Cake Pops Truffles, making your own from scratch is a game-changer. It allows you to control the sweetness and consistency, resulting in a much richer, tangier, and more authentic flavor that truly complements the pumpkin spice cake. Trust me, the extra 10 minutes are worth it!
- Soften Ingredients: Ensure your cream cheese and unsalted butter are at room temperature. This is absolutely paramount for a smooth, lump-free frosting. If they are too cold, your frosting will be clumpy and hard to work with. If you forget to take them out ahead of time, you can cut the butter into smaller pieces and let it sit for a bit, or gently microwave the cream cheese for 10-15 seconds (be careful not to melt it!).
- Cream Butter and Cream Cheese: In a large mixing bowl, using an electric mixer, beat the softened cream cheese and butter together on medium speed until they are light, fluffy, and completely smooth. This usually takes about 2-3 minutes. Scrape down the sides of the bowl frequently to ensure everything is evenly combined. You want to see no visible lumps of butter or cream cheese.
- Add Vanilla and Salt: Beat in the 1 teaspoon of pure vanilla extract and the pinch of salt. The salt is important as it helps to cut through the sweetness of the sugar and enhance all the other flavors. Mix for another 30 seconds until just combined.
- Incorporate Powdered Sugar: Gradually add the sifted powdered sugar, about 1 cup at a time, beating on low speed until each addition is incorporated, then increasing to medium. Sifting the powdered sugar beforehand prevents lumps in your frosting, ensuring a beautifully smooth final product. Continue adding until your frosting reaches your desired sweetness and consistency. You might not need all 4 cups, or you might need a tiny bit more – it really depends on your preference and the humidity. For cake pops/truffles, we want a slightly firmer frosting than usual, as it needs to help bind the cake crumbs.
- Achieve Perfect Consistency: Once all the powdered sugar is incorporated, beat the frosting on medium-high speed for an additional 1-2 minutes until it’s super light, airy, and fluffy. This aeration makes the frosting truly delightful. If your frosting seems too thick, you can add a tiny splash of milk or heavy cream (about ½ teaspoon at a time) until it reaches the right consistency. If it’s too thin, add a bit more sifted powdered sugar.
Transforming Cake into Truffle Base
This is where the magic truly begins! We’re taking our beautifully baked pumpkin spice cake and turning it into a moist, flavorful “dough” that will be the heart of our Pumpkin Spice Cake Pops Truffles.
- Crumble the Cooled Cake: Once your pumpkin spice cake is completely cool, crumble it into a very large mixing bowl. You can do this by hand, breaking it into fine crumbs, or for a quicker method, use a food processor. If using a food processor, pulse the cake in batches until it forms fine crumbs. The finer the crumbs, the smoother your truffles will be. Ensure there are no large chunks left, as they will make your truffles difficult to form and less pleasant to eat. This process is surprisingly satisfying!
- Add the Frosting: Now, add about half of your prepared cream cheese frosting to the cake crumbs. We are looking for a specific consistency, so it’s important to add the frosting gradually. Using your hands (clean hands, of course!), mix and knead the frosting into the cake crumbs. This is the best way to feel the texture developing.
- Achieve the Right Consistency: Continue adding frosting, a tablespoon or two at a time, mixing thoroughly after each addition, until the mixture is firm enough to roll into a ball but still moist and pliable. It should hold its shape without being sticky or greasy. A good test is to roll a small piece between your palms; if it forms a smooth ball easily without crumbling or falling apart, you’ve got it! You likely won’t use all of the frosting, so don’t worry if you have some leftover – save it for another treat or enjoy it with a spoon (I won’t tell!). This step is crucial for the structural integrity of your Pumpkin Spice Cake Pops Truffles. Too much frosting, and they’ll be too soft and won’t hold their shape; too little, and they’ll crumble.
Forming and Chilling Your Pumpkin Spice Cake Pops Truffles
Now that we have our perfect cake mixture, it’s time to shape them into uniform, delightful truffles. Consistency in size helps with even coating later on, and chilling is absolutely essential for stability.
- Portion the Mixture: Using a small cookie scoop (about 1 tablespoon or 1.5 tablespoons for slightly larger truffles) or your hands, portion out the cake mixture. Aim for roughly 1 to 1.5-inch balls. Using a scoop helps ensure uniformity in size.
- Roll into Balls: Gently roll each portion between your palms to form smooth, round balls. Place the formed truffles on a baking sheet lined with parchment paper or wax paper. Try to make them as round and smooth as possible; this will make coating them much easier and give them a professional finish.
- Initial Chill: Once all the truffles are formed, place the baking sheet in the refrigerator for at least 30 minutes to firm them up. This initial chill is important, but we’ll need a longer one later. Firm truffles are much easier to handle and coat without them falling apart. If you’re in a hurry, you can put them in the freezer for about 15-20 minutes.
- Prepare for Coating: While your truffles are chilling, prepare your workspace for coating. This means setting out your melted chocolate/candy melts, your sprinkles, and another parchment-lined baking sheet for the coated truffles. Having everything ready before you start coating will make the process much smoother and less stressful.
The Art of Coating Your Pumpkin Spice Cake Pops Truffles
This is arguably the most fun part, where your humble cake balls transform into gleaming, festive Pumpkin Spice Cake Pops Truffles! The key here is proper chocolate melting and quick, confident dipping.
- Melt the Coating: Place your white candy melts or chopped white chocolate in a microwave-safe bowl. Microwave on 50% power in 30-second intervals, stirring thoroughly after each interval, until the chocolate is completely melted and smooth. This low and slow method prevents the chocolate from seizing or burning. If you’re using white chocolate, ensure it’s a good quality brand that melts smoothly. If it seems too thick for dipping, you can add ½ to 1 teaspoon of coconut oil or vegetable shortening (not water or milk!) and stir until combined and thinned slightly. You want it to be fluid enough to coat easily but not so thin that it doesn’t adhere well. A double boiler method also works wonderfully for melting chocolate if you prefer.
- Deep Chill: Retrieve your truffles from the refrigerator. For best results, I actually like to put them in the freezer for another 10-15 minutes right before coating. The colder your truffles are, the better they will hold their shape when dipped into the warm chocolate, and the quicker the chocolate will set. This minimizes the chances of crumbs getting into your chocolate or the truffles melting into a mess.
-
Dip and Coat: This is where speed and technique come into play!
- Take one chilled truffle and drop it into the melted white chocolate/candy melts.
- Using a dipping tool, a fork, or a spoon, gently roll the truffle in the chocolate until it is completely covered.
- Carefully lift the truffle out of the chocolate, tapping the tool or fork gently against the rim of the bowl to allow any excess chocolate to drip off. This creates a smoother finish and prevents puddles at the base.
- If you’re having trouble with crumbs, try letting the truffle sit in the chocolate for just a second longer to allow the warmth to slightly “seal” the surface before lifting.
- Decorate Immediately: Once you’ve removed the truffle from the chocolate and let the excess drip, immediately transfer it to your prepared parchment-lined baking sheet. While the chocolate is still wet, sprinkle with your chosen decorations (pumpkin sprinkles, autumn-colored sprinkles, cinnamon sugar). Act quickly! White chocolate sets quite fast, especially on a cold truffle. If you wait too long, your sprinkles won’t adhere.
- Repeat and Replenish: Continue this dipping and decorating process with the remaining truffles. If your chocolate starts to thicken, return it to the microwave for a short burst (15-20 seconds on low power) and stir until smooth again. Don’t be afraid to reheat it as needed.
Final Chilling and Optional Drizzle for Your Pumpkin Spice Cake Pops Truffles
You’re almost there! A final chill ensures the coating is perfectly set, and an optional drizzle adds that extra touch of gourmet elegance to your beautiful Pumpkin Spice Cake Pops Truffles.
- Set the Coating: Once all your Pumpkin Spice Cake Pops Truffles are coated and decorated, return the baking sheet to the refrigerator for at least 15-20 minutes. This final chill will fully set the chocolate coating, making your truffles firm, stable, and ready for serving or storage. A perfectly set coating is key to a satisfying bite and prevents sticky fingers.
- Optional Drizzle Decoration: If you want to add an extra flourish, melt a few ounces of dark chocolate or orange candy melts (following the same gentle melting process as before). Transfer the melted chocolate to a small piping bag, a zip-top bag with a tiny corner snipped off, or simply use a spoon. Drizzle artistic lines or patterns over the chilled, set truffles. The contrast in color looks fantastic and adds another layer of visual appeal. Let this drizzle set for a few minutes at room temperature or in the fridge.
- Serving and Storage: Your homemade Pumpkin Spice Cake Pops Truffles are now complete and ready to be enjoyed! They are best served at room temperature or slightly chilled. Store any leftovers in an airtight container in the refrigerator for up to a week. For longer storage, you can freeze them for up to a month; just be sure to thaw them in the refrigerator before serving. They make wonderful gifts, party favors, or a delightful treat for yourself. Each bite offers a burst of autumnal flavor, combining the moist, spiced pumpkin cake with rich, tangy cream cheese and a crisp, sweet white chocolate shell. Enjoy the fruits of your labor!
A Little Note on Perfection:
Don’t worry if your first few truffles aren’t perfectly round or your drizzle isn’t exactly symmetrical. The beauty of homemade treats lies in their unique charm. What truly matters is the incredible flavor and the joy of creating something delicious for yourself and your loved ones. These Pumpkin Spice Cake Pops Truffles are a labor of love, and every step contributes to a truly delightful experience.
Variations to Explore:
Feel free to experiment with different coatings! A milk chocolate coating would also be delicious, or you could add a tiny bit of orange food coloring specifically for chocolate (oil-based, not water-based!) to your white candy melts for a vibrant pumpkin hue. You could also mix finely crushed gingersnap cookies into your cake crumbs for an extra layer of spice and texture, or sprinkle them on top instead of traditional sprinkles. The possibilities are endless for customizing your Pumpkin Spice Cake Pops Truffles to your exact liking!

Conclusion:
If there’s one recipe I truly implore you to try this season, it’s this one. We’ve journeyed through the simple steps, the delightful ingredients, and the promise of a truly unique treat, and now it’s time to seal the deal on why these aren’t just any dessert. These aren’t merely cake pops; they are a celebration of autumn’s finest flavors, encapsulated in a convenient, bite-sized sphere of pure joy. I honestly believe that the harmonious blend of warm spices, the incredible moistness of the cake, and the satisfying snap of the chocolate coating elevates these beyond your average bake. It’s the kind of dessert that immediately brings a smile to people’s faces, conjuring up cozy memories and creating new ones with every single taste. The ease of preparation belies the sophisticated flavor profile, making it an absolute win for both novice bakers and seasoned pros alike. You’re not just making a dessert; you’re crafting an experience, a little moment of bliss that captures the very essence of fall in an irresistible package.
What I adore most about these is their incredible versatility, not just in flavor, but in presentation and purpose. Once you’ve mastered the basic technique for these luscious treats, the world of creative possibilities truly opens up. For serving, imagine a beautiful platter of these arranged alongside a steaming mug of spiced cider or a rich, dark coffee – the perfect accompaniment for a chilly afternoon gathering. They make an exceptional centerpiece for any autumn-themed party, providing an elegant yet approachable dessert option that guests can easily enjoy while mingling. Consider gifting them too! Packaged in small, decorative boxes tied with a rustic twine, they transform into thoughtful, homemade presents that speak volumes about your care and culinary prowess. No one can resist a handmade gift, especially when it tastes this good!
Creative Twists and Serving Inspirations
But let’s talk about taking them even further. While the classic chocolate coating is undeniably delicious, don’t shy away from experimenting with different finishes. A white chocolate coating, perhaps infused with a touch of orange zest or a hint of maple extract, would offer a delightful contrast. For a truly decadent experience, consider a dark chocolate coating, maybe sprinkled with a whisper of sea salt to cut through the sweetness. Beyond chocolate, a simple dusting of cinnamon sugar or a mixture of finely chopped toasted pecans or walnuts would add fantastic texture and another layer of autumnal flavor. I sometimes like to add a tiny drop of orange food coloring to my white chocolate coating to give them a vibrant, festive hue for Halloween or Thanksgiving. You could even drizzle them with a caramel sauce or a subtle espresso glaze for an extra gourmet touch. Imagine serving them on lollipop sticks for a fun, interactive dessert, or nestled in mini paper cupcake liners on a tiered stand. The possibilities are genuinely endless, and each variation simply adds to the charm and appeal of these delightful bites.
My greatest hope is that you feel inspired to dive into your kitchen and bring these magical little creations to life. There’s a profound joy in baking, and even more so in sharing the fruits of your labor with loved ones. I promise you, the effort is minimal compared to the immense satisfaction you’ll feel when you see the delight on people’s faces. So, please, gather your ingredients, put on some cozy music, and let the aroma of baking spices fill your home. When you finally bite into one of these incredibly moist and perfectly spiced Pumpkin Spice Cake Pops Truffles, you’ll understand exactly why I’m so enthusiastic about them. Don’t forget to get creative with your toppings and presentations! And once you’ve experienced the pure deliciousness for yourself, I would absolutely love to hear all about it. Share your baking triumphs, your unique twists, and your serving suggestions with me. Your experiences not only bring me joy but also inspire a community of fellow food lovers. Happy baking, and enjoy every single delightful bite!
Easy Pumpkin Spice Cake Pop Truffles – Perfect Fall Treat!
Easy Pumpkin Spice Cake Pop Truffles – a delightful, bite-sized fall treat. Moist, spiced cake crumbs blended with creamy frosting, enrobed in a luscious chocolate coating, perfect for entertaining or a cozy indulgence.
Ingredients
-
1 batch Pumpkin Cake, 9×13 pan (already prepared)
-
6 ounces cream cheese, at room temperature
-
6 tablespoons butter, at room temperature
-
3 cups confectioners’ sugar, sifted
-
12 oz bag or bar of white or milk chocolate, chopped
-
Optional: Sprinkles, autumn-colored decorations, or extra chocolate for drizzle
Instructions
-
Step 1
Beat 6 oz softened cream cheese and 6 tbsp softened butter until smooth and fluffy (2-3 minutes). Gradually add 3 cups sifted confectioners’ sugar, beating until the frosting is light, airy, and fluffy. -
Step 2
Crumble the cooled 9×13 pumpkin cake into very fine crumbs in a large bowl. Add about half of the prepared cream cheese frosting to the cake crumbs. Mix by hand, adding more frosting a tablespoon at a time, until the mixture is firm enough to roll into a ball and holds its shape without crumbling. -
Step 3
Portion mixture into 1 to 1.5-inch balls using a scoop or hands. Roll into smooth, round balls and place them on a parchment-lined baking sheet. Refrigerate for at least 30 minutes to firm up. -
Step 4
Melt 12 oz white or milk chocolate in a microwave-safe bowl using 30-second intervals at 50% power, stirring until completely smooth. If too thick, add ½-1 tsp coconut oil or vegetable shortening and stir. -
Step 5
For best results, freeze truffles for 10-15 minutes just before coating. Dip each chilled truffle into melted chocolate, ensuring full coverage. Tap off any excess chocolate for a smooth finish. -
Step 6
Immediately place the coated truffle on the parchment-lined baking sheet and decorate with sprinkles or desired toppings while the chocolate is still wet. Repeat with remaining truffles. -
Step 7
Refrigerate coated truffles for 15-20 minutes to fully set. Optional: Drizzle with extra melted chocolate for decoration and let set. Store in an airtight container in the refrigerator for up to a week, or freeze for longer storage.
Important Information
Nutrition Facts (Per Serving)
It is important to consider this information as approximate and not to use it as definitive health advice.
Allergy Information
Please check ingredients for potential allergens and consult a health professional if in doubt.