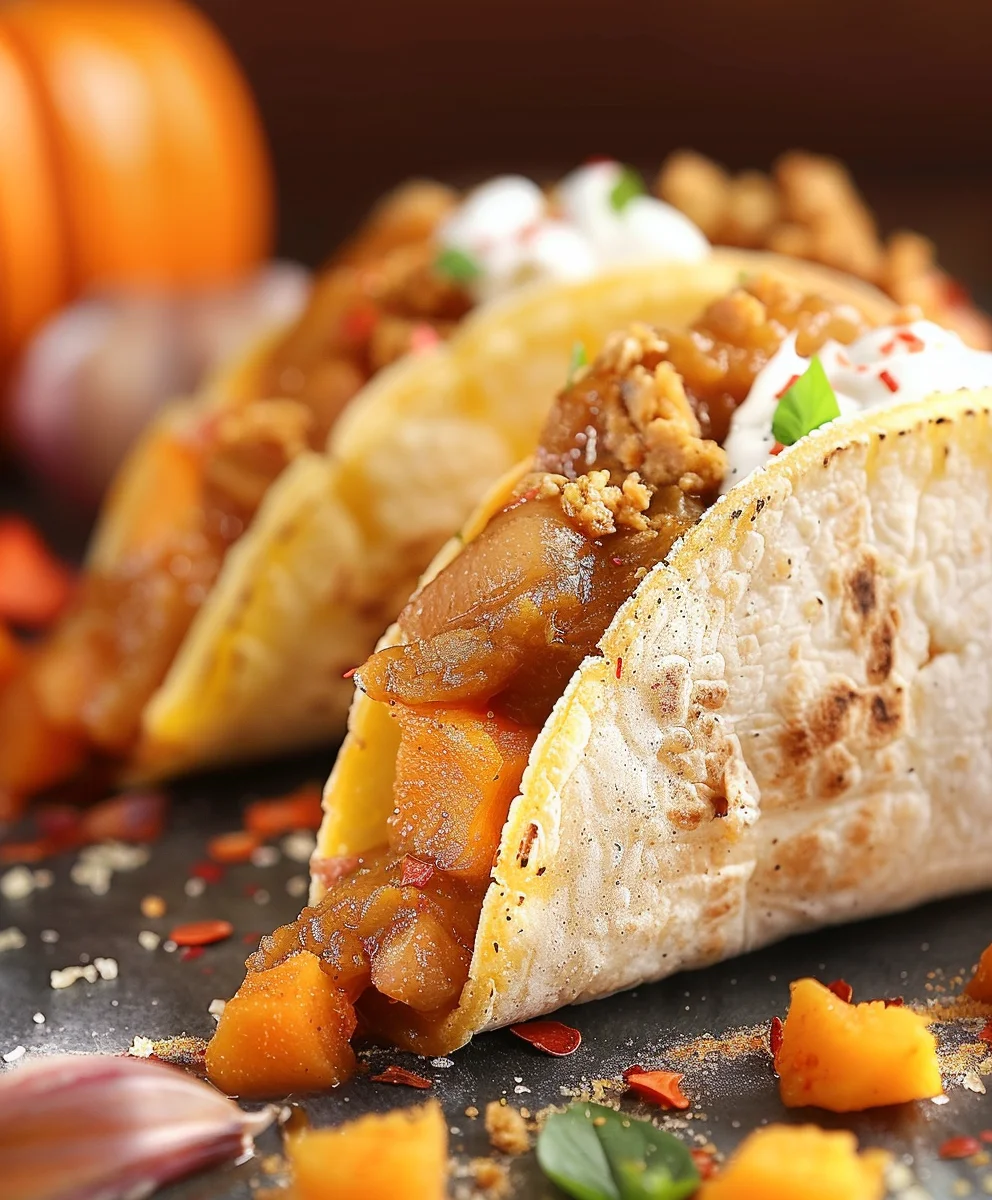
Pumpkin Pie Tacos might sound like a surprising culinary invention, but I promise you, this delightful dessert fusion is about to become your new seasonal obsession. In a world where culinary boundaries are constantly being redefined, this ingenious creation stands as a testament to the joy of fusion cuisine, elegantly marrying the comforting, nostalgic essence of autumn’s most beloved dessert with the playful, hand-held convenience of a taco.
I find that people absolutely adore this dish because it offers the best of both worlds: the familiar, warmly spiced, creamy pumpkin filling we cherish, often infused with notes of cinnamon, nutmeg, and ginger, encased in a delightfully crisp, usually cinnamon-sugar dusted, taco shell. The textural contrast is simply irresistible—a soft, velvety interior meeting a satisfying crunch with every bite. It’s not just a dessert; it’s an experience, a conversation starter, and an incredibly fun way to enjoy a classic in a completely new light. Preparing these unique Pumpkin Pie Tacos is an invitation to embrace innovation in your kitchen, delivering a taste that is both comforting and exhilaratingly fresh.

Ingredients:
-
For the Silky Pumpkin Pie Filling:
- 1 (15-ounce) can pumpkin puree: Make sure it’s 100% pumpkin, not pumpkin pie filling, which already has spices and sugar added.
- 1/2 cup granulated sugar: For sweetness, adjust to your preference.
- 1/4 cup packed light brown sugar: Adds a deeper, more molasses-like sweetness that complements the pumpkin beautifully.
- 1/2 teaspoon ground cinnamon: Essential for that classic pumpkin pie flavor.
- 1/4 teaspoon ground nutmeg: Another critical spice for warmth.
- 1/4 teaspoon ground ginger: Provides a subtle kick.
- Pinch of ground cloves: Use sparingly, as it’s potent, but it adds depth.
- 1/4 teaspoon salt: Crucial for balancing the flavors and enhancing sweetness.
- 1 cup heavy cream: For an incredibly rich and smooth texture. Whole milk or evaporated milk can be substituted for a slightly lighter filling, but cream delivers the best mouthfeel.
- 1 teaspoon vanilla extract: A must-have for enhancing all the other flavors.
-
For the Crispy Cinnamon Sugar Taco Shells:
- 10-12 (6-inch) flour tortillas: Small, soft taco-sized tortillas work best for individual servings. You might want to get a few extra for practice or if some don’t shape perfectly.
- 1/2 cup granulated sugar: For coating the shells.
- 2 teaspoons ground cinnamon: To mix with the sugar for that irresistible cinnamon-sugar coating.
- Approximately 3-4 cups vegetable oil or canola oil: For frying the tortillas. You’ll need enough to allow the tortillas to submerge or at least be half-submerged.
-
For the Dreamy Whipped Cream (Optional but Highly Recommended!):
- 1 cup cold heavy cream: Straight from the fridge, cold cream whips up best.
- 2 tablespoons confectioners’ sugar (powdered sugar): Sweetens the cream and helps stabilize it.
- 1/2 teaspoon vanilla extract: For a delightful aroma and flavor.
-
For Garnish and Extra Flair:
- Caramel sauce: Store-bought or homemade, for drizzling.
- Chopped pecans or walnuts: Adds texture and a nutty flavor.
- Extra pinch of ground cinnamon: For dusting on top.
Phase 1: Crafting the Silky Pumpkin Pie Filling
- Combine Dry Ingredients: In a large mixing bowl, measure out your pumpkin puree. In a separate small bowl, whisk together the granulated sugar, light brown sugar, ground cinnamon, ground nutmeg, ground ginger, pinch of ground cloves, and salt. Make sure there are no lumps in the brown sugar; you can press it against the side of the bowl with a spoon if needed. This step ensures that your spices and sugars are evenly distributed throughout the filling.
- Mix with Pumpkin Puree: Add the combined sugar and spice mixture directly into the bowl with the pumpkin puree. Using a sturdy whisk or a rubber spatula, stir everything together until the ingredients are thoroughly incorporated. You want to see a uniform orange color without any streaks of dry spice or sugar. This is the foundation of our delicious Pumpkin Pie Tacos filling.
- Add Wet Ingredients: Pour in the heavy cream and vanilla extract. Continue to whisk or stir until the mixture is completely smooth and luscious. The heavy cream will transform the texture, making it incredibly creamy and ready to be a star in our dessert tacos.
- Taste and Adjust: Now is the perfect time to give the filling a small taste. Depending on your preference for sweetness or spice, you can add a tiny bit more sugar, cinnamon, or even a whisper more ginger or nutmeg. Remember, the flavors will meld and deepen as it chills.
- Chill Thoroughly: Cover the bowl with plastic wrap and refrigerate for at least 4 hours, or preferably overnight. This chilling step is absolutely crucial. Not only does it allow the flavors to fully develop and marry, but it also thickens the filling significantly, making it much easier to scoop and hold its shape inside our crispy taco shells. A well-chilled filling is key to successful Pumpkin Pie Tacos.
Phase 2: Creating the Crispy Cinnamon Sugar Taco Shells
- Prepare the Cinnamon Sugar Coating: In a shallow dish or a wide plate, combine the 1/2 cup granulated sugar and 2 teaspoons of ground cinnamon. Whisk them together until they are well mixed. Set this aside; we’ll be coating our warm shells immediately after frying.
- Set Up for Frying: Line a baking sheet with several layers of paper towels. This will be where you drain your fried tortillas. Next to this, have your cinnamon sugar mixture ready. Prepare a pair of tongs and a metal spatula, as you’ll be working with hot oil.
- Heat the Oil: Pour the vegetable or canola oil into a large, heavy-bottomed pot or a Dutch oven. You need enough oil to reach a depth of about 1.5 to 2 inches. Heat the oil over medium-high heat until it reaches about 350-360°F (175-180°C). If you don’t have a thermometer, you can test the oil by dropping a small piece of tortilla into it; it should sizzle immediately and aggressively, but not brown too quickly. Safety first: ensure you have good ventilation and avoid overcrowding the pot.
- Fry the Tortillas, One by One: Carefully place one flour tortilla into the hot oil. It will immediately start to bubble and puff up slightly. Fry for about 15-20 seconds on one side until it’s just starting to turn golden brown and crisp up.
- Shape the Taco Shells: Using your tongs, flip the tortilla over. Now, immediately use the tongs to gently fold the tortilla in half, creating a “taco” shape. You might need to hold it in place for a few seconds as it fries, allowing the shape to set. Continue frying for another 15-20 seconds, or until both sides are a beautiful golden brown and the shell is crisp. The edges should be firm but not burnt.
- Drain and Coat: Carefully remove the shaped tortilla from the oil using the tongs. Hold it over the pot for a second to let excess oil drip off, then immediately transfer it to the prepared paper towel-lined baking sheet to drain for another few seconds.
- Coat in Cinnamon Sugar: While the tortilla shell is still warm (this is critical for the sugar to stick!), carefully pick it up and place it into the shallow dish with the cinnamon sugar mixture. Gently press and flip it to coat both sides generously. You want a good, even layer. Don’t be shy!
- Cool and Repeat: Transfer the coated taco shell to a wire rack to cool completely. As it cools, it will become even crisper. Repeat this process with the remaining tortillas, making sure the oil maintains its temperature between batches. It’s a bit of a process, but these homemade shells make our Pumpkin Pie Tacos truly special.
Phase 3: Whipping Up the Dreamy Toppings (Optional but Recommended!)
- Prepare for Whipping: Ensure your heavy cream is very cold. For best results, you can also chill your mixing bowl (preferably a metal one) and whisk attachment in the freezer for 10-15 minutes before you start. Cold equipment helps the cream whip up faster and hold its peaks better.
- Combine Ingredients: Pour the cold heavy cream into the chilled mixing bowl. Add the confectioners’ sugar and vanilla extract.
- Whip to Perfection: Using an electric mixer (handheld or stand mixer) fitted with the whisk attachment, start mixing on low speed to combine the ingredients, then gradually increase to medium-high speed. Whip until the cream forms soft peaks. This means when you lift the whisk, the cream will hold a gentle peak that slightly droops. For our Pumpkin Pie Tacos, soft to medium peaks are usually ideal, as it’s easy to dollop or pipe. Be careful not to over-whip, or you’ll end up with butter!
- Chill Until Use: Cover the whipped cream and refrigerate until you are ready to assemble your Pumpkin Pie Tacos. It’s best when freshly whipped, but it can hold in the fridge for a few hours.
Phase 4: Assembling Your Delectable Pumpkin Pie Tacos
- Gather Your Components: Make sure your chilled pumpkin pie filling is ready, your crispy cinnamon sugar taco shells are cooled, and your fresh whipped cream (if using) and garnishes are prepped and at hand.
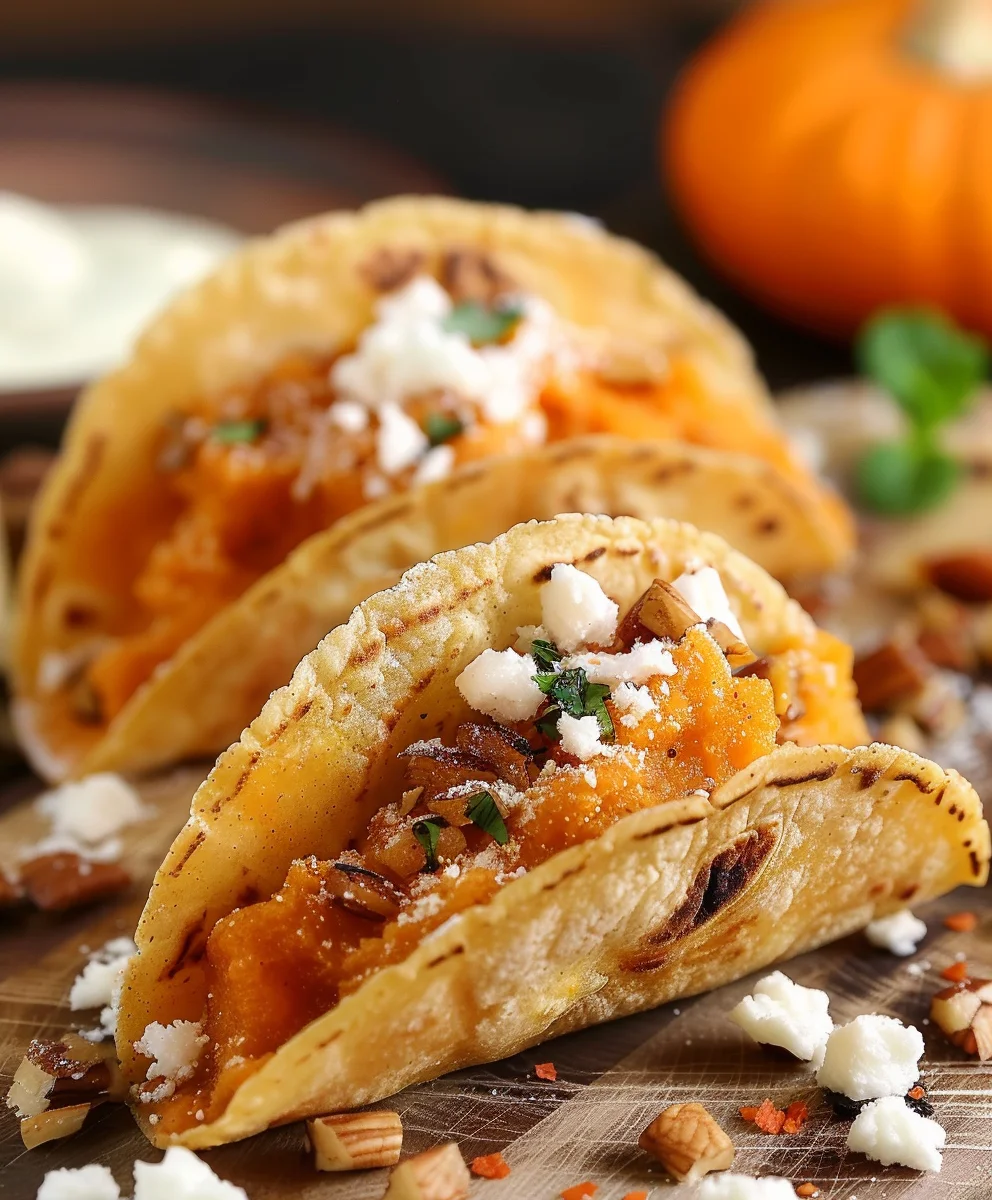
- Fill the Shells: Gently take one of the cooled, crispy cinnamon sugar taco shells. Using a spoon or a small cookie scoop, carefully spoon a generous amount of the chilled pumpkin pie filling into the center of the taco shell. Be mindful not to overfill, as you want the shell to hold its shape and be easy to eat. A good balance is key here – enough filling to satisfy, but not so much that it spills over. The cold, thick filling should hold nicely inside the warm, crispy shell, creating a delightful contrast in temperature and texture that makes these Pumpkin Pie Tacos so irresistible.
- Add the Whipped Cream: Now for the crowning glory! Take a spoonful of your freshly whipped cream and place a dollop on top of the pumpkin pie filling. For a more elegant presentation, you could transfer the whipped cream to a piping bag fitted with a star tip and pipe a beautiful swirl. This adds another layer of creaminess and visual appeal to your dessert tacos.
- Garnish with Flair: This is where you can truly personalize your Pumpkin Pie Tacos.
- Drizzle: Generously drizzle a little caramel sauce over the whipped cream and pumpkin filling. The sweet, buttery notes of caramel are a perfect complement.
- Sprinkle: Sprinkle some chopped pecans or walnuts over the caramel. This adds a lovely crunch and nutty depth that rounds out the flavors.
- Dust: For a final touch, dust a tiny pinch of ground cinnamon over the top of the whipped cream. It adds a beautiful aroma and a hint of extra spice.
- Serve Immediately: Once assembled, these Pumpkin Pie Tacos are best enjoyed right away when the shells are at their crispiest. The delightful combination of the crunchy cinnamon sugar shell, the smooth, spiced pumpkin filling, and the creamy toppings is a sensory experience you won’t want to miss.
Tips for Perfect Pumpkin Pie Tacos:
-
Don’t Rush the Chill:
The pumpkin filling absolutely needs adequate time to chill. This isn’t just about temperature; it’s about the flavors maturing and the consistency firming up. A runny filling will make your Pumpkin Pie Tacos messy and less enjoyable. Plan ahead and make the filling the day before.
-
Oil Temperature is Key:
For the taco shells, maintaining a consistent oil temperature (around 350-360°F or 175-180°C) is vital. If the oil is too cool, the tortillas will absorb too much oil and become greasy. If it’s too hot, they’ll burn before they crisp up properly or before you can shape them. A deep-fry thermometer is a worthwhile investment here.
-
Work Quickly with the Cinnamon Sugar:
The success of the cinnamon sugar coating relies on the taco shells being warm when they’re coated. The residual heat from frying helps the sugar adhere and slightly melt onto the surface, creating that perfect sweet crunch.
-
Experiment with Spices:
While the classic pumpkin pie spice blend is fantastic, feel free to adjust it to your liking. A tiny dash of cardamom could add an exotic note, or a bit more ginger could give a bolder kick. Taste your filling before chilling and adjust.
-
Alternative Shells:
If frying isn’t your thing, you can try baking the tortillas. Brush them lightly with melted butter, sprinkle with cinnamon sugar, and drape them over the rungs of an oven rack or place them in a taco shell mold. Bake at 350°F (175°C) until crisp and golden, then coat again if needed. This method yields a lighter, less greasy shell, though the texture might be slightly different.
-
Flavor Variations for Your Pumpkin Pie Tacos:
- Spiced Pecans: Instead of plain chopped nuts, toast the pecans lightly and then toss them with a pinch of cinnamon and brown sugar for an extra layer of flavor.
- Cream Cheese Swirl: For a tangier filling, consider swirling in a small amount of softened cream cheese to your pumpkin filling (ensure it’s well combined and smooth).
- Boozy Option: A tiny splash of rum or bourbon in the pumpkin filling (added with the cream) or a spiced rum caramel sauce can elevate these to an adult-only treat.
Storage and Make-Ahead Advice for Pumpkin Pie Tacos:
-
Pumpkin Filling:
The pumpkin pie filling can be made up to 2-3 days in advance and stored in an airtight container in the refrigerator. This makes the assembly process on the day of serving incredibly quick.
-
Cinnamon Sugar Taco Shells:
The crispy shells are best made on the day of serving for optimal crispness. However, if you need to make them ahead, allow them to cool completely on a wire rack, then store them in an airtight container at room temperature for up to 1 day. To refresh them, you can place them in a preheated oven at 300°F (150°C) for a few minutes until crisp again. Avoid refrigerating the shells, as they will lose their crispness.
-
Whipped Cream:
Homemade whipped cream is always best served fresh. While it can be stored in the refrigerator for a few hours, it may deflate slightly. If making ahead, whip it just before assembly for the freshest texture.
-
Assembled Pumpkin Pie Tacos:
Once assembled, these dessert tacos are meant to be eaten immediately. The moisture from the filling and toppings will quickly soften the crispy shells, so only assemble as many as you plan to serve right away.
-
Portion Control for Your Pumpkin Pie Tacos:
If you’re not serving a crowd, consider making half batches of the shells or filling, or simply store components separately and assemble on demand. This ensures every Pumpkin Pie Taco is a fresh and delightful experience.
Conclusion:
You’ve reached the grand finale, and I truly hope you’re feeling as excited as I am about what you’ve just discovered. This isn’t merely another dessert recipe; it’s an invitation to experience autumn’s most beloved flavors in an entirely fresh, exciting, and unbelievably delicious format. We’re talking about a culinary masterpiece that seamlessly marries the comforting, familiar taste of pumpkin pie with the fun, handheld delight of a taco. The contrast of the crispy, cinnamon-sugar-dusted shell, lovingly cradling a velvety, perfectly spiced pumpkin filling, creates an explosion of textures and flavors in every single bite. It’s a treat that looks impressive enough for any holiday gathering, yet is surprisingly approachable for a cozy weeknight dessert. This recipe truly redefines what a fall dessert can be, transforming a classic into an innovative sensation that will undoubtedly become a new family favorite. Get ready to impress, delight, and perhaps even mystify your guests with this ingenious creation. The unique combination and ease of preparation make these Pumpkin Pie Tacos an absolute must-try for anyone who loves a delightful twist on tradition.
But the journey doesn’t end with just the basic recipe! This is where your creativity truly gets to shine. To elevate your dessert to an even more celestial plane, consider these delightful additions: A generous dollop of freshly whipped cream, perhaps infused with a hint of maple or vanilla, is a classic pairing that never disappoints, adding an airy, cloud-like contrast to the rich filling. For the ultimate indulgence, a scoop of premium vanilla bean ice cream melting gently over the warm taco is absolutely divine – think pie a la mode, but in a far more exciting package! A drizzle of warm caramel sauce, a scattering of toasted pecans, or even some mini chocolate chips can provide extra layers of flavor and visual appeal. These small touches can turn an already fantastic dessert into an unforgettable experience.
Want to experiment with the ‘shell’? Try using a slightly thicker, flakier pastry dough, baked and shaped, for a more substantial bite. Or, for a gluten-free option, carefully bake corn tortillas until crisp, infusing them perhaps with a little cinnamon before baking. If you’re feeling extra adventurous, why not infuse your shells with other spices like a touch of cardamom or ginger? For the filling itself, you can easily adapt it: swirl in a spoonful of cream cheese for a tangier, richer profile, or a touch of espresso powder to deepen the warm spice notes. You could even add a thin layer of cream cheese frosting or a dollop of apple butter inside the shell before adding the pumpkin for an unexpected twist. These tacos are fantastic on their own, but truly shine when paired with a hot cup of spiced apple cider, a creamy pumpkin spice latte, or even a robust dark roast coffee for an after-dinner treat. Imagine serving these at your next brunch – mini versions would be an absolute showstopper and a guaranteed conversation starter!
Now, my friend, the stage is set, the ingredients are waiting, and the instructions are crystal clear. There’s absolutely nothing stopping you from embarking on this delightful culinary adventure. I wholeheartedly encourage you to make these sensational Pumpkin Pie Tacos your next kitchen project. I promise you, the joy of creating and then savoring these unique treats is an experience you won’t soon forget. Don’t just take my word for it; go ahead and try them for yourself! I am incredibly confident that this recipe will become a treasured addition to your fall dessert repertoire. And when you do, please, please, please share your experience with me and our wonderful community. Did you add a unique topping? Did you serve them with a special drink? Did they become an instant hit with your family and friends? Snap a photo, share your stories in the comments below, or even tell me all about it. Your feedback, your triumphs, and your creative variations are what truly inspire me and make this shared love of cooking so incredibly rewarding. I am genuinely excited to hear about your delicious success!
Easy Pumpkin Pie Tacos – The Ultimate Fall Dessert Twist!
Pumpkin Pie Tacos elegantly marry the comforting, nostalgic essence of autumn’s most beloved dessert with the playful, hand-held convenience of a taco. This delightful dessert offers a familiar, warmly spiced, creamy pumpkin filling encased in a delightfully crisp, cinnamon-sugar dusted taco shell.
Ingredients
-
18-24 (6-inch) flour tortillas
-
1/2 cup Granulated Sugar
-
1 tsp Ground Cinnamon
-
1/3 cup melted Butter
-
4 oz cream cheese, softened
-
1/4 cup powdered sugar (for filling)
-
3/4 cup canned pumpkin puree
-
1/2 tsp pure vanilla extract (for filling)
-
1 1/2 tsp pumpkin pie spice
-
1/2 cup Heavy Whipping Cream (for whipped cream)
-
2 tbsp Powdered Sugar (for whipped cream)
-
1/2 tsp Vanilla Extract (for whipped cream)
-
Chopped pecans for garnish
Instructions
-
Step 1
In a bowl, combine 3/4 cup pumpkin puree, 4 oz softened cream cheese, 1/4 cup powdered sugar, 1/2 tsp vanilla extract (for filling), and 1 1/2 tsp pumpkin pie spice. Mix until smooth. Cover and chill for at least 4 hours, or preferably overnight, for best consistency and flavor. -
Step 2
In a shallow dish, mix 1/2 cup granulated sugar and 1 tsp ground cinnamon. Set aside. -
Step 3
Heat 3-4 cups vegetable or canola oil (not butter, which is unsuitable for deep frying) in a heavy-bottomed pot to 350-360°F (175-180°C). Fry one flour tortilla at a time for 15-20 seconds per side until golden. Using tongs, fold it in half to create a taco shape while frying, holding it until the shape sets and it becomes crisp. Drain excess oil on paper towels. -
Step 4
Immediately after frying and draining, coat the warm taco shell generously in the cinnamon sugar mixture. Transfer to a wire rack to cool and crisp completely. Repeat for all tortillas. -
Step 5
In a chilled bowl, combine 1/2 cup cold heavy whipping cream, 2 tbsp powdered sugar, and 1/2 tsp vanilla extract. Whip with an electric mixer until soft peaks form. Chill until ready to use. -
Step 6
Fill each cooled cinnamon sugar taco shell with a generous scoop of the chilled pumpkin pie filling. Top with a dollop of freshly whipped cream. Garnish with chopped pecans. Optionally, drizzle with caramel sauce and dust with an extra pinch of ground cinnamon (as suggested in the article). Serve immediately for optimal crispness.
Important Information
Nutrition Facts (Per Serving)
It is important to consider this information as approximate and not to use it as definitive health advice.
Allergy Information
Please check ingredients for potential allergens and consult a health professional if in doubt.