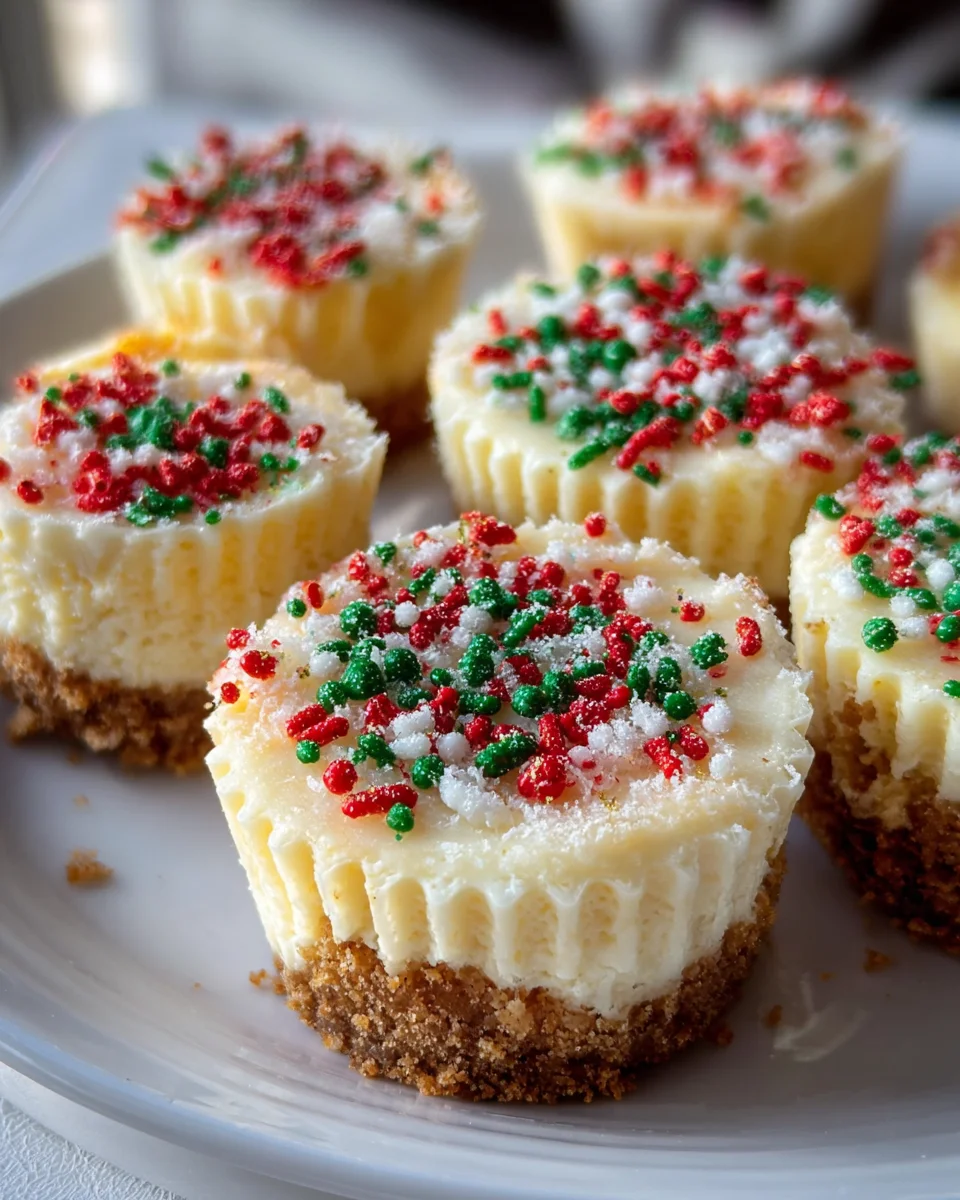
Mini Christmas Cheesecakes Recipe
Oh, I am so excited to share this recipe with you! If you’re anything like me, you love the idea of a show-stopping dessert for the holidays, but maybe not all the fuss of slicing and serving a big cake. That’s exactly why my Mini Christmas Cheesecakes are going to be your new go-to festive treat! What makes them truly special? Well, each guest gets their very own perfect little cheesecake – no awkward cuts, no messy plates, just pure, individual deliciousness. You’ll love them because they bring all the creamy, dreamy indulgence of a classic cheesecake, but in a delightful, bite-sized package that’s perfectly portioned and incredibly easy to serve at any gathering. These beauties feature a sweet, crumbly crust topped with a rich, velvety cheesecake filling, and then they’re crowned with vibrant, festive toppings that just scream ‘Christmas joy.’ They’re not only adorable to look at, but also an absolute pleasure to eat, making them the ultimate hassle-free, crowd-pleasing dessert for your holiday celebrations.

Ingredient Notes
Crafting the perfect batch of Mini Christmas Cheesecakes starts with understanding the stars of the show: our ingredients. I always say that good ingredients are the foundation of great flavor, and for these festive little treats, it couldn’t be truer. Here’s a breakdown of what you’ll need and why, along with some helpful substitutions.
For the Crust:
- Graham Cracker Crumbs: These are my go-to for a classic cheesecake crust. They provide a stable, subtly sweet base that complements the creamy filling beautifully. For a more pronounced Christmas flavor, you can absolutely substitute these with crushed ginger snap cookies or even shortbread crumbs. Imagine that warm, spicy ginger complementing the cool cheesecake – divine! If you need a gluten-free option, simply use gluten-free graham crackers or a suitable gluten-free cookie crumb.
- Unsalted Butter, Melted: Butter binds our crumbs together, creating a firm crust that won’t crumble apart when you bite into it. I prefer unsalted so I can control the salt level myself. If you only have salted butter, just omit any additional salt you might add to the crust mixture. For a dairy-free alternative, a good quality vegan butter substitute works perfectly here.
- Granulated Sugar: A touch of sugar in the crust enhances its sweetness and helps it crisp up slightly.
For the Cheesecake Filling:
- Full-Fat Cream Cheese: This is non-negotiable for a truly rich and creamy cheesecake. Make sure it’s full-fat and, crucially, softened to room temperature. This prevents lumps and ensures a smooth, uniform batter. Low-fat cream cheese just won’t give you that luxurious texture we’re aiming for. For a dairy-free version, use a high-quality vegan cream cheese alternative that is specifically designed for baking and has a good firm texture.
- Granulated Sugar: Our main sweetener for the filling. It balances the tang of the cream cheese and creates that signature sweet cheesecake flavor.
- Large Eggs: Eggs act as a binder, providing structure and helping the cheesecake set. They also contribute to the silky smooth texture. Make sure they are at room temperature as well, as this helps them incorporate more easily without overmixing.
- Vanilla Extract: A splash of good quality vanilla extract enhances all the other flavors. For a Christmassy twist, consider adding a touch of peppermint extract (about 1/4 teaspoon initially, then adjust to taste) or almond extract for a different festive note.
- Sour Cream or Heavy Cream: A small amount of either of these adds moisture, richness, and a slight tang, contributing to the cheesecake’s characteristic creaminess and preventing it from drying out. Room temperature is key here too.
- Lemon Juice (Optional): Just a tiny squeeze of fresh lemon juice brightens the flavor and cuts through the richness, making the cheesecake taste even more vibrant. It’s subtle, but I find it makes a difference.
For Christmas Decorations (Optional but Highly Recommended!):
- White Chocolate: Melted and drizzled, or as shavings. It looks like snow!
- Fresh or Candied Cranberries: Their vibrant red color and tartness are perfect for the season.
- Mini Candy Canes: Crushed or whole, they scream Christmas and add a lovely peppermint crunch.
- Edible Glitter or Sprinkles: To add that magical, sparkly touch.
- Green and Red Food Coloring: A drop or two can transform your cheesecake into a festive masterpiece, perhaps a swirl in the batter or a dollop of colored cream cheese frosting on top.
- Whipped Cream or Cream Cheese Frosting: Perfect for piping festive swirls.
Remember, the goal is to have fun and make these cheesecakes your own! Don’t be afraid to experiment with the festive additions.
Step-by-Step Instructions
Making these Mini Christmas Cheesecakes is a joyful process, and I’ve broken it down into simple, easy-to-follow steps to ensure your success. Remember, patience is a virtue, especially with cheesecakes!
Step 1: Prepare Your Muffin Tin and Oven
- Preheat your oven to 325°F (160°C). This lower temperature is gentle, which is perfect for cheesecakes.
- Line a 12-cup standard muffin tin with paper liners. I like to use festive red or green liners to enhance the Christmas theme. Lightly spray the inside of the liners with non-stick cooking spray for easy removal, especially if you plan to remove the cheesecakes from their wrappers for presentation.
Step 2: Make the Crust
- In a medium bowl, combine your graham cracker (or ginger snap) crumbs, granulated sugar, and melted unsalted butter. Mix thoroughly until the crumbs are evenly moistened and resemble wet sand.
- Spoon about 1 heaping tablespoon of the crumb mixture into the bottom of each prepared muffin liner. Use the back of a spoon or a small, flat-bottomed glass to firmly press the crumbs into an even layer. This creates a stable base for your mini cheesecakes.
- Bake the crusts for 5-7 minutes. This short bake time helps to set the crust, preventing it from becoming soggy. Remove from the oven and set aside to cool slightly while you prepare the filling. Keep the oven on.
Step 3: Prepare the Cheesecake Filling
- In a large mixing bowl, beat the softened full-fat cream cheese on medium speed using an electric mixer until it’s completely smooth and creamy, with no lumps. This is critical for a smooth cheesecake!
- Gradually add the granulated sugar to the cream cheese, beating on low speed until just combined. Scrape down the sides of the bowl as needed. Avoid overmixing once the sugar is in.
- Beat in the vanilla extract (and peppermint or almond extract, if using). If adding a non-alcohol liquid flavoring, ensure it’s fully incorporated.
- Add the sour cream (or heavy cream) and lemon juice (if using), mixing on low speed until just blended.
- Finally, add the eggs, one at a time. Beat on low speed just until each egg is incorporated before adding the next. Overmixing at this stage can incorporate too much air, which can lead to cracks. We want a smooth, dense filling.
- If you want to add a festive color, gently swirl in a drop or two of red or green food coloring to a portion of the batter, or leave it natural for a classic look.
Step 4: Fill and Bake
- Carefully spoon or pour the cheesecake filling over the pre-baked crusts in the muffin tin, filling each liner almost to the top, but leaving a small gap for expansion (about 1/4 inch from the rim).
- Place the muffin tin in the preheated oven. You don’t usually need a water bath for mini cheesecakes, but if you’re concerned about cracking, a shallow pan of hot water on the rack below can help create a humid environment.
- Bake for 18-22 minutes, or until the edges are set and appear slightly puffed, but the centers still have a slight jiggle when you gently shake the pan. This slight jiggle indicates they are cooked through but not overbaked.
Step 5: Cool and Chill
- Once baked, turn off the oven and prop open the oven door slightly. Let the mini cheesecakes cool in the oven for about 15-20 minutes. This slow cooling helps prevent drastic temperature changes that can cause cracks.
- Remove the muffin tin from the oven and let the cheesecakes cool completely on a wire rack at room temperature. This usually takes about an hour.
- Once completely cool, transfer the muffin tin to the refrigerator and chill the mini cheesecakes for at least 4 hours, or preferably overnight. Chilling is essential for the cheesecakes to fully set and achieve their perfect dense, creamy texture. Don’t skip this step!
Step 6: Decorate and Serve
- Once thoroughly chilled, carefully remove the mini cheesecakes from the muffin tin. Peel off the paper liners just before serving, or leave them on for easy handling.
- Now for the fun, festive part! Decorate your Mini Christmas Cheesecakes with your chosen toppings: a dollop of whipped cream, a sprinkle of crushed candy cane, a few fresh cranberries, a drizzle of melted white chocolate, or some festive sprinkles. Get creative and make them sparkle!
- Serve cold and enjoy the holiday cheer!
Tips & Suggestions
I’ve made countless cheesecakes over the years, and I’ve picked up a few tricks that I love to share. These tips are specifically tailored for your Mini Christmas Cheesecakes to ensure they turn out beautifully and taste absolutely incredible!
- Room Temperature Ingredients are a Must: I cannot stress this enough! For a smooth, lump-free cheesecake filling, your cream cheese and eggs must be at room temperature. Cold ingredients don’t emulsify properly and will result in a lumpy batter and a less-than-silky texture. Plan ahead and take them out of the fridge at least an hour before you start baking.
- Don’t Overmix the Batter: Once you add the eggs, mix only until just combined. Overmixing incorporates too much air into the batter, and that air will expand during baking and then collapse as the cheesecake cools, leading to cracks. Gentle is the key!
- Prevent Cracks (Even in Minis): While mini cheesecakes are less prone to cracking than their larger counterparts, it can still happen. The best defense is a gentle bake (lower temperature), no overmixing, and a slow cooling process (cooling in the oven with the door ajar, then slowly at room temperature).
- Easy Liner Removal: If you plan to remove the paper liners for presentation, a light spray of cooking oil inside the liner before adding the crust can make a big difference. Chilling also helps the cheesecake firm up enough to release cleanly.
- Get Creative with Christmas Flavors: Don’t limit yourself to just vanilla! A touch of peppermint extract in the filling (start with 1/4 tsp and taste), or a swirl of cranberry sauce on top, can really elevate the festive factor. Consider a hint of orange zest or a pinch of cinnamon for a different holiday spice profile. Remember, any non-alcohol extracts are excellent here.
- Decorate with Flair: This is where your Mini Christmas Cheesecakes truly shine! Think vibrant reds and greens. Crushed candy canes, fresh cranberries, a sprig of rosemary for a “winter tree” look, white chocolate shavings to mimic snow, or even edible glitter for a magical sparkle. A simple dollop of whipped cream or a swirl of green or red cream cheese frosting piped on top makes them look extra special.
- Make Ahead for Stress-Free Holidays: These mini cheesecakes are perfect for making in advance! They need ample chilling time anyway, so preparing them a day or two before your Christmas gathering saves you precious time on the actual day. Just decorate right before serving for the freshest look.
- Taste and Adjust: Before you add the eggs to the filling (as the eggs are considered raw), taste a tiny bit of your batter. Does it need more vanilla? A touch more sweetness? This is your chance to fine-tune the flavor profile.
Storage
Once you’ve poured your heart into making these delightful Mini Christmas Cheesecakes, knowing how to store them properly is crucial to maintain their fresh taste and perfect texture. Here’s my best advice:
- Refrigeration is Key: Cheesecakes are highly perishable and must be stored in the refrigerator. After they have completely cooled at room temperature, transfer them to an airtight container. This will protect them from absorbing any odd odors from your fridge and prevent them from drying out. They will keep beautifully for up to 3-4 days in the refrigerator.
- Layering for Storage: If you need to stack them in a container, place a piece of parchment paper or wax paper between layers to prevent them from sticking together or damaging their decorations.
- Freezing for Longer Storage: Yes, you can absolutely freeze Mini Christmas Cheesecakes! This is a fantastic option if you want to get ahead on your holiday baking or have leftovers.
- Freezing Method: Once the cheesecakes are completely chilled and firm, place them (undecorated is best for freezing) on a baking sheet and freeze for 1-2 hours until solid. This prevents them from sticking together.
- Wrapping: Once solid, wrap each mini cheesecake individually in plastic wrap, then place them in a freezer-safe airtight container or heavy-duty freezer bag. This double layer of protection helps prevent freezer burn.
- Duration: Frozen mini cheesecakes can be stored for up to 1 month. Beyond that, the texture might start to degrade slightly, but they would still be safe to eat.
- Thawing: To thaw, simply transfer the frozen cheesecakes from the freezer to the refrigerator overnight, or for at least 6-8 hours. Avoid thawing them at room temperature, as this can make them weep and become soggy.
- Decorate After Thawing: It’s always best to decorate your mini cheesecakes after they have been thawed and are ready to serve. This ensures your festive toppings look their best.
- Serving Temperature: Mini cheesecakes are best served chilled, straight from the refrigerator. This is when their texture is at its peak creaminess and firmness.
By following these storage tips, you can enjoy your delicious Mini Christmas Cheesecakes throughout the festive season!
Final Thoughts
I truly hope you’re as excited as I am to try this delightful Mini Christmas Cheesecakes Recipe! These aren’t just any cheesecakes; they are miniature masterpieces, perfectly crafted to bring a touch of festive magic to your holiday table. What makes this particular Mini Christmas Cheesecakes Recipe a must-try is its unique blend of convenience, charm, and undeniable deliciousness.
Imagine the joy of serving individual, perfectly portioned treats that are not only stunning to look at but also incredibly simple to make. They eliminate the need for cutting and serving, making your holiday entertaining a breeze. I promise you, this Mini Christmas Cheesecakes Recipe will become a beloved tradition, bringing smiles and sweet memories to everyone who tastes them. So, gather your ingredients, embrace the holiday spirit, and get ready to create some truly special desserts. Happy baking!