Halloween Crinkle Cookies – that delightful phrase instantly conjures images of spooky fun and delicious treats, doesn’t it? Get ready to transform your kitchen into a cauldron of culinary magic with a recipe that’s as visually striking as it is utterly delicious. While crinkle cookies themselves have a charming history, delighting taste buds with their unique cracked appearance, their vibrant colors and powdery coating make them an absolutely perfect fit for Halloween’s playful spirit.
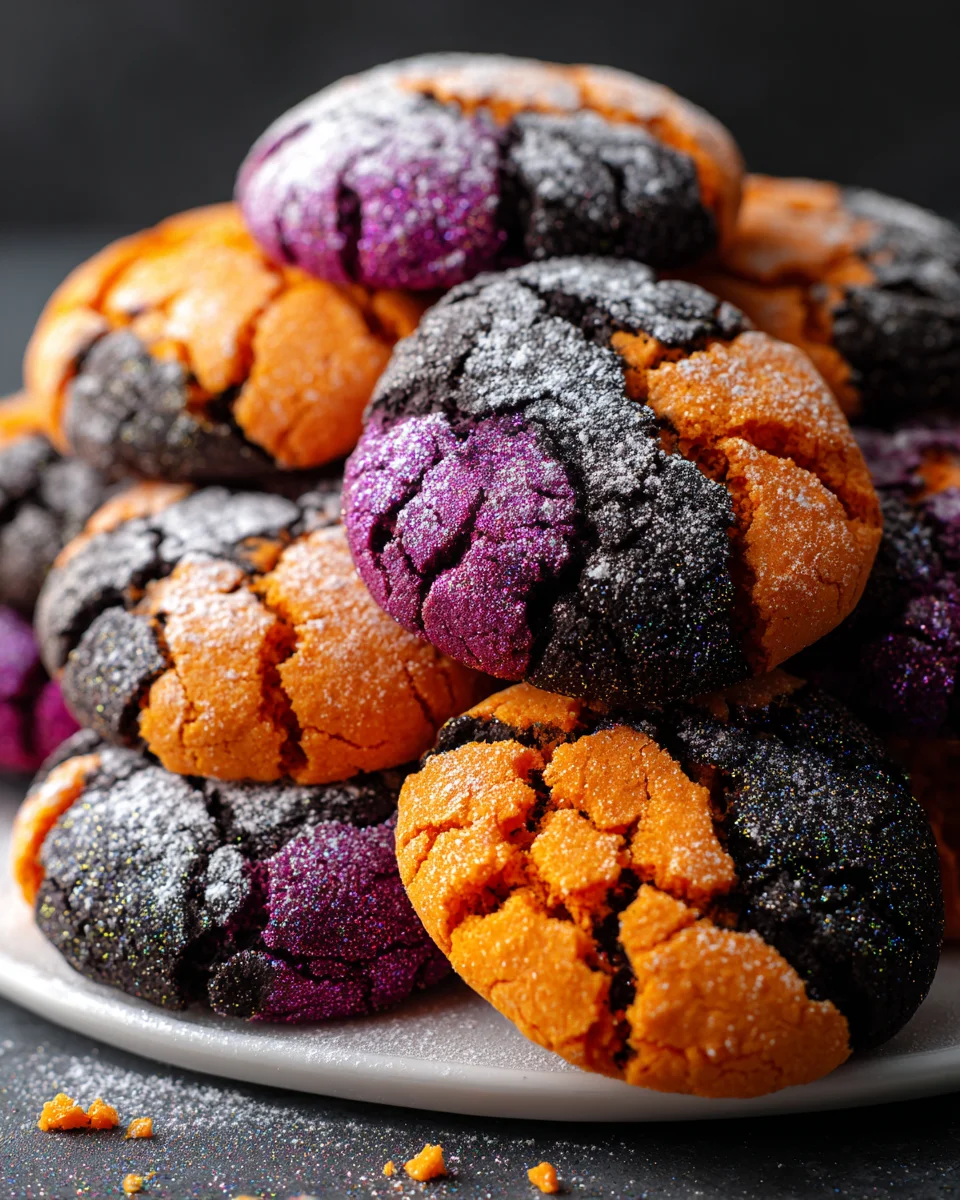
I absolutely adore how these cookies capture the essence of the season. We’re talking about taking a classic, beloved cookie and giving it a ghoulishly good makeover, ideal for costume parties, trick-or-treaters, or a cozy night in with a scary movie. What truly makes them irresistible is that magical combination of a fudgy, chewy center and a slightly crisp exterior, all enrobed in a dramatic, crackled sugar coating. They offer a fantastic textural contrast that keeps you coming back for more. Plus, the convenience factor is huge; they’re surprisingly simple to make, yet always impress. The vibrant orange, green, or purple hues, coupled with the stark white “crinkles,” perfectly capture the festive and slightly eerie essence of the holiday. Every bite of these Halloween Crinkle Cookies is a celebration of flavor and a playful nod to the season’s spooky charm. Prepare to be enchanted!

Ingredients:
- 2 cups (250g) All-Purpose Flour: Make sure it’s unbleached if you can, and always measure it properly. I like to spoon my flour into the measuring cup and then level it off with a straight edge to avoid packing it too much, which can lead to dry, dense cookies.
- ¾ cup (75g) Unsweetened Cocoa Powder: I always reach for a good quality Dutch-processed cocoa powder. It gives these Halloween Crinkle Cookies a wonderfully deep, dark, almost black color, which is absolutely perfect for a spooky Halloween treat! It also has a smoother, less bitter chocolate flavor compared to natural cocoa.
- 2 teaspoons Baking Powder: This is our leavening agent, helping our cookies achieve that lovely soft, cakey interior. Always check the expiration date; old baking powder won’t give your cookies the lift they need.
- ½ teaspoon Salt: A crucial ingredient that enhances all the other flavors, especially the rich chocolate. Don’t skip it!
- 1 cup (226g) Unsalted Butter: This needs to be softened to room temperature. This means it should be pliable but still cool to the touch, not melted. Softened butter creams beautifully with sugar, incorporating air and creating a tender crumb in our Halloween Crinkle Cookies.
- 1 ¾ cups (350g) Granulated Sugar: Our primary sweetener. It also helps with the spreading and texture of the cookies.
- 2 large Eggs: Also at room temperature. Room temperature eggs emulsify better with the butter and sugar mixture, resulting in a smoother, more uniform dough. If you forget to take them out ahead of time, a quick soak in warm water for a few minutes will do the trick!
- 2 teaspoons Vanilla Extract: Use pure vanilla extract for the best flavor. It complements the chocolate beautifully and adds a warm, inviting aroma to our Halloween Crinkle Cookies.
- ½ cup (100g) Powdered Sugar (Confectioners’ Sugar): For rolling the cookies. This is what creates the base of our signature “crackle” effect.
- ¼ cup (50g) Granulated Sugar: Also for rolling the cookies, forming the second layer of the crinkle coating.
- Optional Food Coloring (Gel or Powder): For an extra spooky touch! I love using orange and purple gel food coloring to mix with the powdered sugar, creating vibrant, festive coatings for my Halloween Crinkle Cookies. This really elevates their Halloween appeal!
Gathering Your Ghoulish Goodies (Ingredient Preparation)
Before we dive into mixing, it’s incredibly helpful to prepare all your ingredients. This practice, often called “mise en place” in the culinary world, ensures a smoother baking process and prevents you from scrambling mid-recipe. Trust me, it makes a huge difference, especially when you’re aiming for perfect Halloween Crinkle Cookies!
- First, take your unsalted butter and eggs out of the refrigerator at least 30-60 minutes before you plan to start baking. Room temperature ingredients are key for a smooth, homogenous cookie dough. Softened butter creams much more effectively with sugar, incorporating air for a lighter texture, and room temperature eggs emulsify better, preventing a curdled-looking mixture.
- Measure out your all-purpose flour into a bowl. Remember my tip about spooning and leveling to avoid compacting it. Then, measure your unsweetened cocoa powder, baking powder, and salt. Combine these dry ingredients thoroughly in a medium bowl using a whisk. Whisking ensures that the leavening agent and salt are evenly distributed throughout the flour, meaning every bite of your Halloween Crinkle Cookies will be perfectly balanced. Set this bowl aside for a moment.
- Next, prepare your rolling sugars. In a shallow bowl, combine the ½ cup of powdered sugar and the ¼ cup of granulated sugar. This mixture will give us the classic crinkled look. If you’re going for a truly festive Halloween theme, this is where you can divide your powdered sugar into two or three separate bowls. For example, I love taking half of the powdered sugar, adding a few drops of orange gel food coloring, and mixing it thoroughly with a fork until the color is vibrant and uniform. Do the same with purple for another batch! Just make sure the colored powdered sugar is completely free of lumps. You’ll still want to mix a bit of granulated sugar into your colored powdered sugar bowls for that extra crunch and definition in the crinkle.
Conjuring the Cookie Dough
Now for the fun part – bringing all these wonderful ingredients together to create the base for our spectacular Halloween Crinkle Cookies! This stage is all about technique and paying attention to texture.
- In a large mixing bowl, preferably one that fits comfortably under a stand mixer with a paddle attachment, or with a hand mixer, add your softened unsalted butter and the 1 ¾ cups of granulated sugar. Beat these two together on medium speed for about 3-5 minutes. You’re looking for a transformation here: the mixture should become light, fluffy, and pale in color. This process is called “creaming,” and it’s vital because it incorporates air into the butter and sugar, which contributes significantly to the cookie’s final texture – soft, tender, and slightly cakey. Scrape down the sides of the bowl often with a rubber spatula to ensure everything is getting properly mixed.
- Once your butter and sugar are beautifully creamed, crack in one room temperature egg at a time. Beat well after each addition, allowing the egg to fully incorporate into the mixture before adding the next. This usually takes about 30 seconds to a minute per egg. The mixture might look a little curdled at first, but keep beating, and it will smooth out. The eggs add richness, moisture, and help bind everything together. After the second egg is fully incorporated, stir in the 2 teaspoons of vanilla extract. Give it another quick beat to ensure the vanilla is evenly distributed, filling your kitchen with a lovely aroma!
- Now it’s time to introduce our dry ingredients to the wet mixture. With the mixer on low speed, gradually add the dry ingredient mixture (flour, cocoa powder, baking powder, salt) to the wet ingredients. Add it in about three additions, mixing just until combined after each. The key here is not to overmix. Overmixing develops the gluten in the flour too much, which can lead to tough, dense cookies. As soon as you see no more streaks of dry flour, stop the mixer. The dough will be thick, somewhat sticky, and a gorgeous deep chocolate color – perfect for our spooky Halloween Crinkle Cookies!
Chilling for Chills (Dough Chilling)
This step might feel like an annoying wait, but trust me, it’s absolutely crucial for the success of your Halloween Crinkle Cookies. Don’t be tempted to skip it!
- Scrape the cookie dough into a clean bowl, cover it tightly with plastic wrap, and place it in the refrigerator. I like to press the plastic wrap directly onto the surface of the dough to prevent a skin from forming. Chill the dough for at least 2 hours, or ideally, up to 24 hours. Why chill the dough? There are several excellent reasons. Firstly, chilling allows the flour to fully hydrate, which leads to a more tender and flavorful cookie. Secondly, it solidifies the butter, making the dough much firmer and easier to handle. This is especially important for crinkle cookies, as a cold, firm dough is less likely to spread too much in the oven, helping maintain their shape and giving you that beautiful, distinct crinkle pattern. Lastly, a chilled dough prevents the powdered sugar coating from melting into the dough too quickly, ensuring it stays on the surface to create that striking contrast. This is a non-negotiable step for truly impressive Halloween Crinkle Cookies.
Shaping Your Spooky Spheres
Once your dough is perfectly chilled, we can start shaping these delightful treats! This is where the magic of the crinkle really begins to take shape, especially with our festive colored sugar coatings.
- Preheat your oven to 350°F (175°C). Line two baking sheets with parchment paper or silicone baking mats. This prevents sticking and ensures even baking, making cleanup a breeze.
- Retrieve your chilled dough from the refrigerator. If it’s very hard after a long chill, let it sit on the counter for 5-10 minutes to soften just slightly, making it easier to scoop. Using a small cookie scoop (about 1.5 tablespoons capacity, or a #40 scoop), portion out the dough. Roll each portion into a smooth ball between the palms of your hands. Aim for consistent size; this ensures all your Halloween Crinkle Cookies bake evenly.
- Now for the double coating! This is the secret to a fantastic crinkle. First, roll each dough ball thoroughly in the plain granulated sugar that you combined with powdered sugar earlier. This layer will adhere directly to the dough and help create some texture.
- Next, roll the sugar-coated dough ball generously in the bowl of pure powdered sugar, or your chosen colored powdered sugar (orange or purple!). Make sure it is completely coated, with no spots of the chocolate dough showing through. Don’t be shy with the powdered sugar here; a thick coating is essential for that pronounced crinkle effect. The more powdered sugar, the more dramatic the cracks will be once baked.
- Place the heavily coated dough balls on your prepared baking sheets, leaving about 2 inches of space between each cookie. These cookies will spread a bit, and you want to give them room to breathe and crinkle without merging into one giant cookie monster.
Baking Your Bewitching Bites
The moment of truth! Baking these Halloween Crinkle Cookies is a quick process, and keeping an eye on them is important to achieve that perfect balance of soft interior and crisp edges.
- Bake the cookies one sheet at a time in your preheated oven for 10-12 minutes. You’ll know they’re done when the edges are set and firm, but the centers still look slightly soft and puffy. As they cool, they will firm up further. You’ll see the beautiful cracks forming on the surface as they bake – it’s such a satisfying sight! The powdered sugar will remain visible in the cracks, creating that signature crinkled appearance.
- As soon as they come out of the oven, the Halloween Crinkle Cookies will be very delicate. Let them cool on the baking sheet for about 5 minutes. This cooling period on the hot sheet allows them to set up a bit more, making them sturdy enough to transfer without breaking.
Cooling Your Creepy Confections
Proper cooling is the final touch to ensure your Halloween Crinkle Cookies are perfect, allowing their texture and flavor to fully develop.
- After 5 minutes on the baking sheet, carefully transfer the cooled cookies to a wire rack to cool completely. Cooling on a wire rack allows air to circulate all around the cookies, preventing the bottoms from becoming soggy and ensuring a consistent texture throughout. It’s truly amazing how much flavor and texture develop as they cool.
- Once completely cool, your beautiful Halloween Crinkle Cookies are ready to be devoured! They’re absolutely perfect for any Halloween party, a spooky movie night, or just a treat to enjoy with a warm cup of coffee or milk.
Tips for Terrifyingly Tasty Halloween Crinkle Cookies:
- Don’t Rush the Chill: I can’t emphasize this enough. The chilling time is your best friend for a perfect crinkle and to prevent excessive spreading.
- Be Generous with the Powdered Sugar: This is the most crucial step for the iconic crinkle. The more powdered sugar, the more dramatic and defined your cracks will be.
- Consistent Cookie Size: Use a cookie scoop to ensure all your cookies are the same size. This leads to even baking and a more professional-looking batch of Halloween Crinkle Cookies.
- Storage: Store your cooled Halloween Crinkle Cookies in an airtight container at room temperature for up to 3-4 days. They tend to stay wonderfully soft and fudgy!
- Make Ahead: The cookie dough can be made ahead of time and stored, covered, in the refrigerator for up to 3 days. You can also freeze the rolled (but unbaked) cookie dough balls for up to 3 months. When ready to bake, place them directly on a baking sheet and add an extra minute or two to the baking time.
- Flavor Variations: Feel free to experiment with extracts! A hint of peppermint extract for “mint chocolate chip” crinkles, or even a touch of orange extract to enhance the chocolate-orange combo, could be delightful twists on these Halloween Crinkle Cookies.
- For a Deeper Black Color: If you want an even darker, spookier black cookie, you can use black cocoa powder instead of or in combination with Dutch-processed cocoa powder. This creates an intense color without needing food coloring in the dough itself, leaving all the color fun for the crinkle coating!
Conclusion:
So there you have it, my friends! We’ve journeyed through the simple steps to create a truly magical treat, and I sincerely hope you’re feeling as excited as I am about these cookies. This isn’t just another cookie recipe; it’s an invitation to bring a burst of joy and vibrant color into your kitchen, especially as the seasons change. What makes these cookies an absolute must-try, in my humble opinion, is their irresistible combination of a wonderfully chewy center, slightly crisp edges, and that signature crinkled, powdered sugar exterior that just screams homemade perfection. They strike that delicate balance between being incredibly indulgent and delightfully fun to make. You’ll find yourself reaching for a second, or even a third, without a moment’s hesitation. The aroma alone, as they bake to perfection, is enough to warm any home and lift spirits, promising a delicious reward that never disappoints. They truly embody comfort and celebration in every single bite.
Now that you’re ready to enjoy your freshly baked batch, let’s talk about how to make the most of them. While these cookies are utterly phenomenal on their own – seriously, just grab one straight off the cooling rack and savor it – they also pair beautifully with a variety of beverages. Imagine a crisp autumn evening, a cozy blanket, and a warm mug of your favorite tea, coffee, or even a luxurious hot chocolate, all accompanied by these delightful treats. They’re perfect for after-dinner indulgence, a mid-afternoon pick-me-up, or even as a cheerful addition to a brunch spread. If you’re hosting, arrange them artfully on a platter with some seasonal fruit or a scoop of vanilla ice cream for a simple yet elegant dessert. For the little ones, a tall glass of cold milk is the quintessential companion. They are also incredibly sturdy and travel well, making them ideal for school lunches, potlucks, or as a thoughtful homemade gift for neighbors and friends. I often pack a few in a decorative bag for a hostess gift – they always disappear fast! Don’t underestimate their power to brighten someone’s day.
But the fun doesn’t stop there! One of the things I love most about baking is the freedom to get creative and put your own spin on a classic. While the recipe we just followed yields truly spectacular results, don’t hesitate to experiment with variations to suit your taste or the occasion. For instance, if you’re looking for an extra layer of flavor, consider adding a touch of almond extract alongside the vanilla, or even a hint of espresso powder to deepen the chocolate notes. You could also experiment with different types of chocolate chips – milk, dark, or even white chocolate chunks could transform the profile entirely. Feeling adventurous? Try adding a pinch of chili powder for a subtle, unexpected kick that beautifully complements the sweetness. For a truly festive twist, especially if you’re making these specific treats around October, you could use food coloring to tint the dough in vibrant oranges, purples, or greens before baking, creating truly eye-catching Halloween Crinkle Cookies that are perfect for a spooky celebration. You can also press a small piece of candy corn or a decorative sprinkle mix into the tops of the cookies immediately after they come out of the oven for an extra festive touch. The possibilities are truly endless, limited only by your imagination!
So, what are you waiting for? I wholeheartedly encourage you to roll up your sleeves, gather your ingredients, and dive into the joyful process of baking these amazing cookies. Trust me, the smiles they’ll bring to your face and the faces of your loved ones will be worth every single step. Don’t be shy about making them; this recipe is forgiving and genuinely fun for bakers of all skill levels. Once you’ve had a chance to bake and taste them, I would absolutely love to hear about your experience! Did you stick to the original recipe, or did you venture into some exciting variations? What was your favorite part of the process, and, more importantly, how delicious were your cookies? Please share your triumphs, your clever adaptations, and your delightful photos with me. Your feedback and creativity inspire me and our entire baking community. Happy baking, everyone, and get ready to enjoy a truly special treat that will quickly become a cherished favorite!
Easy Halloween Crinkle Cookies – A Spooktacular Treat!
These Halloween Crinkle Cookies are a visually striking and utterly delicious treat, perfect for costume parties, trick-or-treaters, or a cozy night in. Enjoy a fudgy, chewy center with a slightly crisp, dramatically crackled sugar coating in vibrant Halloween hues.
Ingredients
Instructions
Important Information
Nutrition Facts (Per Serving)
It is important to consider this information as approximate and not to use it as definitive health advice.
Allergy Information
Please check ingredients for potential allergens and consult a health professional if in doubt.