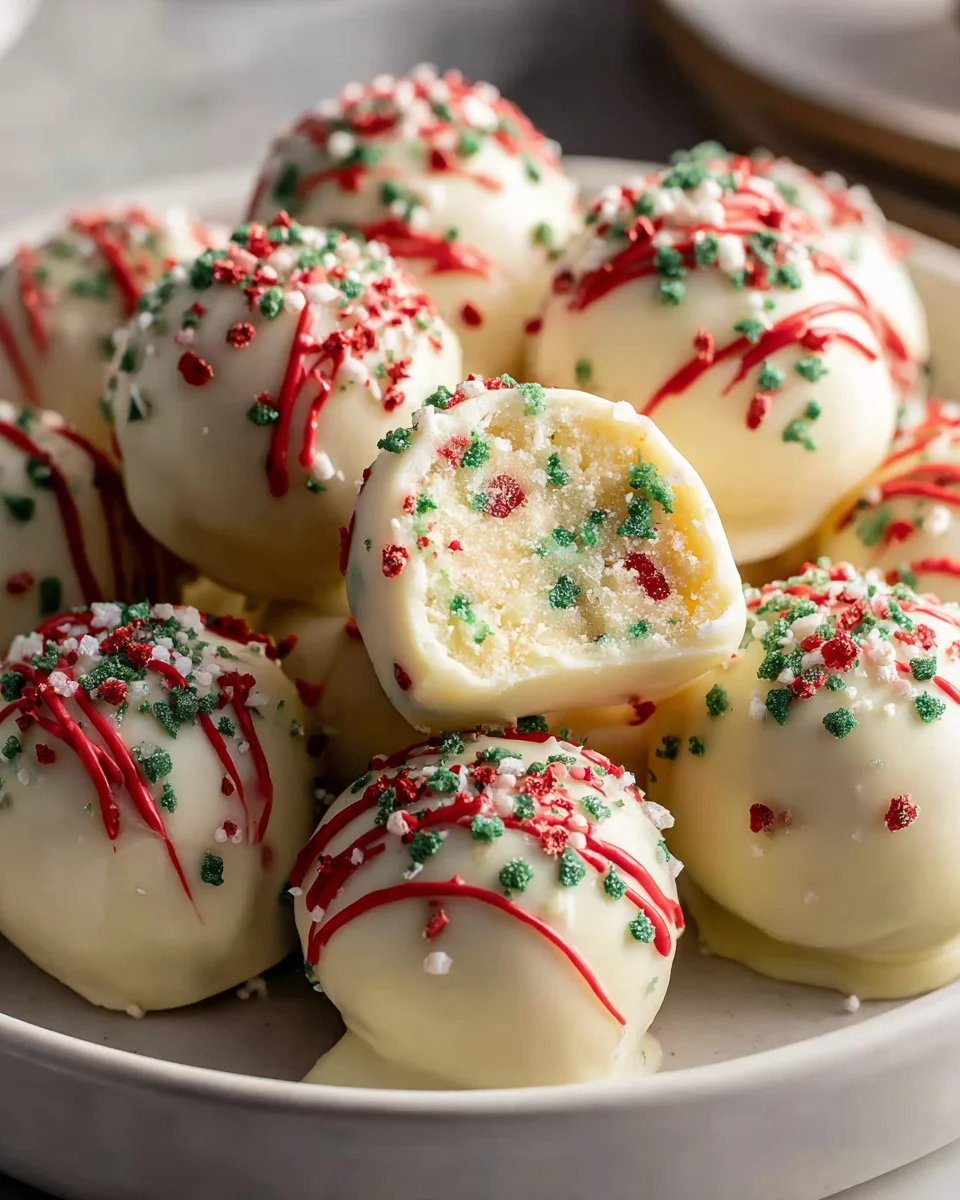
Christmas Tree Cake Truffles are exactly that, offering a delightful explosion of flavor and festivity in every single morsel. Imagine the perfect bite-sized treat that encapsulates all the joy and sweetness of the holiday season, wrapped in an adorable festive package. These charming little confections have quickly become a holiday favorite, celebrated for their incredibly moist, rich cake interior, encased in a luscious, vibrant chocolate shell and adorned with cheerful sprinkles.
While the concept of cake truffles—or their close cousin, cake pops—is a more recent culinary innovation, emerging as a creative way to transform leftover cake into something new and exciting, their spirit perfectly aligns with the age-old tradition of baking special, shareable treats during Christmas. We’ve always loved miniature desserts that bring smiles, and these fit the bill perfectly.
What makes them truly irresistible is their unique combination of textures: the soft, tender crumb of the cake meeting the satisfying snap of the chocolate coating. Beyond their incredible taste, their convenience as a make-ahead party treat and their undeniable visual appeal, especially when shaped and decorated like miniature Christmas trees, makes them a standout. Whether you’re looking for a stunning addition to your holiday dessert platter or a thoughtful homemade gift, these Christmas Tree Cake Truffles are guaranteed to steal the show and fill your home with holiday cheer. Get ready to discover your new favorite festive indulgence!

Ingredients:
- 12 Little Debbie Christmas Tree Cakes (Yes, the classic ones with the green tree and sprinkles! This is the star of our show for these delightful Christmas Tree Cake Truffles.)
- 4-6 ounces cream cheese frosting, store-bought or homemade (I find about half a standard 16-ounce tub is usually perfect, but you might need a little more or less depending on consistency.)
- 24 ounces white melting wafers or white chocolate chips (For that beautiful, festive coating. Candy melts work wonderfully for vibrant colors.)
- 1 teaspoon shortening or coconut oil (Optional, but I highly recommend it for thinning your chocolate slightly for a smoother dip.)
- Festive sprinkles (Think red, green, gold, silver – whatever makes your heart sing with Christmas cheer!)
- Optional: Green food coloring gel (If you want to tint some of your white chocolate for extra decoration, making them even more like actual Christmas Tree Cake Truffles!)
- Optional: Red decorating gel or icing (For adding small details, perhaps tiny ornaments on your tree truffles.)
Equipment You’ll Need:
- Large mixing bowl
- Food processor (highly recommended for speed and consistency, but a fork or potato masher works too!)
- Rubber spatula or sturdy spoon
- Baking sheet(s)
- Parchment paper or silicone baking mats
- Small cookie scoop (about 1 tablespoon size, for consistent truffle size)
- Microwave-safe bowls (for melting chocolate) or a double boiler setup
- Truffle dipping tool, fork, or sturdy toothpicks
Preparing the Christmas Tree Cake Crumbs
- Unwrap Your Christmas Treats: First things first, carefully unwrap all 12 of your beloved Little Debbie Christmas Tree Cakes. I know it’s tempting to take a bite right away, but we need them intact for our magical transformation into Christmas Tree Cake Truffles! Lay them out on a clean surface.
-
Crumble with Care: This is where the magic begins. You have a couple of options here, and my preference is definitely using a food processor for ease and consistency.
- Food Processor Method (Recommended): Break the cakes into smaller pieces and place them in your food processor. Pulse several times until the cakes are completely broken down into fine, even crumbs. You want them to resemble moist sand – no large chunks of cake or frosting should remain. This step is crucial for achieving a smooth, uniform truffle texture. If you leave big pieces, your truffles might be lumpy, and we want perfectly smooth Christmas Tree Cake Truffles!
- Manual Method: If you don’t have a food processor, don’t worry! You can achieve similar results with a large bowl and a fork, potato masher, or even your clean hands. Just place the unwrapped cakes into a large mixing bowl and mash them thoroughly until they form fine crumbs. It will take a bit more elbow grease, but the outcome will still be delicious. Make sure to really break down any large pieces of cake or frosting.
Once you’ve achieved your desired crumb consistency, transfer the cake crumbs to a large mixing bowl, if they aren’t already in one.
Mixing and Forming the Christmas Tree Truffles
- Add the Frosting Binder: Now for the binding agent! Add about 4 ounces (which is roughly half a standard 16-ounce tub) of your cream cheese frosting to the cake crumbs in the bowl. I love cream cheese frosting for this because its slight tang balances the sweetness of the cakes beautifully.
-
Mix Until Dough-Like: Using a sturdy spatula or your clean hands, begin to mix the frosting into the cake crumbs. At first, it might seem like there isn’t enough frosting, but keep mixing! The warmth of your hands or the friction from the spatula will help incorporate everything.
- Look for a Play-Doh Consistency: You’re aiming for a consistency similar to Play-Doh or a very thick cookie dough. It should be moist enough to hold together when pressed, but not overly sticky or greasy. If it’s too dry and crumbles, add another tablespoon or two of frosting and mix again. If it feels too wet, you can add a tiny bit more cake crumb (if you have any extra) or even a spoonful of powdered sugar, though this rarely happens if you stick to the suggested amount.
- Ensure Even Distribution: Continue mixing until the frosting is evenly distributed throughout all the cake crumbs. You want every bit of crumb to be coated, ensuring a cohesive and perfectly scoopable mixture for our Christmas Tree Cake Truffles.
-
Scoop and Roll Your Truffles: Line one or two baking sheets with parchment paper or silicone mats. This is important to prevent sticking later.
- Portioning for Uniformity: Using a small cookie scoop (I prefer a 1-tablespoon size for perfect bite-sized truffles), scoop out portions of the cake mixture. Drop each scoop onto the prepared baking sheet. This helps ensure all your Christmas Tree Cake Truffles are roughly the same size, which is great for even dipping and a professional look.
- Rolling into Smooth Balls: Once you have all your portions scooped, gently roll each portion between your palms to form smooth, round balls. If the mixture starts to stick to your hands, you can lightly dampen them with a little water or pop the mixture back into the fridge for 5-10 minutes to firm up slightly. Smoothness here will lead to perfectly coated truffles later.
Chilling the Truffles
- Chill to Firm Up: Once all your Christmas Tree Cake Truffles are rolled, place the baking sheets into the refrigerator. Let them chill for at least 30 minutes, or up to an hour. This chilling step is absolutely crucial! It helps the truffles firm up, making them much easier to dip into chocolate without crumbling or falling apart. A well-chilled truffle holds its shape beautifully.
Melting the Chocolate Coating
-
Prepare Your White Chocolate: While your truffles are chilling, it’s time to prepare their festive coating. Place your white melting wafers or white chocolate chips into a microwave-safe bowl.
- Microwave Method: Heat the chocolate in the microwave in 30-second intervals, stirring thoroughly after each interval. White chocolate can seize or burn easily, so be patient and go slow. Stirring is key, even if it doesn’t look fully melted, as residual heat will continue to melt the chocolate. Continue until the chocolate is smooth and completely melted, with no lumps.
- Double Boiler Method: Alternatively, you can use a double boiler. Place the chocolate in a heatproof bowl set over a saucepan of simmering water, ensuring the bottom of the bowl does not touch the water. Stir constantly until the chocolate is smooth and melted.
- Thin the Chocolate (Optional but Recommended): Once your chocolate is melted and smooth, stir in the teaspoon of shortening or coconut oil, if using. This small addition makes a huge difference! It helps thin out the chocolate slightly, making it much easier to dip the truffles and achieve a thinner, smoother coating. It also helps prevent the chocolate from setting too quickly.
- Keep the Chocolate Warm: If you’re working with a large batch, you might find the chocolate starts to thicken as it cools. You can keep it over a very low heat on a double boiler, or reheat it in short bursts (10-15 seconds) in the microwave if using that method, stirring well each time.
Dipping and Decorating Your Christmas Tree Cake Truffles
-
Dip the Truffles: Retrieve your chilled truffles from the refrigerator. Working one at a time, use a truffle dipping tool, a sturdy fork, or even a toothpick to dip each truffle into the melted white chocolate.
- Coating Technique: Submerge the truffle completely in the chocolate. Lift it out, gently tapping the tool or fork against the side of the bowl to allow any excess chocolate to drip off. You want a nice, even coating, not a thick blob!
- Return to Parchment: Carefully place the dipped truffle back onto the parchment-lined baking sheet.
-
Decorate Immediately: This is the fun part, and it’s important to work quickly! Once you’ve placed a dipped truffle back on the parchment, immediately sprinkle it with your festive sprinkles before the chocolate has a chance to set.
- Festive Sprinkles: Shower them with red, green, gold, or silver sprinkles to enhance that Christmas spirit. These are, after all, Christmas Tree Cake Truffles!
- Optional Green Drizzle: If you want to get extra fancy, you can melt a small amount of additional white chocolate and tint it green with a few drops of green food coloring gel. Drizzle this over some of your truffles for an extra “Christmas tree” effect. You can use a spoon or a piping bag with a very small hole for this.
- Optional Red Accents: Use red decorating gel or a tiny bit of red icing to add small dots or lines, mimicking ornaments or garlands on your tiny Christmas trees.
- Work in Batches: If your chocolate is setting too fast, consider dipping and decorating only a few truffles at a time. This ensures your decorations adhere properly before the chocolate hardens.
Final Chilling and Storage
- Final Chill to Set: Once all your Christmas Tree Cake Truffles are dipped and decorated, return the baking sheets to the refrigerator for another 15-20 minutes. This final chill will allow the chocolate coating to fully set and harden, ensuring a beautiful, firm shell.
- Storage: Once completely set, transfer your beautiful Christmas Tree Cake Truffles to an airtight container. Store them in the refrigerator. They will stay fresh and delicious for up to 1-2 weeks. However, in my experience, they rarely last that long because they are just too irresistible!
- Serving Suggestion: For the best flavor and texture, I like to let them sit out at room temperature for about 10-15 minutes before serving, just to take the chill off. This allows the cake and frosting inside to soften slightly, creating that perfect melt-in-your-mouth experience.
Tips for Perfect Christmas Tree Cake Truffles Every Time:
- Quality of Cakes Matters: While Little Debbie Christmas Tree Cakes are iconic for this recipe, ensure they are fresh for the best texture.
- Don’t Over-Mix: Once the frosting is incorporated and the mixture is pliable, stop mixing. Over-mixing can sometimes make the cake mixture tough.
- Keep Your Workspace Tidy: Have all your ingredients and tools ready and organized before you start dipping. This makes the process much smoother and less stressful.
- Embrace Imperfection: Homemade treats often have a charming, rustic look. Don’t stress too much if every truffle isn’t perfectly round or perfectly coated. They’ll still be absolutely delicious and appreciated!
- Make it a Family Affair: This recipe is fantastic for getting kids involved in the kitchen. They’ll love crumbling the cakes and, especially, decorating the truffles!
There you have it! A truly fun, festive, and incredibly tasty treat that’s perfect for holiday parties, gifting, or just indulging yourself. These Christmas Tree Cake Truffles are sure to be a showstopper!
Conclusion:
Well, my friends, we’ve reached the sweet end of our journey, and I genuinely hope you’re as excited as I am about these incredible treats. If there’s one recipe you absolutely must add to your festive repertoire this year, it’s these delightful truffles. They’re more than just a dessert; they’re a tiny bite of holiday magic, wrapped in a whimsical, nostalgic package. What makes them an undeniable winner? For starters, they are unbelievably easy to make, even for those who might feel a little intimidated by baking from scratch. We’re talking about minimal effort for maximum impact. The combination of moist, tender cake crumbs mixed with a rich, creamy frosting, all enrobed in a smooth chocolate shell, creates a texture and flavor profile that is utterly irresistible. Every bite transports you straight back to cherished childhood memories, evoking the joyous spirit of the season. They’re perfectly portioned, incredibly satisfying, and frankly, a conversation starter at any gathering. Trust me, once you make these, your friends and family will be begging you for the recipe, cementing your status as the ultimate holiday treat guru. This isn’t just a recipe; it’s an experience, a little piece of edible happiness that brings smiles and cheer to everyone lucky enough to try them.
Now, let’s talk about how to make these beauties truly shine, or how to put your own creative spin on them. When it comes to serving, these truffles are incredibly versatile. Imagine them nestled elegantly on a festive dessert platter, perhaps alongside some classic gingerbread cookies and peppermint bark. They pair wonderfully with a warm mug of hot chocolate or a rich, dark coffee – the perfect accompaniment for a cozy evening by the fire. You could also package a few of them in small decorative bags with a pretty ribbon to give as charming homemade gifts or party favors. They’re ideal for school parties, office potlucks, or simply to have on hand for unexpected holiday guests.
But the fun doesn’t stop there – let’s explore some delightful variations!
If you want to change up the sprinkles, feel free to use nonpareils, edible glitter, or even finely crushed candy canes for an extra minty crunch. For the chocolate coating, while white chocolate offers that classic snowy look, you could absolutely experiment with milk chocolate, dark chocolate, or even different colored candy melts to match your party theme. Imagine green or red candy melts for a truly vibrant display! Want to add a textural surprise? Try folding in some finely chopped toasted pecans or walnuts into the cake mixture before rolling. A touch of orange zest or a hint of almond extract could also elevate the flavor profile, adding another layer of complexity. And who says these have to be exclusively for Christmas? While their name evokes holiday cheer, you can easily adapt this recipe for any occasion. Simply swap out the Christmas-themed sprinkles for colors that suit a birthday, Valentine’s Day, or even a baby shower. Use a different flavor of cake mix – perhaps a chocolate cake for a decadent truffle, or a funfetti for an instant party hit. The possibilities are truly endless, allowing you to customize these treats to your heart’s content and make them uniquely yours, year-round.
So, there you have it! My sincerest encouragement to dive into your kitchen, gather your ingredients, and embark on the delicious adventure of making these exceptional treats. I promise you, the joy of creating something so festive and utterly delicious is a reward in itself. There’s a special kind of magic that happens when you mix, roll, and decorate these little gems, knowing they’re going to bring so much happiness to others. Don’t hesitate – make these Christmas Tree Cake Truffles your next baking project! Once you’ve whipped up a batch, I would absolutely love to hear about your experience. Did you try a fun variation? Were they a hit at your holiday party? What was your favorite part of making them? Your feedback and shared stories truly make this community vibrant and inspire others to try new things. Please, share your pictures, your triumphs, and even your funny kitchen anecdotes in the comments below. Let’s celebrate the joy of homemade treats together. Happy baking, and happy holidays!
Easy Christmas Tree Cake Truffles: Perfect Holiday Dessert
Christmas Tree Cake Truffles are exactly that, offering a delightful explosion of flavor and festivity in every single morsel. Imagine the perfect bite-sized treat that encapsulates all the joy and sweetness of the holiday season, wrapped in an adorable festive package. These charming little confections have quickly become a holiday favorite, celebrated for their incredibly moist, rich cake interior, encased in a luscious, vibrant chocolate shell and adorned with cheerful sprinkles.
Ingredients
Instructions
Important Information
Nutrition Facts (Per Serving)
It is important to consider this information as approximate and not to use it as definitive health advice.
Allergy Information
Please check ingredients for potential allergens and consult a health professional if in doubt.