Chicken Caesar Wrap – few dishes combine classic flavors with modern convenience quite so perfectly. I’m sure many of us cherish the timeless elegance of a traditional Caesar salad, with its crisp romaine, savory croutons, and that undeniably rich, zesty dressing. But what if you could take all those beloved elements and transform them into a portable, satisfying meal that fits effortlessly into your busy schedule? This is precisely where the humble yet mighty Chicken Caesar Wrap truly shines.
Born from the brilliant idea of taking a beloved salad and tucking it neatly into a soft tortilla, this creation offers a delightful twist on a culinary icon. While the Caesar salad itself boasts a storied past tracing back to the innovative mind of Caesar Cardini, its wrap counterpart represents a fantastic evolution, perfectly catering to our desire for delicious, on-the-go meals.
Why has it captured so many hearts?
I believe it’s the irresistible symphony of textures and tastes: the tender, perfectly seasoned chicken, the satisfying crunch of fresh romaine, the sharp bite of Parmesan, all enveloped in that creamy, garlicky Caesar dressing, and finally, embraced by a soft, pliable tortilla. It’s a complete meal in every bite, offering incredible flavor without sacrificing convenience. Whether you’re seeking a quick lunch, a delightful picnic option, or an easy dinner solution, this wrap delivers on every front, making it a beloved staple for countless food enthusiasts.

Ingredients:
- For the Chicken:
- 2 large boneless, skinless chicken breasts (about 6-8 oz each)
- 1 tablespoon olive oil, plus more for cooking
- 1 teaspoon garlic powder
- 1 teaspoon onion powder
- 1/2 teaspoon smoked paprika (optional, for extra flavor)
- 1/2 teaspoon salt, or to taste
- 1/4 teaspoon black pepper, freshly ground, or to taste
- Pinch of dried Italian herbs (oregano, basil, thyme – optional)
- For the Creamy Caesar Dressing (Homemade – yields about 1 cup):
- 1/2 cup good quality mayonnaise (I prefer full-fat for creaminess)
- 2 tablespoons freshly grated Parmesan cheese, plus extra for garnish
- 1 tablespoon fresh lemon juice (about half a lemon)
- 1 clove garlic, minced very finely
- 1 teaspoon Dijon mustard
- 1/2 teaspoon Worcestershire sauce
- 1/4 teaspoon anchovy paste (optional, but highly recommended for authentic flavor; can omit or use a dash of soy sauce as a substitute if preferred)
- Pinch of black pepper
- 1-2 tablespoons milk or water, to thin to desired consistency (optional)
- For the Wraps and Assembly:
- 4 large flour tortillas (10-12 inches) – whole wheat or plain, your preference
- 4-5 cups crisp romaine lettuce, finely chopped or shredded
- 1/2 cup freshly grated Parmesan cheese, for layering
- Optional additions:
- 1/4 cup croutons, crushed (for texture without the bulk of whole croutons)
- 2-3 slices cooked bacon, crumbled
- 1/4 red onion, thinly sliced
- 1/4 avocado, thinly sliced
Preparing the Chicken:
- Prepare the Chicken Breasts: First things first, let’s get our chicken ready. Take your boneless, skinless chicken breasts and pat them very dry with paper towels. This step is crucial for achieving a nice sear. If your chicken breasts are very thick, you might want to pound them lightly to an even thickness (about 3/4 inch). This ensures they cook uniformly and prevents them from drying out in spots. I usually place them between two pieces of plastic wrap and use a rolling pin or the flat side of a meat mallet for this.
- Season the Chicken: In a small bowl, whisk together the 1 tablespoon of olive oil, garlic powder, onion powder, smoked paprika (if using), salt, black pepper, and dried Italian herbs (if using). This creates a simple yet incredibly flavorful marinade. Rub this mixture all over both sides of the chicken breasts, making sure they are thoroughly coated. Allow them to sit at room temperature for about 10-15 minutes while you prepare your cooking pan. This short marination time helps the flavors penetrate and takes the chill off the chicken, promoting more even cooking.
- Cook the Chicken: Heat a large non-stick skillet or cast-iron pan over medium-high heat. Add another tablespoon of olive oil to the hot pan. Once the oil is shimmering and just starting to smoke lightly, carefully place the seasoned chicken breasts in the pan. Don’t overcrowd the pan; if necessary, cook them in batches.
- Sear and Cook: Sear the chicken for about 5-7 minutes per side, or until it has a beautiful golden-brown crust and is cooked through. The exact cooking time will depend on the thickness of your chicken. You’re looking for an internal temperature of 165°F (74°C) when measured with an instant-read thermometer at the thickest part. Resist the urge to move the chicken too much during the searing process; let it develop that gorgeous crust.
- Rest and Slice: Once cooked, remove the chicken from the pan and place it on a cutting board. This next step is vital for juicy chicken: tent it loosely with aluminum foil and let it rest for at least 5-10 minutes. Resting allows the juices to redistribute throughout the meat, ensuring every bite is tender and moist. After resting, slice the chicken against the grain into thin strips, or dice it into bite-sized pieces, according to your preference for the wrap. I find strips work beautifully for a satisfying bite in a wrap.
Crafting the Creamy Caesar Dressing (Homemade Option):
While a good store-bought Caesar dressing can certainly do the trick, making your own elevates this Chicken Caesar Wrap to a whole new level. It’s surprisingly easy and the fresh flavors are incomparable.
- Gather Your Ingredients: Make sure you have all your dressing ingredients at hand. Freshly grated Parmesan cheese is a must here; the pre-grated kind in a can just won’t give you the same flavor or texture. For the garlic, mince it as finely as possible, or even use a microplane grater for a paste-like consistency to ensure it blends smoothly without any harsh chunks.
- Combine the Base: In a medium-sized bowl, combine the 1/2 cup of mayonnaise, 2 tablespoons of freshly grated Parmesan cheese, 1 tablespoon of fresh lemon juice, the finely minced garlic, 1 teaspoon of Dijon mustard, and 1/2 teaspoon of Worcestershire sauce. If you’re using anchovy paste (and I really, really encourage you to try it, even if you’re skeptical – it doesn’t taste “fishy” but adds incredible depth and umami), add 1/4 teaspoon now.
- Whisk Until Creamy: Whisk all the ingredients together vigorously until they are thoroughly combined and smooth. You want a creamy, emulsified texture.
- Season and Adjust Consistency: Season the dressing with a pinch of freshly ground black pepper. Taste the dressing and adjust any seasonings to your liking. Does it need more lemon juice for brightness? A little more Parmesan for cheesiness? Perhaps another tiny dash of Worcestershire or anchovy for depth? This is your chance to make it perfect for your palate. If the dressing is too thick for your preference, whisk in 1-2 tablespoons of milk or water, a little at a time, until you reach your desired pourable (but still thick enough to cling to ingredients) consistency.
- Chill (Optional but Recommended): For the best flavor, cover the bowl and refrigerate the dressing for at least 30 minutes. This allows the flavors to meld beautifully. The dressing can be made a day or two in advance and stored in an airtight container in the refrigerator. Just give it a good stir before using.
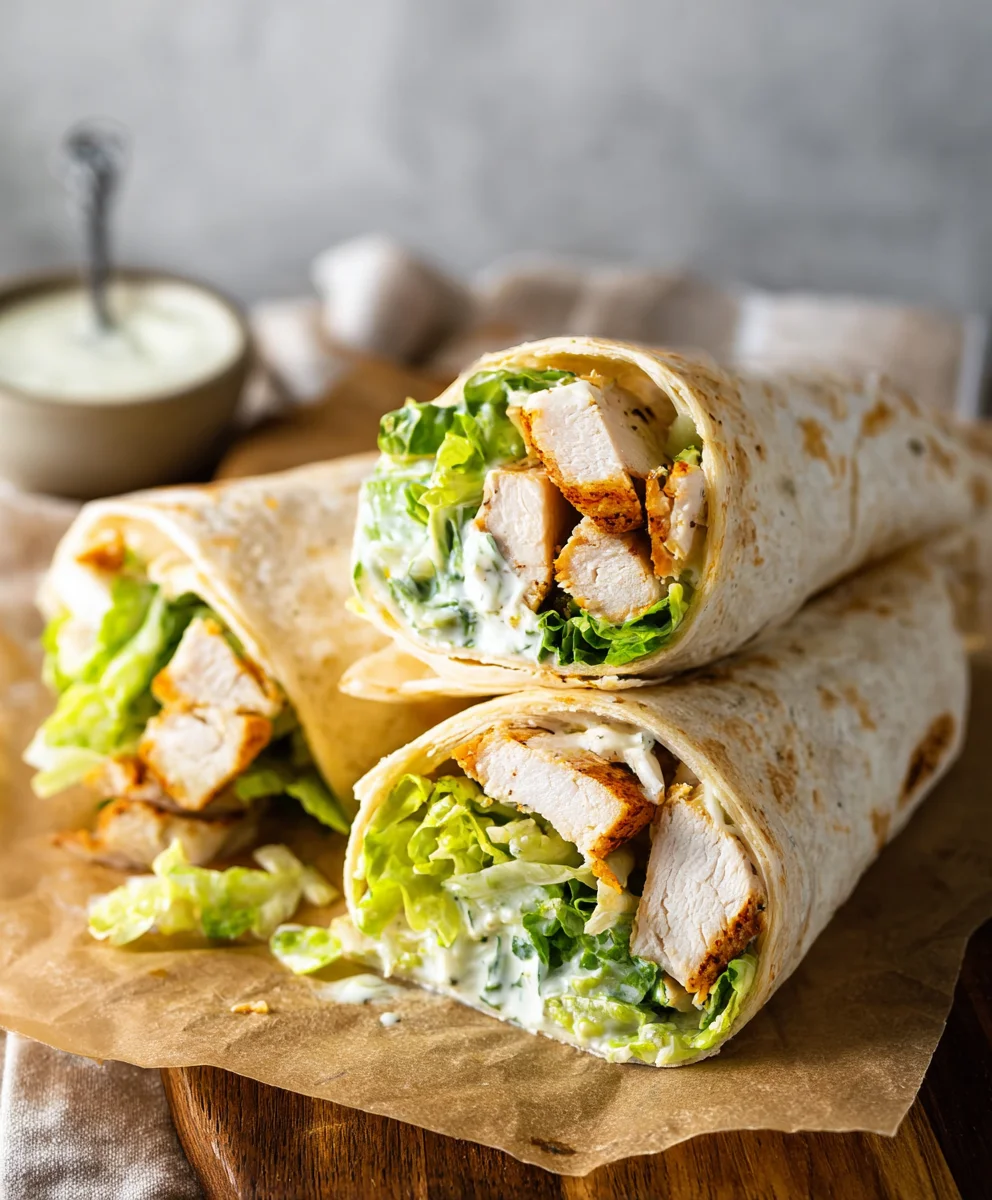
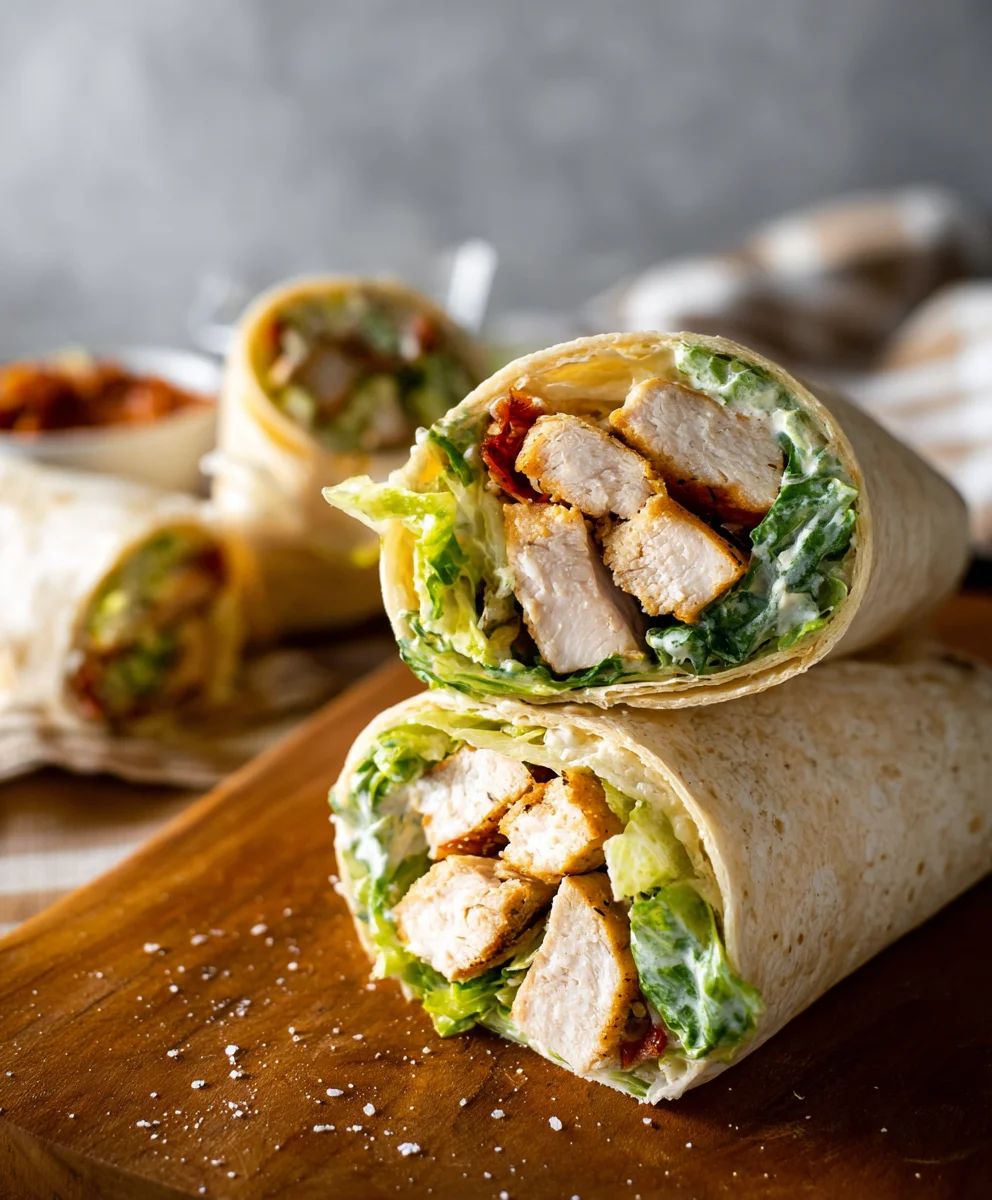
Assembling the Chicken Caesar Wraps:
Now for the fun part – bringing all these delicious components together into the ultimate Chicken Caesar Wrap! The key here is proper layering and a good wrapping technique to ensure a secure and enjoyable experience.
- Prepare Your Workstation: Lay out your large flour tortillas on a clean, flat surface. I like to warm my tortillas slightly in a dry skillet for about 15-20 seconds per side, or in the microwave for 10-15 seconds. This makes them more pliable and less likely to crack when rolled, resulting in a much more pleasant wrap experience. Have your chopped romaine, sliced chicken, extra Parmesan cheese, and creamy Caesar dressing ready to go. If using any optional additions like crushed croutons, crumbled bacon, or red onion, have those prepped too.
- Dress the Lettuce: In a separate bowl, toss the finely chopped romaine lettuce with about half of the Caesar dressing. You want the lettuce to be lightly coated, not drenched, as we’ll be adding more dressing directly to the wrap. This ensures every bit of lettuce has flavor. For a more traditional Caesar experience, you could also add the crushed croutons directly to the dressed lettuce at this stage for even distribution and to allow them to slightly soften and absorb some dressing without becoming soggy in the wrap itself.
- Layer the Tortilla: Take one warmed tortilla and spread a thin, even layer of Caesar dressing (about 1-2 tablespoons) across the center, leaving a border of about 1-2 inches around the edges. This border is essential for a clean roll.
- Add the Greens: Next, place a generous amount of your dressed romaine lettuce in a horizontal line across the center of the tortilla, over the dressing. Don’t overfill, but make sure you have enough for a satisfying crunch. This layer acts as a barrier, helping to keep other ingredients from making the tortilla soggy.
- Introduce the Chicken and Cheese: Evenly distribute a portion of your sliced or diced cooked chicken over the lettuce. Follow this with a sprinkle of extra freshly grated Parmesan cheese. If you’re adding optional ingredients like crumbled bacon, thinly sliced red onion, or avocado, layer them on top of the chicken and cheese now.
-
The Art of Wrapping Your Chicken Caesar Wrap:
This is where many go wrong, leading to a messy wrap. Follow these steps carefully:
- Fold in the Sides: Take the left and right sides of the tortilla (the shorter ends of your horizontal line of filling) and fold them inward, over the filling, by about 1-1.5 inches. This creates a secure pocket for your ingredients.
- Tuck and Roll: Now, grasp the bottom edge of the tortilla (the one closest to you). Pull it up and over the filling, tucking it in tightly under the ingredients. This initial tuck is the most important part for a firm wrap.
- Continue Rolling: While keeping the tucked-in flap snug, continue to roll the tortilla upward, away from you, as tightly as you can, until you reach the top edge. The goal is to create a compact, cylinder-like wrap that holds everything securely. Don’t be afraid to apply a little pressure as you roll.
- Secure and Serve: Once rolled, you should have a neatly wrapped Chicken Caesar Wrap. If you’re serving immediately, you can cut the wrap in half diagonally. This makes it easier to eat and showcases the beautiful layers of filling. If you’re preparing them in advance, you can wrap them tightly in plastic wrap or parchment paper and refrigerate them for a few hours.
- Repeat: Continue this process for the remaining tortillas and filling.
Serving Suggestions and Variations for Your Chicken Caesar Wrap:
Your freshly made Chicken Caesar Wrap is now ready to be devoured! It’s a fantastic meal on its own, perfect for lunch or a light dinner, but you can also enhance the experience with a few additions or variations.
- Classic Pairing: Serve your wraps with a side of simple kettle chips, a small cup of fruit salad, or some raw veggie sticks (carrots, celery, bell peppers) to add extra crunch and freshness. A light coleslaw or a cup of your favorite soup also pairs wonderfully.
- Spice it Up: If you enjoy a bit of heat, consider adding a pinch of red pepper flakes to your chicken seasoning or directly into the Caesar dressing. A few slices of jalapeño or a drizzle of sriracha mayo inside the wrap can also give it a spicy kick.
- Herbaceous Twist: Fresh herbs like chopped parsley or chives mixed into the dressing or sprinkled over the chicken can add another layer of fresh flavor.
- Protein Boost: While it’s already a chicken wrap, if you want to experiment, try adding cooked shrimp or grilled steak strips instead of or alongside the chicken for a different take on the Caesar wrap. Hard-boiled eggs, sliced, can also be a nice addition.
- Vegetarian Option: To make a delicious vegetarian Caesar wrap, simply omit the chicken. You can replace it with crispy roasted chickpeas, grilled halloumi cheese, marinated and grilled portobello mushrooms, or even some seasoned baked tofu or tempeh strips. Ensure your Caesar dressing is vegetarian-friendly (omit anchovy paste or use a suitable vegan substitute).
- Make it Vegan: For a completely vegan version of this delightful wrap, use a plant-based chicken substitute (like seasoned seitan or seitan strips), a vegan mayonnaise for the dressing base, nutritional yeast for a cheesy flavor alongside vegan Parmesan, and ensure all other ingredients are plant-based.
- Experiment with Cheeses: While Parmesan is traditional, don’t hesitate to experiment with other cheeses. A sprinkle of crumbled feta, shredded provolone, or even a sharp cheddar can add interesting flavor profiles to your Chicken Caesar Wrap.
- Add More Veggies: Feel free to customize your wrap with other crisp vegetables. Thinly sliced cucumbers, cherry tomatoes halved, or even some shredded carrots can add more nutrients and texture. Just be mindful not to overfill the wrap.
- Leftovers and Storage: If you have any leftover chicken or dressing, store them separately in airtight containers in the refrigerator. The cooked chicken will last for 3-4 days, and the homemade dressing will keep well for about 5-7 days. It’s best to assemble the wraps just before eating to prevent the tortillas from getting soggy. If you must prepare them in advance, wrap them very tightly in plastic wrap to minimize air exposure and consume them within a few hours for the best texture.
Conclusion:
So, there you have it! We’ve journeyed through the simple steps of creating what I truly believe is one of the most satisfying and incredibly versatile meals you can whip up in your own kitchen. This isn’t just any recipe; it’s an invitation to elevate your everyday meals with minimal effort but maximum flavor. I’m talking about a dish that consistently delivers on taste, convenience, and pure deliciousness. If you’re looking for a quick lunch, a delightful dinner, or even a sophisticated snack that satisfies those savory cravings, your search ends here. This recipe for a homemade Chicken Caesar Wrap is truly a game-changer.
Why is this particular wrap a must-try? Well, for starters, it brilliantly combines the classic, beloved flavors of a Caesar salad – the crisp romaine, the sharp Parmesan, the creamy, tangy dressing, and the savory croutons – all nestled cozily with tender, perfectly cooked chicken inside a soft tortilla. It’s an explosion of textures and tastes in every single bite, offering that satisfying crunch alongside the smooth, rich dressing. But beyond its undeniable flavor, its appeal lies in its incredible ease of preparation. We all have busy lives, and the thought of spending hours in the kitchen can often deter us from cooking something fresh and exciting. This recipe demolishes that barrier. With a little pre-planning (like cooking your chicken ahead of time) or even using a rotisserie chicken, you can assemble these wraps in mere minutes, making it an ideal choice for those hectic weeknights or lazy weekend lunches.
Moreover, the beauty of this Chicken Caesar Wrap lies in its adaptability. While the core ingredients create a symphony of flavors, I absolutely encourage you to play around with it and make it uniquely yours. For those who adore a bit of extra crunch, consider adding some thinly sliced red onion or a handful of fresh cucumber sticks. If you’re a fan of a richer, creamier texture, a few slices of ripe avocado can be a truly wonderful addition, lending a beautiful creaminess that complements the Caesar dressing perfectly. Don’t be shy about experimenting with your choice of greens either; while romaine is traditional, some mixed greens or even baby spinach can offer a slightly different, equally delightful character to your wrap. For a little kick, a dash of hot sauce or a pinch of red pepper flakes mixed into your chicken or dressing can awaken your taste buds in the most exciting way.
When it comes to serving suggestions, the possibilities are genuinely endless. These wraps are fantastic on their own as a complete meal, but they also pair wonderfully with a variety of sides. Imagine serving them alongside a vibrant fruit salad for a refreshing contrast, or perhaps with a bowl of homemade tomato soup for a cozy, comforting lunch. A side of crispy sweet potato fries or a simple green salad (without Caesar dressing, of course, to avoid flavor overload!) would also be magnificent. If you’re hosting a casual get-together, cutting these wraps into smaller, bite-sized pinwheels makes for an incredibly elegant and easy appetizer that’s always a crowd-pleaser. For meal prep enthusiasts, assemble all your ingredients separately and then build your wrap fresh right before eating to ensure maximum crispness and prevent any sogginess – trust me, your future self will thank you!
I truly hope that reading through this has inspired you to roll up your sleeves and give this incredible recipe a try. It’s more than just food; it’s about creating moments of culinary joy, whether for yourself after a long day or for your loved ones around the dinner table. There’s something immensely satisfying about crafting something so delicious with your own hands. Once you’ve experienced the pure delight of biting into your very own perfectly constructed Chicken Caesar Wrap, I would absolutely love to hear about it! Please don’t hesitate to share your experiences, your unique twists, or any photos of your culinary masterpieces. Tag me on social media or leave a comment below – your creativity truly inspires me, and I can’t wait to see what delicious variations you come up with. Happy cooking, and enjoy every single mouth-watering bite!
Frequently Asked Questions (FAQs)
Can I make this Chicken Caesar Wrap ahead of time?
You absolutely can, but with a small caveat! To keep your wrap from getting soggy, I recommend preparing all your components (cooked chicken, dressing, washed and chopped romaine, croutons, Parmesan) and storing them separately in airtight containers in the refrigerator. When you’re ready to eat, simply assemble your wrap fresh. This way, everything stays perfectly crisp and delicious!
What kind of tortillas or wraps should I use?
For the best experience, I suggest using large, soft flour tortillas (about 10-12 inches) that are pliable and easy to fold. Whole wheat tortillas are a fantastic healthier alternative, and spinach or sundried tomato flavored wraps can add an extra layer of subtle flavor and color. Just make sure they’re sturdy enough to hold all your delicious fillings without tearing!
How do I prevent my Chicken Caesar Wrap from getting soggy?
The key to avoiding a soggy wrap is two-fold: First, ensure your romaine lettuce is thoroughly dry after washing. Excess water is a prime culprit. Second, don’t overdress your chicken or lettuce. Add just enough dressing to coat, and try to apply it closer to when you’re ready to eat. As mentioned above, assembling just before serving is the ultimate anti-soggy strategy!
Can I use a different protein instead of chicken?
Definitely! This recipe is incredibly versatile. Grilled shrimp makes an excellent substitute for a seafood twist. For a vegetarian option, consider using pan-fried halloumi, roasted chickpeas, grilled tofu, or even some seasoned tempeh. Leftover steak, thinly sliced, also works wonderfully if you’re looking for a red meat option. Feel free to get creative with your protein!
Is this Chicken Caesar Wrap recipe healthy?
This recipe can be a very healthy and balanced meal! To make it even healthier, opt for whole wheat tortillas, use grilled or baked chicken breast (skinless), and be mindful of the amount of Caesar dressing you use, or consider a lighter homemade version. Loading up on extra fresh veggies like cucumber or bell peppers will also boost its nutritional value. It’s a great way to get a good serving of protein and greens!
Can I make my own Caesar dressing from scratch?
Yes, and I highly encourage it if you have the time! Homemade Caesar dressing is often fresher and more flavorful than store-bought. A classic recipe typically includes egg yolk (or mayonnaise for an egg-free version), garlic, Dijon mustard, lemon juice, Worcestershire sauce, anchovy paste (optional but highly recommended for authentic flavor), Parmesan cheese, and olive oil. There are many fantastic recipes online for homemade Caesar dressing if you’re feeling adventurous!
Easy Chicken Caesar Wrap
A quick and satisfying meal, this Chicken Caesar Wrap combines tender chicken, crisp romaine lettuce, tangy Parmesan cheese, and creamy Caesar dressing, all rolled into a soft tortilla. Perfect for on-the-go lunches or a light dinner.
Ingredients
-
3 cups chopped romaine lettuce
-
1 1/2 cups chopped cooked chicken
-
1/3 cup Caesar dressing
-
1/3 cup freshly grated Parmesan cheese
-
1/2 cup homemade croutons
-
Kosher salt, to taste
-
Freshly ground black pepper, to taste
-
4 flour tortillas or wraps, 10-inch
Instructions
-
Step 1
Pat 2 boneless, skinless chicken breasts dry. Pound to 3/4-inch thickness. Season with 1 tbsp olive oil, 1 tsp garlic powder, 1 tsp onion powder, 1/2 tsp salt, 1/4 tsp black pepper, and optional smoked paprika/Italian herbs. Cook in a skillet with 1 tbsp olive oil over medium-high heat for 5-7 minutes per side, until internal temperature reaches 165°F (74°C). Rest for 5-10 minutes, then slice or dice to yield about 1 1/2 cups. -
Step 2
In a bowl, whisk together 1/2 cup mayonnaise, 2 tbsp grated Parmesan, 1 tbsp fresh lemon juice, 1 minced garlic clove, 1 tsp Dijon mustard, 1/2 tsp Worcestershire sauce, and 1/4 tsp anchovy paste (optional). Season with a pinch of black pepper and thin with 1-2 tbsp milk/water if needed. Chill for 30 minutes for best flavor. Use 1/3 cup for the wraps. -
Step 3
Warm 4 large tortillas slightly to increase pliability. In a separate bowl, toss 3 cups chopped romaine lettuce with about half (approx. 1/6 cup) of the Caesar dressing. -
Step 4
Spread a thin layer of the remaining Caesar dressing (1-2 tablespoons) across the center of each tortilla, leaving a 1-2 inch border. Layer evenly with the dressed romaine lettuce, 1 1/2 cups chopped cooked chicken (divided), 1/3 cup freshly grated Parmesan cheese (divided), and 1/2 cup homemade croutons (divided). -
Step 5
Fold in the left and right sides of the tortilla (about 1-1.5 inches) over the filling. Then, pull the bottom edge up and over the filling, tucking it in tightly. Continue rolling upward away from you as tightly as possible to create a compact cylinder. -
Step 6
Cut each wrapped Chicken Caesar Wrap diagonally in half and serve immediately.
Important Information
Nutrition Facts (Per Serving)
It is important to consider this information as approximate and not to use it as definitive health advice.
Allergy Information
Please check ingredients for potential allergens and consult a health professional if in doubt.