Black Milkshake. Prepare to embark on a truly unique culinary journey, one where visual drama meets delightful indulgence. As someone who adores experimenting with unique flavors and presentations, I am absolutely thrilled to share the recipe for this mesmerizing treat. Have you ever encountered a dessert that’s as mysterious as it is delicious, captivating onlookers with its striking appearance before enchanting their taste buds?
While the concept of a “black” dessert might feel distinctly modern, often gaining traction through social media and a desire for innovative, aesthetically pleasing food, its appeal lies in a universal human fascination with the unexpected. This isn’t just another milkshake; it’s a statement, a delightful twist on a beloved classic that pushes the boundaries of conventional presentation, perfect for those seeking an experience beyond the ordinary.
Why This Black Milkshake Will Become Your New Favorite
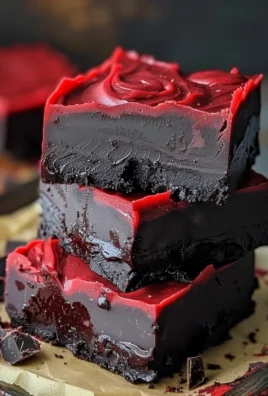
What truly makes this dish a beloved treat isn’t just its mesmerizing hue. People love the Black Milkshake because it offers a decadent symphony of rich, creamy textures and deeply satisfying flavors, often infused with notes of dark chocolate, coffee, or even intriguing charcoal for that signature shade. Every velvety-smooth sip promises a luxurious escape, making it the perfect choice for impressing guests, adding a touch of edgy elegance to any gathering, or simply treating yourself to something wonderfully out of the ordinary. Its ability to combine comfort with an element of surprise makes it undeniably captivating.

Ingredients:
- High-Quality Vanilla Ice Cream: 4 cups (about 1 liter or 8 generous scoops). I always recommend a full-fat, premium vanilla ice cream. It provides the essential creamy base and a subtle sweetness that balances the rich chocolate, allowing the “black” flavor to truly shine in our Black Milkshake. Make sure it’s slightly softened, but not completely melted, for optimal blending.
- Whole Milk: 1 to 1.5 cups (240-360ml), chilled. The exact amount will depend on your desired thickness for the Black Milkshake. I prefer whole milk for its richness, but you can certainly use 2% or even a non-dairy alternative like almond or oat milk if you prefer, though it might subtly alter the creaminess.
- Black Cocoa Powder: 1/4 cup (60ml). This is the absolute star of our Black Milkshake, giving it that incredibly deep, jet-black color without resorting to excessive food coloring. It also imparts a unique, slightly less bitter, “Oreo-like” chocolate flavor compared to regular cocoa. Don’t confuse it with Dutch-processed cocoa; black cocoa is processed even further, resulting in its distinct color and flavor profile.
- Dark Chocolate Sandwich Cookies (e.g., Oreos): 10-12 cookies, crushed. These contribute both to the black color palette and a delightful textural element, adding intense chocolate flavor and tiny crunchy bits throughout our Black Milkshake. I usually separate a few for garnish later.
- Granulated Sugar or Sweetener of Choice: 2-4 tablespoons (30-60ml), or to taste. Black cocoa powder is less sweet than regular cocoa, so a little extra sugar helps balance the flavors and enhances the overall sweetness of the Black Milkshake. You can also use maple syrup, agave nectar, or a sugar substitute if you prefer.
- Pure Vanilla Extract: 1 teaspoon (5ml). A touch of vanilla always amplifies the chocolate flavors and adds a beautiful aromatic depth to the Black Milkshake. It’s a small addition that makes a big difference.
- Optional: Black Gel Food Coloring: A few drops. While the black cocoa does most of the heavy lifting, if you’re aiming for an absolutely inky, dramatic black milkshake, a few drops of high-quality gel food coloring can push it over the edge. I typically use it when I want to ensure the deepest, most consistent black, especially for themed events.
- Optional Toppings:
- Whipped Cream (homemade or store-bought)
- More crushed dark chocolate sandwich cookies
- Chocolate syrup or dark chocolate shavings
- Black sprinkles or edible glitter for extra flair
Prepping Your Ingredients for the Ultimate Black Milkshake:
Before we dive into the blending magic, a little preparation goes a long way to ensure your Black Milkshake is absolutely perfect. Trust me, these small steps make a big difference in the final product!
- Gather All Your Tools and Ingredients: First things first, make sure you have everything laid out. This includes your trusty high-speed blender, measuring cups and spoons, and your serving glasses. I always find that having everything within arm’s reach makes the process so much smoother and more enjoyable. There’s nothing worse than realizing you’re missing an ingredient mid-blend!
- Chill Your Serving Glasses: This is a step I never skip, especially for milkshakes. Pop your serving glasses into the freezer for at least 15-20 minutes before you start blending. A chilled glass will help keep your Black Milkshake colder for longer, preventing it from melting too quickly and ensuring every sip is as refreshing as the first. This also adds a touch of professional presentation, making your shake feel even more special.
- Measure Your Ingredients Precisely: While milkshakes are forgiving, for the best consistency and flavor profile for our Black Milkshake, it’s good to measure your ingredients, especially the milk and cocoa powder. Having the right ratio is key to achieving that rich, thick texture and intense black color we’re aiming for.
- Prepare Your Cookies: Take your dark chocolate sandwich cookies and crush them. You can do this by placing them in a Ziploc bag and using a rolling pin, or by giving them a quick pulse in a food processor. I like to leave some slightly larger chunks for texture, but mostly fine crumbs for incorporation into the shake and for a beautiful garnish later. Reserve a few spoonfuls of the crushed cookies for sprinkling on top of your finished Black Milkshake.
- Slightly Soften Your Ice Cream: For easier blending and a smoother consistency, allow your vanilla ice cream to sit out at room temperature for about 5-10 minutes. It should be soft enough to scoop easily but not completely melted into a puddle. This ensures that your blender won’t struggle and you’ll get a perfectly smooth, velvety Black Milkshake.
Crafting the Perfect Black Milkshake Base:
Now for the exciting part – building the foundation of our incredible Black Milkshake! The order in which you add ingredients to your blender can actually make a difference, especially when dealing with thick, frozen components.
- Start with the Liquids: Pour the chilled whole milk into your high-speed blender. I always start with liquids at the bottom of the blender jar. This helps create a vortex during blending, which pulls the thicker ingredients down into the blades more efficiently, preventing any chunks from being left behind. Starting with 1 cup of milk and adding more later if needed is a good strategy to control thickness.
- Introduce the Flavor Powerhouses: Next, add the black cocoa powder, granulated sugar (or your chosen sweetener), and the pure vanilla extract to the blender with the milk. Adding these dry ingredients now allows them to dissolve and disperse more effectively into the liquid before the frozen ice cream thickens everything up. This ensures a consistent flavor throughout your Black Milkshake and avoids any gritty surprises from undissolved cocoa powder.
- Add the Star of the Show – Vanilla Ice Cream: Carefully scoop your slightly softened vanilla ice cream into the blender. Four generous cups should create a wonderfully rich and substantial Black Milkshake. Pile it right on top of the liquid and dry ingredients.
- Incorporate the Cookie Crumbs: Gently add most of your crushed dark chocolate sandwich cookies into the blender. I usually hold back a small amount for garnish, but the majority goes in now. These cookies aren’t just for flavor; they contribute significantly to the dark color and add fantastic texture to every sip of your Black Milkshake.
- (Optional) Intensify the Black Hue: If you desire an even more dramatic, truly inky black milkshake, now is the time to add a few drops of black gel food coloring. Gel coloring is concentrated, so start with just 2-3 drops, knowing you can always add more if you feel it needs it. I find that black cocoa does a fantastic job on its own, but for a truly show-stopping Black Milkshake, a little extra help can be fun!
Blending for Black Milkshake Perfection:
This is where everything comes together! Blending seems simple, but there are a few tricks to achieve that ideal creamy, smooth, and perfectly thick consistency for your Black Milkshake.
- Begin Blending on Low Speed: Secure the lid on your blender and start blending on a low setting. This allows the ingredients to start breaking down and combining without splattering. I like to use a pulsing motion at first, which helps to incorporate the ice cream and cookies into the liquid base. This initial gentle blending helps prevent air pockets from forming and ensures an even mix from the start.
- Gradually Increase Speed and Scrape Sides: Once the ingredients begin to come together, gradually increase the blender speed to medium-high. You’ll want to blend until the Black Milkshake is completely smooth and creamy. If your blender has a tamper, use it to push down any unblended chunks towards the blades. If not, stop the blender, use a rubber spatula to scrape down the sides of the jar, ensuring everything is thoroughly incorporated, and then continue blending. This is crucial for achieving that consistent, luscious texture.
- Check for Desired Consistency: Keep an eye on the texture. You’re looking for a thick, velvety consistency that’s pourable but still substantial enough to hold a spoon upright for a few seconds. If your Black Milkshake is too thick for your liking, add an extra splash of chilled milk (about 1-2 tablespoons at a time) and blend again until you reach your preferred consistency. Conversely, if it’s too thin, you can add another scoop of vanilla ice cream and blend briefly until it thickens up. Remember, the perfect Black Milkshake consistency is a matter of personal preference!
- Taste and Adjust: Before pouring, give your Black Milkshake a quick taste test. This is your chance to adjust the sweetness. If you find it’s not sweet enough for your palate, add another tablespoon of sugar or your chosen sweetener and blend for a few more seconds until fully dissolved. Sometimes the intensity of the black cocoa benefits from a little extra sweetness.
Assembling and Serving Your Dramatic Black Milkshake:
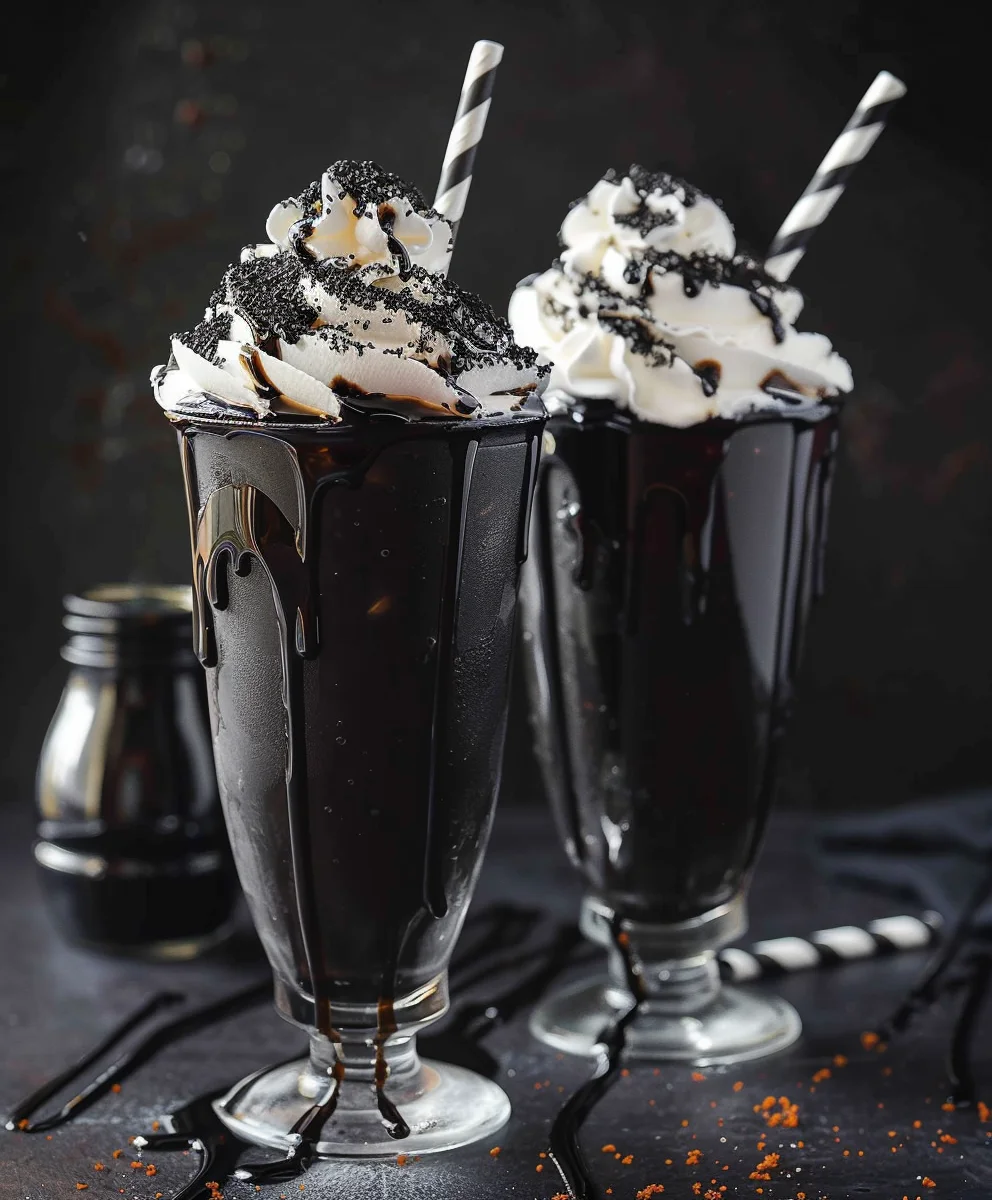
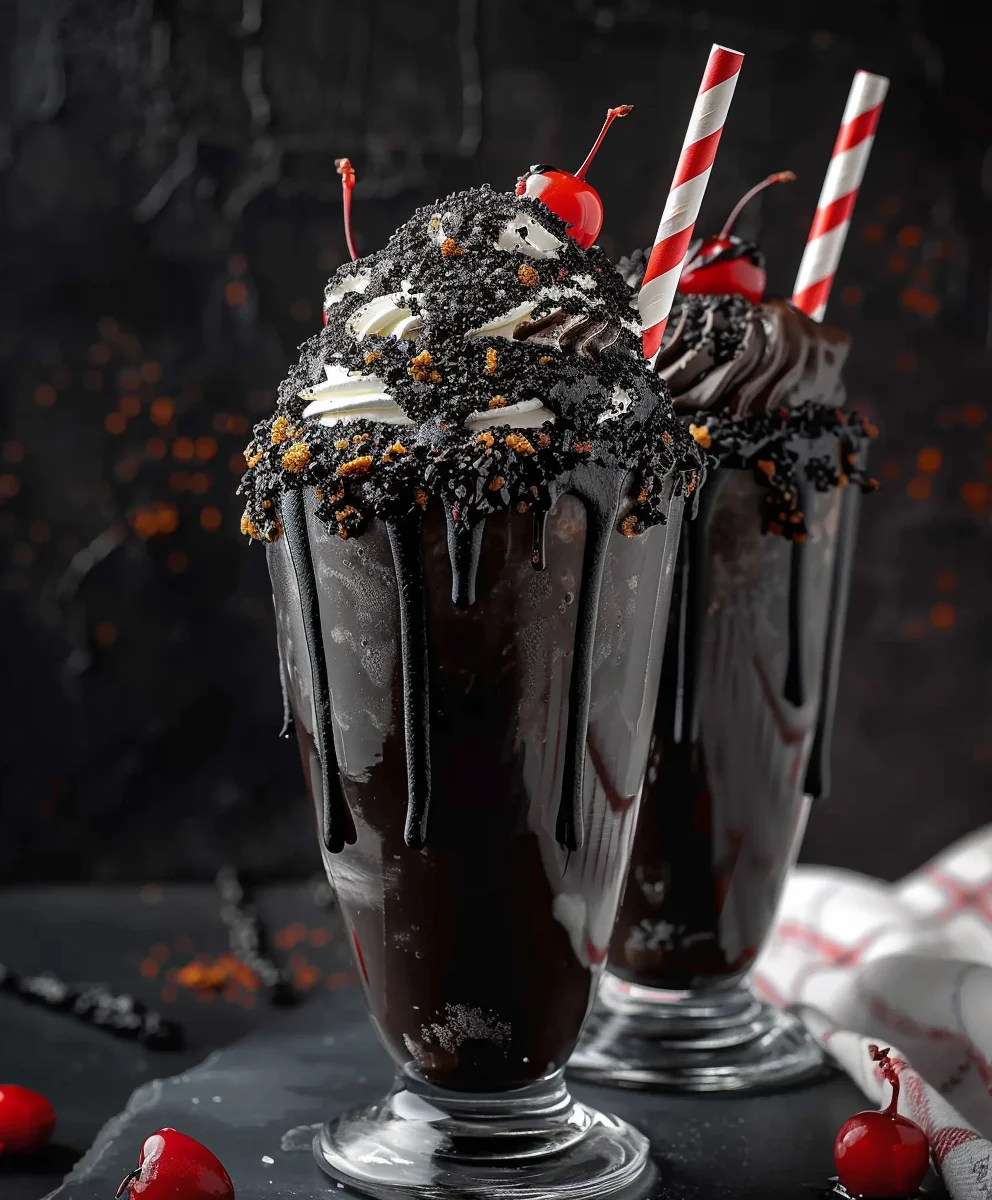
The moment has arrived! All your careful preparation and blending will culminate in a visually stunning and incredibly delicious Black Milkshake. Presentation is key to truly enjoying this dark delight.
- Pour into Chilled Glasses: Retrieve your beautifully chilled glasses from the freezer. Carefully pour the thick, dark, velvety Black Milkshake into each glass. Aim to fill them almost to the brim, leaving just a little space for our wonderful toppings. The contrast of the inky black shake against the frosty glass is already a treat for the eyes!
- Crown with Whipped Cream: This is where the fun really begins! Generously top each Black Milkshake with a swirling crown of whipped cream. Whether you’ve whipped it yourself or used store-bought, the fluffy white cream provides a delightful visual and textural contrast to the deep black shake. It’s an indulgence that makes any milkshake feel special.
- Garnish with Crushed Cookies: Remember those extra crushed dark chocolate sandwich cookies we reserved? Now’s the time to sprinkle them over the whipped cream. The dark crumbs against the white cream look absolutely stunning and add another layer of delicious chocolate flavor and a satisfying crunch with every spoonful. This really ties the theme of our Black Milkshake together.
- Add a Drizzle of Chocolate Syrup: For an extra touch of decadence and visual appeal, drizzle some chocolate syrup over the whipped cream and down the sides of the glass. A dark chocolate syrup works particularly well, enhancing the rich chocolate notes of our Black Milkshake.
- Final Flourishes (Optional): If you’re feeling extra fancy, consider adding a few black sprinkles, some edible silver or black glitter, or even a whole dark chocolate sandwich cookie perched on the rim of the glass. A wide straw is also essential for enjoying such a thick and delightful beverage.
- Serve Immediately: The absolute best way to enjoy your magnificent Black Milkshake is right after it’s made. The texture will be at its peak—thick, cold, and creamy. Hand them out to your eager guests, or savor one all to yourself. There’s nothing quite like a freshly made, dramatic Black Milkshake to make any moment feel a little more extraordinary. Enjoy every single decadent sip!
Conclusion:
And there you have it, my friends! After whipping up countless batches and refining every single element, I can confidently tell you that this isn’t just another drink recipe; it’s an experience. This particular Black Milkshake transcends the ordinary, offering something truly captivating for both the eyes and the palate. From the moment you lay eyes on its striking, inky hue, you know you’re in for a treat that’s as mysterious as it is delicious. I truly believe it’s a must-try because it successfully combines a stunning visual presentation with an incredibly rich, creamy, and deeply satisfying flavor profile that will surprise and delight you.
What makes this recipe stand out, in my humble opinion, is its perfect balance. It’s sweet, yes, but not cloyingly so. The subtle notes of its key ingredients harmonize beautifully, creating a depth of flavor that lingers pleasantly on your tongue, encouraging you to savor every single sip. The texture is undeniably luxurious – thick, velvety, and smooth, exactly what you crave in a truly indulgent milkshake. It’s also incredibly versatile, making it suitable for a variety of occasions, whether you’re looking for a dramatic Halloween treat, a sophisticated dessert alternative for a dinner party, or simply a fun and unique beverage to brighten up a regular afternoon. You’ll find yourself craving this unique concoction long after the last drop is gone.
Now, let’s talk about how to truly make this recipe your own and elevate your enjoyment. While it’s absolutely perfect as is, there are so many fantastic ways to serve and customize your Black Milkshake. For a truly decadent dessert experience, I love serving it in a tall, chilled glass, topped with a generous swirl of freshly whipped cream and a sprinkle of edible glitter or a dusting of cocoa powder for extra visual flair. Consider pairing it with a contrasting light-colored dessert, like a lemon tart or a vanilla bean panna cotta, to really make its dark elegance pop. It’s also wonderful alongside a movie night, transforming a simple evening into something a little more special and memorable.
But don’t stop there! The beauty of this recipe lies in its adaptability. Here are some of my favorite variations:
-
For the Ultimate Indulgence: Swirl a ribbon of dark chocolate ganache or a dollop of salted caramel sauce into your glass before pouring the milkshake. Top with chocolate shavings, crushed Oreos, or even mini marshmallows for a textural wonderland.
-
A Minty Fresh Twist: Add a few drops of food-grade peppermint extract to the blender for a refreshing mint chocolate flavor that’s reminiscent of classic after-dinner mints.
-
Spiced Perfection: For a warmer, more aromatic experience, a pinch of cinnamon or a tiny dash of nutmeg in the blender can introduce a comforting depth, especially lovely for cooler evenings.
-
Grown-Up Version: For those over 21, a splash of coffee liqueur or even a dark rum can transform this into a sophisticated, dessert-like cocktail. Just remember to enjoy responsibly!
-
Vegan Friendly: Easily adapt this recipe by using your favorite non-dairy ice cream (vanilla or chocolate work wonderfully) and a plant-based milk. The result is just as creamy and satisfying!
-
Nutty Delight: A spoonful of hazelnut spread or a dash of almond extract can introduce a lovely nutty dimension that complements the other flavors beautifully.
Each of these variations offers a new dimension to explore, ensuring that your Black Milkshake can always be tailored to your mood or occasion. It’s a fantastic canvas for your culinary creativity, and I encourage you to experiment freely!
I genuinely hope you’re feeling inspired to give this recipe a try very soon. It’s one of those recipes that truly delivers on its promise of uniqueness and deliciousness. I promise you, making this at home is not only incredibly easy but also immensely rewarding. There’s a certain magic in creating something so visually stunning and tasting so good with your own hands. Don’t be intimidated by its striking appearance; it’s surprisingly simple to master.
Once you’ve experienced the joy of this delightful beverage, I would absolutely love to hear about it! Your experiences and insights are invaluable. Did you stick to the original recipe, or did you venture into one of the variations? What was your favorite topping? Did you share it with friends, or keep all that deliciousness to yourself (no judgment here!)? Please don’t hesitate to come back and share your thoughts in the comments section below. Even better, if you capture a photo of your magnificent creation, I’d be thrilled to see it! Tag me on your social media platforms – I’m always excited to see how your culinary adventures turn out. Your feedback not only brightens my day but also helps others in our community discover new ways to enjoy this incredible treat. So go on, grab your blender, and let’s make some magic happen with this unforgettable Black Milkshake. Happy blending!
Easy Black Milkshake: Dark, Creamy & Mysteriously Delicious!
A dramatically dark and creamy Black Milkshake that’s as mysterious as it is delicious. This unique twist on a classic treat combines rich flavors with a striking jet-black appearance, perfect for impressing guests or enjoying a wonderfully out-of-the-ordinary indulgence.
Ingredients
-
1/4 cup (60ml) heavy cream or whipping cream
-
Black sanding sugar
-
2 cups (475ml) vanilla ice cream, packed
-
1/4 to 1/2 cup (60 to 120ml) milk
-
3 tablespoons (26 grams) black cocoa powder
-
2 tablespoons maple syrup
-
2 teaspoons vanilla extract
-
Sprinkles, optional
Instructions
-
Step 1
Chill serving glasses in the freezer for at least 15-20 minutes. Allow vanilla ice cream to soften slightly (5-10 minutes) for easier blending. -
Step 2
In a high-speed blender, combine 1/4 to 1/2 cup milk, 3 tbsp black cocoa powder, 2 tbsp maple syrup, and 2 tsp vanilla extract. Blend until ingredients are fully dispersed. -
Step 3
Add the softened vanilla ice cream. Start blending on low, then gradually increase to medium-high until the mixture is completely smooth and creamy. Scrape down sides with a spatula if needed. -
Step 4
Check for desired thickness; add a splash more milk if too thick, or an extra scoop of ice cream if too thin. Taste and adjust sweetness with additional maple syrup if desired. -
Step 5
For a truly inky black hue, add a few drops of black gel food coloring and blend briefly. -
Step 6
Pour the Black Milkshake into the chilled glasses. If using, whip 1/4 cup heavy cream into whipped cream and generously top each milkshake. Garnish with black sanding sugar and sprinkles, then serve immediately.
Important Information
Nutrition Facts (Per Serving)
It is important to consider this information as approximate and not to use it as definitive health advice.
Allergy Information
Please check ingredients for potential allergens and consult a health professional if in doubt.