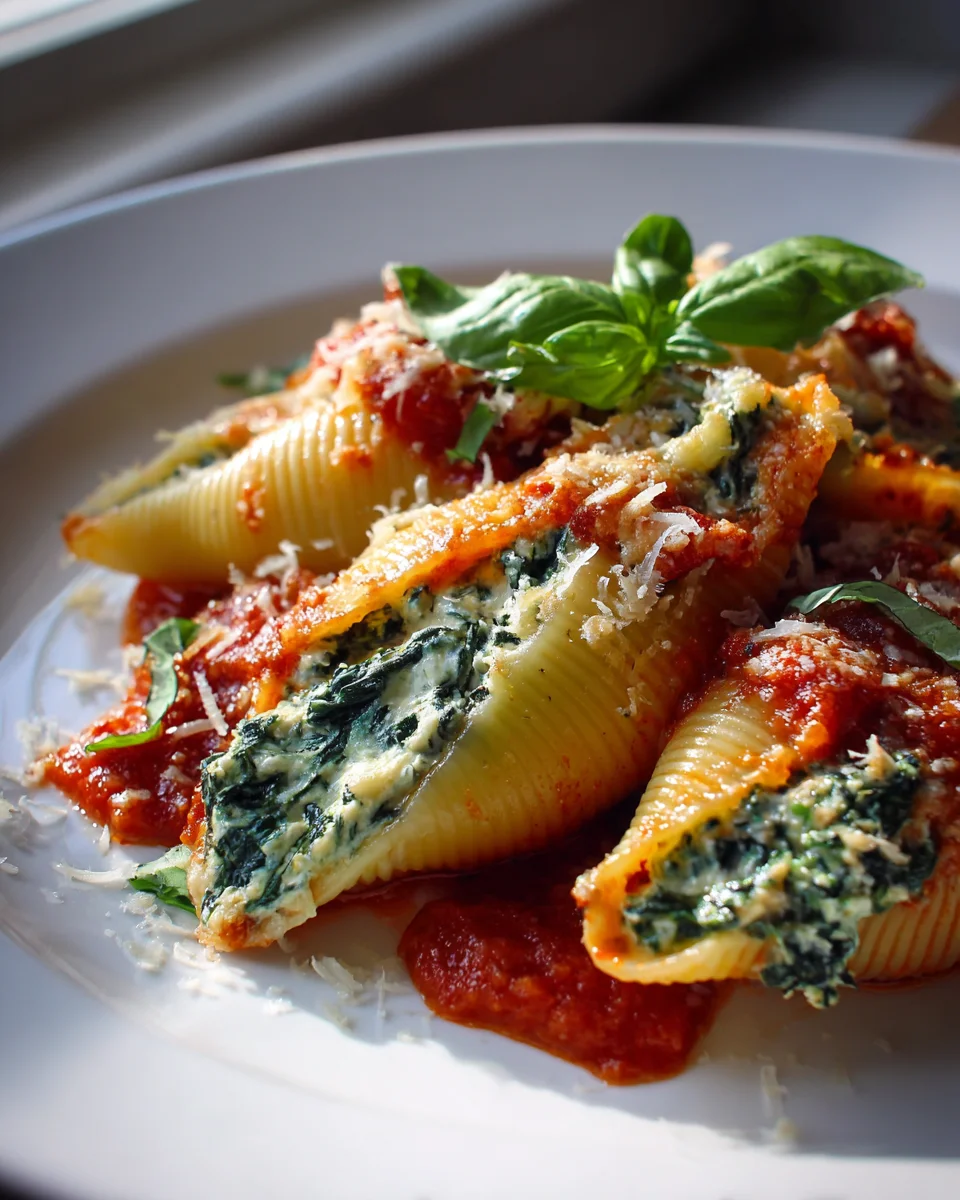
Spinach And Cheese Stuffed Shells (vegetarian Comfort Bake)
There are some meals that just wrap you in a warm hug, and for me, Spinach And Cheese Stuffed Shells (vegetarian Comfort Bake) is absolutely one of them. I’m so excited to share this recipe with you because it’s a true vegetarian classic that delivers on all fronts: incredible flavor, satisfying heartiness, and pure comfort.
What makes this dish so special, you ask? Well, imagine perfectly cooked jumbo pasta shells, each one a generous edible cup, brimming with a creamy, dreamy filling of ricotta cheese, savory sautéed spinach, and a blend of other delightful cheeses. These little pockets of joy are then nestled in a rich, vibrant marinara sauce and baked until bubbling, golden, and utterly irresistible. It’s more than just pasta; it’s an experience.
I know you’re going to love this recipe because it strikes the perfect balance between feeling indulgent and being incredibly simple to put together. It’s a guaranteed crowd-pleaser, whether you’re feeding a hungry family, entertaining friends, or simply craving a cozy, nourishing meal for yourself. Every bite offers that perfect blend of tangy tomato, rich cheese, and earthy spinach, making it the ultimate comfort food without any meat. Get ready to fall in love with your new favorite go-to bake!

Ingredient Notes
When I set out to make my Spinach and Cheese Stuffed Shells, I always start with quality ingredients because, let’s be honest, that’s where the comfort truly begins! This dish relies on a beautiful balance of flavors and textures, so here’s a breakdown of what I use and some helpful notes and substitutions.
- Jumbo Pasta Shells (Conchiglioni): These are the stars of the show! You’ll want about 20-24 shells for a standard 9×13 inch baking dish. My top tip here is to cook them just shy of al dente—they’ll continue to cook in the oven, and you don’t want them falling apart when you stuff them. Rinse them with cold water immediately after draining to stop the cooking process and prevent sticking, then lay them out on a baking sheet or clean kitchen towel while you prepare the filling. If you can’t find jumbo shells, manicotti or cannelloni tubes can work, though they might be a bit trickier to stuff.
- Fresh or Frozen Spinach: I often use a 10-ounce package of frozen chopped spinach because it’s convenient and economical. The most critical step here is to thaw it completely and then squeeze out every single drop of excess water. Seriously, wring it out like your life depends on it! Watery spinach makes for a runny filling, and nobody wants that. If using fresh spinach (about 1-1.5 pounds), wash it, then quickly wilt it in a pan with a splash of water, let it cool, and then—you guessed it—squeeze out all the water before chopping.
- Ricotta Cheese: This is the creamy heart of our filling. I always go for whole milk ricotta for that extra richness and creaminess that defines a true comfort bake. Part-skim works too if you prefer, but whole milk truly delivers on texture. If you’re in a pinch, cottage cheese (small curd) can be a decent substitute, just make sure to drain any excess liquid.
- Mozzarella Cheese: We’ll use this twice! Part of it goes into the filling for internal meltiness, and the rest goes on top for that glorious golden-brown crust. I prefer using a low-moisture, pre-shredded mozzarella for convenience, but freshly grated whole milk mozzarella melts beautifully. Provolone or a blend of Italian cheeses can also be lovely for the topping.
- Parmesan Cheese: Freshly grated Parmesan adds a salty, nutty depth of flavor that’s irreplaceable. I usually grate my own, but a good quality pre-grated Parmesan works too. A Pecorino Romano could be a bolder substitute if you like a sharper kick.
- Egg: A single large egg acts as a binder for our cheese and spinach filling, ensuring it holds together beautifully inside the shells.
- Marinara or Tomato Sauce: A good quality marinara sauce is key for the base and topping. I often use a jarred brand I love for simplicity, but if I have time, I’ll whip up a simple homemade one with crushed tomatoes, garlic, onion, and fresh basil. Feel free to use your favorite! You could even make a creamy rosé sauce by stirring a bit of heavy cream into your marinara.
- Aromatics & Seasonings: Fresh minced garlic (about 2-3 cloves) and a pinch of salt, black pepper, and sometimes a tiny grating of nutmeg (it really brightens spinach!) are essential. I also like to add a teaspoon or two of dried Italian seasoning for that classic herbaceous aroma.
- Fresh Basil or Parsley (for garnish): Totally optional, but a sprinkle of fresh chopped basil or parsley at the end adds a pop of color and freshness that elevates the dish.
Step-by-Step Instructions
Making Spinach and Cheese Stuffed Shells is a joyful process, and it’s surprisingly straightforward. Here’s how I bring this comforting dish to life:
- Prepare the Pasta Shells: First, I bring a large pot of salted water to a rolling boil. I add the jumbo pasta shells and cook them according to package directions, but I always aim for about 2 minutes less than the recommended time. We want them pliable but firm enough to handle without tearing—remember, they’ll finish cooking in the oven. Once they’re done, I drain them immediately, rinse them with cold water to halt the cooking and prevent sticking, and then lay them out in a single layer on a baking sheet or clean kitchen towel to cool while I prepare the filling.
- Prep the Spinach: This is a crucial step! If I’m using frozen spinach, I make sure it’s completely thawed. Then, I place it in a clean kitchen towel or several layers of paper towels and squeeze, twist, and wring out every last drop of moisture. Seriously, squeeze it until you think you can’t squeeze anymore – a dry filling is a happy filling! If I’m using fresh spinach, I quickly wilt it in a pan, let it cool, and then squeeze it dry before giving it a rough chop.
- Make the Cheesy Filling: In a large mixing bowl, I combine the drained spinach, whole milk ricotta cheese, about two-thirds of the shredded mozzarella, all of the grated Parmesan, the large egg, minced garlic, a pinch of salt, freshly ground black pepper, and a tiny dash of nutmeg if I’m feeling fancy. I use a spoon or my clean hands to mix everything thoroughly until it’s well combined and evenly distributed.
- Prepare the Baking Dish: I grab a 9×13 inch baking dish and pour about 1.5 to 2 cups of my favorite marinara sauce into the bottom, spreading it evenly. This creates a cozy bed for the shells and prevents them from sticking.
- Stuff the Shells: Now for the fun part! I carefully pick up each cooled pasta shell and, using a small spoon (or even a piping bag if I want to be super neat), I generously fill it with the spinach and cheese mixture. I don’t skimp on the filling; each shell should be plump and inviting. As I stuff each shell, I carefully arrange it open-side-up in the prepared baking dish, nestled closely with its neighbors. I try to make sure they’re snugly fit without being overly crowded.
- Top with Sauce and Cheese: Once all the shells are stuffed and arranged in the dish, I pour the remaining marinara sauce evenly over the top of the shells, making sure each one gets a good coating. Then, I sprinkle the remaining shredded mozzarella cheese over everything – this will create that irresistible golden, bubbly crust.
- Bake to Perfection: I preheat my oven to 375°F (190°C). I cover the baking dish loosely with aluminum foil and bake for 25 minutes. Covering it helps the dish heat through evenly and prevents the cheese from browning too quickly. After 25 minutes, I remove the foil and bake for another 15-20 minutes, or until the cheese on top is melted, bubbly, and beautifully golden brown, and the sauce is simmering at the edges.
- Rest and Serve: I know it’s tempting, but I always let the dish rest for about 5-10 minutes after taking it out of the oven. This allows the filling to set slightly and prevents a messy collapse when serving. Then, I scoop out generous portions, garnish with fresh basil or parsley if I have it, and serve immediately. Pure comfort!
Tips & Suggestions
Over the years, I’ve picked up a few tricks that really make a difference when preparing these Spinach and Cheese Stuffed Shells. These tips ensure a delicious outcome every time and offer ways to customize the dish to your liking:
- Don’t Overcook the Pasta: I cannot stress this enough! Al dente, or even slightly undercooked, is your friend. The shells will absorb moisture and continue to cook in the oven, so if you start with mushy pasta, you’ll end up with a messy, broken dish.
- Squeeze that Spinach DRY: Seriously, this is probably the most important tip. Any excess water in the spinach will lead to a watery, soggy filling that just won’t hold its shape or flavor. Use a clean kitchen towel and wring it out with all your might.
- Consider a Piping Bag for Filling: While a spoon works perfectly well, if you want a cleaner, quicker, and less messy way to stuff the shells, try using a large piping bag (or even a sturdy Ziploc bag with a corner snipped off). It makes the process surprisingly efficient and fun!
- Make it Ahead: This dish is fantastic for meal prepping! You can assemble the entire dish (without baking) up to 24 hours in advance. Just cover it tightly with plastic wrap and refrigerate. When you’re ready to bake, let it sit on the counter for about 20-30 minutes to come closer to room temperature before baking, then follow the usual baking instructions, possibly adding an extra 5-10 minutes to the covered baking time.
- Customize Your Filling: Don’t be afraid to experiment with the filling!
- Veggie Boost: Sautéed finely diced mushrooms, bell peppers, or even some sun-dried tomatoes (chopped and drained) can add extra flavor and texture to the cheese mixture. Just make sure any added vegetables are cooked and well-drained to avoid introducing excess moisture.
- Herb Variation: Beyond Italian seasoning, try adding fresh oregano, chives, or a touch of red pepper flakes for a little kick.
- Extra Creaminess: For an even richer filling, stir in a tablespoon or two of cream cheese or mascarpone with the ricotta.
- Boost Your Sauce: While a good jarred marinara is fine, you can easily elevate it. Sauté some extra garlic and onion before stirring in the jarred sauce, or simmer it with fresh basil and a splash of non-alcoholic red wine substitute (like non-alcoholic cooking wine or a rich broth) for added depth.
- Serving Suggestions: I love serving these stuffed shells with a simple crisp green salad tossed with a light vinaigrette to cut through the richness. A side of warm garlic bread or focaccia is also a must for soaking up every last bit of that delicious sauce!
Storage
One of the best things about Spinach and Cheese Stuffed Shells is how well they store, making them perfect for leftovers or future easy meals. Here’s how I typically handle storage:
- Refrigeration:
- Cooked Dish: Once cooled completely, I cover the baking dish tightly with aluminum foil or transfer individual portions to airtight containers. The baked stuffed shells will keep beautifully in the refrigerator for up to 3-4 days.
- Unbaked Dish: As mentioned in the tips, you can assemble the dish up to 24 hours in advance. Cover it tightly with plastic wrap and store it in the refrigerator. When ready to bake, let it sit out for 20-30 minutes before baking, and you might need to add an extra 5-10 minutes to the covered baking time.
- Freezing:
- Cooked Dish: Allow the baked shells to cool completely. For best results and easier portioning later, I often freeze individual portions. Place cooled shells on a baking sheet lined with parchment paper and freeze until solid (about 2-3 hours). Then, transfer the frozen shells to freezer-safe bags or containers. This prevents them from sticking together. Alternatively, you can freeze the entire cooled baking dish, wrapped tightly in several layers of plastic wrap and then foil. The dish will maintain its quality in the freezer for up to 2-3 months.
- Unbaked Dish: You can also freeze the entire assembled, unbaked dish. Wrap it very tightly in plastic wrap and then aluminum foil to prevent freezer burn. It will keep well for up to 2-3 months.
- Reheating:
- From Refrigerator (Cooked):
- Oven: For the best results, especially if reheating a larger portion, preheat your oven to 350°F (175°C). Place the shells (covered with foil to prevent drying out) in an oven-safe dish and bake for 20-30 minutes, or until heated through. Uncover for the last few minutes if you want the cheese to re-crisp slightly.
- Microwave: For individual servings, transfer to a microwave-safe plate, cover loosely, and heat on high for 2-4 minutes, or until hot. Be aware that the texture might be slightly softer than oven-reheated.
- From Freezer (Cooked):
- Oven (Recommended): If reheating an entire frozen dish, remove all plastic wrap but leave the foil. Bake at 350°F (175°C) for about 45-60 minutes, then remove the foil and bake for an additional 15-20 minutes, or until bubbling and heated through. For individual frozen shells, place them in an oven-safe dish, cover with foil, and bake at 350°F (175°C) for 30-40 minutes, or until hot.
- Thawing first: For a quicker reheat, you can thaw the dish in the refrigerator overnight before following the “from refrigerator” oven reheating instructions.
- From Freezer (Unbaked): If baking from frozen, remove all plastic wrap but keep the foil. Bake at 375°F (190°C) for about 60-75 minutes, then remove the foil and bake for another 20-30 minutes, or until the cheese is melted and golden, and the dish is bubbly and heated through.
- From Refrigerator (Cooked):
Final Thoughts
There’s something incredibly satisfying about a dish that feels both indulgent and wholesome, and that’s precisely the magic you’ll find in my Spinach And Cheese Stuffed Shells (vegetarian Comfort Bake). I genuinely believe this recipe is a must-try for anyone craving a truly heartwarming and unforgettable meal.
Each generously stuffed shell, bursting with creamy ricotta, vibrant spinach, and bubbling mozzarella, coated in a rich tomato sauce, creates an experience that goes beyond just eating—it’s pure comfort in every bite. It’s the perfect vegetarian comfort bake for a cozy family dinner or a delightful gathering with friends, proving that sometimes, the simplest ingredients can create the most profound flavors. I can’t wait for you to experience the joy of making and sharing these wonderful Spinach And Cheese Stuffed Shells (vegetarian Comfort Bake) in your own home!

Delicious Spinach & Cheese Stuffed Shells Comfort Bake
- Total Time: 1 hour 10 minutes
- Yield: 4 servings 1x
Description
This Spinach and Cheese Stuffed Shells is a true vegetarian classic that delivers incredible flavor and satisfying heartiness. Nestled in a rich marinara sauce, these creamy, cheesy shells are the ultimate comfort food.
Ingredients
- 20–24 Jumbo Pasta Shells (Conchiglioni)
- 10-ounce package of Fresh or Frozen Spinach
- Whole Milk Ricotta Cheese
- Shredded Mozzarella Cheese
- Freshly Grated Parmesan Cheese
- 1 large Egg
- Marinara or Tomato Sauce
- Fresh minced Garlic (about 2-3 cloves)
- Salt
- Black Pepper
- Nutmeg (optional)
- Dried Italian Seasoning (1-2 teaspoons)
- Fresh Basil or Parsley (for garnish, optional)
Instructions
- Prepare the Pasta Shells: Bring a large pot of salted water to a rolling boil. Add the jumbo pasta shells and cook them according to package directions, about 2 minutes less than the recommended time. Drain them immediately, rinse with cold water, and lay them out in a single layer to cool.
- Prep the Spinach: If using frozen spinach, ensure it’s completely thawed and squeeze out all excess moisture. If using fresh spinach, wilt it in a pan, let it cool, and squeeze it dry before chopping.
- Make the Cheesy Filling: In a large mixing bowl, combine the drained spinach, whole milk ricotta cheese, two-thirds of the shredded mozzarella, all of the grated Parmesan, the egg, minced garlic, salt, black pepper, and nutmeg. Mix thoroughly until well combined.
- Prepare the Baking Dish: Pour 1.5 to 2 cups of marinara sauce into the bottom of a 9×13 inch baking dish, spreading it evenly.
- Stuff the Shells: Fill each cooled pasta shell with the spinach and cheese mixture and arrange them open-side-up in the prepared baking dish.
- Top with Sauce and Cheese: Pour the remaining marinara sauce over the stuffed shells and sprinkle the remaining shredded mozzarella cheese on top.
- Bake to Perfection: Preheat the oven to 375°F (190°C). Cover the dish loosely with aluminum foil and bake for 25 minutes. Remove the foil and bake for another 15-20 minutes until the cheese is melted and golden brown.
- Rest and Serve: Let the dish rest for 5-10 minutes before serving. Garnish with fresh basil or parsley if desired.
- Prep Time: 30 mins
- Cook Time: 40 mins
- Category: Dinner
- Method: Baking
- Cuisine: Italian
Nutrition
- Serving Size: 1 shell
- Calories: 320
- Sugar: 5 g
- Sodium: 600 mg
- Fat: 15 g
- Saturated Fat: 8 g
- Unsaturated Fat: 5 g
- Trans Fat: 0 g
- Carbohydrates: 35 g
- Fiber: 3 g
- Protein: 15 g
- Cholesterol: 70 mg
Keywords: Ensure to squeeze out all excess water from the spinach to avoid a watery filling. You can customize the filling with sautéed vegetables or different herbs for added flavor.