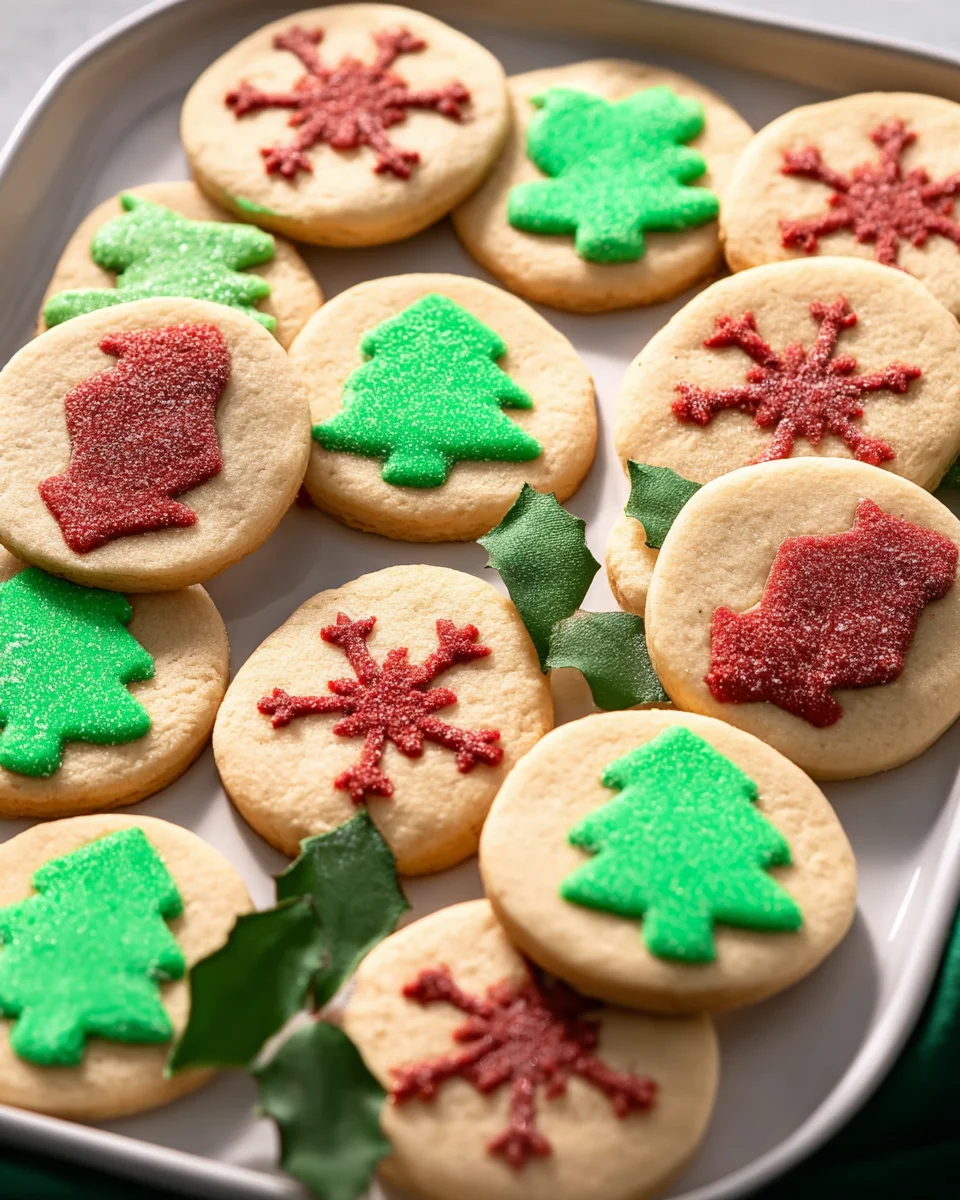
Slice And Bake Christmas Cookies are not just any ordinary holiday treat; they are a delightful tradition that captures the spirit of the season in each delicious bite. These cookies, with their charming shapes and festive colors, evoke memories of cozy kitchens filled with laughter, the warmth of the oven, and the sweet aroma of freshly baked goods. The beauty of Slice And Bake Christmas Cookies lies in their simplicity and versatility. You can prepare the dough ahead of time, refrigerate it, and simply slice and bake when you’re ready to spread the holiday cheer. This makes them a favorite for busy families, holiday parties, and gift-giving alike. Whether adorned with colorful sprinkles or drizzled with icing, these cookies are sure to bring smiles to faces of all ages.
What Is Slice And Bake Christmas Cookies
Slice And Bake Christmas Cookies are a type of cookie that is made by preparing a rich and buttery dough, rolling it into a log, and then chilling it until it’s firm enough to slice. Once you slice the chilled dough into rounds, you pop them in the oven for a quick bake. The texture is wonderfully tender and slightly crisp at the edges, creating a perfect balance that melts in your mouth. Unlike drop cookies that require individual shaping, these cookies are incredibly convenient—just slice, bake, and enjoy! They can be jazzed up with various add-ins like chocolate chips, nuts, or festive spices, making them stand out in a sea of holiday treats.
Why You’ll Fall in Love with This Recipe
- Easy to prepare: Make the dough in advance and store it in the fridge.
- Customizable: Add your favorite mix-ins for a unique twist every time.
- Family-friendly: Kids love helping with the slicing and decorating!
- Perfect for gifting: Slice them up, package them beautifully, and share the joy.
How Does It Taste?
The flavor profile of Slice And Bake Christmas Cookies is a delightful symphony of sweetness and buttery richness, often enhanced by hints of vanilla or almond extract. The texture is a perfect combination of tender and slightly crisp, giving each bite a satisfying crunch before it melts away. Depending on your chosen mix-ins, you can enjoy bursts of chocolatey goodness or the crunch of nuts, all while being enveloped in that warm, comforting taste that screams holiday cheer.
Health & Ingredient Benefits
While these cookies are certainly a treat, they do incorporate some ingredients that offer simple health benefits:
- Butter: Provides a rich flavor while being a source of fat that can promote satiety.
- Whole wheat flour: Can be used for added fiber, making your cookies a bit more wholesome.
- Eggs: High in protein, helping to bind the ingredients together and adding a richness to the dough.
- Nuts: If you choose to include them, they add healthy fats and a satisfying crunch.
So gather your loved ones and get ready to roll out some holiday magic with Slice And Bake Christmas Cookies!

Ingredients You’ll Need
- 2 ½ cups all-purpose flour – This forms the base of the cookies, providing structure.
- 1 cup unsalted butter, softened – Adds richness and moisture for a tender texture.
- 1 cup granulated sugar – Sweetens the cookies and helps with browning.
- 1 large egg – Binds the ingredients together and contributes to the cookie’s structure.
- 1 teaspoon vanilla extract – Enhances the flavor profile, giving a lovely aroma.
- ½ teaspoon baking powder – Helps the cookies rise slightly for a softer bite.
- ¼ teaspoon salt – Balances the sweetness and enhances overall flavor.
- 1 cup colored sprinkles or chopped nuts (optional) – Adds festive color and texture.
Tools You’ll Need
- Mixing bowl
- Electric mixer or whisk
- Spoon or spatula
- Plastic wrap
- Baking sheet
- Parchment paper
- Sharp knife or pastry cutter
Optional Substitutions & Additions
- For dairy-free options, replace butter with coconut oil or a dairy-free butter substitute.
- Use almond extract instead of vanilla for a different flavor profile.
- Swap granulated sugar for brown sugar for a deeper, molasses-like flavor.
- Add spices such as cinnamon or nutmeg for a festive twist.
How to Make Slice And Bake Christmas Cookies
Step 1: Prepare the Dough
In a large mixing bowl, cream together the softened unsalted butter and granulated sugar until light and fluffy, about 3-4 minutes. The mixture should be pale in color and have a smooth texture. This step is crucial as it incorporates air into the batter, which helps the cookies rise.
Step 2: Mix in the Egg and Vanilla
Beat in the egg and vanilla extract until fully combined. The mixture will turn slightly more liquid but should still hold some of its fluffiness. Scrape down the sides of the bowl to ensure even mixing.
Step 3: Combine Dry Ingredients
In a separate bowl, whisk together the all-purpose flour, baking powder, and salt. Gradually add this dry mixture into the wet ingredients. Mix on low speed or with a spatula until just combined. Be careful not to overmix, as this can lead to tough cookies.
Step 4: Add Sprinkles or Nuts (Optional)
If you’re opting for the festive touch, fold in the colored sprinkles or chopped nuts at this stage. This will give your cookies a cheerful holiday appearance and add a delightful crunch.
Step 5: Shape the Dough
Divide the dough into two equal portions. Shape each portion into a log about 2 inches in diameter. Wrap each log tightly in plastic wrap and refrigerate for at least 2 hours, or until firm. This chilling step is crucial for slice-and-bake cookies, ensuring they maintain their shape during baking.
Step 6: Preheat and Slice
Once the dough is firm, preheat your oven to 350°F (175°C). Remove one log from the refrigerator and slice it into ¼-inch thick rounds using a sharp knife. Place the slices on a baking sheet lined with parchment paper, leaving space between each cookie as they will spread slightly during baking.
Step 7: Bake
Bake in the preheated oven for 10-12 minutes, or until the edges are lightly golden. The centers may look slightly underbaked, but they will firm up as they cool. Keep a close eye on them to prevent burning!
Step 8: Cool and Enjoy
Once baked, let the cookies cool on the baking sheet for about 5 minutes before transferring them to a wire rack to cool completely. This will help them set properly and make them easier to handle.
What to Serve With
These Slice And Bake Christmas Cookies pair wonderfully with a cup of hot cocoa or a warm glass of spiced apple cider. For a festive touch, serve them alongside a cheese platter or a selection of holiday treats to create a delightful dessert spread.
Tips for Success
- Chill the dough sufficiently to ensure clean, even slices.
- Use a sharp knife to slice the logs for perfectly round cookies.
- Experiment with different mix-ins like dried fruit or chocolate chips for variety.
- Keep an eye on the cookies while baking to avoid overbaking; they should be lightly golden at the edges.
Common Mistakes to Avoid
- Not chilling the dough long enough, which can result in spreading during baking.
- Overmixing the dough after adding the flour, leading to tough cookies.
- Skipping the parchment paper, which can stick to the baking sheet.
How to Store & Reheat
Storing
Store your Slice And Bake Christmas Cookies in an airtight container at room temperature for up to one week. For longer storage, consider freezing the baked cookies in a single layer and then transferring them to a freezer-safe bag, where they can last for up to three months.
Reheating
If you want to enjoy your cookies warm, simply pop them in a preheated oven at 300°F (150°C) for about 5 minutes. This will help them regain their soft texture without overbaking.
Frequently Asked Questions
- Can I freeze the cookie dough? Yes! You can freeze the logs of dough before slicing. Just wrap them tightly in plastic wrap and place them in a freezer-safe bag.
- How thick should I slice the cookies? Aim for about ¼-inch thickness for the best results; thicker slices may require longer baking time.
- Can I add chocolate chips? Absolutely! Feel free to mix in chocolate chips or any other favorite add-ins.
Nutritional Info
Each Slice And Bake Christmas Cookie contains approximately 120 calories, with 6 grams of fat, 15 grams of carbohydrates, and 1 gram of protein. Nutritional values may vary depending on specific ingredients and portion sizes used.

Final Thoughts
If you’re looking to spread some holiday cheer with a delightful treat, then Slice And Bake Christmas Cookies is a must-try recipe! These cookies are not only easy to prepare, but they also bring the joy of festive baking right into your kitchen. The beautiful slices reveal their colorful and festive nature, making them perfect for sharing with friends and family. Plus, the ability to customize flavors and decorations means you can make them uniquely yours. So grab your favorite ingredients, roll up your sleeves, and let the magic of Slice And Bake Christmas Cookies fill your home with the warmth of the season. Happy baking!
Slice And Bake Christmas Cookies
These homemade slice and bake Christmas cookies are surprisingly easy to make, taste better than the original, and are customizable to include your favorite holiday shapes.
Ingredients You’ll Need
- 2 1/2 cups all-purpose flour
- 1 cup granulated sugar
- 3/4 cup unsalted butter, softened
- 2 large eggs
- 1 teaspoon baking powder
- 1 teaspoon vanilla extract
- 1/2 teaspoon kosher salt
- A few drops of food coloring (gel or natural)
Instructions
-
Step 1
1. In a large mixing bowl, beat butter, sugar, and vanilla extract until light and fluffy, about 3 minutes. -
Step 2
2. Add eggs one at a time, mixing just until combined. -
Step 3
3. In a separate bowl, whisk flour, baking powder, and salt. -
Step 4
4. Gradually add dry ingredients to wet ingredients until dough comes together. Add more flour if dough is too wet. -
Step 5
5. Remove about 10 ounces of dough and mix in food coloring. -
Step 6
6. Freeze colored dough for 5-10 minutes, then roll out into a rectangle about 1/2-inch thick. Return to freeze for 30 minutes. -
Step 7
7. Use a small cookie cutter to cut out shapes, using a little water to adhere them together. Form a log about 10 inches long. -
Step 8
8. Freeze log for 2 hours until solid, then wrap plain dough around it, ensuring no gaps. -
Step 9
9. Chill log in the fridge for at least 30 minutes. -
Step 10
10. Preheat oven to 350°F and line baking sheets with parchment paper. -
Step 11
11. Slice dough into 1/4-inch rounds and space 2 inches apart on baking sheets. Bake for about 12 minutes until bottoms are light golden brown.
Important Information
Nutrition Facts
Per serving: ~350 calories. Based on a 2000 calorie diet.
Allergy Information
Always check labels for specific allergen information.