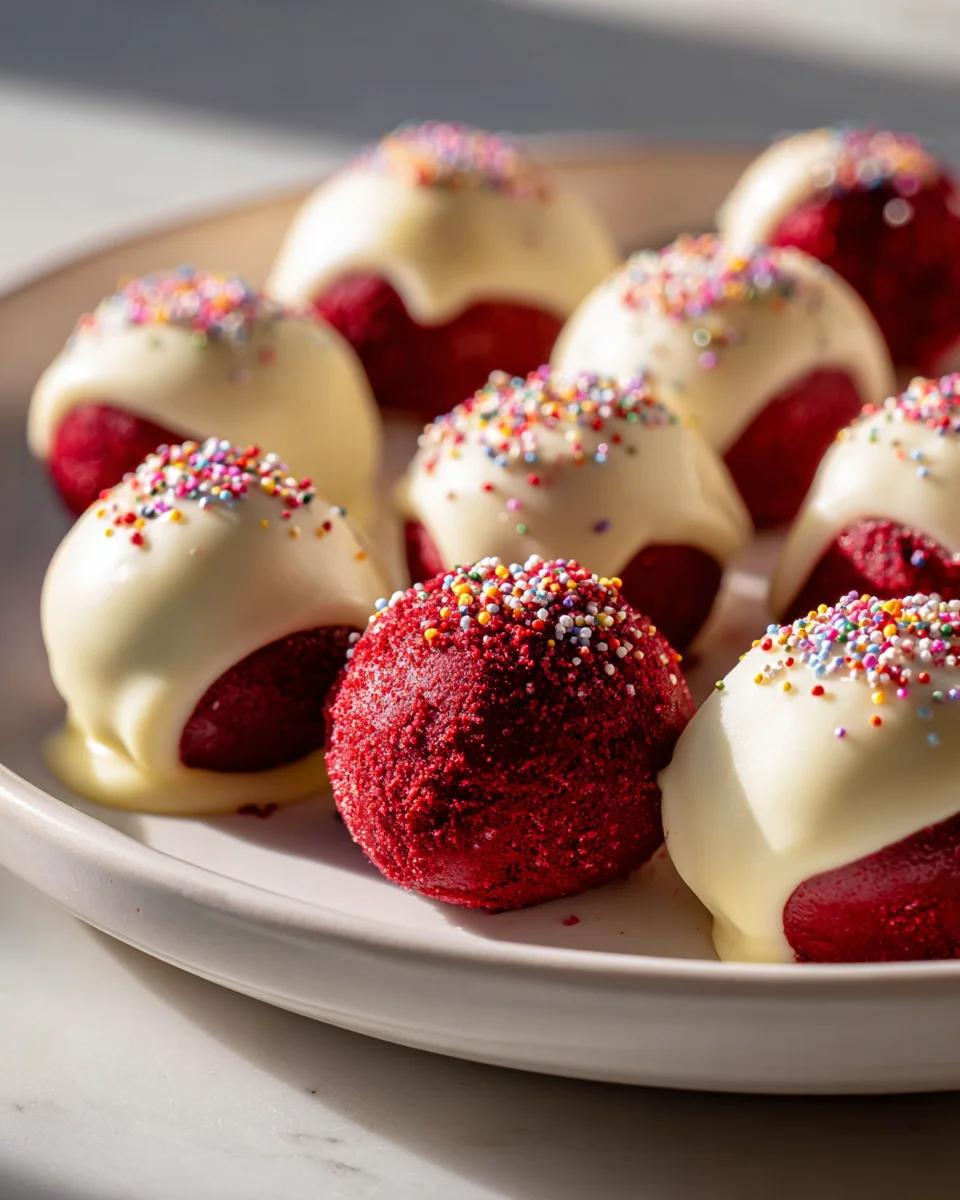
Red Velvet Truffles
Oh my goodness, do I have a treat for you today! When it comes to desserts that truly scream ‘special occasion’ while still being incredibly fun and easy to make, nothing quite hits the spot like these Red Velvet Truffles. They’re a true masterpiece of flavor and texture, embodying all the rich, cocoa-tinged goodness of a classic red velvet cake, but in a delightful, bite-sized package.
Imagine sinking your teeth into a velvety smooth, intensely flavorful sphere, bursting with that signature tangy cream cheese frosting goodness, all encased in a dreamy coating. That’s exactly what you’ll get with these truffles! I promise, these aren’t just any ordinary sweet; they’re an experience. Readers will absolutely adore how simple it is to create such an impressive dessert, perfect for holiday platters, impressive party favors, or just a little indulgence when you need something extraordinary without hours in the kitchen. We’ll be taking the beloved flavors of red velvet cake and transforming them into these irresistible, easy-to-make morsels that everyone will adore.

Ingredient Notes
Hello fellow dessert lovers! When it comes to making delightful Red Velvet Truffles, the magic truly lies in a few key ingredients. Getting these right ensures that iconic tangy-sweet flavor and vibrant color we all adore. Let me walk you through what you’ll need to create these bite-sized wonders.
- Red Velvet Cake: This is the star of our show, providing the signature flavor and color. You’ll need about 1 standard 9×13 inch red velvet cake. You can bake one from scratch using your favorite recipe, use a store-bought mix (prepare according to package directions), or even repurpose leftover red velvet cake from a celebration. The cake needs to be completely cooled before you begin.
- Substitution: For a gluten-free version, simply use your favorite gluten-free red velvet cake recipe or mix. The texture will be very similar once crumbled.
- Cream Cheese Frosting: The perfect partner to red velvet cake, this frosting acts as the binder for our truffles and infuses them with that unmistakable tangy sweetness. You’ll typically need about 1/2 to 3/4 of a 16-ounce tub of store-bought cream cheese frosting, or an equivalent amount of homemade. If making it yourself, aim for a classic recipe with cream cheese, unsalted butter, powdered sugar, and a touch of vanilla extract. Make sure it’s at room temperature for easy mixing.
- Substitution: For a dairy-free option, look for vegan cream cheese frostings or make your own with vegan cream cheese and butter alternatives. The consistency might be slightly different, so adjust the amount as needed.
- Chocolate for Coating: Most commonly, white chocolate is used for its beautiful contrast with the red interior and its sweet, creamy flavor. High-quality white chocolate chips, baking bars, or even candy melts (also known as confectionery coating) work wonderfully. About 10-12 ounces should be sufficient for a batch of 30-40 truffles. You could also use milk or dark chocolate for a different flavor profile.
- Substitution: For a dairy-free or vegan option, use high-quality vegan white chocolate chips or bars. You can also experiment with different colored candy melts if you want to get creative with your presentation.
- Decorations (Optional): This is where you can add your personal flair!
- Red Velvet Cake Crumbs: Reserve a small amount of your cake crumbs before mixing for a classic red velvet look.
- Sprinkles: Red, white, or themed sprinkles (like for holidays) always look festive.
- Cocoa Powder: A dusting of unsweetened cocoa powder can add a sophisticated touch and a hint of bitterness.
- Drizzled Chocolate: A contrasting chocolate drizzle (e.g., dark chocolate over white chocolate coating) is also a lovely option.
- Vanilla Extract (Optional): A tiny dash, about 1/4 to 1/2 teaspoon, can enhance the flavors in the truffle mixture, especially if your cake or frosting isn’t intensely flavored. Be careful not to add too much liquid.
Step-by-Step Instructions
Crafting these luscious Red Velvet Truffles is a delightful process, and I’m here to guide you through each simple step. Let’s create some magic together!
- Prepare the Red Velvet Cake Crumbs: First things first, we need to transform your beautiful red velvet cake into fine crumbs. If your cake has a top crust, you can gently trim it off, but it’s not strictly necessary. Using your hands, crumble the entire cake into a large mixing bowl. Make sure there are no large lumps; we’re aiming for a consistency similar to fine breadcrumbs. If you prefer, a food processor can do this quickly and efficiently, just pulse until finely crumbled. If you plan to use cake crumbs for decoration, set aside about 1/4 to 1/2 cup before adding the frosting.
- Mix with Cream Cheese Frosting: Now for the creamy binder! Add about half of your room-temperature cream cheese frosting to the bowl with the cake crumbs. Using your hands or a sturdy spoon, start mixing. The goal is to incorporate the frosting thoroughly until the mixture comes together and is pliable, like a thick dough. It should be moist enough to hold its shape when pressed, but not overly sticky or wet. Continue adding frosting, a tablespoon at a time, until you reach this perfect consistency. Avoid adding too much, as it can make the truffles too soft to roll and coat. If you’re adding vanilla extract, now’s the time to mix it in.
- Chill the Truffle Mixture: This step is crucial for easy handling. Cover the bowl tightly with plastic wrap and refrigerate the mixture for at least 30 minutes to 1 hour. This chilling time allows the mixture to firm up, making it much easier to roll into neat balls. Don’t skip this part!
- Shape the Truffles: Line a baking sheet with parchment paper or wax paper. Remove the chilled mixture from the fridge. Using a small cookie scoop (about 1 tablespoon in size) or simply your hands, scoop out portions of the mixture. Roll each portion between your palms to form smooth, uniform balls. Aim for a consistent size so they look professional and bake evenly (though we’re not baking them!). Place the formed truffles onto your prepared baking sheet.
- Chill Again (Mandatory!): Once all your truffles are shaped, pop the baking sheet back into the refrigerator for another 15-20 minutes. This second chill firms them up even more, ensuring they hold their shape and don’t melt too quickly when dipped into the warm chocolate coating. This step really makes a difference for a smooth, even coating.
- Prepare the Chocolate Coating: While your truffles are chilling for the second time, prepare your chocolate coating. Place your white chocolate chips or chopped baking bar in a microwave-safe bowl. Microwave on medium power (50%) in 30-second intervals, stirring thoroughly after each interval, until the chocolate is completely melted and smooth. Be very careful not to overheat it, as white chocolate can seize easily. Alternatively, use a double boiler over simmering water, stirring until smooth. Keep the chocolate warm enough to remain fluid for dipping.
- Coat the Truffles: Remove the chilled truffles from the fridge. Using a dipping fork or a regular fork, carefully drop one truffle into the melted white chocolate. Gently roll it around to fully coat it. Lift the truffle out, tapping the fork gently against the rim of the bowl to allow any excess chocolate to drip off. You want a thin, even coating.
- Decorate Immediately: As soon as you lift the coated truffle from the chocolate, transfer it back to the parchment-lined baking sheet. While the chocolate is still wet, sprinkle it with your chosen decorations – reserved red velvet cake crumbs, sprinkles, or cocoa powder. The chocolate will set quickly, so work efficiently on each truffle individually if decorating.
- Final Chill to Set: Once all your Red Velvet Truffles are coated and decorated, return the baking sheet to the refrigerator for at least 30 minutes, or until the chocolate coating is completely set and firm to the touch.
Tips & Suggestions
To ensure your Red Velvet Truffles are nothing short of spectacular, I’ve gathered some of my favorite tips and tricks. These suggestions will help you achieve perfect results every time and even inspire you to get creative!
-
- Achieving the Perfect Mixture Consistency: The key to great truffles is the cake-to-frosting ratio. You want a mixture that is moist enough to stick together and hold its shape when rolled, but not so sticky that it clings to your hands or too soft that it falls apart. Start with less frosting than you think you need and add more gradually. If you accidentally add too much frosting and the mixture becomes too soft, don’t despair! You can try adding a few tablespoons of finely crushed graham cracker crumbs or even some more crumbled plain cake to absorb excess moisture, then re-chill thoroughly.
- Embrace the Chill: I cannot stress enough the importance of chilling. Chilling the truffle mixture before rolling makes shaping a breeze and helps them maintain their form. Chilling them again before coating ensures they stay firm when dipped into the warm chocolate, preventing them from melting or crumbling. Finally, chilling after coating sets the chocolate beautifully. Patience with chilling is a virtue here!
- Mastering Chocolate Melting: When melting your chocolate for coating, whether in the microwave or a double boiler, always use low heat and stir frequently. Overheating chocolate, especially white chocolate, can cause it to seize, becoming thick, grainy, and unusable for dipping. If it starts to seize, sometimes adding a tiny bit of coconut oil or vegetable shortening (about 1/2 teaspoon per cup of chocolate) and stirring vigorously can save it, but prevention is best.
- Efficient Coating Technique: Work quickly once your truffles are out of the fridge and your chocolate is ready. Use a fork or a specialized dipping tool to dunk each truffle. Tap off excess chocolate gently against the side of the bowl. If your chocolate starts to thicken as you dip, you can briefly warm it up again (very carefully!) to restore its fluidity. For a super smooth finish, after tapping off excess chocolate, gently run the bottom of the truffle against the edge of the bowl to remove any final drips before placing it on parchment paper.
- Get Creative with Toppings: While reserved red velvet cake crumbs are classic, don’t limit yourself! Try finely chopped nuts (pecans or walnuts pair beautifully with red velvet), a drizzle of contrasting dark chocolate, edible glitter, or even a dusting of gold luster dust for an elegant touch. For holiday seasons, use festive sprinkles.
- Flavor Enhancements: If you want to subtly enhance the red velvet flavor, you can add a tiny drop (think 1/8 to 1/4 teaspoon) of non-alcoholic vanilla extract or even a hint of almond extract to the cake-and-frosting mixture before chilling. Be cautious not to add too much liquid, as it can alter the consistency. &li>
- Gift-Giving Perfection: Red Velvet Truffles make fantastic homemade gifts! Arrange them in decorative mini cupcake liners inside a pretty box. They are always a welcome treat for friends, family, or as a host gift.
Storage
Once you’ve put all that love into making your beautiful Red Velvet Truffles, you’ll want to store them properly to maintain their freshness, flavor, and delightful texture. Here’s what I recommend:
- Refrigeration is Key: Because these truffles contain cream cheese frosting, they are perishable and absolutely must be stored in the refrigerator. The cold temperature also helps the chocolate coating stay firm and prevents the truffles from becoming too soft.
- Airtight Container: Place your finished Red Velvet Truffles in a single layer in an airtight container. If you need to stack them, place a piece of parchment paper or wax paper between layers to prevent them from sticking together or damaging their delicate coating. An airtight container will protect them from drying out and absorbing any lingering odors from your fridge.
- Shelf Life: When stored correctly in the refrigerator, your Red Velvet Truffles will stay fresh and delicious for up to 1 week. Beyond that, the cake can start to dry out slightly, and the flavors might mellow.
- Serving Temperature: While they need to be stored cold, I find that Red Velvet Truffles taste best when allowed to sit at room temperature for about 10-15 minutes before serving. This allows the creamy interior to soften slightly, enhancing the flavor and texture experience. However, don’t leave them out for too long, especially in a warm environment.
- Freezing for Longer Storage: Yes, you can freeze Red Velvet Truffles! This is a fantastic option if you’ve made a large batch or want to prepare them ahead of time.
- How to Freeze: Arrange the fully coated and set truffles in a single layer on a baking sheet. Place the baking sheet in the freezer for about 1-2 hours, or until the truffles are solid. Once frozen, transfer them to a freezer-safe airtight container or a heavy-duty freezer bag. This initial freeze prevents them from sticking together when stored.
- Freezer Life: Properly frozen, Red Velvet Truffles can last for up to 1-2 months. Longer than that, and there’s a risk of freezer burn affecting the flavor and texture.
- Thawing: To enjoy frozen truffles, simply transfer them from the freezer to the refrigerator and let them thaw overnight, or for several hours. Once thawed, you can let them sit at room temperature for a few minutes before serving, as mentioned above. Do not refreeze thawed truffles.
Final Thoughts
There’s just something truly special about a treat that captures hearts with both its stunning appearance and its irresistible taste. I genuinely believe that these Red Velvet Truffles are one of those recipes that will become a cherished favorite in your repertoire. They’re not only surprisingly simple to create, but they deliver that rich, decadent flavor and vibrant hue that instantly elevates any moment. Whether you’re seeking a heartfelt homemade gift, an elegant contribution to a dessert table, or simply a delightful indulgence for yourself, these Red Velvet Truffles are absolutely perfect. Trust me, once you experience the smooth, creamy texture and the classic sweet-and-tangy balance of these particular truffles, you’ll understand why they are an absolute must-try. Go ahead, treat yourself and your loved ones to the pure magic of these incredible Red Velvet Truffles!

Decadent Red Velvet Truffles: Easy No-Bake Holiday Treat
- Total Time: 15 minutes
- Yield: 30-40 truffles 1x
Description
Indulge in these delightful Red Velvet Truffles that combine the rich flavors of red velvet cake with creamy frosting, all in a bite-sized treat. Perfect for holiday gatherings or a special indulgence, these no-bake truffles are simple to make and utterly delicious.
Ingredients
- 1 standard 9×13 inch red velvet cake
- 1/2 to 3/4 of a 16-ounce tub of store-bought cream cheese frosting or an equivalent amount of homemade
- 10–12 ounces of white chocolate chips, baking bars, or candy melts for coating
- Red Velvet Cake Crumbs (optional, reserved from the cake)
- Red, white, or themed sprinkles (optional)
- Unsweetened cocoa powder (optional)
- Drizzled chocolate (optional)
- 1/4 to 1/2 teaspoon of vanilla extract (optional)
Instructions
- Prepare the Red Velvet Cake Crumbs: Crumble the entire cooled red velvet cake into a large mixing bowl until it resembles fine breadcrumbs. Set aside about 1/4 to 1/2 cup of crumbs for decoration if desired.
- Mix with Cream Cheese Frosting: Add about half of the room-temperature cream cheese frosting to the cake crumbs and mix until the mixture is pliable and holds its shape. Add more frosting gradually until the desired consistency is reached.
- Chill the Truffle Mixture: Cover the bowl tightly with plastic wrap and refrigerate for at least 30 minutes to 1 hour to firm up the mixture.
- Shape the Truffles: Line a baking sheet with parchment paper. Scoop out portions of the chilled mixture and roll them into smooth balls, placing them on the prepared baking sheet.
- Chill Again: Refrigerate the shaped truffles for another 15-20 minutes to ensure they hold their shape when coated.
- Prepare the Chocolate Coating: Melt the white chocolate in a microwave-safe bowl or double boiler until smooth, being careful not to overheat.
- Coat the Truffles: Dip each chilled truffle into the melted white chocolate, ensuring they are fully coated, and allow excess chocolate to drip off.
- Decorate Immediately: While the chocolate is still wet, sprinkle the truffles with reserved cake crumbs, sprinkles, or cocoa powder.
- Final Chill to Set: Return the decorated truffles to the refrigerator for at least 30 minutes until the chocolate coating is set.
- Prep Time: 15 mins
- Cook Time: 0 mins
- Category: Dessert
- Method: No-Bake
- Cuisine: American
Nutrition
- Serving Size: 1 truffle
- Calories: 150
- Sugar: 12 g
- Sodium: 50 mg
- Fat: 8 g
- Saturated Fat: 4 g
- Unsaturated Fat: 3 g
- Trans Fat: 0 g
- Carbohydrates: 18 g
- Fiber: 1 g
- Protein: 2 g
- Cholesterol: 15 mg
Keywords: For a gluten-free version, use a gluten-free red velvet cake recipe. For a dairy-free option, substitute with vegan cream cheese frosting and high-quality vegan chocolate.