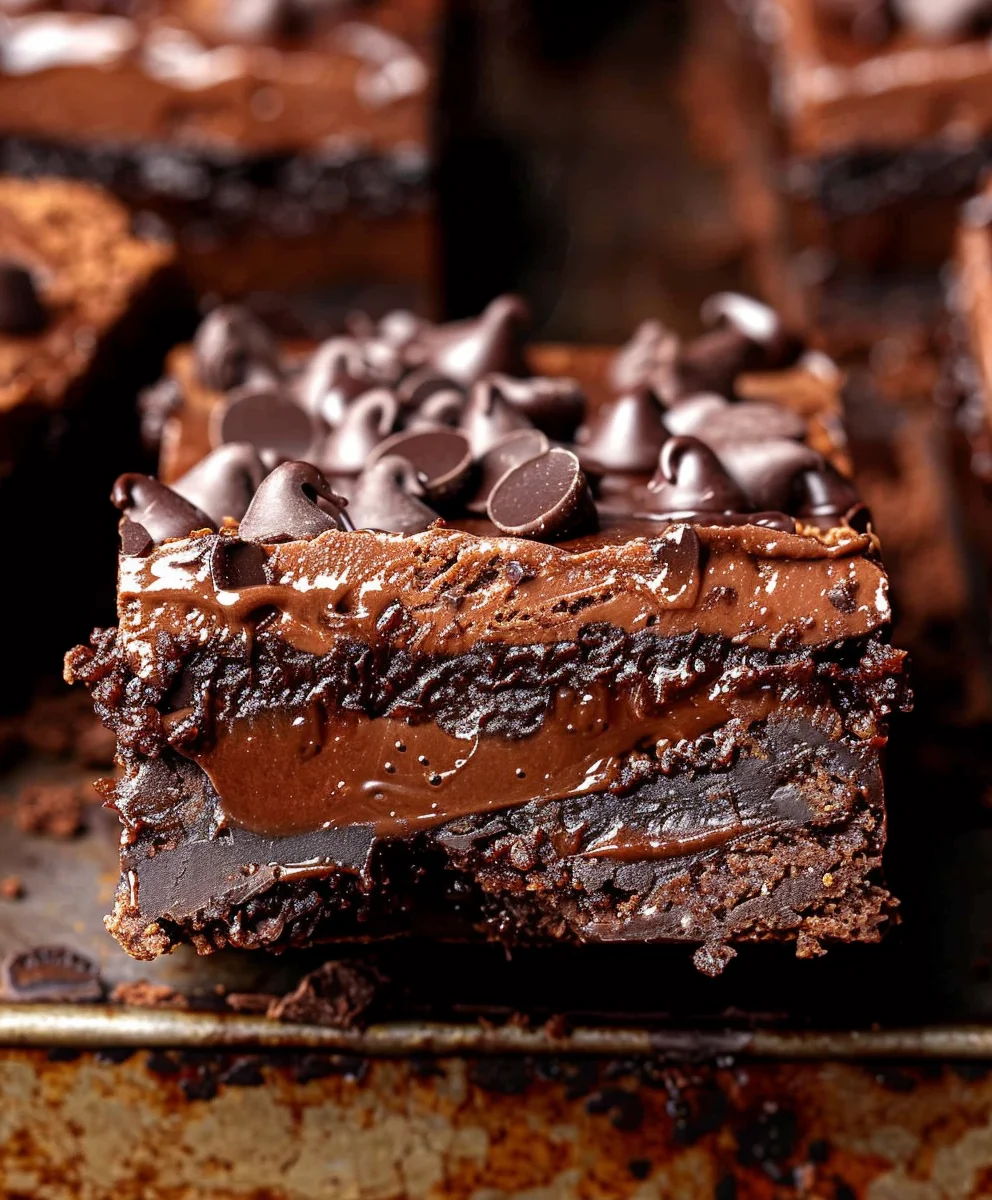
Chocolate Cheesecake Brownie Bars – the very name conjures images of pure dessert bliss, doesn’t it? I’ve always believed that some of the greatest culinary creations stem from daring to combine two already perfect indulgences. And that’s precisely what we have here: a magnificent merger of the fudgy, rich goodness of a classic brownie with the smooth, tangy sophistication of a creamy cheesecake. The concept of blending two beloved desserts into one irresistible creation speaks volumes about our modern culinary landscape – a desire for innovative treats that deliver on both flavor and fun, and these bars certainly deliver in spades!
This isn’t just any dessert; it’s a testament to the universal love for decadent comfort food. People adore these bars not only for their utterly irresistible flavor profile – the deep cocoa notes harmonizing beautifully with the bright cream cheese – but also for the delightful textural contrast. Imagine: a dense, chewy brownie base topped with a velvety, smooth cheesecake layer, often swirled with even more chocolate for an extra visual and taste dimension. It’s a treat that effortlessly elevates any occasion, transforming a simple gathering into a memorable feast. These incredible Chocolate Cheesecake Brownie Bars truly offer the best of both worlds, making them an undisputed crowd-pleaser and a personal favorite.

Ingredients:
For the Rich Brownie Layer:
- 1 cup (2 sticks or 226g) unsalted butter, cut into pieces
- 4 ounces (about 113g) unsweetened chocolate, chopped
- 2 cups (400g) granulated sugar
- 4 large eggs
- 1 teaspoon vanilla extract
- 1 cup (120g) all-purpose flour
- ½ cup (45g) unsweetened cocoa powder (Dutch-processed for a darker, less acidic flavor, but natural is fine too!)
- ½ teaspoon salt
For the Velvety Cheesecake Layer:
- 2 packages (8 ounces each, total 16 ounces or 452g) cream cheese, softened to room temperature
- ½ cup (100g) granulated sugar
- 1 large egg
- 1 teaspoon vanilla extract
Optional Garnish:
- Flaky sea salt (a tiny sprinkle over the top is divine!)
- Chocolate shavings or mini chocolate chips
- Dusting of cocoa powder
Preparing the Brownie Layer for Your Chocolate Cheesecake Brownie Bars
- Preheat and Prepare Your Pan: First things first, let’s get our oven ready. Preheat your oven to 350°F (175°C). Then, line a 9×13-inch baking pan with parchment paper, leaving an overhang on the sides. This parchment paper is going to be your best friend when it comes to lifting out your beautiful Chocolate Cheesecake Brownie Bars later. I always give the parchment paper a light spray with non-stick cooking spray as well, just to be extra sure nothing sticks, especially around the exposed edges. The overhang acts as a sling, making removal a breeze and keeping the bars intact for perfect presentation.
- Melt the Chocolate and Butter: In a large, microwave-safe bowl or a heatproof bowl set over a saucepan of simmering water (a double boiler setup), combine the unsalted butter and chopped unsweetened chocolate. If you’re using the microwave, heat in 30-second intervals on medium power, stirring well after each, until the mixture is completely melted and smooth. Be careful not to scorch the chocolate; it can seize up if overheated. If using a double boiler, stir constantly over medium-low heat until everything is beautifully melted and glossy. Remove from heat and let it cool slightly for about 5-10 minutes. This cooling step is important because we don’t want the residual heat to scramble our eggs later when we add them. A lukewarm mixture is ideal here.
- Whisk in the Sugars: To the slightly cooled chocolate mixture, add the 2 cups of granulated sugar. Whisk vigorously for at least one full minute until well combined. The mixture should look shiny and a bit thick, almost like a dark, viscous syrup. This step helps dissolve the sugar crystals, which is crucial for achieving that characteristic fudgy, chewy brownie texture we’re aiming for. It also adds to the overall structure and moisture of the finished brownie layer in our Chocolate Cheesecake Brownie Bars.
- Incorporate Eggs and Vanilla: Now, one at a time, crack in the large eggs, whisking well after each addition until fully incorporated. Don’t just dump them all in! Whisking each egg in individually ensures that they are fully emulsified into the batter, leading to a smoother texture and a more stable brownie. After all four eggs are in, stir in the vanilla extract. The mixture should become even shinier and slightly lighter in color, with a noticeable thickness. I find that about 30-45 seconds of vigorous whisking per egg works wonders to achieve this perfect consistency.
- Combine Dry Ingredients: In a separate medium bowl, whisk together the all-purpose flour, unsweetened cocoa powder, and salt. Make sure there are no lumps in the cocoa powder; I often sift it if it looks particularly clumpy, as clumps can result in pockets of unmixed powder in your final brownie. This ensures an even distribution of the dry ingredients throughout your brownie batter, contributing to a consistent texture and flavor.
- Gently Fold in Dry to Wet: Add the dry ingredients to the wet chocolate mixture. Using a rubber spatula, gently fold until just combined. Do not overmix! This is a common pitfall in brownie making. Overmixing develops the gluten in the flour, which can lead to tough, cake-like brownies instead of the dense, fudgy brownies we’re aiming for. Stop folding as soon as you no longer see streaks of flour. A few small lumps of dry ingredients are perfectly fine; they will hydrate during baking.
- Pour into Pan: Pour about two-thirds of the brownie batter into your prepared 9×13-inch baking pan. Using an offset spatula or the back of a spoon, gently spread it evenly across the bottom of the pan, making sure to reach into all the corners. This will form the substantial base layer of our incredibly rich and delicious Chocolate Cheesecake Brownie Bars. Reserve the remaining one-third of the brownie batter in its bowl; we’ll be using this for the beautiful swirl later.
Crafting the Velvety Cheesecake Layer
- Soften the Cream Cheese: It is absolutely crucial that your cream cheese is at room temperature for this step. If it’s cold, you’ll end up with stubborn lumps, and nobody wants lumpy cheesecake! You can leave it out on the counter for an hour or two, or if you’re in a hurry, you can unwrap it and microwave it on low power for 15-30 seconds, just until it’s soft to the touch but not melted. I usually cut it into cubes to help it soften faster.
- Beat the Cream Cheese: In a medium-sized bowl, using an electric mixer (handheld or stand mixer fitted with the paddle attachment), beat the softened cream cheese on medium speed until it is perfectly smooth and creamy, about 2-3 minutes. Make sure to scrape down the sides of the bowl frequently with your spatula to ensure everything gets incorporated evenly and no bits of unmixed cream cheese remain. This is the foundation of your silky cheesecake layer, so dedicate time to making it lump-free and airy.
- Add Sugar: Gradually add the ½ cup of granulated sugar to the cream cheese, beating on medium-low speed until just combined and smooth. Continue to scrape down the bowl as you mix. We want to avoid incorporating too much air at this stage, which can sometimes cause cracks in your cheesecake during baking or cooling. Mix just until the sugar is fully dissolved and the mixture is homogenous.
- Mix in Egg and Vanilla: Beat in the large egg and the vanilla extract until just incorporated. As with the brownie batter, be mindful not to overmix here. Overmixing after the egg is added can also lead to excess air, which can cause cracking. Mix only until everything is homogenous and the mixture is beautiful, thick, smooth, and pourable. This delicate cheesecake layer is what truly elevates these from just brownies to magnificent and memorable Chocolate Cheesecake Brownie Bars!
Assembling and Baking Your Decadent Chocolate Cheesecake Brownie Bars
- Assemble the Layers: Carefully and evenly spoon the cheesecake mixture over the brownie batter already in the pan. Use an offset spatula or the back of a spoon to gently spread it out to cover the entire brownie layer, taking care not to disturb the brownie base too much. The goal is a smooth, even layer of cheesecake.
- Create the Swirl Effect: Now for the artistic part! Take the remaining one-third of the brownie batter that you reserved earlier. Using a spoon, drop small dollops (about ½ to 1 teaspoon in size) of this brownie batter randomly over the cheesecake layer. Don’t worry about perfection here; natural, organic variations in placement will make your finished Chocolate Cheesecake Brownie Bars even more appealing. Try to distribute them somewhat evenly across the surface.
- Swirl with Style: Using a butter knife, a skewer, or even a toothpick, gently drag it through the dollops and the cheesecake layer to create a beautiful marble or swirl pattern. You can go in figure-eights, zig-zags, or random swirls, depending on the look you desire. Be careful not to scrape the bottom of the pan and mix too much of the base brownie layer into the swirl; we’re aiming for distinct swirls of chocolate brownie and creamy cheesecake, not a fully integrated mixture. This step is what makes these Chocolate Cheesecake Brownie Bars so visually dynamic and irresistible.
-
Bake to Perfection: Place the baking pan into your preheated oven. Bake for approximately 40-50 minutes. The bake time can vary depending on your specific oven, so keep a close eye on them, especially after the 40-minute mark.
How to Check for Doneness:
The edges of the brownie bars should appear set and slightly puffed, and the cheesecake layer might still have a very slight jiggle in the very center when you gently shake the pan. A toothpick inserted into the brownie portion (not the exact center of the cheesecake) should come out with moist crumbs, but not wet batter. If you insert it into the cheesecake portion, it should come out clean. Avoid overbaking, as this can lead to a dry brownie and a cracked cheesecake layer. I usually start checking around the 40-minute mark and then in 5-minute increments thereafter.
- Cool Gradually: Once baked, remove the pan from the oven and place it on a wire rack to cool completely at room temperature. This gradual cooling is essential for the cheesecake layer to set properly and prevent any potential cracking that can occur from drastic temperature changes. Patience is a virtue here; resisting the urge to cut into them immediately is truly the hardest part! Allow at least 2-3 hours for them to come to full room temperature.
The Final Touches: Chilling, Cutting, and Enjoying Your Chocolate Cheesecake Brownie Bars
- Chill Thoroughly: After cooling completely to room temperature, cover the pan loosely with plastic wrap and transfer it to the refrigerator. Chill for at least 4 hours, or preferably overnight. This step is non-negotiable for perfectly set and clean-cut Chocolate Cheesecake Brownie Bars. The extended chilling allows the cheesecake to firm up completely and gives all the rich flavors time to meld beautifully together. I can’t stress enough how much better these taste and how much easier they are to cut after a good, long chill. Don’t skip it!
-
Lift and Cut: Once thoroughly chilled, use the parchment paper overhang to carefully lift the entire slab of brownie bars out of the pan and onto a cutting board.
Tips for Perfect Cuts:
To get clean, professional-looking squares or rectangles, I recommend using a large, very sharp knife. For truly pristine cuts that show off those beautiful layers, run your knife under hot water for a few seconds, wipe it completely clean and dry, and then make a single, decisive cut. Repeat this process – heating and cleaning the knife – before each subsequent cut. This prevents the cheesecake from sticking and dragging, giving you those beautiful, defined layers without a crumbly mess. I usually aim for 12-16 bars, but you can cut them into any size you prefer.
- Optional Garnish and Serve: If desired, sprinkle a little flaky sea salt over the top of your cut Chocolate Cheesecake Brownie Bars – the subtle saltiness truly enhances and balances the rich chocolate flavor! You could also add some chocolate shavings, a dusting of unsweetened cocoa powder, or a few mini chocolate chips for extra flair and textural contrast. Serve them chilled for the best experience.
- Storage: Store any leftover Chocolate Cheesecake Brownie Bars in an airtight container in the refrigerator for up to 5-7 days. They taste even better the next day, in my opinion, as the flavors continue to deepen and the textures fully set. You can also freeze them for longer storage; simply wrap individual bars tightly in plastic wrap and then aluminum foil to prevent freezer burn, and store in a freezer-safe bag for up to 2-3 months. Thaw frozen bars in the refrigerator overnight before serving.
And there you have it! A truly decadent and impressive treat that combines the best of fudgy brownies with creamy, tangy cheesecake. These Chocolate Cheesecake Brownie Bars are perfect for any gathering, a delightful dessert, or simply a luxurious treat for yourself. Enjoy every single bite!
Conclusion:
Well, my dear baking enthusiasts, we’ve reached the sweet finale, and I genuinely hope you’re as excited as I am about the incredible journey we’ve just taken. If you’ve been searching for that one dessert that truly has it all – the rich, comforting depth of a brownie perfectly harmonizing with the luxurious, tangy creaminess of a cheesecake – then let me tell you, you have absolutely found your new go-to. These Chocolate Cheesecake Brownie Bars aren’t just a dessert; they’re an experience, a symphony of textures and flavors that will undoubtedly become a treasured recipe in your culinary repertoire. I poured my heart into perfecting this recipe because I believe everyone deserves to taste this level of pure, unadulterated bliss. It’s the kind of treat that transforms an ordinary day into something special, making every bite a moment to savor. This isn’t just another recipe; it’s a celebration of two beloved classics, meticulously crafted to deliver unparalleled satisfaction.
What truly makes these bars a must-try, in my humble opinion, is the masterful balance we achieve. We’re not just layering two great desserts; we’re creating something entirely new and greater than the sum of its parts. Imagine that dense, incredibly fudgy brownie base – oh-so-chocolatey, with just the right amount of chewiness around the edges and gooey perfection in the center. Now, picture that being crowned with a thick, velvety layer of classic vanilla cheesecake, subtly sweet with that signature bright tang. The magic truly happens when these two collide in your mouth, offering a delightful contrast that keeps you coming back for more. It’s robust without being overwhelming, decadent without being too heavy, and utterly satisfying from the very first nibble to the last crumb. Trust me when I say, this recipe is designed to impress, whether you’re serving it at a sophisticated dinner party or simply indulging in a quiet moment of self-care. It’s the perfect blend of comforting familiarity and exciting complexity, a true showstopper that speaks volumes without a single word.
When it comes to serving these beauties, the possibilities are as delightful as the bars themselves! While they are absolutely divine chilled and sliced straight from the pan, allowing the flavors to meld beautifully, I highly recommend experimenting. For an extra touch of warmth and indulgence, try gently heating a square in the microwave for a few seconds until the brownie is just slightly gooey and the cheesecake is soft. Serve it alongside a scoop of premium vanilla bean ice cream or a dollop of freshly whipped cream, perhaps with a scattering of fresh raspberries or a drizzle of raspberry coulis to cut through the richness with a burst of fruity brightness. A light dusting of cocoa powder or a few chocolate shavings can also add an elegant finish, making them visually appealing as well as incredibly delicious. They are equally wonderful as a grab-and-go snack from the fridge, a perfect lunchbox treat, or the star of any dessert platter. Honestly, there’s no wrong way to enjoy these bars, but a little extra flair never hurts!
But why stop there? One of the greatest joys of baking is making a recipe your own, and these bars offer fantastic opportunities for customization. Feel free to swirl in a tablespoon of strong espresso powder into the brownie batter for a delightful mocha twist, enhancing the chocolate flavor without making it taste overtly like coffee. Or, for a nutty crunch, fold in some chopped walnuts or pecans into either the brownie or cheesecake layer. If you’re feeling extra adventurous, consider adding a different extract to your cheesecake – a hint of almond for a marzipan-like nuance, or a touch of peppermint for a festive holiday version. You could even swap out the chocolate chips in the brownie for white chocolate or milk chocolate chunks, or swirl some melted caramel or a spoonful of raspberry jam into the cheesecake batter just before baking for an extra layer of flavor and visual appeal. Don’t be afraid to experiment and truly personalize your batch! The versatility of this recipe means you can adapt it to any occasion, any season, or simply to satisfy a specific craving. Your imagination is the only limit to the delicious variations you can create.
So, what are you waiting for? I’ve shared all my secrets and now it’s your turn to bring this magnificent dessert to life in your own kitchen. I promise you, the aroma alone as these bake will be enough to get your taste buds tingling, and the first bite will be pure magic. I am so incredibly excited for you to experience the joy of making and tasting these incredible bars. Please, when you do make them, come back and share your experience with me! What did you love most? Did you try any variations? Your feedback and shared moments truly make my day, and I can’t wait to hear all about your baking adventures. Happy baking, my friends, and prepare to fall deeply in love with your new favorite dessert – these incredible bars are just waiting to bring smiles and satisfaction to everyone who tries them!

Decadent Chocolate Cheesecake Brownie Bars Recipe
Chocolate Cheesecake Brownie Bars are a magnificent merger of fudgy, rich brownie goodness with the smooth, tangy sophistication of creamy cheesecake. This irresistible creation offers deep cocoa notes harmonizing with bright cream cheese, and a delightful textural contrast of dense brownie and velvety cheesecake, making it an undisputed crowd-pleaser.
Ingredients
-
2 cups Oreo crumbs
-
4 tbsp unsalted butter, melted
-
24 oz cream cheese, room temperature
-
1 cup granulated sugar
-
1/2 cup unsweetened cocoa powder (Dutch-processed)
-
8 oz chocolate bar, melted (e.g., Lindt 70%)
-
1/2 cup heavy cream, room temperature
-
1 tsp pure vanilla extract
-
4 large eggs, room temperature
-
1 cup semi-sweet chocolate chips
-
1/2 cup heavy cream
Instructions
-
Step 1
Preheat oven to 350°F (175°C). Line a 9×13-inch baking pan with parchment paper, leaving an overhang. -
Step 2
Melt unsalted butter and chopped unsweetened chocolate together until smooth. Let cool slightly. Whisk granulated sugar into the chocolate mixture until well combined. Beat in eggs one at a time, then stir in vanilla extract. In a separate bowl, whisk together all-purpose flour, cocoa powder, and salt. Gently fold dry ingredients into the wet mixture until just combined; do not overmix. Pour 2/3 of the brownie batter into the prepared pan; spread evenly. Reserve remaining 1/3. -
Step 3
Ensure cream cheese is at room temperature. Beat softened cream cheese in a medium bowl until smooth and creamy. Gradually add ½ cup granulated sugar, beating until smooth. Mix in large egg and vanilla extract until just incorporated. -
Step 4
Carefully spoon and spread the cheesecake mixture evenly over the brownie batter in the pan. Drop small dollops of the reserved brownie batter randomly over the cheesecake layer. Use a knife or skewer to gently swirl the dollops into the cheesecake layer, creating a marble pattern. -
Step 5
Bake for 40-50 minutes, or until edges are set and the cheesecake center has a slight jiggle. A toothpick inserted into brownie portion should have moist crumbs. -
Step 6
Cool completely on a wire rack at room temperature for 2-3 hours. Cover and chill in the refrigerator for at least 4 hours, or preferably overnight, for best setting and flavor. -
Step 7
Lift bars from pan using parchment overhang. For clean cuts, use a sharp knife, heating and wiping it clean between each cut. Cut into 12-16 bars. Optionally garnish with flaky sea salt, chocolate shavings, or cocoa powder. Serve chilled. -
Step 8
Store leftovers in an airtight container in the refrigerator for up to 5-7 days. Can be frozen for 2-3 months by wrapping individual bars tightly.
Important Information
Nutrition Facts (Per Serving)
It is important to consider this information as approximate and not to use it as definitive health advice.
Allergy Information
Please check ingredients for potential allergens and consult a health professional if in doubt.