Marshmallow Rice Krispies Halloween Brains are not just a treat; they are an experience, a delightful fusion of spooky aesthetics and comforting, nostalgic flavors that truly capture the spirit of the season. There’s an undeniable thrill in presenting a dish that looks delightfully gruesome yet tastes utterly delicious. Who can resist the satisfying crunch of puffed rice cereal, bound together by gooey, sweet marshmallows, especially when sculpted into something so whimsically macabre?
I’ve always found immense joy in the simplicity of no-bake desserts, and this recipe is a testament to that. It brings back cherished childhood memories of making classic Rice Krispies treats, but with an exciting, festive twist that makes it perfect for any Halloween gathering. The ease of preparation, combined with the impressive visual impact, makes this a perennial favorite.
Transforming simple ingredients into something so dramatically themed is part of the magic of Halloween.
These particular Marshmallow Rice Krispies Halloween Brains are incredibly versatile; they can be made ahead of time and are always a hit with both kids and adults who appreciate a good, fun fright. Join me as we craft these deliciously spooky creations, perfect for your next ghoulish celebration!

Ingredients:
- ½ cup (1 stick) unsalted butter, plus extra for greasing
- 1 (10 ounce) bag miniature marshmallows (about 5½ cups)
- 1 teaspoon pure vanilla extract
- ½ teaspoon green gel food coloring (or more, to achieve your desired ghastly hue)
- 6 cups Rice Krispies cereal
- 1 (0.68 ounce) tube red gel icing (the kind with a fine tip for drawing)
- Non-stick cooking spray
Gathering Your Tools and Setting the Scene
- First things first, let’s get organized! You’ll want to have all your ingredients measured and ready to go before you even think about turning on the stove. These “Marshmallow Rice Krispies Halloween Brains” come together quickly once the marshmallows are melting, so being prepared is key. Grab a very large, heavy-bottomed pot or Dutch oven – you’ll need plenty of space for mixing.
- Next, prepare your work surface. Line a large baking sheet (or two, depending on the size of your brains!) with parchment paper. This will prevent your sticky creations from adhering to the pan. You might also want to lightly spray the parchment paper with non-stick cooking spray, just to be extra safe. Trust me, nothing is worse than a stuck brain!
- Also, have a large bowl handy, and ensure your Rice Krispies cereal is measured out and waiting in it. When it’s time to add the cereal, you’ll want to do it swiftly.
- Important for shaping: Set aside a small bowl of butter or a stick of butter. You’ll be greasing your hands generously to prevent the sticky marshmallow mixture from becoming an unwelcome permanent fixture on your skin. This is a crucial step for forming those distinct “Marshmallow Rice Krispies Halloween Brains” shapes.
Creating the Ghastly Green Marshmallow Base
- In your large, heavy-bottomed pot, melt the ½ cup of unsalted butter over medium-low heat. You want the butter to melt slowly and completely without browning. Browning butter, while delicious in some recipes, would alter the color and flavor of our ghoulish brains, and we want a clean, vibrant green. Stir occasionally to ensure even melting.
-
Once the butter is fully melted, add the entire 10-ounce bag of miniature marshmallows to the pot. Reduce the heat to low. This is where patience comes in! Continuously stir the marshmallows with a sturdy spatula or wooden spoon. The goal is to melt them slowly and evenly into a smooth, gooey liquid.
Why low heat and continuous stirring are essential:
If the heat is too high, the marshmallows can scorch on the bottom of the pot, resulting in hard, sugar crystals in your treats and a less pleasant texture. Low heat and constant stirring ensure a perfectly smooth, homogeneous marshmallow mixture, which is vital for the malleability needed to shape “Marshmallow Rice Krispies Halloween Brains.” This usually takes about 5-7 minutes.
- Once the marshmallows are about 75% melted and mostly liquid with just a few small lumps remaining, remove the pot from the heat. The residual heat will continue to melt the last few lumps as you stir.
- Now, it’s time to add our signature color! Stir in the 1 teaspoon of pure vanilla extract and ½ teaspoon of green gel food coloring. Start with ½ teaspoon, and add more if you want a more intense, vibrant green. Mix thoroughly until the color is evenly distributed throughout the marshmallow mixture. You’re aiming for a shade that screams “toxic waste” or “mad scientist experiment gone wrong” – perfect for “Marshmallow Rice Krispies Halloween Brains.” Gel food coloring gives a much more concentrated and vibrant color than liquid, so it’s my preferred choice for this spooky project.
Incorporating the Cereal and Preparing for Molding
- Working quickly, pour all 6 cups of Rice Krispies cereal into the green marshmallow mixture in the pot. Using your sturdy spatula, gently fold the cereal into the marshmallow. The key here is to mix just until the cereal is evenly coated. Over-mixing can crush the cereal, leading to a denser, less airy texture in your finished treats. You want those signature crispy bites! Ensure every single piece of cereal gets a lovely coating of that eerie green goo.
- Once the cereal is just coated, immediately remove the pot from the heat if you haven’t already. Allow the mixture to cool for a very short period, about 2-3 minutes. It should still be quite warm and pliable but not so hot that it’s difficult to handle. This slight cooling helps it stiffen just enough to make shaping easier without losing its stickiness.
Shaping Your Ghastly “Marshmallow Rice Krispies Halloween Brains”
- Now for the fun, and slightly messy, part! Generously butter your hands, or spray them thoroughly with non-stick cooking spray. I find butter works best for a truly non-stick experience. You’ll need to re-butter your hands periodically as you shape, as the stickiness will inevitably start to build up.
- Scoop out about ½ to ¾ cup of the warm Rice Krispies mixture for each brain. The exact size is up to you – whether you want small, bite-sized brains or larger, more gruesome specimens!
- Begin to gently compress and mold the mixture in your hands. The trick is not to press too hard, as you want the brains to retain some airiness. Shape it into an irregular, somewhat rounded oval or kidney-bean shape. Think organic, not perfectly symmetrical.
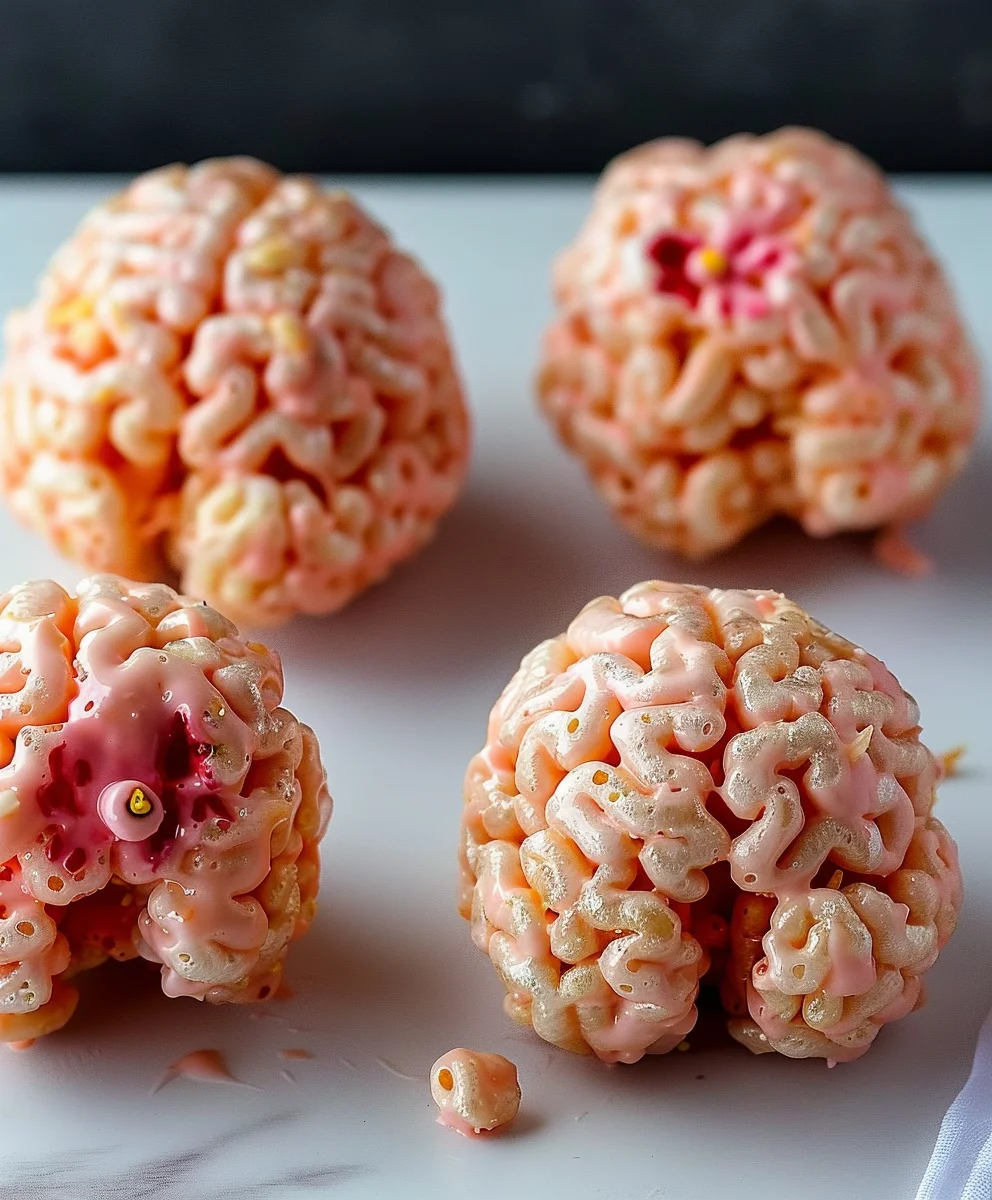
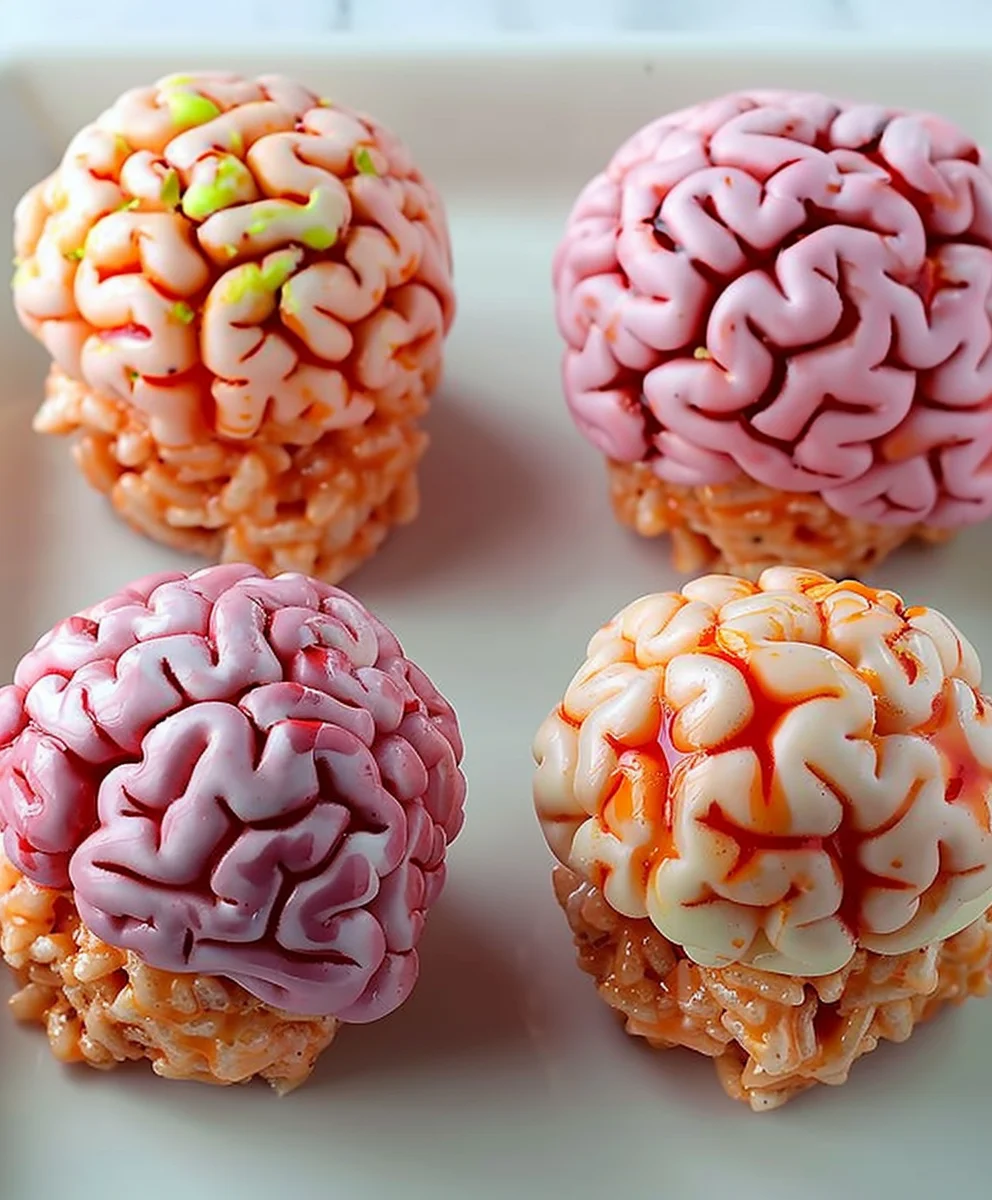
- Once you have your basic blob shape, use your thumbs or the side of your hand to create a central indentation or “fissure” running lengthwise down the middle of your brain. This central line is what really sells the “brain” look, giving it that characteristic cerebrum appearance. Don’t worry about perfection; real brains aren’t perfectly smooth!
- Next, use your fingertips to gently pinch and pull small ridges and folds all over the surface of your brain. These are the “gyri” and “sulci” – the natural convolutions of a brain. Randomness is your friend here! The more uneven and lumpy, the more realistic and creepy your “Marshmallow Rice Krispies Halloween Brains” will look. Spend a little time on each one to give it unique character.
- Carefully place each shaped brain onto your prepared parchment-lined baking sheet. Continue this process until all of the Rice Krispies mixture has been transformed into a batch of wonderfully grotesque green brains.
-
Allow the shaped brains to cool completely at room temperature for at least 30 minutes to an hour. This will allow them to set firmly, making them easier to handle and decorate without losing their shape. You can also pop them in the refrigerator for about 15-20 minutes if you’re in a hurry, but let them warm up slightly to room temperature before decorating for the best gel icing application.
Why complete cooling is important:
Decorating warm “Marshmallow Rice Krispies Halloween Brains” can cause your red gel icing to melt and spread too much, losing the intricate details you’re about to create. A fully cooled brain provides a stable canvas.
Decorating for a Ghoulish Finish: Adding the “Blood”
- Once your green Rice Krispies brains are completely cool and firm, it’s time for the final, gruesome touch: the “blood” vessels! Grab your tube of red gel icing. Ensure the tip is clean and clear.
- Starting with one brain, gently squeeze the tube to create thin, squiggly lines that crisscross the surface of the brain. Follow the natural folds and ridges you created earlier. You want to make it look like a network of capillaries and blood vessels.
- Pay special attention to the central fissure – run a slightly thicker line of red gel icing down this divide to emphasize it, making it look as though it’s still fresh from a monstrous procedure. You can also let some of the “blood” drip slightly down the sides for an extra macabre effect.
- Don’t be afraid to be a little messy! Realism in this context often means imperfections. Some thicker blobs here, some thinner veins there – it all adds to the wonderfully disturbing aesthetic of your “Marshmallow Rice Krispies Halloween Brains.”
- Repeat this decorating process for all of your brains until each one is adorned with its bloody finish. Take a step back and admire your handiwork. Each one will be a unique, delightfully disgusting masterpiece!
- Allow the red gel icing to set for about 10-15 minutes before serving or storing. While it won’t ever completely harden like royal icing, giving it a few minutes will prevent smudging.
- These “Marshmallow Rice Krispies Halloween Brains” are best enjoyed the day they are made for optimal freshness and crispiness. However, they can be stored in an airtight container at room temperature for up to 2-3 days. Layer them with parchment paper to prevent them from sticking together and smudging the “blood.”
- Serve these terrifying treats on a platter for your Halloween party, or arrange them dramatically in a punch bowl with some dry ice (carefully, of course!) for an ultimate spooky centerpiece. They are guaranteed to be a hit and elicit both shrieks and delighted munching! Enjoy your creepy culinary creation!
Conclusion:
Well, my friends, we’ve reached the delicious finale of our journey into creating one of the most delightfully spooky treats you can imagine. After walking through each simple step, I truly hope you’re feeling inspired and excited to bring these ghoulish goodies to life in your own kitchen. Seriously, if there’s one recipe that truly encapsulates the spirit of Halloween — combining frightful fun with undeniable deliciousness — it’s this one. It’s not just a dessert; it’s an experience, a conversation starter, and quite possibly the highlight of any festive gathering you host.
Why is this recipe a non-negotiable must-try for your spooky season celebrations? Let me count the ways! First off, the ease of preparation is simply unmatched. You don’t need to be a gourmet chef or possess any advanced baking skills to whip up a batch of these beauties. With just a handful of readily available ingredients, a single pot, and a little bit of time, you’ll transform ordinary pantry staples into extraordinary edible art. The minimal cooking time means more moments spent enjoying the festivities and less time slaving over a hot stove. But beyond the simplicity, it’s the sheer joy and creativity involved that truly make this recipe shine. There’s something so satisfying about molding and shaping these gooey, sweet concoctions, knowing that each one will emerge as a uniquely creepy masterpiece. They are a fantastic project for kids and adults alike, fostering laughter and shared memories in the kitchen. Imagine the sheer delight, and perhaps a touch of playful horror, on your guests’ faces when they encounter a platter of these unsettlingly realistic, yet utterly charming, confectionery creations!
The classic, comforting taste of sweet marshmallows and crispy rice cereal is a universally loved combination. It’s that nostalgic flavor that transports many of us back to childhood, but here, it’s presented with a wickedly fun twist. Each bite offers that perfect balance of chewy, crunchy, and sweet, making them incredibly addictive. They disappear from party platters faster than ghosts vanish at dawn, I promise you! This year, make sure your Halloween spread includes these iconic, and surprisingly simple, Marshmallow Rice Krispies Halloween Brains. They are more than just a treat; they’re a centerpiece, a conversation starter, and a testament to how creative and fun holiday baking can be without being overly complicated. Trust me when I say, once you try making these, they’ll become a staple in your autumnal repertoire, eagerly anticipated by all your friends and family.
Now, let’s talk about making these even more spectacular or adapting them to your heart’s content. When it comes to serving, you could arrange them artfully on a large platter, perhaps nestled among some dried leaves, fake spiderwebs, or even some dry ice for an extra touch of spooky ambiance that will truly wow your guests. For individual servings, consider placing each “brain” in a clear plastic cup or on a small doily-lined plate. This makes them easy to grab and enjoy, especially at a bustling party where hands are full. Want to elevate the gore factor? A drizzle of store-bought edible red gel, often labeled as “blood gel,” can add a wonderfully gruesome touch, making your brains look even more disturbingly realistic. You could also attach edible candy eyes to the sides for an even more comical, yet still creepy, effect, transforming them into bizarre, multi-eyed creatures straight out of a mad scientist’s lab.
But don’t stop there with your creativity! These treats are incredibly versatile. While we’ve focused on the brain shape for Halloween, the basic recipe can be adapted for any holiday or theme. Think vibrant green monster heads for a general spooky party, or even little orange pumpkins for Thanksgiving by simply adding food coloring and shaping them differently. You could incorporate other mix-ins too: mini chocolate chips for a chocolatey surprise, rainbow sprinkles for a vibrant, less spooky version, or even a few drops of peppermint extract for a festive winter twist. Imagine making them with a dash of almond extract for a marzipan-like nuance, or a splash of vanilla bean paste for an extra layer of gourmet flavor that truly elevates the experience. For those who love texture, a handful of crushed Oreos or chocolate sandwich cookies mixed into the cereal can add a delightful crunch and color variation. You could even dip a portion of the cooled brains in melted white or dark chocolate, allowing it to set, then drawing on intricate patterns with contrasting chocolate for an elegant, yet still slightly eerie, presentation. The possibilities are truly endless, limited only by your imagination and daring spirit!
So, what are you waiting for? This Halloween, roll up your sleeves, gather your ingredients, and prepare to embark on a fun, delicious, and slightly macabre culinary adventure. I genuinely can’t wait for you to experience the joy of creating these Marshmallow Rice Krispies Halloween Brains yourself. When you do try this recipe, please, please, please share your creations! I would absolutely love to see how your brains turn out, what variations you come up with, or any funny stories from your kitchen escapades. Tag me on social media, leave a comment below, or send me a message – hearing from you and seeing your amazing work is truly the most rewarding part of sharing these recipes. Your feedback, your photos, and your enthusiasm fuel my passion for creating and sharing more fun ideas. Remember, food brings us together, and spooky treats make memories that last a lifetime. Happy haunting, and most importantly, happy baking!
Marshmallow Rice Krispies Halloween Brains Treats
Craft delightfully spooky Halloween brain treats using a classic marshmallow Rice Krispies base, shaped into macabre forms and decorated with red ‘blood’ for a gruesome, yet delicious, festive snack. A simple no-bake recipe perfect for all ages.
Ingredients
-
6 tbsp unsalted butter
-
6 cups regular marshmallows
-
4 cups Rice Krispies cereal
-
½ tsp salt
-
Red food coloring, as needed
Instructions
-
Step 1
Line a large baking sheet with parchment paper. Have all ingredients measured and ready. Keep butter or non-stick spray nearby for greasing hands. -
Step 2
In a large, heavy-bottomed pot, melt 6 tbsp unsalted butter over medium-low heat. Add 6 cups regular marshmallows and ½ tsp salt, stirring continuously until fully melted and smooth. Remove the pot from heat. -
Step 3
Quickly pour 4 cups Rice Krispies cereal into the melted marshmallow mixture. Gently fold with a sturdy spatula until the cereal is evenly coated. Allow the mixture to cool for 2-3 minutes until warm and pliable enough to handle. -
Step 4
Generously butter your hands. Scoop about ½ to ¾ cup of the mixture and gently compress and mold it into an irregular, rounded oval. Use your thumbs or fingertips to create a central indentation (fissure) and pinch/pull small ridges and folds all over the surface, mimicking brain convolutions. Place each shaped brain onto the prepared baking sheet. -
Step 5
Allow the shaped brains to cool completely at room temperature for at least 30 minutes to an hour until firm. Once firm, use red food coloring to draw thin, squiggly lines across the surface and a slightly thicker line down the central fissure, resembling blood vessels. Allow the red food coloring to set for 10-15 minutes before serving or storing. Store in an airtight container at room temperature for up to 2-3 days.
Important Information
Nutrition Facts (Per Serving)
It is important to consider this information as approximate and not to use it as definitive health advice.
Allergy Information
Please check ingredients for potential allergens and consult a health professional if in doubt.