Coconut Shrimp With Sweet Chili Mayo A Tropical Twist Youll Crave Again And Again is more than just a dish; it’s an invitation to a culinary escape, transporting your taste buds to a sun-drenched paradise with every single bite. Imagine the delightful crunch of golden, perfectly fried shrimp, each morsel infused with the subtle, sweet essence of coconut, giving way to tender, juicy meat. This irresistible texture is then elevated by a vibrant, creamy, and gently spiced sweet chili mayo that truly seals the deal.
While celebrated globally as a beloved appetizer, the inspiration for coconut-crusted seafood draws from the rich culinary traditions of various tropical regions, from the Caribbean islands where coconut is a staple to the flavorful cuisines of Southeast Asia. This particular rendition beautifully marries those exotic influences with a modern, universally appealing flair. I’ve always found this dish to be an absolute showstopper, delivering an unparalleled balance of savory, sweet, and a gentle spicy kick that makes it utterly addictive. Get ready to discover why Coconut Shrimp With Sweet Chili Mayo A Tropical Twist Youll Crave Again And Again is destined to become your new go-to recipe for elevating any gathering or simply treating yourself to an extraordinary culinary experience.

Ingredients:
-
For the Coconut Shrimp:
- 1.5 to 2 pounds large shrimp, peeled, deveined, with tails on. I always recommend using high-quality, fresh or flash-frozen shrimp for the best flavor and texture. Keeping the tails on makes for a fantastic presentation and a convenient handle for dipping!
- 1 cup all-purpose flour. This is our crucial first layer, helping the egg wash adhere evenly to the shrimp.
- 3 large eggs. Whisked well, these eggs create the sticky bridge between our dry flour and the crunchy coconut coating.
- 2 cups Panko breadcrumbs. Panko is a game-changer for crispy texture! Its airy, flaky structure gives a much lighter and crunchier crust than traditional breadcrumbs.
- 2 cups unsweetened shredded coconut. Make sure it’s unsweetened to avoid an overly sweet result, as the sweet chili mayo provides plenty of sweetness. The shredded texture is ideal for creating that beautiful, craggy, golden-brown crust we’re looking for.
- 1 teaspoon salt. Divided, for seasoning both the flour and the shrimp.
- ½ teaspoon black pepper. Freshly ground pepper always adds a little extra oomph to the seasoning.
- 4-6 cups vegetable oil or canola oil, for frying. You’ll need enough oil to submerge the shrimp partially or fully, depending on the size of your pot.
-
For the Sweet Chili Mayo:
- ½ cup good quality mayonnaise. I prefer a full-fat, creamy mayo for the richest flavor and texture.
- ¼ cup sweet chili sauce. This is the star of our dipping sauce! Choose a brand you love; there are many excellent options available in the international aisle of most grocery stores.
- 1 tablespoon fresh lime juice. A squeeze of fresh lime brightens up the entire sauce and cuts through the richness of the mayo and the sweetness of the chili.
- ½ teaspoon Sriracha (optional). If you like a little extra kick, a touch of Sriracha adds a fantastic layer of heat without overpowering the other flavors. Feel free to adjust to your preference!
- ¼ teaspoon garlic powder. Just a hint of garlic powder enhances the savory notes of the mayo.
-
For Garnish (Optional, but highly recommended!):
- Fresh cilantro or parsley, finely chopped. A sprinkle of fresh herbs adds a pop of color and freshness.
- Lime wedges. Perfect for a final squeeze over the hot shrimp.
- Extra shredded coconut, lightly toasted. For an even more tropical presentation and a boost of coconut aroma.
Preparing the Shrimp
- Prepare Your Shrimp: If you’re using frozen shrimp, make sure they are completely thawed. The best way to do this is to transfer them to the refrigerator the night before. If you’re in a hurry, you can place the sealed bag of shrimp in a bowl of cold water for about 30-45 minutes. Once thawed, gently pat each shrimp extremely dry with paper towels. This step is absolutely critical! Any excess moisture will prevent the breading from adhering properly and will result in a less crispy coating, and nobody wants soggy coconut shrimp. I usually lay them out on a few layers of paper towels and then gently press another layer on top.
- Season the Shrimp: In a medium bowl, or directly on a clean surface, lightly season your pat-dried shrimp with a pinch of salt and black pepper. We’re looking for a subtle seasoning here, as the breading itself will also have flavor, and the dipping sauce brings a lot to the table. Toss them gently to ensure each shrimp gets a light coating of seasoning.
Setting Up Your Breading Station
This is where the magic happens! A well-organized breading station makes the process efficient and much less messy.
-
Prepare Your Breading Bowls: Set up three shallow bowls or dishes, wide enough to comfortably fit a shrimp.
- Bowl 1 (Flour): Pour the 1 cup of all-purpose flour into the first bowl. Add ½ teaspoon of salt and ¼ teaspoon of black pepper to the flour and whisk them together. This ensures our first layer is seasoned too.
- Bowl 2 (Egg Wash): In the second bowl, crack the 3 large eggs. Add a tiny splash of water (about 1 teaspoon) or milk, and whisk them vigorously with a fork until the yolks and whites are completely combined and a little frothy. This creates our sticky binder.
- Bowl 3 (Coconut & Panko): In the third, and largest, bowl, combine the 2 cups of Panko breadcrumbs with the 2 cups of unsweetened shredded coconut. Add the remaining ½ teaspoon of salt and ¼ teaspoon of black pepper, and mix them thoroughly with your hands or a spoon. You want an even distribution of Panko and coconut for that perfect texture and flavor.
- Adopt the Two-Hand Technique: To keep your hands relatively clean and prevent clumpy breading, I highly recommend using the “one wet hand, one dry hand” technique. Use one hand (your “wet hand”) for handling the shrimp through the flour and egg wash, and the other hand (your “dry hand”) for pressing the coconut-Panko mixture onto the shrimp. This minimizes mess and ensures a smooth breading process. Trust me, this little trick saves a lot of frustration!
Breading the Shrimp
-
Breading Each Shrimp: Now for the fun part!
- Using your “wet hand,” pick up one seasoned shrimp by the tail.
- Dredge the shrimp completely in the flour mixture (Bowl 1), ensuring it’s fully coated. Shake off any excess flour. You want a thin, even layer.
- Transfer the floured shrimp to the egg wash (Bowl 2), coating it thoroughly. Let any excess egg drip off.
- Immediately transfer the egg-coated shrimp to the coconut and Panko mixture (Bowl 3). This is where your “dry hand” comes in. Use your dry hand to generously spoon the mixture over the shrimp, gently pressing the coconut and Panko onto all surfaces. You really want to make sure every inch of the shrimp is covered and that the coating is pressed on firmly so it doesn’t fall off during frying. This also helps create that satisfying, thick crust.
- Once fully coated, give the shrimp a gentle shake to remove any loose breading.
- Arrange on a Rack: Place each breaded shrimp on a wire rack set over a baking sheet. This allows air to circulate around the shrimp and prevents the coating from getting soggy while you bread the remaining shrimp. It also makes for easy transfer to the fryer later.
- Chill for Success: Once all the shrimp are breaded, transfer the baking sheet with the wire rack to the refrigerator. Let the breaded shrimp chill for at least 30 minutes. This step is crucial for ensuring the coating adheres perfectly and becomes extra crispy when fried. Chilling helps the breading ‘set’ and prevents it from falling off in the hot oil. If you have time, you can even chill them for up to 2 hours, or even flash-freeze them for 15-20 minutes before frying for an even firmer crust.
Frying the Coconut Shrimp
Deep frying can seem intimidating, but with the right setup and precautions, it’s very manageable and yields incredibly delicious results. Safety first!
- Set Up Your Frying Station: Choose a heavy-bottomed pot or Dutch oven, preferably one with high sides to minimize splattering. Pour 4-6 cups of vegetable or canola oil into the pot. You need at least 2-3 inches of oil depth. Attach a deep-fry thermometer to the side of the pot. Have your chilled, breaded shrimp ready, and set up another wire rack over paper towels near your frying station for draining the cooked shrimp.
-
Heat the Oil: Place your pot of oil over medium-high heat. Carefully monitor the temperature with your thermometer. We’re aiming for a temperature of 350°F to 375°F (175°C to 190°C). It’s important to reach this temperature before adding the shrimp. If the oil isn’t hot enough, the shrimp will absorb too much oil and become greasy. If it’s too hot, the coating will burn before the shrimp is cooked through.
- No thermometer? No problem! You can test the oil by dropping a small pinch of Panko or a tiny piece of breading into it. If it sizzles vigorously and turns golden brown in about 20-30 seconds, your oil is ready. If it browns too quickly, it’s too hot. If it just sits there or bubbles slowly, it’s not hot enough.
-
Fry in Batches: Once the oil is at temperature, carefully add the breaded shrimp to the hot oil, one by one. Do not overcrowd the pot! Frying in small batches (about 4-6 shrimp at a time, depending on your pot size) is absolutely crucial. Overcrowding will drastically lower the oil temperature, leading to greasy, soggy shrimp and inconsistent cooking.
- Fry the shrimp for about 2-3 minutes per batch, flipping them gently halfway through, until they are beautifully golden brown and crispy on all sides. The shrimp themselves cook very quickly, so we’re primarily focused on getting that perfect, crunchy, golden exterior.
- When the shrimp are done, they will be opaque throughout, and the coating will be a rich, golden-brown hue.
- Drain and Season: Using a slotted spoon or spider skimmer, carefully remove the cooked shrimp from the oil. Let any excess oil drip off for a moment, then transfer them to the prepared wire rack set over paper towels. Immediately sprinkle a tiny pinch of extra salt over the hot shrimp. Seasoning while hot helps the salt adhere and enhances the flavor.
- Maintain Oil Temperature: Allow the oil temperature to return to 350-375°F (175-190°C) before adding the next batch of shrimp. Adjust the heat as needed. This ensures consistent cooking for all your shrimp.
Pro Tip for Perfect Frying:
Keep a close eye on your oil temperature. It will drop slightly when you add cold shrimp, and then rise again. You might need to adjust your heat between batches to keep it in that ideal 350-375°F range. Patience and monitoring are key to perfectly crispy, non-greasy coconut shrimp every time. Don’t be afraid to take the pot off the heat for a minute if it’s getting too hot, or turn up the heat if it’s dropping too much.
Alternative Cooking Methods:
If deep frying isn’t your preferred method, you can still enjoy delicious coconut shrimp! They won’t be quite as deeply golden or uniformly crispy as fried, but these methods are still excellent:
- Air Fryer Method: Preheat your air fryer to 375°F (190°C). Lightly spray the basket with cooking spray. Arrange the breaded shrimp in a single layer in the basket, making sure not to overcrowd. Lightly mist the tops of the shrimp with cooking spray. Air fry for 8-12 minutes, flipping halfway through, until golden brown and cooked through. Cooking time will vary by air fryer model. You’re looking for that beautiful golden color and a crunchy texture.
- Oven Baked Method: Preheat your oven to 400°F (200°C). Arrange the breaded shrimp in a single layer on a baking sheet lined with parchment paper. Lightly spray the tops of the shrimp with cooking spray. Bake for 12-18 minutes, flipping halfway through, until golden brown and cooked through. Keep an eye on them, as ovens vary. The spray helps achieve a crispier exterior.
Crafting the Sweet Chili Mayo
While your shrimp are frying or baking, whip up this incredibly simple yet flavorful dipping sauce. It’s the perfect counterpoint to the rich, crispy shrimp.
- Combine Ingredients: In a small bowl, combine the ½ cup mayonnaise, ¼ cup sweet chili sauce, 1 tablespoon fresh lime juice, ½ teaspoon Sriracha (if using), and ¼ teaspoon garlic powder.
- Whisk Until Smooth: Whisk all the ingredients together until they are completely smooth and well combined. Taste and adjust seasoning as needed. If you like more heat, add a little more Sriracha. If you prefer it tangier, a tiny bit more lime juice. The balance of sweet, tangy, and a touch of heat is what makes this sauce so irresistible.
- Chill (Optional but Recommended): For the best flavor, cover the sweet chili mayo and refrigerate it for at least 15-20 minutes to allow the flavors to meld. You can even make this sauce a day ahead of time!
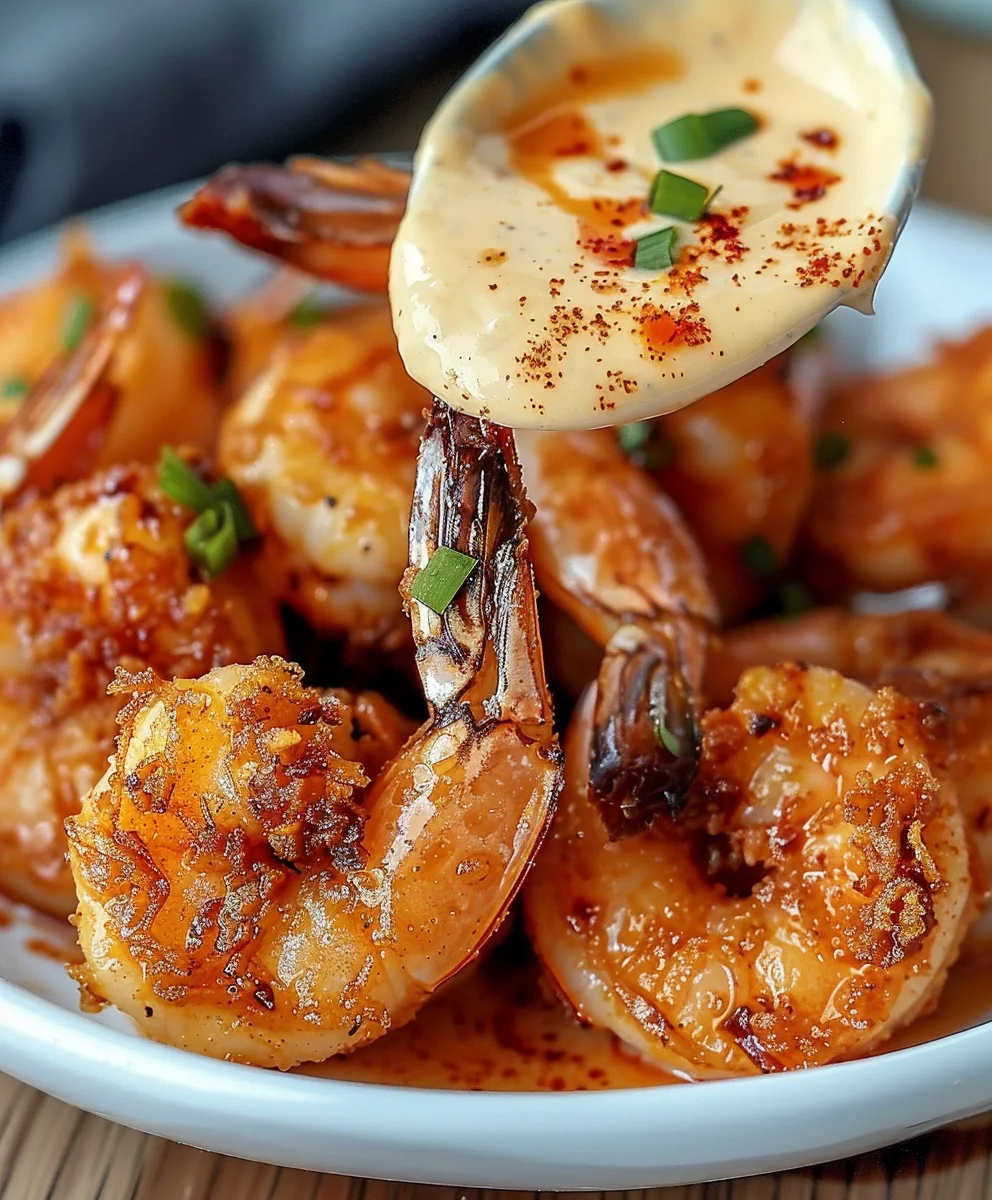
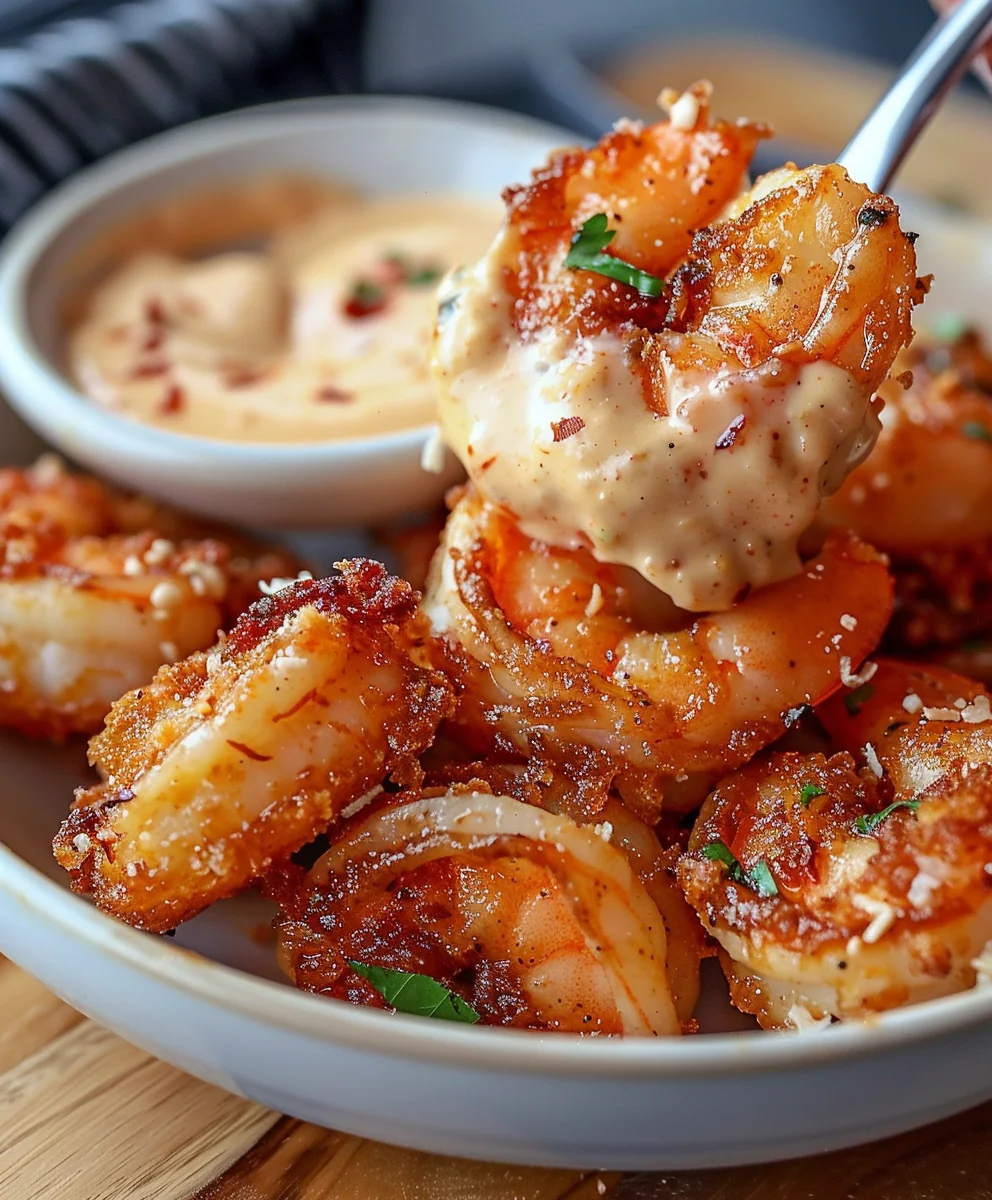
Serving Your Tropical Delight
- Arrange and Garnish: Once all the coconut shrimp are cooked and drained, arrange them artfully on a serving platter. A beautiful presentation always makes the food taste even better! Garnish with a sprinkle of fresh chopped cilantro or parsley, a few lime wedges for squeezing, and if you’re feeling fancy, a scattering of lightly toasted shredded coconut.
- Serve Immediately: Coconut shrimp are best served hot and fresh, straight from the fryer or oven. Place the bowl of sweet chili mayo right alongside the platter of shrimp for easy dipping.
Serving Suggestions and Pairings:
These crispy, golden treasures are absolutely fantastic on their own as an appetizer, but they also make a delightful light meal. Here are some ideas for turning your “Coconut Shrimp With Sweet Chili Mayo A Tropical Twist Youll Crave Again And Again” into a full spread:
- For a Light Meal: Serve them alongside a fresh, vibrant green salad with a light vinaigrette to cut through the richness. A simple side of fluffy jasmine rice would also be lovely.
- Tropical Theme: Embrace the tropical vibe! A side of fresh mango salsa or a pineapple and cucumber salad would complement the flavors beautifully.
- Pair with Cocktails: These shrimp are practically begging to be served with a refreshing tropical cocktail. Think mai tais, piña coladas, or a simple mojito.
- Party Platter: If serving for a gathering, arrange them around the sweet chili mayo, perhaps with some fresh fruit skewers or vegetable sticks for a balanced appetizer spread.
No matter how you serve them, get ready for rave reviews. The irresistible crunch of the coconut breading, the succulent shrimp within, and that perfectly balanced, zesty-sweet dipping sauce combine to create a flavor experience that you and your guests will absolutely crave!
Conclusion:
Well, my friends, we’ve reached the sweet, crispy, and utterly satisfying end of our culinary journey together. I genuinely hope you’re feeling inspired and excited to dive into your kitchen to recreate this absolute gem of a dish. What makes this recipe an undeniable must-try, you ask? It’s the harmonious blend of textures and flavors that dance on your palate with every single bite. The succulent shrimp, perfectly coated in a delicate layer of sweet, flaky coconut, achieves an incredible golden crispness that is simply irresistible. This isn’t just another shrimp recipe; it’s a vibrant explosion of tropical joy, a mini-vacation for your taste buds. The secret weapon, of course, is that luscious sweet chili mayo – a creamy, tangy, and subtly spicy counterpoint that elevates the entire experience, cutting through the richness beautifully and adding an addictive zing that will have you reaching for more.
I truly believe that once you taste the exquisite balance of sweet, savory, and a hint of heat in this creation, you’ll understand why I’m so passionate about it. This is more than just a dish; it’s an experience, an escape. It’s the kind of appetizer that disappears in minutes at any gathering, or a delightful main course that feels special without being overly complicated. I’ve made it countless times, and each time, it reaffirms its status as a crowd-pleaser and a personal favorite. The combination of crispy coconut, tender shrimp, and that incredible dipping sauce truly lives up to its promise, making it clear why this is the recipe for Coconut Shrimp With Sweet Chili Mayo A Tropical Twist Youll Crave Again And Again. Prepare yourself for compliments, because this dish is a guaranteed showstopper!
Now, let’s talk about how you can make this deliciousness even more versatile in your own home. While these crispy delights are phenomenal on their own as a standalone appetizer, don’t limit yourself! For a complete and satisfying main course, I love serving them alongside a bed of fluffy jasmine rice or a vibrant coconut-lime sticky rice. The subtle sweetness of the rice complements the shrimp perfectly, absorbing any extra sauce and adding a wonderful texture. To add some freshness and balance, a simple side of stir-fried snap peas, steamed asparagus, or a colorful bell pepper medley tossed with a light soy-ginger dressing would be absolutely fantastic. Imagine a platter of golden shrimp, glistening rice, and bright green vegetables – it’s a feast for the eyes as well as the stomach, creating a well-rounded and deeply satisfying meal that feels both indulgent and wholesome.
Thinking of hosting a party or a casual get-together? These coconut shrimp are your go-to! Arrange them artfully on a large platter with small bowls of the sweet chili mayo for dipping. You could also offer a second dipping sauce, perhaps a zesty mango salsa or a simple lime aioli, to give your guests options and cater to different palates. A fresh, crunchy coleslaw, perhaps with a touch of pineapple or mandarin oranges, makes for an excellent side dish, offering a wonderful textural contrast and a refreshing element. Don’t forget those essential lime wedges! A squeeze of fresh lime juice over the warm shrimp right before serving brightens all the flavors and adds that final, essential touch of acidity that makes everything pop. They’re perfect for game day, backyard barbecues, holiday gatherings, or even just a cozy Friday night in when you’re craving something a little bit special and utterly delicious.
And here’s where your creativity can truly shine! While the sweet chili mayo is undeniably perfect, feel free to experiment with the dipping sauce. Perhaps you prefer a spicier kick? Add a dash of sriracha or a pinch of red pepper flakes directly to the mayo mixture. Or maybe you’d like an even more pronounced tropical twist? A pineapple-ginger dipping sauce or a passion fruit glaze could be an exciting alternative. For those who want to explore healthier cooking methods, consider an air fryer. While it might not achieve the exact same deep-fried crispness, it can still produce wonderfully golden and delicious results with less oil. Just remember to spray them lightly with cooking spray before air frying to encourage that beautiful color. You could also try adding a pinch of curry powder to your coconut mixture for an Indian-inspired twist, or even mix in a bit of panko breadcrumbs with the coconut for an extra layer of crunch. Don’t be afraid to make this recipe truly your own, tailoring it to your family’s preferences and your pantry’s contents; that’s the beauty of home cooking!
I genuinely encourage each and every one of you to set aside some time soon and give this recipe a whirl. It might look incredibly impressive on a plate, but I promise you, it’s far more approachable than you think, and the reward for your efforts is truly magnificent. The aroma alone as these cook will make your mouth water in anticipation, and that first bite? Pure bliss. You’ll be amazed at how easily you can replicate restaurant-quality deliciousness right in your own kitchen, creating unforgettable memories and satisfying cravings with every golden, crunchy piece. This recipe is a fantastic way to treat yourself, your family, or your guests to something truly special.
Once you’ve whipped up your batch of these incredible coconut shrimp, I would absolutely love to hear all about your experience! Did you stick to the original recipe, or did you put your own unique spin on it? What did you serve it with? Were there any creative variations that truly surprised you? Please, don’t hesitate to share your photos, your triumphs, and any clever additions or modifications you came up with in the comments section below or on social media. Your feedback and creativity not only inspire me but also enrich the entire cooking community, offering new ideas and perspectives for everyone. Happy cooking, and get ready to indulge in a truly unforgettable tropical treat that you’ll undoubtedly want to make again and again!
Coconut Shrimp w/ Sweet Chili Mayo: Tropical Crave!
A delightful culinary escape, transporting your taste buds to a sun-drenched paradise with every single bite. Enjoy the delightful crunch of golden, perfectly fried shrimp, infused with the subtle, sweet essence of coconut, elevated by a vibrant, creamy, and gently spiced sweet chili mayo.
Ingredients
-
1 lb large shrimp, peeled, deveined, tails on
-
1 cup all-purpose flour
-
3 large eggs
-
2 cups Panko breadcrumbs
-
2 cups sweetened shredded coconut
-
1 tsp salt, divided
-
½ tsp black pepper, divided
-
4-6 cups vegetable or canola oil, for frying
-
½ cup mayonnaise
-
¼ cup sweet chili sauce
-
1 tbsp fresh lime juice
-
½ tsp Sriracha (optional)
-
¼ tsp garlic powder
-
Fresh cilantro or parsley, for garnish (optional)
-
Lime wedges, for garnish (optional)
-
Toasted shredded coconut, for garnish (optional)
Instructions
-
Step 1
Thaw and pat shrimp extremely dry. Season lightly with salt and pepper. -
Step 2
Set up three shallow bowls: 1) flour with ½ tsp salt and ¼ tsp pepper; 2) whisked eggs with 1 tsp water; 3) Panko, sweetened shredded coconut, remaining salt & pepper. -
Step 3
Use a ‘wet hand’ for handling shrimp through flour and egg wash, and a ‘dry hand’ for pressing coconut-Panko mixture. -
Step 4
Dredge shrimp in flour, then egg wash, then press firmly into coconut-Panko mixture to coat thoroughly. Place on a wire rack. -
Step 5
Chill breaded shrimp for at least 30 minutes (up to 2 hours or flash-freeze 15-20 minutes) in the refrigerator to help the coating set. -
Step 6
In a heavy-bottomed pot, heat 4-6 cups vegetable or canola oil to 350-375°F (175-190°C). Use a deep-fry thermometer or test with a pinch of Panko (it should sizzle and turn golden in 20-30 seconds). -
Step 7
Carefully add shrimp to hot oil in small batches (4-6 at a time) to avoid overcrowding. Fry for 2-3 minutes per batch, flipping halfway, until golden brown and crispy. Remove with a slotted spoon. -
Step 8
Transfer cooked shrimp to a wire rack set over paper towels to drain. Immediately sprinkle with a tiny pinch of extra salt. Allow oil temperature to return to 350-375°F (175-190°C) before frying the next batch. -
Step 9
Preheat air fryer to 375°F (190°C). Lightly spray basket and shrimp. Air fry 8-12 minutes, flipping halfway, until golden brown and cooked through. -
Step 10
Preheat oven to 400°F (200°C). Arrange shrimp on a parchment-lined baking sheet, spray lightly. Bake 12-18 minutes, flipping halfway, until golden brown and cooked through. -
Step 11
In a small bowl, whisk together mayonnaise, sweet chili sauce, fresh lime juice, Sriracha (optional), and garlic powder until smooth. Chill for 15-20 minutes for best flavor (optional). -
Step 12
Arrange hot coconut shrimp on a platter. Garnish with fresh cilantro or parsley, lime wedges, or toasted shredded coconut. Serve immediately with the sweet chili mayo for dipping.
Important Information
Nutrition Facts (Per Serving)
It is important to consider this information as approximate and not to use it as definitive health advice.
Allergy Information
Please check ingredients for potential allergens and consult a health professional if in doubt.