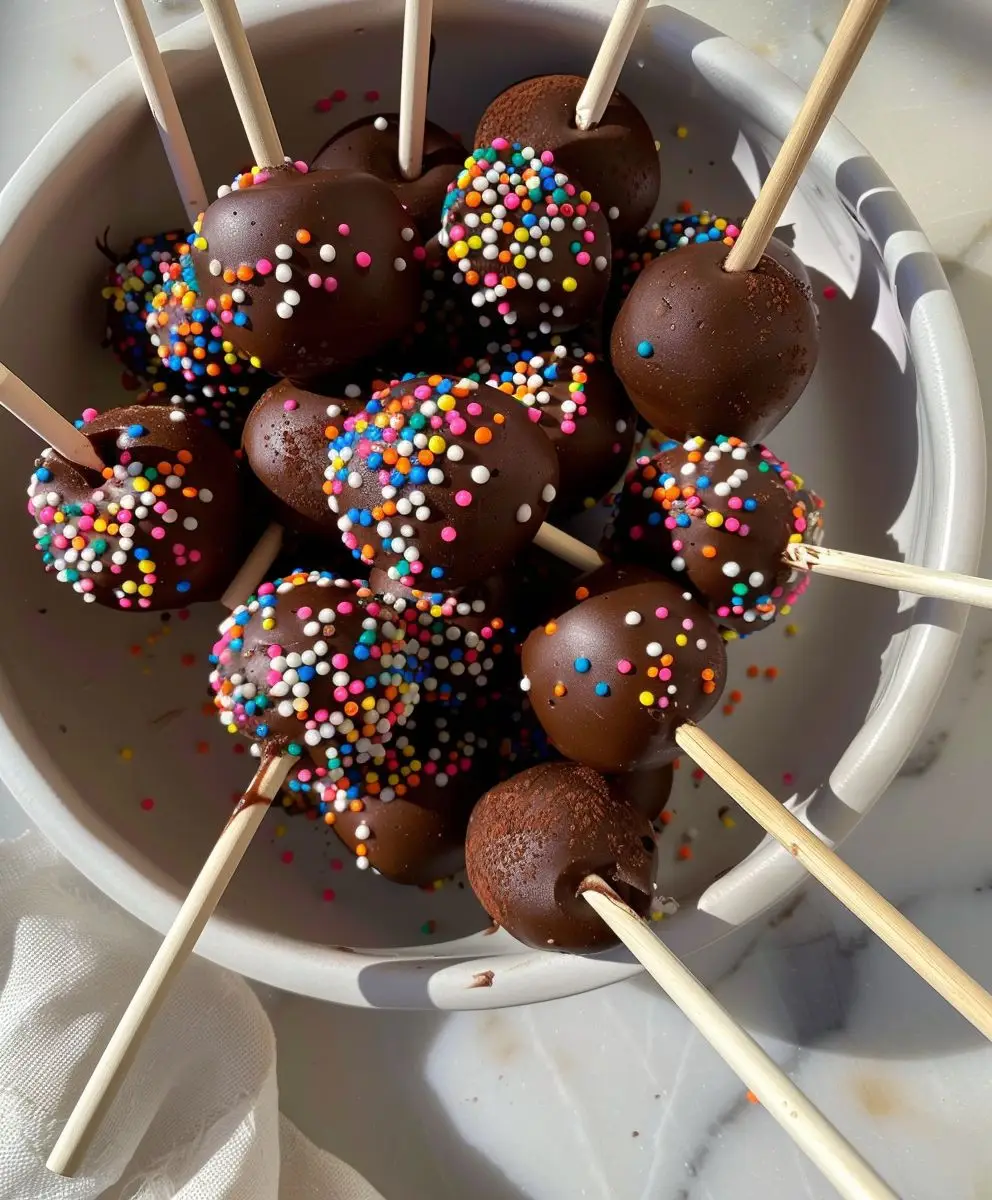
Chocolate Cake Pops: A Sweet Treat for Any Occasion
Chocolate Cake Pops: Just the name conjures up images of decadent, bite-sized delights, perfect for parties, celebrations, or a simple afternoon indulgence. I’ve always loved the playful nature of these little treats; they’re so much fun to make and even more fun to eat! Their popularity has exploded in recent years, transforming from a novelty dessert into a beloved classic.
While the precise origins of cake pops are a bit murky, the concept of dipping cake into chocolate and creating bite-sized treats has been around for ages. Think of traditional truffles, or even the simple pleasure of dipping a piece of cake into your hot cocoa. Cake pops, however, elevate this simple idea to an art form, allowing for endless creativity in flavor combinations and decorative designs.
What makes Chocolate Cake Pops so irresistible? It’s the perfect blend of textures and tastes, of course! The moist, tender cake crumbles beautifully against the smooth, rich coating of chocolate. The small size makes them incredibly convenient – perfect for portion control (or not!), and easy to transport to any gathering. Plus, the endless possibilities for customization mean you can tailor them to any occasion or personal preference. From classic chocolate to vibrant sprinkles, from elegant drizzles to whimsical shapes, the only limit is your imagination!
In this recipe, I’ll guide you through creating these delightful treats from scratch, sharing my tips and tricks for achieving perfectly formed, flawlessly coated Chocolate Cake Pops every time. Get ready to embark on a sweet adventure!

Ingredients:
- 1 box (15.25 ounces) devil’s food cake mix
- 1 cup water
- 1/3 cup vegetable oil
- 3 large eggs
- 1 cup (2 sticks) unsalted butter, softened
- 3 cups powdered sugar
- 1/2 cup unsweetened cocoa powder
- 1/4 cup milk
- 1 teaspoon vanilla extract
- 6 ounces semi-sweet chocolate, chopped
- Assorted sprinkles (optional)
- Lollipop sticks
- Styrofoam block for display (optional)
Preparing the Cake
- Preheat your oven to 350°F (175°C). Grease and flour two 9-inch round baking pans. I like to use baking spray with flour for an even coating.
- In a large bowl, combine the devil’s food cake mix, water, oil, and eggs. Beat with an electric mixer on medium speed for about 2 minutes, until the batter is smooth and well combined. Don’t overmix!
- Pour the batter evenly into the prepared pans. I find it helpful to use a kitchen scale to ensure even distribution.
- Bake for 30-35 minutes, or until a wooden skewer inserted into the center comes out clean. Every oven is different, so keep an eye on them!
- Let the cakes cool in the pans for 10 minutes before inverting them onto a wire rack to cool completely. This prevents them from sticking and ensures even cooling.
Making the Chocolate Buttercream Frosting
- In a large bowl, beat the softened butter with an electric mixer until it’s light and fluffy. This usually takes about 3-5 minutes. Don’t skip this step! It’s crucial for a smooth frosting.
- Gradually add the powdered sugar, one cup at a time, beating well after each addition. Scrape down the sides of the bowl as needed.
- Add the cocoa powder and milk. Beat until the frosting is smooth and creamy. If it seems too thick, add a teaspoon of milk at a time until you reach your desired consistency.
- Stir in the vanilla extract. A little vanilla goes a long way in enhancing the chocolate flavor.
Crumbling the Cake and Forming the Pops
- Once the cakes are completely cool, crumble them into a large bowl using your hands or a fork. I prefer using my hands – it’s more satisfying!
- Add about 2 cups of the chocolate buttercream frosting to the crumbled cake. Start with less and add more if needed to achieve a consistency that holds its shape well but isn’t too dry. You want it to be moist enough to roll into balls.
- Mix gently with your hands until the cake and frosting are thoroughly combined. Be careful not to overmix, or the cake will become too wet.
- Roll the mixture into 1-inch balls. I find it helpful to use a small cookie scoop for consistent sizing. Place the balls on a baking sheet lined with parchment paper.
- Place the baking sheet in the freezer for at least 30 minutes to firm up the cake pops. This makes them much easier to dip in chocolate.
Dipping the Cake Pops in Chocolate
- Melt the semi-sweet chocolate in a microwave-safe bowl in 30-second intervals, stirring after each interval, until completely melted and smooth. Alternatively, you can melt the chocolate in a double boiler.
- Insert a lollipop stick about halfway into each frozen cake pop. Make sure the stick is firmly inserted.
- Dip each cake pop into the melted chocolate, ensuring it’s fully coated. Gently tap the stick against the side of the bowl to remove any excess chocolate.
- Immediately sprinkle with your desired sprinkles, if using. Work quickly, as the chocolate sets fast.
- Place the dipped cake pops back onto the parchment-lined baking sheet and refrigerate for at least 30 minutes, or until the chocolate is completely set.
Displaying Your Cake Pops
- Once the chocolate is set, you can display your cake pops in a variety of ways. A Styrofoam block is a classic option, but you can also arrange them in a decorative vase or glass.
- For a more elegant presentation, you can add a ribbon or decorative paper to the lollipop sticks.
- Store the cake pops in an airtight container in the refrigerator for up to 3 days. They are best served chilled.
Tips and Variations
For a richer flavor:
Use dark chocolate instead of semi-sweet chocolate for dipping.
For a fun twist:
Use different colored sprinkles or add chopped nuts to the frosting.
For a more intense chocolate flavor:
Add a tablespoon of espresso powder to the frosting.
If your cake pops are too crumbly:
Add a little more frosting to the cake mixture.
If your frosting is too thick:
Add a teaspoon of milk at a time until you reach the desired consistency. Remember to add it gradually!
For a smoother finish:
Dip the cake pops in the melted chocolate twice for a thicker coating. Let the first coat set slightly before dipping again.
Conclusion:
So there you have it – my foolproof recipe for decadent Chocolate Cake Pops! I truly believe this recipe is a must-try for several reasons. First, the flavor is simply irresistible. The rich, moist chocolate cake perfectly complements the creamy, smooth coating, creating a delightful balance of textures and tastes. It’s the kind of treat that satisfies a serious chocolate craving without being overly sweet or heavy. Second, the recipe itself is surprisingly straightforward. Even if you’re a beginner baker, you’ll find the step-by-step instructions easy to follow, and the process is incredibly rewarding. Watching those little balls of chocolatey goodness transform from simple cake crumbs into elegant, perfectly formed pops is truly satisfying.
And let’s not forget the versatility! This Chocolate Cake Pops recipe is a blank canvas for your creativity. Want to add a sprinkle of sea salt for a sophisticated touch? Go for it! Prefer a different type of chocolate coating? Milk chocolate, dark chocolate, even white chocolate with sprinkles – the possibilities are endless. You can easily customize the flavor profile to suit your preferences and the occasion. For a festive touch, try dipping them in melted candy melts and adding festive sprinkles, or drizzle them with melted chocolate and add chopped nuts. The options are truly limitless!
I’ve personally enjoyed serving these Chocolate Cake Pops at various gatherings, from casual get-togethers with friends to more formal parties. They’re always a huge hit, disappearing almost as quickly as I can place them on the platter. They’re perfect for birthday parties, holiday celebrations, or even just a spontaneous treat for yourself on a particularly challenging day. They also make fantastic gifts – imagine the delight on someone’s face when they receive a box of these homemade goodies!
For a truly impressive presentation, consider arranging your Chocolate Cake Pops on a tiered cake stand or in a decorative glass bowl. You can also use different colored sprinkles or drizzles to create a visually stunning display. For a more sophisticated touch, try adding a small edible flower or a dusting of cocoa powder to each pop. No matter how you choose to present them, these Chocolate Cake Pops are guaranteed to impress.
Beyond the deliciousness and ease of preparation, making these Chocolate Cake Pops is a fantastic way to spend some quality time in the kitchen. It’s a fun and engaging activity that’s perfect for baking with kids or friends. The process is therapeutic, and the end result is a delicious reward for your efforts. So, what are you waiting for?
Give this recipe a try!
I genuinely encourage you to give this Chocolate Cake Pops recipe a shot. I’m confident you’ll be amazed by how easy and delicious they are to make. Once you’ve mastered the basic recipe, feel free to experiment with different flavors and decorations. The possibilities are truly endless! And most importantly, don’t forget to share your creations with me! I’d love to see your beautiful Chocolate Cake Pops and hear about your baking experience. Share your photos and feedback on social media using #MyChocolateCakePops – I can’t wait to see what you come up with!
Happy Baking!
Chocolate Cake Pops: A Deliciously Easy Recipe
Decadent chocolate cake pops made with devil's food cake, rich chocolate buttercream frosting, and semi-sweet chocolate. A fun and delicious treat!
Ingredients
Instructions
Recipe Notes
- For richer flavor, use dark chocolate.
- For a fun twist, use different colored sprinkles or add chopped nuts to the frosting.
- For more intense chocolate flavor, add a tablespoon of espresso powder to the frosting.
- If cake pops are too crumbly, add more frosting.
- If frosting is too thick, add milk gradually.
- For a smoother finish, dip cake pops twice.