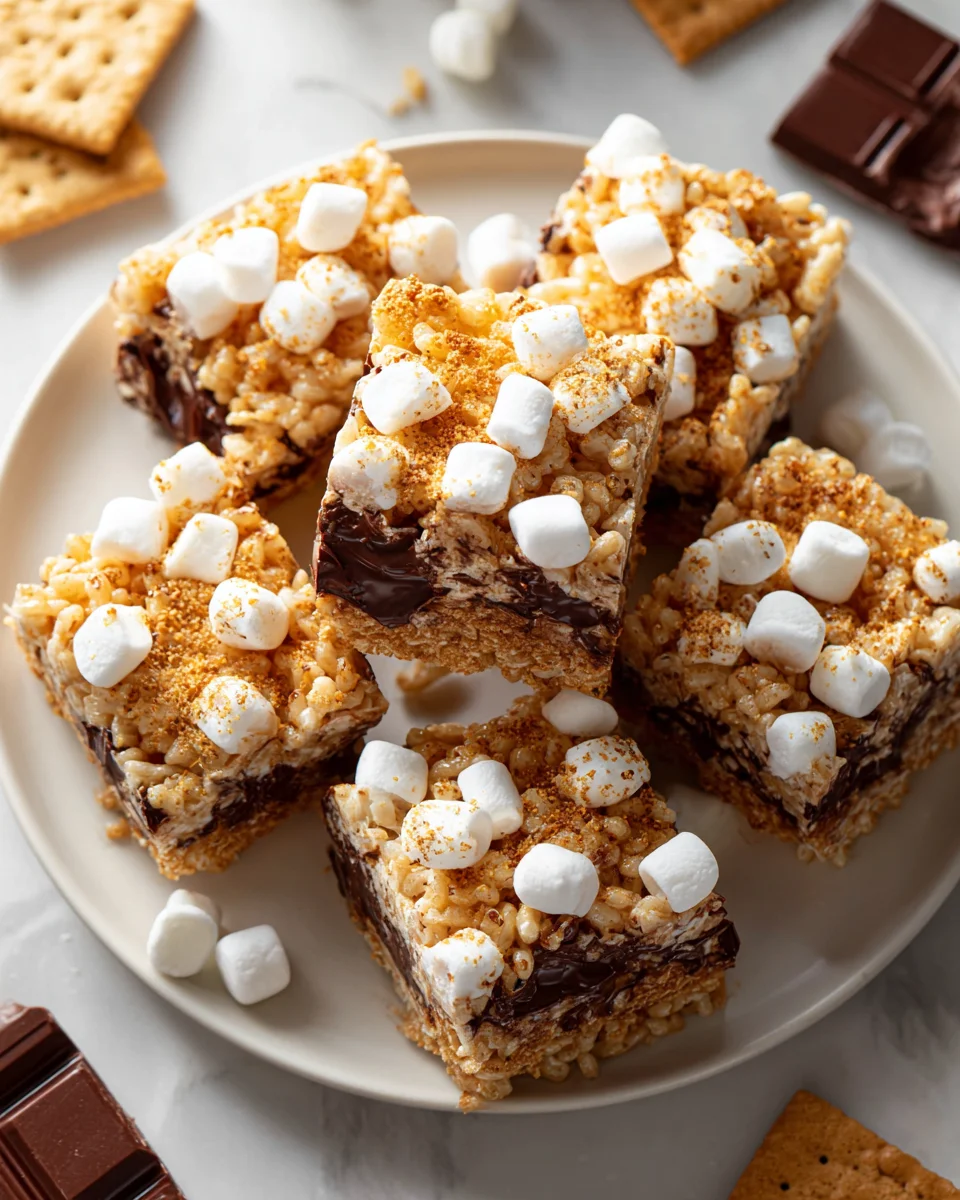
S’mores Rice Krispie Treat Bars
I’m so excited to share this recipe with you today because it truly brings together two of my all-time favorite nostalgic treats: classic Rice Krispie Treats and the irresistible flavors of s’mores! These aren’t just any dessert; these S’mores Rice Krispie Treat Bars are a delightful mash-up that captures all the gooey, chocolatey, and toasted marshmallow goodness of a campfire s’more, nestled on a perfectly crisp and chewy Rice Krispie treat base, complete with hints of graham cracker. What makes this recipe so special is how effortlessly it delivers that beloved campfire experience without needing any flames or outdoor setup – just pure, unadulterated indoor s’mores magic!
You’re going to absolutely love these bars because they are an ultimate crowd-pleaser, ridiculously easy to whip up, and perfect for satisfying that sweet tooth craving any time of year. Imagine sinking your teeth into a bite that’s crunchy from the cereal, soft and chewy from the marshmallow binder, rich from melted chocolate, and finished with a golden-brown, lightly toasted mini marshmallow on top – it’s pure bliss! They’re fantastic for parties, lunchboxes, or just a cozy night in, and I promise, these will disappear in a flash.

Oh, the joy of s’mores! That classic campfire treat with gooey toasted marshmallows, melty chocolate, and crisp graham crackers. What if I told you we could capture all that magic, without a campfire, in a super easy, no-bake bar? That’s exactly what my S’mores Rice Krispie Treat Bars bring to the table. These aren’t just any rice krispie treats; they’re an elevated, nostalgic twist that will have everyone reaching for more. I absolutely adore making these because they’re quick, require minimal fuss, and deliver maximum s’mores satisfaction. Let’s dive into how you can whip up a batch of these irresistible goodies!
Ingredient Notes
Creating truly spectacular S’mores Rice Krispie Treat Bars starts with understanding the role each ingredient plays. While the recipe is simple, a few choices can make all the difference in texture and flavor.
- Crisp Rice Cereal: This is our foundational crunch! While the classic “Rice Krispies” brand works perfectly, any store-brand crisp rice cereal will do the trick. Just make sure it’s fresh and hasn’t gone stale, as that can impact the final texture of your bars.
- Mini Marshmallows: We use mini marshmallows for two reasons: they melt more quickly and evenly into the butter, creating that perfect sticky binder, and they’re ideal for sprinkling on top for that iconic s’mores aesthetic. You’ll need a good quantity for both the base and the topping. If you only have regular-sized marshmallows, you can use them for the base by cutting them into smaller pieces to aid melting, but I’d still recommend mini marshmallows for the top layer for better distribution and toasting.
- Unsalted Butter: Butter isn’t just for flavor; it helps prevent the marshmallows from sticking to the pot and gives the treats a lovely richness. I always opt for unsalted butter in baking and sweet treats because it allows me to control the salt content precisely. If you only have salted butter, you can use it, but you might want to omit any additional salt in the recipe.
- Graham Crackers: This is where the “graham” in s’mores comes in! You’ll need to crush your graham crackers. For the base, I like a mix of fine crumbs and slightly larger pieces for textural interest. For the topping, you can sprinkle a few larger, roughly broken pieces to mimic bits of campfire-roasted graham.
- Milk Chocolate Chips or Chopped Chocolate Bar: The “chocolate” component is crucial! Milk chocolate is the traditional choice for s’mores, offering a sweet, creamy melt. Chocolate chips are super convenient and melt beautifully when sprinkled on top. Alternatively, you can chop up your favorite milk chocolate bar into small pieces. If you prefer a darker chocolate, feel free to use semi-sweet or dark chocolate chips for a less sweet, more intense chocolate flavor. I usually go for standard milk chocolate chips to keep it authentic to the s’mores experience.
- Vanilla Extract: A splash of good quality vanilla extract really enhances the overall flavor, adding depth and warmth to the sweet marshmallow base. Don’t skip it!
- Pinch of Salt (Optional but Recommended): A tiny pinch of fine sea salt can dramatically improve the flavor balance in sweet treats, cutting through some of the sweetness and making all the other flavors pop. I almost always add it to my treats.
Step-by-Step Instructions
Making these S’mores Rice Krispie Treat Bars is incredibly straightforward, perfect for a quick dessert fix. Follow these steps for gooey, crunchy perfection!
- Prepare Your Pan: First things first, grab a 9×13-inch baking pan. I like to line mine with parchment paper, leaving an overhang on the sides. This makes lifting the finished bars out super easy. If you don’t have parchment, grease the pan generously with butter or cooking spray.
- Melt the Butter: In a large, heavy-bottomed pot or Dutch oven, melt your unsalted butter over low to medium-low heat. The key here is low and slow; we don’t want to brown the butter, just melt it gently.
- Add Marshmallows and Vanilla: Once the butter is mostly melted, add two-thirds of your mini marshmallows to the pot. Stir constantly with a silicone spatula or wooden spoon. Continue to cook over low heat, stirring until the marshmallows are completely melted and smooth. This step takes a few minutes, but patience is a virtue here – rushing it can lead to tough treats. Once melted, remove the pot from the heat and stir in the vanilla extract.
- Incorporate Cereal and Graham Crackers: Now for the fun part! Add your crisp rice cereal and about half of your crushed graham crackers into the melted marshmallow mixture. Working quickly, use your spatula to gently fold everything together until the cereal and graham cracker pieces are fully coated with the marshmallow mixture. Be gentle; you want to coat, not crush, the cereal.
- Press into Pan: Transfer the mixture immediately into your prepared 9×13-inch pan. Lightly grease your hands or the back of your spatula with butter or cooking spray. Gently and evenly press the mixture into the pan. Resist the urge to press too firmly, as this can compress the cereal and result in dense, hard bars. A gentle, even spread is what we’re aiming for.
- Top with S’mores Goodness: While the base is still warm and sticky, sprinkle the remaining mini marshmallows evenly over the top. Then, scatter your milk chocolate chips (or chopped chocolate) and the rest of your crushed graham crackers over the marshmallows.
- Toast (Optional but Highly Recommended!): This is how we get that classic toasted marshmallow flavor. If you have a kitchen torch, carefully torch the top of the marshmallows until they’re golden brown and slightly bubbly. If you don’t have a torch, you can place the pan under your oven’s broiler for about 1-2 minutes. Keep a very close eye on it, as marshmallows can go from perfectly toasted to burnt in seconds! Watch for a nice golden-brown color, then pull them out.
- Cool Completely: Let your S’mores Rice Krispie Treat Bars cool completely at room temperature, which usually takes about 1-2 hours. This allows them to set properly, making them much easier to cut and enjoy.
- Cut and Serve: Once cooled, use the parchment paper overhang to lift the entire slab out of the pan. Place it on a cutting board and cut it into desired bar sizes. I usually aim for 12-16 bars. Now, go ahead and enjoy your delightful homemade s’mores!
Tips & Suggestions
I’ve made my fair share of Rice Krispie treats, and these S’mores Rice Krispie Treat Bars benefit from a few special considerations to get them just right every time. Here are my favorite tips for success:
- Don’t Overcook Your Marshmallows: This is perhaps the most crucial tip! When melting the marshmallows and butter, keep the heat low and stir constantly. Overcooking the marshmallows makes them seize up and become brittle once cooled, resulting in hard, tooth-breaking treats instead of wonderfully chewy ones. Remove them from the heat as soon as they’re fully melted and smooth.
- Grease Everything: Marshmallow mixture is notoriously sticky. Lightly greasing your spatula, your hands (if pressing by hand), and your pan is essential for a smooth process. A light coat of butter or cooking spray goes a long way.
- Gentle Pressing is Key: When you’re pressing the mixture into the pan, remember to be gentle. If you pack it down too firmly, your bars will be dense and hard. A light, even press allows for air pockets, keeping them delightfully chewy and soft.
- Even Distribution for Every Bite: Make sure to stir well when adding the cereal and graham crackers to the marshmallow mixture. You want every bite of your S’mores Rice Krispie Treat Bar to have that perfect balance of crunch, chew, and graham flavor.
- Toasting the Topping: The broiler method for toasting the top layer of marshmallows can be tricky. My personal preference is using a kitchen torch if you have one. It gives you much more control over the toasting process, allowing you to achieve that perfect golden-brown, slightly charred finish without risking burning the whole batch. If using a broiler, preheat it, place the pan on the top rack, and watch it like a hawk – it literally takes seconds.
- Get Creative with Chocolate: While milk chocolate is classic, don’t be afraid to experiment! Dark chocolate chips can add a lovely bitterness that balances the sweetness. White chocolate chips could also be a fun, albeit different, twist. You could even drizzle melted chocolate over the cooled bars for an extra touch of decadence.
- Add a Pinch of Salt: As mentioned in the ingredient notes, a tiny pinch of salt (about 1/4 teaspoon for a full batch) stirred into the melted marshmallow mixture can truly enhance all the flavors and balance the sweetness beautifully. It’s my secret weapon for elevating almost any sweet treat.
- Serve Fresh: While they store well, these S’mores Rice Krispie Treat Bars are truly at their best the day they are made. The cereal is crispiest, and the marshmallows are at their chewiest.
Storage
Once you’ve made a batch of these glorious S’mores Rice Krispie Treat Bars, you’ll want to make sure they stay fresh and delicious for as long as possible. Luckily, storing them is super simple:
- Airtight Container at Room Temperature: The best way to store your S’mores Rice Krispie Treat Bars is in an airtight container at room temperature. This is crucial for preventing them from drying out and becoming hard or stale. Keep them away from direct sunlight or heat sources.
- Layer with Parchment: If you’re stacking the bars in your container, I recommend placing a piece of parchment paper or wax paper between the layers. This prevents them from sticking together, especially if your chocolate or marshmallows are a bit melty.
- Shelf Life: These treats are best enjoyed within 3-4 days of making them. While they might last a bit longer, the cereal starts to lose its crispness and the texture can change after that.
- Avoid the Refrigerator: I generally advise against storing Rice Krispie treats in the refrigerator. The cold air tends to make them very hard and less chewy, which isn’t the ideal texture we’re going for. Room temperature is truly their happy place.
- Freezing (Optional): While not typically necessary, you can freeze S’mores Rice Krispie Treat Bars. Wrap individual bars tightly in plastic wrap, then place them in a freezer-safe airtight container or bag. They can be frozen for up to 1 month. When you’re ready to enjoy, simply let them thaw at room temperature for an hour or two. The texture might be slightly chewier, but they’ll still be delicious!
Final Thoughts
And there you have it! I truly believe that these S’mores Rice Krispie Treat Bars are more than just a dessert; they’re an instant ticket to pure joy. What makes them an absolute must-try is that perfect fusion of classic campfire flavors – the rich chocolate, the gooey marshmallow, and the crunchy graham cracker – all nestled within the beloved chewy embrace of a Rice Krispie Treat. It’s not just a snack; it’s an experience that’s both nostalgic and excitingly new. The ease with which you can whip up a batch makes them perfect for any occasion, from a backyard barbecue to a cozy night in. So, go ahead, give these incredible S’mores Rice Krispie Treat Bars a try. I promise, your taste buds will thank you for this delightful journey back to childhood, elevated to a whole new level of deliciousness!

Chewy S’mores Rice Krispie Treat Bars: Best No-Bake Recipe
- Total Time: 25 minutes
- Yield: 12-16 bars 1x
Description
These S’mores Rice Krispie Treat Bars combine the nostalgic flavors of classic Rice Krispie Treats with the gooey goodness of s’mores. Perfect for any occasion, they deliver a delightful crunch and chew that will satisfy your sweet tooth.
Ingredients
- 6 cups Crisp Rice Cereal
- 10 cups Mini Marshmallows
- 1/2 cup Unsalted Butter
- 1 1/2 cups Graham Crackers, crushed
- 1 cup Milk Chocolate Chips or Chopped Chocolate Bar
- 1 teaspoon Vanilla Extract
- Pinch of Salt (Optional but Recommended)
Instructions
- Prepare Your Pan: Grab a 9×13-inch baking pan and line it with parchment paper, leaving an overhang on the sides.
- Melt the Butter: In a large pot, melt the unsalted butter over low to medium-low heat.
- Add Marshmallows and Vanilla: Once the butter is melted, add two-thirds of the mini marshmallows and stir until completely melted and smooth. Remove from heat and stir in the vanilla extract.
- Incorporate Cereal and Graham Crackers: Add the crisp rice cereal and half of the crushed graham crackers into the melted marshmallow mixture and fold gently until fully coated.
- Press into Pan: Transfer the mixture into the prepared pan and gently press it down evenly.
- Top with S’mores Goodness: Sprinkle the remaining mini marshmallows, milk chocolate chips, and the rest of the crushed graham crackers over the top.
- Toast (Optional but Highly Recommended!): Use a kitchen torch to toast the marshmallows until golden brown, or broil in the oven for 1-2 minutes, watching closely.
- Cool Completely: Let the bars cool completely at room temperature for 1-2 hours.
- Cut and Serve: Lift the bars out using the parchment paper and cut into desired sizes.
- Prep Time: 15 mins
- Cook Time: 10 mins
- Category: Dessert
- Method: No-Bake
- Cuisine: American
Nutrition
- Serving Size: 1 bar
- Calories: 200
- Sugar: 15 g
- Sodium: 50 mg
- Fat: 8 g
- Saturated Fat: 5 g
- Unsaturated Fat: 2 g
- Trans Fat: 0 g
- Carbohydrates: 30 g
- Fiber: 1 g
- Protein: 2 g
- Cholesterol: 15 mg
Keywords: Don't overcook your marshmallows; keep the heat low and stir constantly. Grease your spatula and hands to prevent sticking, and gently press the mixture into the pan for chewy bars.