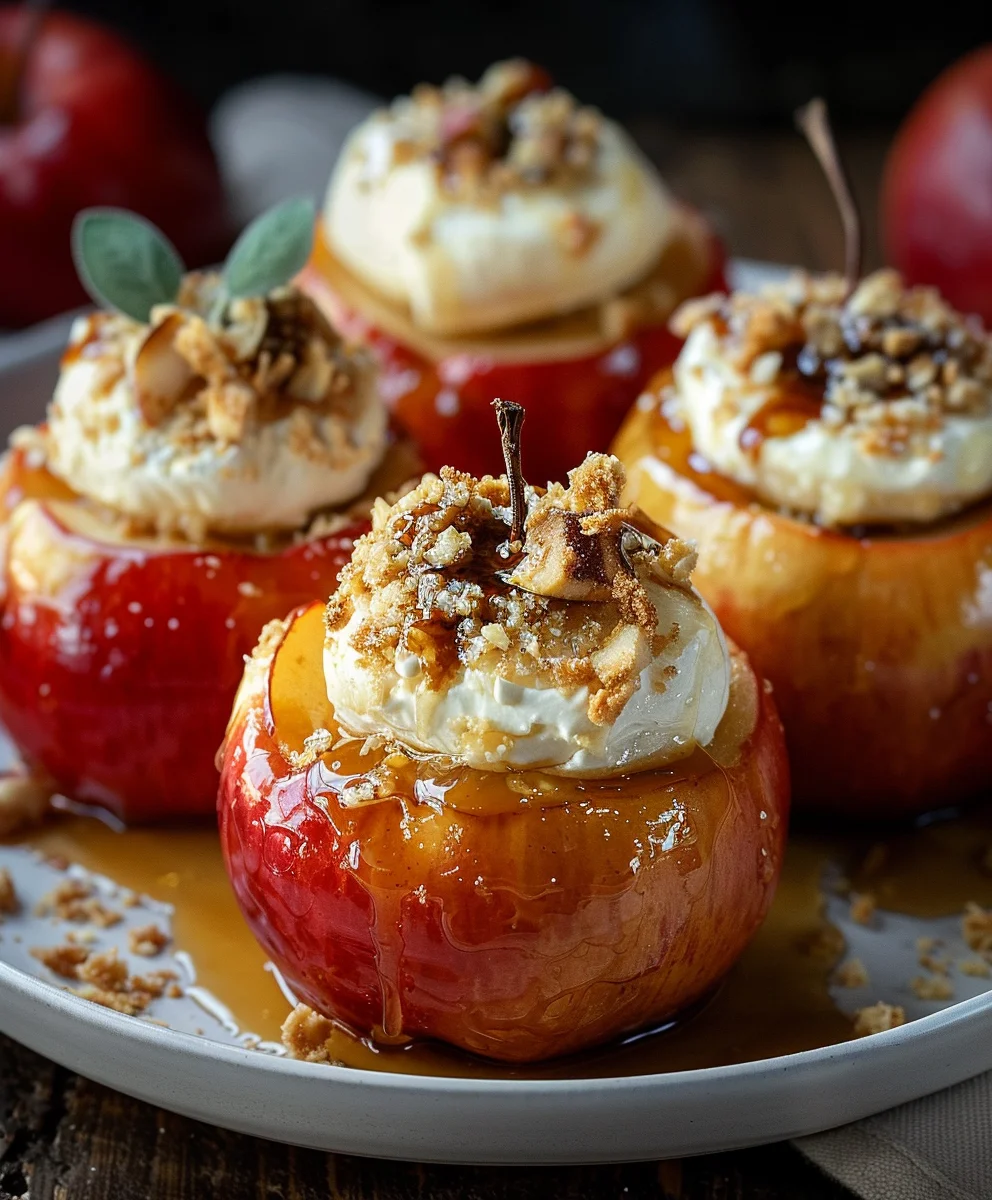
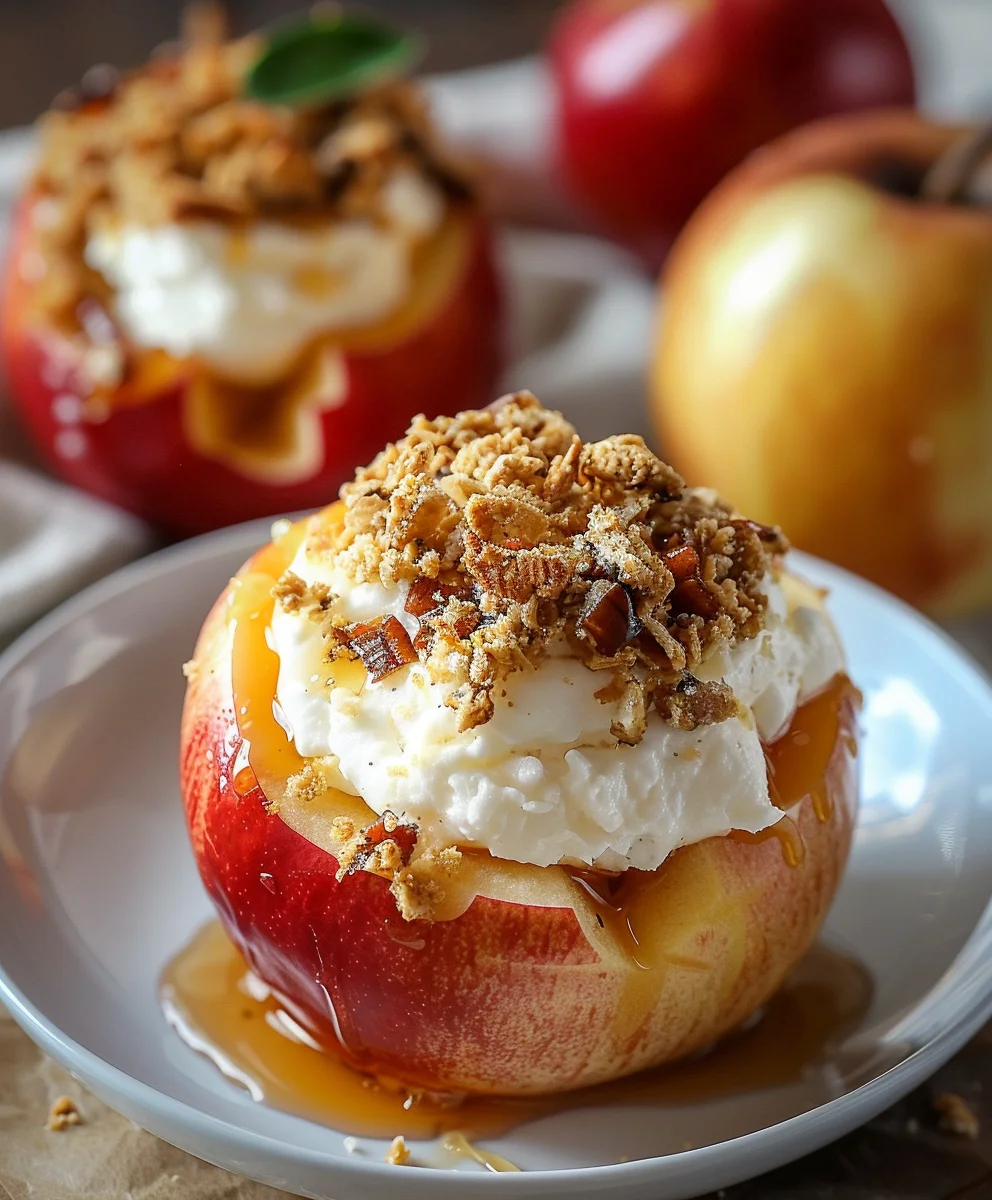
Cheesecake Stuffed Baked Apples are not just a dessert; they are an exquisite culinary revelation, offering a harmonious blend of two beloved comfort food classics transformed into a surprisingly simple yet utterly sophisticated treat. Imagine biting into a perfectly tender, warm apple, its natural sweetness complemented by a lusciously creamy, tangy cheesecake filling, all infused with comforting hints of cinnamon and spice. It’s a moment of pure, unadulterated bliss that feels both nostalgic and refreshingly innovative, capturing the very essence of cozy indulgence.
While baked apples have been a wholesome, rustic dessert enjoyed for centuries across various cultures, providing warmth and comfort, and cheesecake holds its own as a universally adored indulgence with ancient roots, this recipe takes a delightful modern twist. We’re elevating the simple, comforting baked fruit by infusing it with the rich, creamy decadence of a classic cheesecake, creating an individual portion that feels incredibly special without being overly complicated. It’s the kind of dessert that impresses guests at a dinner party yet is straightforward enough to whip up for a cozy evening at home, making it wonderfully versatile.
Why this dessert is an absolute game-changer:
People adore this particular dish not only for its incredible taste and delightful textural contrast – the soft, yielding apple against the smooth, rich cheesecake – but also for its clever convenience and presentation. Each Cheesecake Stuffed Baked Apple is a self-contained masterpiece, ensuring perfect portions every time. It’s a unique offering that skillfully marries the heartiness of a fruit dessert with the luxuriousness of a creamy confection, making it an instant favorite for anyone seeking a dessert that truly stands out and satisfies on multiple levels.

Ingredients:
- 6 large, firm baking apples (such as Honeycrisp, Fuji, Gala, or Granny Smith for a tart contrast)
- 8 ounces (226g) cream cheese, softened to room temperature
- 1/2 cup (100g) granulated sugar, plus 2 tablespoons for apples
- 1 large egg
- 1 teaspoon pure vanilla extract
- 1/2 teaspoon ground cinnamon, plus 1/4 teaspoon for apples
- 1/4 teaspoon ground nutmeg
- 1/2 cup (50g) graham cracker crumbs, plus 2 tablespoons for topping
- 2 tablespoons unsalted butter, melted
- 1/2 cup (120ml) hot water (for the baking dish)
- Optional toppings: Caramel sauce, whipped cream, a sprinkle of extra cinnamon, chopped pecans or walnuts
Equipment You’ll Need:
- Large mixing bowl
- Electric mixer (handheld or stand mixer)
- Apple corer or a small spoon/melon baller
- Paring knife
- Baking dish (9×13 inch or similar, large enough to hold all apples snugly)
- Measuring cups and spoons
- Small brush (for melted butter)
- Wire cooling rack
Preparing Your Apples:
Creating these delightful Cheesecake Stuffed Baked Apples begins with careful preparation of our star fruit. The quality of your apples can truly make or break this dessert, so select firm, unblemished varieties that hold their shape well during baking.
- Preheat Your Oven and Prepare Baking Dish: First things first, let’s get that oven ready. Preheat your oven to 375°F (190°C). While the oven heats, find a baking dish that’s large enough to comfortably fit all six of your apples in a single layer. You don’t want them too cramped, but a little snugness is fine. Pour 1/2 cup of hot water into the bottom of the baking dish. This creates a moist environment, helping the apples to steam slightly and become wonderfully tender without drying out, which is key to perfectly baked apples.
- Wash and Dry the Apples Thoroughly: Rinse each apple under cool running water to remove any dirt or residue. Pat them completely dry with a clean kitchen towel. A dry surface helps the butter and sugar adhere better and ensures a more even bake.
- Carefully Core the Apples: This step requires a bit of precision. Using an apple corer, or if you don’t have one, a small spoon or melon baller and a paring knife, carefully remove the core from the center of each apple. The most important thing here is to make sure you do not core all the way through the bottom. You need to leave about 1/2 to 3/4 inch (1.5-2 cm) of the apple intact at the base to form a natural cup for our luscious cheesecake filling. Widen the opening slightly at the top, if necessary, to make it easier to spoon in the filling later.
- Optional: Score or Peel a Strip: To prevent the apple skins from bursting during baking and to encourage even cooking, I like to take a paring knife and lightly score a ring around the circumference of each apple, about halfway down. Alternatively, you can peel a small strip of skin, about an inch wide, around the top opening of each apple. This helps the skin to relax and expand as the apple bakes, preventing cracking and ensuring a beautiful presentation for your finished Cheesecake Stuffed Baked Apples.
- Season the Apples for Enhanced Flavor: In a small bowl, melt 2 tablespoons of unsalted butter. Using a pastry brush, lightly brush the outside of each cored apple with the melted butter. This helps the apples brown beautifully and adds a subtle richness. Next, sprinkle the apples evenly with the remaining 2 tablespoons of granulated sugar and 1/4 teaspoon of ground cinnamon. This creates a wonderfully sweet and aromatic crust on the apple, complementing the rich cheesecake interior.
- Arrange Apples in Baking Dish: Place the prepared apples upright in your baking dish, ensuring they are stable. The water in the dish will provide the necessary moisture for steaming during the baking process, ensuring your apples become perfectly tender.
Crafting the Luscious Cheesecake Filling:
The heart of our Cheesecake Stuffed Baked Apples lies in this incredibly creamy and flavorful cheesecake filling. It’s simple to make but delivers a rich, decadent experience that perfectly balances the tartness of the baked apples.
- Ensure Cream Cheese is Softened: This is a crucial first step for a smooth, lump-free filling. Make sure your 8 ounces of cream cheese is at room temperature and thoroughly softened. If it’s still cold, you’ll end up with lumps that are hard to beat out. You can achieve this by leaving it on the counter for at least 30-60 minutes, or if you’re short on time, carefully microwave it for 10-15 second intervals until just soft.
- Cream the Cream Cheese and Sugar: In your large mixing bowl, combine the softened cream cheese and 1/2 cup of granulated sugar. Using an electric mixer on medium speed, beat the mixture for 2-3 minutes until it is incredibly smooth, light, and fluffy. Scrape down the sides of the bowl often with a spatula to ensure everything is fully incorporated. This initial beating is vital for creating that classic cheesecake texture.
- Incorporate the Egg and Vanilla: Reduce the mixer speed to low. Add the large egg and 1 teaspoon of pure vanilla extract to the cream cheese mixture. Continue mixing just until combined. Be careful not to overmix once the egg is added, as too much air can cause the filling to puff up too much and potentially crack during baking. We’re aiming for a dense, creamy filling.
- Add the Warm Spices: Now, let’s infuse some cozy fall flavors into our filling! Add 1/2 teaspoon of ground cinnamon and 1/4 teaspoon of ground nutmeg to the mixture. Mix on low speed until the spices are evenly distributed throughout the filling. These warm spices are incredibly complementary to both the apple and the creamy cheesecake, elevating the overall aroma and taste of your Cheesecake Stuffed Baked Apples.
- Gently Fold in Graham Cracker Crumbs: Finally, add 1/2 cup of graham cracker crumbs to the cheesecake mixture. Using a spatula, gently fold the crumbs into the filling until they are just incorporated. We want to keep some of that creamy texture, so avoid overmixing. The graham cracker crumbs add a lovely subtle texture and a classic cheesecake base flavor right into our filling, making each bite even more delightful.
Assembling the Cheesecake Stuffed Baked Apples:
Now comes the satisfying part where we bring all our prepared components together to create the magnificent Cheesecake Stuffed Baked Apples. This is where the magic truly starts to take shape!
- Spoon Filling into Prepared Apples: Take your beautifully prepared cheesecake filling and, using a spoon or a small cookie scoop, carefully fill each cored apple. Don’t be shy here! Pile the filling generously into the cavity, creating a slight dome or mound on top. As the cheesecake bakes, it will settle slightly, so a generous initial fill ensures a substantial and satisfying portion of creamy cheesecake in every apple.
- Add the Graham Cracker Crumb Topping: For an extra layer of texture and a nod to the classic cheesecake crust, sprinkle the remaining 2 tablespoons of graham cracker crumbs over the top of the cheesecake filling in each apple. You can gently press them down a little, but don’t compact them too much. This creates a delightful crumble topping that will become slightly crisp and golden brown during baking, adding another dimension to your Cheesecake Stuffed Baked Apples.
Baking Perfection:
The baking process is where our Cheesecake Stuffed Baked Apples transform from simple ingredients into a warm, tender, and incredibly satisfying dessert. Patience is key here to achieve that perfect balance of soft apple and creamy filling.
- Bake Until Tender and Golden: Carefully transfer your baking dish with the stuffed apples to the preheated 375°F (190°C) oven. Bake for approximately 35-50 minutes. The exact baking time will vary depending on the size and variety of your apples. You’ll know they are done when the apples are fork-tender (you should be able to easily pierce the apple flesh with a fork) and the cheesecake filling is set, lightly golden brown on top, and no longer jiggles excessively in the center. The aroma filling your kitchen will be an excellent indicator too!
- Cool Before Serving: Once baked to perfection, carefully remove the baking dish from the oven. The apples and filling will be extremely hot. Allow the Cheesecake Stuffed Baked Apples to cool in the baking dish for about 10-15 minutes before attempting to move them. This cooling period allows the apples to firm up slightly and the cheesecake filling to fully set, making them easier to handle and serve. You can then carefully transfer them to a wire rack to cool further, or serve them warm directly from the dish.
Finishing Touches and Serving Suggestions:
While delicious on their own, a few simple garnishes can elevate your Cheesecake Stuffed Baked Apples into a truly show-stopping dessert. Presentation always adds to the enjoyment!
- Drizzle with Caramel Sauce: My absolute favorite way to finish these is with a generous drizzle of warm caramel sauce. The buttery, sweet notes of caramel perfectly complement the baked apple and the rich cheesecake. You can use store-bought caramel or make your own for an extra special touch.
- Add a Dollop of Whipped Cream: A cloud of freshly whipped cream, or even a scoop of vanilla bean ice cream, provides a wonderful temperature and texture contrast. The cool creaminess against the warm, tender apple and cheesecake is simply divine.
- Sprinkle with Chopped Nuts: For an added crunch and nutty flavor, sprinkle a few chopped pecans or walnuts over the top. Toasted nuts would be even better, bringing out their deep, aromatic qualities.
- A Touch of Spice: A final, light dusting of ground cinnamon or a very fine grating of fresh nutmeg can also enhance the warm, inviting aroma and flavor profile of your finished Cheesecake Stuffed Baked Apples.
- Serve Warm: These are truly best served warm, allowing the flavors to meld and the textures to remain soft and inviting. They make a fantastic dessert for a cozy evening, a holiday gathering, or just a special treat for yourself.
Tips for Success with Your Cheesecake Stuffed Baked Apples:
- Choose the Right Apples: As mentioned, firm baking apples are key. Avoid softer varieties like Red Delicious, as they tend to become mushy. Honeycrisp, Fuji, Gala, and Granny Smith (for a tart counterpoint) are excellent choices that hold their shape well.
- Room Temperature Ingredients: Always ensure your cream cheese and egg are at room temperature before mixing the filling. This prevents lumps and ensures a smooth, emulsified cheesecake mixture. Cold ingredients will result in a clumpy filling.
- Don’t Overmix the Filling: Once the egg is added, mix just until combined. Overmixing can incorporate too much air, which might cause the cheesecake to puff up excessively and then crack during cooling.
- Prevent Apples from Splitting: Scoring the apple skin or peeling a strip around the top helps the apple expand evenly during baking and minimizes the risk of the skin splitting. The water in the baking dish also contributes to a gentler bake.
- Check for Doneness: The best way to tell if your apples are ready is to gently pierce them with a fork. It should slide in easily but the apple should still hold its shape. Overbaked apples can become mushy.
- Storage: Leftover Cheesecake Stuffed Baked Apples can be stored in an airtight container in the refrigerator for up to 3-4 days. Reheat gently in the microwave or oven until warm through.
Delicious Variations to Try:
- Nutty Crunch: Add 1/4 cup of finely chopped pecans, walnuts, or almonds to the cheesecake filling for an added layer of texture and nutty flavor.
- Chocolate Indulgence: Fold in 1/4 cup of mini chocolate chips or finely chopped dark chocolate into the cheesecake filling for a chocolatey twist.
- Spiced Apple Filling: Boost the apple flavor by adding 1 tablespoon of finely diced dried cranberries or chopped raisins to the core of the apple before filling with cheesecake, or even mix a teaspoon of apple pie spice into the apple seasoning.
- Streusel Topping: Instead of just graham cracker crumbs, make a quick streusel topping with 2 tablespoons of flour, 1 tablespoon of brown sugar, 1/4 teaspoon of cinnamon, and 1 tablespoon of cold butter, crumbled together. Sprinkle this over the cheesecake filling before baking for an even more decadent crust.
- Citrus Zest: Add 1 teaspoon of lemon or orange zest to the cheesecake filling. The bright citrus notes can provide a wonderful counterpoint to the richness of the cheesecake and apple.
- Maple Pecan Glaze: Instead of caramel, drizzle with a simple glaze made from maple syrup and finely chopped pecans after baking for a different kind of sweet finish on your Cheesecake Stuffed Baked Apples.
Conclusion:
Well, my friends, we’ve reached the sweet finale, and I truly hope you’re as excited as I am about this incredible dessert. We’ve journeyed through the simple steps to create something truly magical, a dish that consistently earns rave reviews whenever I serve it. This isn’t just another apple recipe; it’s an experience. The delightful contrast between the tender, baked apple and the rich, tangy, and impossibly creamy cheesecake filling is nothing short of spectacular. Every bite offers that warm, comforting fruitiness perfectly balanced by the decadent, smooth cheese, often with a delightful crunch from the oat topping. It’s elegant enough for a special dinner party yet comforting enough for a cozy night in. I promise you, the aroma alone as these bake will fill your home with an irresistible warmth and anticipation that’s hard to beat.
What makes this recipe a definite must-try, in my humble opinion, is its unique blend of familiarity and surprise. Everyone loves baked apples, and who doesn’t adore cheesecake? Combining these two beloved treats results in a dessert that feels both innovative and wonderfully nostalgic. It’s surprisingly straightforward to assemble, making it accessible even for novice bakers, but the end result looks and tastes like something you’d find in a high-end patisserie. The individual portions are also a huge bonus, making serving a breeze and ensuring everyone gets their own little cup of heaven. It’s a fantastic way to enjoy seasonal apples, transforming them into a show-stopping dessert that will undoubtedly impress and become a new favorite in your recipe rotation.
Serving Suggestions & Creative Variations:
Now, let’s talk about taking your Cheesecake Stuffed Baked Apples to the next level. While they are absolutely divine served warm, straight from the oven, with that golden, bubbling topping, there are so many ways to customize your experience. For a truly indulgent treat, a generous scoop of good quality vanilla bean ice cream melting gently alongside or on top is practically mandatory. The cold creaminess against the warm, fruity, cheesy goodness is a symphony for the taste buds. A generous drizzle of warm caramel sauce or a delicate ribbon of homemade chocolate ganache can elevate the dessert further, adding another layer of sweetness and complexity. Don’t forget the classic dollop of freshly whipped cream, perhaps infused with a hint of cinnamon or maple syrup, for an extra touch of luxuriousness that truly makes these feel special.
But why stop there? The beauty of this recipe lies in its incredible adaptability. Feel free to experiment with different apple varieties. While a firm, slightly tart apple like Honeycrisp or Braeburn holds its shape beautifully and provides a lovely counterpoint to the sweet filling, a Granny Smith will offer a more pronounced tartness that some adore. For those who love a nutty crunch, consider adding finely chopped pecans or walnuts to your oat topping, or even a few to the cheesecake filling for an unexpected texture. A pinch of nutmeg, allspice, or even a dash of cardamom can be incorporated into the apple filling or the cheesecake mixture to deepen the autumnal flavors and add an aromatic complexity. And for a truly unique twist, why not try this concept with baked pears? The possibilities for personalization are truly endless, allowing you to tailor this dessert perfectly to your taste preferences.
You can also prepare these gems ahead of time. Assemble them, cover tightly, and refrigerate before baking, then simply pop them in the oven when you’re ready for dessert. This makes them perfect for entertaining, as a significant portion of the work can be done in advance. For a party-friendly option, use smaller, “snack-sized” apples and serve them as elegant mini desserts; they’re always a hit!
Your Turn to Create & Share!
So, there you have it! My comprehensive guide to creating these utterly irresistible Cheesecake Stuffed Baked Apples. I truly hope you feel inspired to head into your kitchen and give this recipe a try very soon. I promise you, the effort involved is surprisingly minimal, but the rewards are immense. Imagine the smiles on your family’s faces, the enthusiastic compliments from your guests, and the pure satisfaction of biting into one of these homemade delights, knowing you created such a masterpiece. Don’t be shy – dive in, bake a batch (or two!), and make some truly sweet and memorable moments in your kitchen.
Once you’ve had a chance to experience the magic of this dessert, I would absolutely love to hear about it! Please come back and share your thoughts in the comments below, your successes, any fun variations you tried, or even just a photo of your beautiful creations. Your feedback and experiences mean the world to me and help foster our wonderful community of home bakers and dessert enthusiasts. Happy baking, and enjoy every single delightful, creamy, crunchy, and fruity bite!
Cheesecake Stuffed Baked Apples: Sweet & Creamy Treat!
Indulge in a harmonious blend of tender, warm baked apples and a luscious, tangy cheesecake filling, infused with comforting cinnamon and spice. This exquisite individual dessert offers a modern twist on two comfort food classics, making it a surprisingly simple yet sophisticated treat perfect for any occasion.
Ingredients
-
4 large apples (Honeycrisp or Gala)
-
8 oz cream cheese, softened
-
1/4 cup granulated sugar
-
1 tsp vanilla extract
-
1/2 tsp ground cinnamon
-
1/4 tsp ground nutmeg
-
1/2 cup graham cracker crumbs
-
1/4 cup chopped walnuts or pecans (optional)
-
2 tbsp melted butter
-
1 tbsp lemon juice
-
1 cup whipped cream (optional, for serving)
Instructions
-
Step 1
Preheat oven to 375°F (190°C). Pour 1/2 cup hot water into a 9×13 inch baking dish. -
Step 2
Wash and dry apples. Carefully core each apple, leaving about 1/2-3/4 inch at the base to form a cup. Lightly score a ring around the circumference or peel a small strip of skin around the top to prevent bursting. Brush apples with 1 tbsp lemon juice and 2 tbsp melted butter. Sprinkle each apple with 1 tbsp of the granulated sugar and 1/4 tsp of the ground cinnamon. Place apples upright in the prepared baking dish. -
Step 3
In a large bowl, beat softened cream cheese with the remaining 3 tbsp granulated sugar until smooth and fluffy. Mix in 1 tsp vanilla extract, the remaining 1/4 tsp ground cinnamon, and 1/4 tsp ground nutmeg until just combined. Gently fold in 1/2 cup graham cracker crumbs and the optional 1/4 cup chopped walnuts or pecans. -
Step 4
Spoon the cheesecake filling generously into each cored apple cavity, creating a slight dome on top. -
Step 5
Carefully transfer the baking dish to the preheated oven. Bake for approximately 35-50 minutes, or until apples are fork-tender and the cheesecake filling is set and lightly golden brown. -
Step 6
Remove from oven and let cool in the baking dish for 10-15 minutes before serving. Serve warm, optionally garnished with caramel sauce, a dollop of whipped cream (from 1 cup whipped cream), or extra cinnamon/nuts.
Important Information
Nutrition Facts (Per Serving)
It is important to consider this information as approximate and not to use it as definitive health advice.
Allergy Information
Please check ingredients for potential allergens and consult a health professional if in doubt.