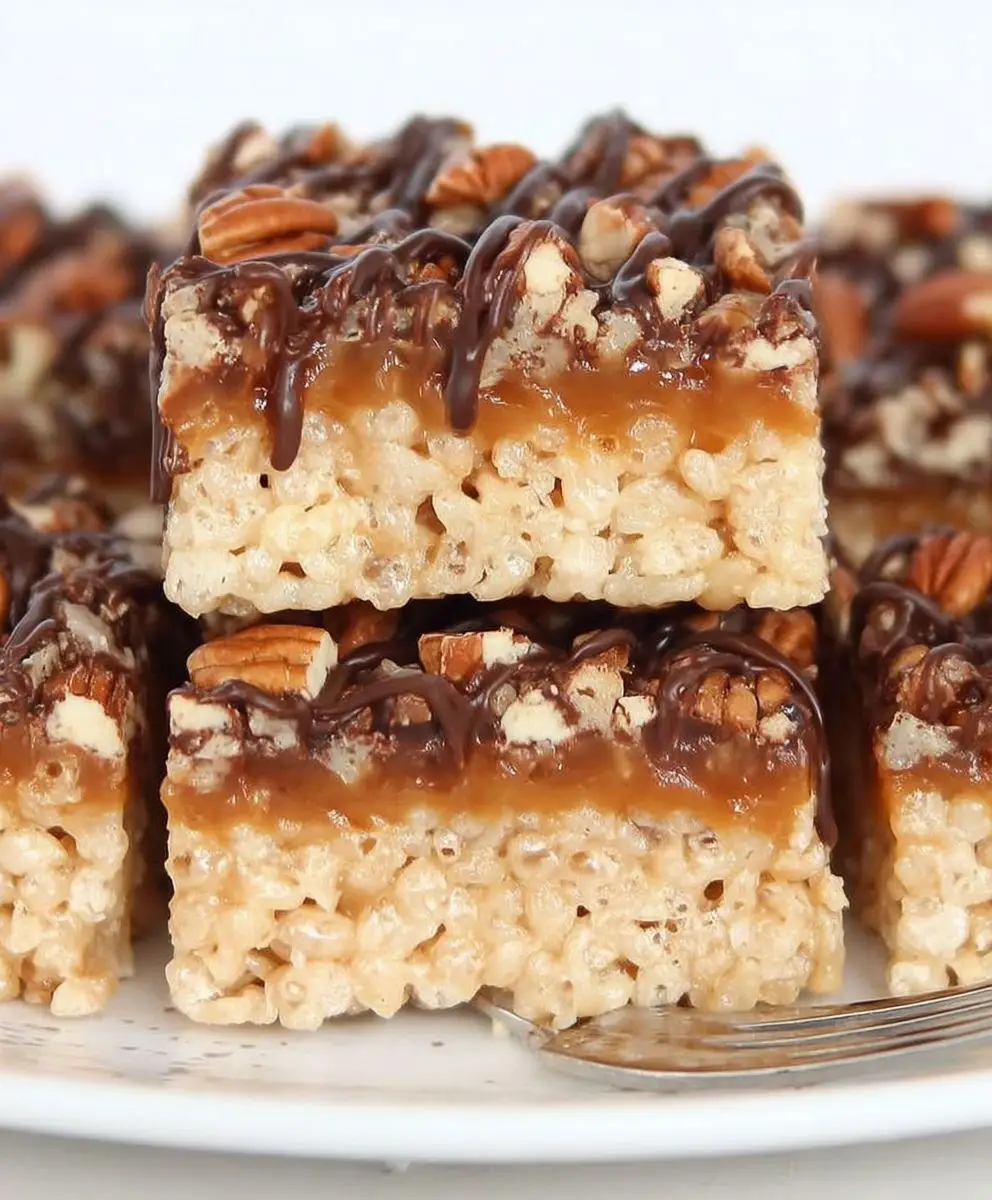
Caramel Turtle Rice Krispies Treats: Prepare to experience a nostalgic treat elevated to a whole new level of decadent delight! Forget everything you thought you knew about this classic childhood favorite because we’re about to embark on a culinary adventure that will tantalize your taste buds and leave you craving more.
Rice Krispies Treats have been a beloved staple in American households since the 1930s, offering a simple yet satisfying combination of crispy cereal, gooey marshmallows, and sweet butter. But what happens when you infuse this timeless treat with the rich, buttery goodness of caramel and the nutty crunch of pecans, transforming it into a Caramel Turtle masterpiece? Pure magic, that’s what!
People adore this upgraded version for its symphony of textures and flavors. The soft, chewy marshmallow base perfectly complements the crispy Rice Krispies, while the luscious caramel adds a layer of irresistible sweetness. The pecans provide a delightful crunch and a hint of earthy flavor that balances the sweetness beautifully. These Caramel Turtle Rice Krispies Treats are not only incredibly delicious but also surprisingly easy to make, making them perfect for a quick dessert, a potluck contribution, or a special treat for loved ones. Get ready to create a batch of these irresistible goodies – you won’t be disappointed!

Ingredients:
- 1/2 cup (1 stick) unsalted butter
- 10 ounces marshmallows (about 40 large or 4 cups mini)
- 6 cups Rice Krispies cereal
- 1 cup caramel bits, unwrapped
- 1/2 cup heavy cream
- 1/2 cup chopped pecans or walnuts (optional)
- 4 ounces milk chocolate, chopped (for drizzling)
- 1 tablespoon vegetable oil (for melting chocolate)
- Pinch of sea salt (optional, for topping)
Making the Caramel Sauce:
- First, let’s tackle the caramel sauce. This is what gives our treats that amazing turtle flavor! In a medium saucepan, combine the caramel bits and heavy cream.
- Place the saucepan over medium-low heat. It’s crucial to keep the heat low to prevent the caramel from burning. Stir constantly with a heat-resistant spatula or wooden spoon.
- Continue stirring until the caramel bits are completely melted and the mixture is smooth and creamy. This usually takes about 5-7 minutes. Don’t rush the process! Patience is key to a perfect caramel sauce.
- Once the caramel is smooth, remove the saucepan from the heat and set it aside. We’ll use this later to incorporate into our Rice Krispies mixture. If the caramel starts to thicken too much while you’re working on the next steps, you can gently reheat it over low heat, stirring constantly, until it returns to a pourable consistency.
Preparing the Rice Krispies Mixture:
- Now, let’s get started on the Rice Krispies base. In a large saucepan (the same one you used for the caramel is fine, just wipe it clean), melt the butter over medium heat.
- Once the butter is completely melted, add the marshmallows. Reduce the heat to low and stir constantly until the marshmallows are completely melted and smooth. This usually takes about 3-5 minutes. Be careful not to burn the marshmallows! Burnt marshmallows will give your treats a bitter taste.
- Remove the saucepan from the heat. This is important because we don’t want the Rice Krispies to get soggy from the residual heat.
- Quickly pour the melted caramel sauce into the marshmallow mixture. Stir until everything is well combined and the mixture is a uniform color. The caramel will make the mixture a bit thicker, which is exactly what we want!
- Add the Rice Krispies cereal to the marshmallow-caramel mixture. Gently fold the cereal into the mixture until it’s evenly coated. Be careful not to crush the Rice Krispies! We want them to retain their shape and crunch.
- If you’re using nuts, add the chopped pecans or walnuts now and gently fold them into the mixture.
Pressing and Setting the Treats:
- Prepare a 9×13 inch baking pan by lining it with parchment paper. This will make it much easier to remove the treats later. Make sure the parchment paper overhangs the sides of the pan for easy lifting.
- Pour the Rice Krispies mixture into the prepared baking pan.
- Using a spatula or your hands (lightly greased with butter or cooking spray), gently press the mixture evenly into the pan. Don’t press too hard! We want the treats to be firm but still slightly soft and chewy.
- Let the treats set at room temperature for at least 30 minutes, or until they are firm to the touch. You can also speed up the process by placing the pan in the refrigerator for about 15-20 minutes.
Drizzling with Chocolate and Finishing Touches:
- While the treats are setting, let’s prepare the chocolate drizzle. In a microwave-safe bowl, combine the chopped milk chocolate and vegetable oil. The vegetable oil will help the chocolate melt smoothly and prevent it from seizing.
- Microwave the chocolate in 30-second intervals, stirring after each interval, until the chocolate is completely melted and smooth. Be careful not to overheat the chocolate! Overheated chocolate can become grainy and difficult to work with.
- Once the treats are set, lift them out of the pan using the parchment paper overhang. Place them on a cutting board.
- Drizzle the melted chocolate over the top of the Rice Krispies treats. You can use a spoon, a fork, or a piping bag to create your desired drizzle pattern.
- If desired, sprinkle a pinch of sea salt over the chocolate drizzle. The salt will enhance the sweetness of the caramel and chocolate and add a delicious salty-sweet contrast.
- Let the chocolate set completely before cutting the treats into squares or rectangles. This usually takes about 15-20 minutes at room temperature, or you can speed up the process by placing them in the refrigerator for a few minutes.
- Once the chocolate is set, cut the treats into your desired size and shape. I like to cut them into squares, but you can also cut them into rectangles or even use cookie cutters to create fun shapes.
Tips and Variations:
- Marshmallow Variations: You can use different flavors of marshmallows to add a unique twist to your treats. Try using flavored marshmallows like strawberry, vanilla, or even chocolate marshmallows.
- Nut Variations: Feel free to experiment with different types of nuts. Walnuts, almonds, or even macadamia nuts would be delicious in these treats. You can also toast the nuts before adding them to the mixture for a richer flavor.
- Chocolate Variations: You can use dark chocolate, white chocolate, or even peanut butter chips instead of milk chocolate for the drizzle.
- Caramel Swirl: For an extra caramel flavor, you can swirl some extra caramel sauce over the top of the treats before the chocolate drizzle sets.
- Storage: Store the Rice Krispies treats in an airtight container at room temperature for up to 3 days. They are best enjoyed fresh, but they will still be delicious after a few days.
- Make Ahead: You can make the caramel sauce ahead of time and store it in the refrigerator for up to a week. Just reheat it gently before using.
- Soft Treats: For softer treats, use slightly less Rice Krispies cereal. For firmer treats, use slightly more.
- Prevent Sticking: To prevent the Rice Krispies mixture from sticking to your hands or spatula, lightly grease them with butter or cooking spray.
Enjoy your delicious Caramel Turtle Rice Krispies Treats!
Conclusion:
And there you have it! These Caramel Turtle Rice Krispies Treats are so much more than your average crispy rice snack. They’re a symphony of textures and flavors, a delightful combination of gooey marshmallow, crunchy cereal, rich caramel, and those satisfyingly salty pecans. Honestly, if you’re looking for a treat that’s easy to make, impressive to share, and utterly irresistible, this is it. This recipe is a must-try because it elevates a classic to something truly special.
But don’t just take my word for it! The proof, as they say, is in the pudding… or in this case, the Caramel Turtle Rice Krispies Treats! I’ve made these for countless gatherings, from casual weeknight desserts to potlucks and even bake sales, and they’re always the first thing to disappear. The combination of sweet and salty is just universally appealing, and the chewy texture is incredibly satisfying.
Serving Suggestions and Variations:
While these treats are perfect on their own, there are so many ways to customize them to your liking. For a truly decadent experience, try drizzling them with melted dark chocolate after they’ve set. The bitterness of the dark chocolate provides a wonderful counterpoint to the sweetness of the caramel and marshmallow.
Another fun variation is to use different types of nuts. Walnuts or almonds would work beautifully in place of the pecans, or you could even use a mix of your favorite nuts. If you’re feeling adventurous, try adding a sprinkle of sea salt on top for an extra burst of flavor.
For a festive touch, consider using colored marshmallows for holidays or special occasions. Red and green marshmallows for Christmas, pastel marshmallows for Easter, or even orange and black marshmallows for Halloween – the possibilities are endless!
If you’re looking to make these treats a bit healthier (though let’s be honest, they’re still a treat!), you could try using brown rice cereal instead of regular Rice Krispies. It will add a slightly nutty flavor and a bit more fiber. You could also reduce the amount of butter and sugar slightly, but be careful not to compromise the texture.
Why You Need to Make These Caramel Turtle Rice Krispies Treats:
Seriously, what are you waiting for? This recipe is so simple, even a beginner baker can master it. It requires minimal ingredients, most of which you probably already have in your pantry. And the best part? It takes less than 30 minutes from start to finish. That’s right, in just half an hour, you can have a batch of these delicious treats ready to enjoy.
I truly believe that these Caramel Turtle Rice Krispies Treats are the perfect combination of nostalgia and indulgence. They’re a comforting classic with a sophisticated twist. They’re the kind of treat that brings a smile to your face and makes you feel like a kid again.
So, go ahead, give this recipe a try. I promise you won’t be disappointed. And when you do, please come back and share your experience in the comments below. I’d love to hear what you think and any variations you tried. Did you add dark chocolate? Did you use different nuts? Did you get creative with the marshmallows? I’m always looking for new ideas!
Happy baking (or should I say, no-baking!) and enjoy your Caramel Turtle Rice Krispies Treats! I’m confident that this recipe will become a new favorite in your household.
Caramel Turtle Rice Krispies Treats: Easy Recipe & Delicious Twist
Chewy and crunchy Rice Krispies treats elevated with a homemade caramel sauce, chopped pecans, and a decadent chocolate drizzle. These Caramel Turtle Rice Krispies Treats are a sweet and salty delight!
Ingredients
Instructions
Recipe Notes
- Marshmallow Variations: Use different flavors of marshmallows.
- Nut Variations: Experiment with different types of nuts (walnuts, almonds, macadamia nuts). Toast the nuts for a richer flavor.
- Chocolate Variations: Use dark chocolate, white chocolate, or peanut butter chips instead of milk chocolate.
- Caramel Swirl: Swirl extra caramel sauce over the top before the chocolate drizzle sets.
- Storage: Store in an airtight container at room temperature for up to 3 days.
- Make Ahead: Make the caramel sauce ahead of time and store it in the refrigerator for up to a week. Reheat gently before using.
- Soft Treats: Use slightly less Rice Krispies cereal for softer treats. Use slightly more for firmer treats.
- Prevent Sticking: Lightly grease your hands or spatula with butter or cooking spray.
- Low Heat is Key: Be careful not to burn the caramel or marshmallows.