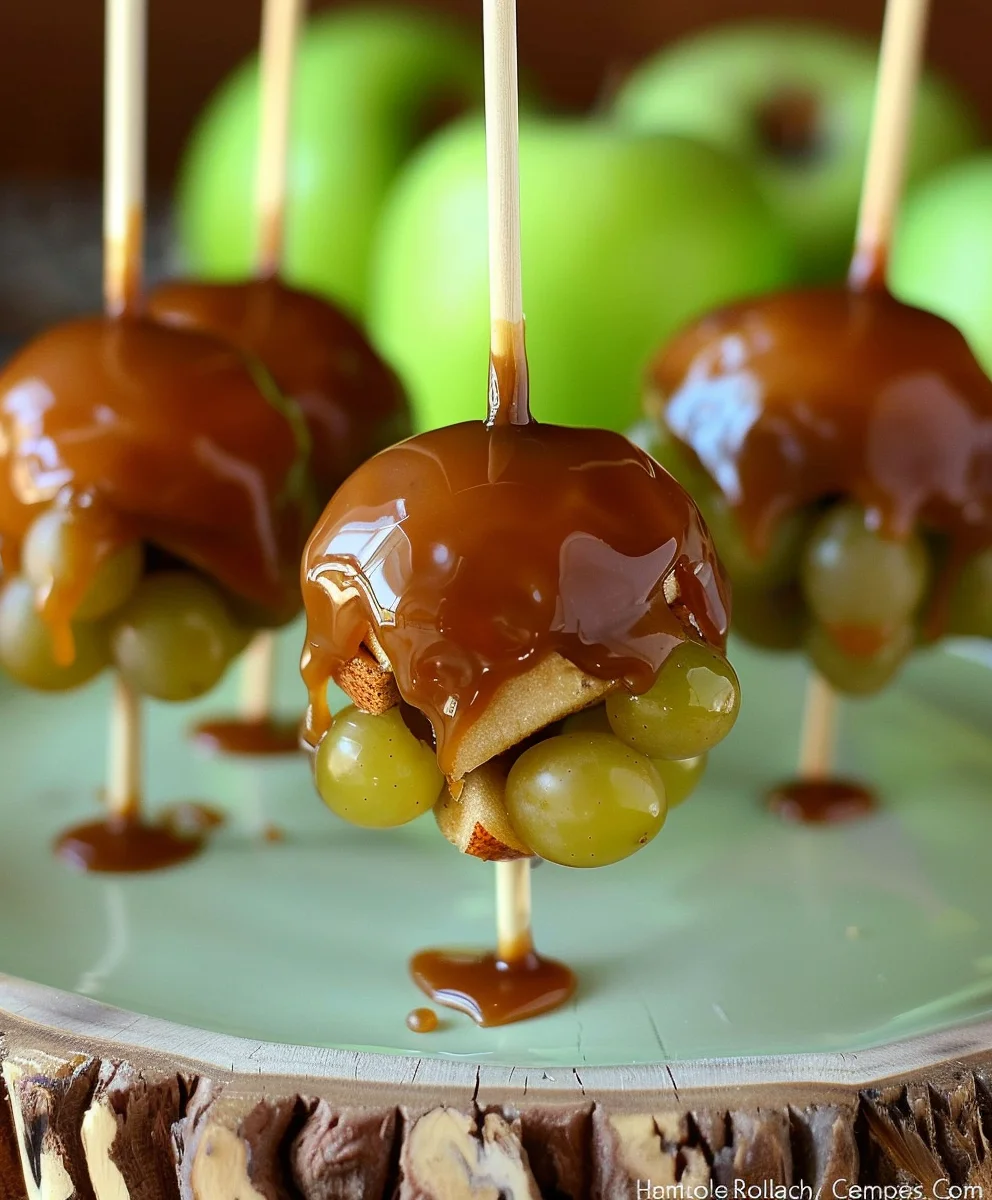
Caramel Apple Grapes are an absolute revelation, transforming a beloved autumn classic into a delightful, bite-sized sensation that I am incredibly excited to share with you today. Imagine the nostalgic essence of crisp, tart apples enveloped in rich, chewy caramel, but re-imagined for ultimate convenience and unexpected texture. Traditionally, the caramel apple is a cherished emblem of fall festivals, carnival merriment, and Halloween festivities, evoking a warmth and joy that many of us hold dear. However, let’s be honest, the classic version, while delicious, can often be a sticky, cumbersome affair to eat.
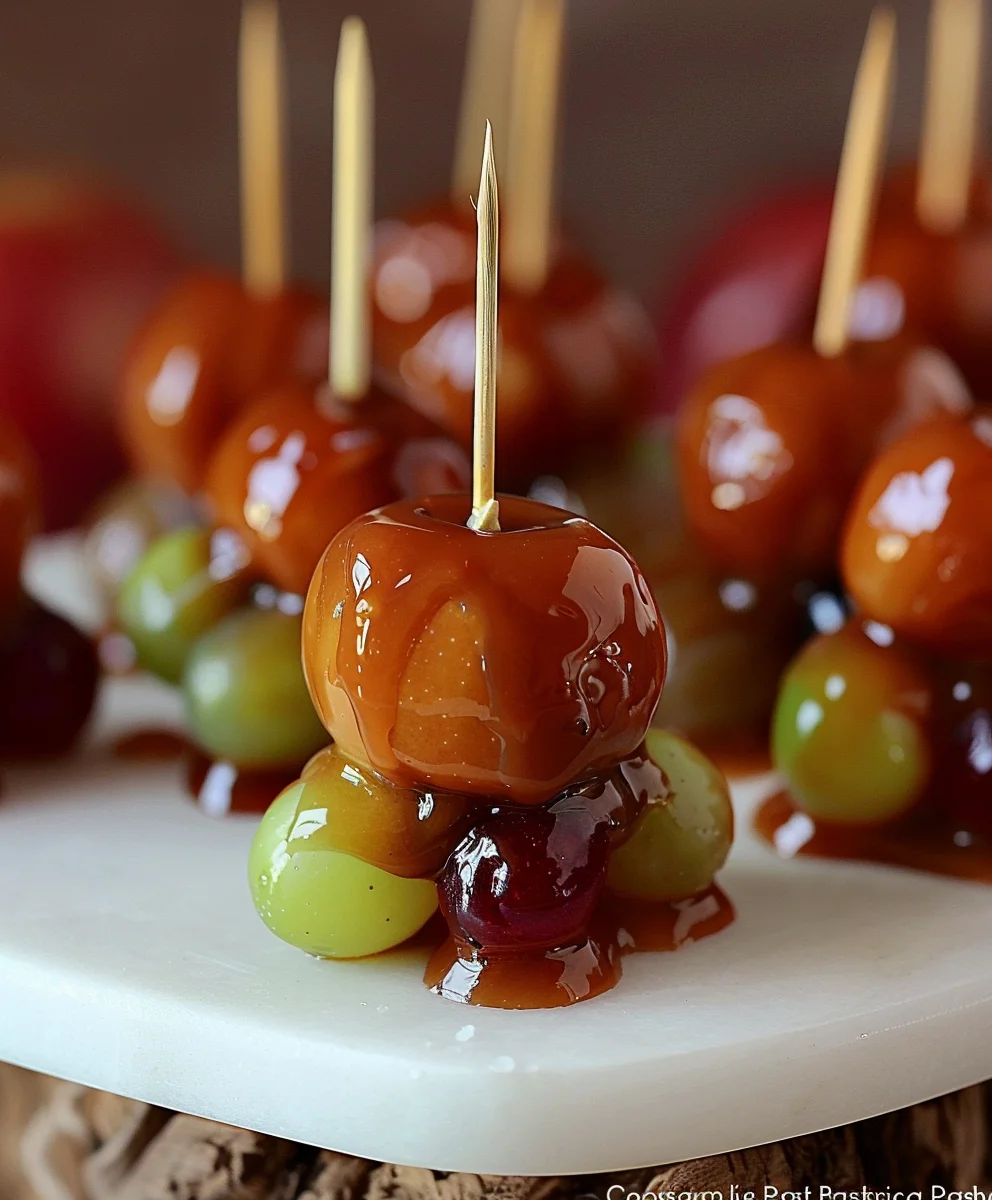
This ingenious twist offers all the irresistible flavor without the mess. People adore this dish because it masterfully combines the juicy, refreshing snap of a fresh grape with the luscious, buttery sweetness of caramel, often finished with a sprinkle of crushed nuts or mini chocolate chips for an extra layer of texture and flavor. It’s the perfect harmony of sweet and tart, crunchy and chewy, making it an incredibly addictive and satisfying treat. Whether you’re hosting a party, looking for an easy yet elegant dessert, or simply craving a unique snack that captures the spirit of the season, these Caramel Apple Grapes are an unequivocal crowd-pleaser that I guarantee will disappear quickly.

Ingredients:
- 2 lbs (approx. 900g) Seedless Green Grapes: I find that crisp, firm green grapes, like Cotton Candy or green Globe varieties, work absolutely best for this recipe. Their slight tartness provides a wonderful contrast to the sweet caramel, and their firm texture ensures they hold up beautifully under the warm coating without becoming mushy. Make sure to select grapes that are plump and free from blemishes or soft spots. They are the star of our “Caramel Apple Grapes” show, so quality matters!
- 1 cup (2 sticks / 226g) Unsalted Butter: Using unsalted butter gives us precise control over the overall saltiness of our caramel. I prefer a good quality, European-style butter for its higher fat content, which contributes to a richer, creamier caramel texture. If you only have salted butter on hand, you can reduce or omit the additional salt mentioned later, but do adjust cautiously.
- 2 cups (400g) Granulated Sugar: This is the primary sweetener and structure builder for our caramel. Ensure it’s fresh and free-flowing. Don’t be tempted to reduce this amount, as it’s crucial for the caramel’s texture and ability to set properly.
- 1/2 cup (120ml) Light Corn Syrup: This often overlooked ingredient is a secret weapon in caramel making! Corn syrup helps prevent crystallization, ensuring our caramel remains smooth and glossy, not grainy. It also adds a lovely chewiness to the final product. Do not substitute with glucose syrup or honey unless you are very experienced with caramel making, as it will alter the consistency significantly.
- 1 cup (240ml) Heavy Cream (at room temperature): The heavy cream is what transforms our sugar mixture into luscious, pourable caramel. Bringing it to room temperature is a critical step; adding cold cream to hot sugar can cause the caramel to seize up and become lumpy. Look for a cream with at least 36% milk fat for the best results.
- 1 teaspoon Pure Vanilla Extract: A touch of good quality vanilla extract elevates the flavor profile, adding warmth and depth to our caramel. I always opt for pure vanilla over artificial for a superior taste. Add it at the very end to preserve its delicate aroma.
- 1/2 teaspoon Fine Sea Salt: A little salt goes a long way in balancing the sweetness of the caramel, truly enhancing all the other flavors. If you’re using salted butter, you might want to start with a quarter teaspoon and taste before adding more.
- Optional Toppings:
- 1 cup Finely Chopped Peanuts, Pecans, or Almonds: Toasted nuts add a fantastic crunch and nutty flavor, reminiscent of classic caramel apples.
- 1/2 cup Mini Chocolate Chips: For a delightful chocolatey twist that pairs wonderfully with caramel.
- 1/2 cup Toffee Bits: Adds another layer of sweet, buttery crunch.
- 1/4 cup Shredded Coconut: For a tropical hint that surprisingly complements the caramel and grapes.
- Wooden Skewers or Toothpicks: You’ll need about 50-60 short skewers (around 4-6 inches) or sturdy toothpicks to make individual “Caramel Apple Grapes.” They make dipping and serving so much easier and cleaner.
- Parchment Paper or Silicone Baking Mats: Essential for lining your baking sheets, preventing the sticky caramel grapes from adhering as they cool and set.
Preparing Your Grapes for Perfection
-
Wash and Dry the Grapes Thoroughly: This step might seem simple, but it’s crucial! Gently remove the green grapes from their stems, being careful not to tear the skin. Place them in a colander and rinse them under cool, running water. I like to let them sit in the colander for a few minutes while giving them a gentle shake to dislodge any debris.
Why Drying is Non-Negotiable:
Any residual moisture on the grapes will prevent the caramel from adhering properly, creating an uneven and patchy coating. After rinsing, spread the grapes out in a single layer on several layers of paper towels or a clean kitchen towel. Let them air dry for at least 30 minutes, or even an hour, flipping them occasionally to ensure all sides are completely dry. You can also gently pat each grape dry with a clean paper towel for extra assurance. This meticulous drying process is key to achieving that perfectly smooth, unbroken caramel shell.
- Prepare for Skewering: While the grapes are drying, prepare your workstation. Line one or two baking sheets with parchment paper or silicone baking mats. This will be where our beautiful “Caramel Apple Grapes” will rest and set after being dipped. Have your optional toppings ready in shallow bowls, if you plan to use them.
- Skewer the Grapes: Once the grapes are absolutely bone dry, it’s time to skewer them. Carefully insert a wooden skewer or sturdy toothpick into the stem end of each individual grape. You want to push it in far enough so the grape feels secure and won’t spin or fall off when dipped, but not so far that it pierces through the other side. This ensures a clean, easy dipping experience and a sturdy handle for eating. Aim for one grape per skewer to mimic the classic caramel apple experience. This also allows for individual portion control and makes the process of coating much more manageable. You will likely end up with 50-60 skewered grapes.
Crafting the Irresistible Caramel Coating
Making homemade caramel can seem intimidating, but with attention to detail and a little patience, you’ll achieve a gloriously smooth and rich coating for your “Caramel Apple Grapes.”
- Combine Wet and Dry Ingredients (Except Cream & Vanilla): In a heavy-bottomed 3-4 quart saucepan or a Dutch oven, combine the granulated sugar, light corn syrup, and unsalted butter. I highly recommend a heavy-bottomed pan because it distributes heat more evenly, which significantly reduces the risk of scorching your caramel. Place the pan over medium-low heat.
- Melt and Stir Gently: Allow the butter to melt slowly into the sugar and corn syrup mixture. Stir gently with a heatproof spatula or wooden spoon to help dissolve the sugar. It’s crucial to keep the heat at medium-low during this initial phase. We want everything to melt together smoothly without rushing it, which can lead to sugar crystallization. Continue to stir occasionally until all the butter has melted and the sugar has largely dissolved, forming a thick, pale yellow syrup.
- Increase Heat and Bring to a Boil: Once the sugar is mostly dissolved and the mixture is homogenous, increase the heat to medium. Bring the mixture to a gentle boil without stirring. Resist the urge to stir once it starts boiling! Stirring at this stage can introduce air bubbles and cause sugar crystals to form on the sides of the pan, leading to a grainy caramel. If you see sugar crystals forming on the sides of the pan, you can gently brush them down with a pastry brush dipped in a little water.
- Cook to Temperature (Candy Thermometer is Your Best Friend!): Continue to cook the mixture, allowing it to bubble steadily. This is where your candy thermometer becomes absolutely indispensable for making perfect “Caramel Apple Grapes.” Insert the thermometer into the mixture, ensuring the bulb is fully submerged but not touching the bottom of the pan. Cook the caramel, without stirring, until it reaches 240°F (115°C) – the firm ball stage. This can take anywhere from 10 to 20 minutes, depending on your stovetop and pan. Keep a close eye on it, as the temperature can rise quickly once it gets closer. The mixture will start to turn a light golden color as it cooks.
- Remove from Heat and Carefully Add Cream: As soon as your caramel reaches 240°F (115°C), immediately remove the pan from the heat. Now, here’s a critical step: Slowly and very carefully pour the room-temperature heavy cream into the hot caramel mixture while continuously stirring with your heatproof spatula or whisk. Be extremely cautious! The mixture will bubble up vigorously and release a lot of steam. This is why bringing the cream to room temperature is so important; cold cream would cause a much more violent reaction and could make the caramel seize. Keep stirring until the cream is fully incorporated and the mixture is smooth.
- Return to Heat and Cook to Final Temperature: Place the saucepan back over medium-low heat. Stir constantly, bringing the mixture back up to a gentle simmer. Continue to cook, stirring frequently, until the caramel reaches 245°F (118°C) – the soft ball stage. This second cooking phase is crucial for achieving the perfect consistency for dipping your “Caramel Apple Grapes.” It will be thick enough to coat the grapes but still pliable and chewy once cooled. Again, monitor your candy thermometer diligently. The caramel will darken slightly to a rich, amber hue during this stage.
- Stir in Vanilla and Salt: Once the caramel reaches 245°F (118°C), remove the pan from the heat for the final time. Stir in the pure vanilla extract and fine sea salt. Stir well until they are fully incorporated. The vanilla adds a beautiful aromatic finish, and the salt balances the sweetness beautifully.
The Art of Coating: Bringing Your Caramel Apple Grapes to Life
Now comes the fun part! Be quick but deliberate during this stage, as the caramel will begin to cool and thicken.
- Prepare Your Dipping Station: Place the hot caramel pan on a heat-safe surface near your prepared baking sheets and optional toppings (if using). If your caramel starts to cool and become too thick to work with while dipping, you can gently warm it over very low heat on the stovetop for a minute or two, stirring constantly, until it reaches a dippable consistency again. Avoid overheating, as this can cause the caramel to burn or become too thin.
- Dip the Grapes: Take one skewered grape by its stick. Carefully dip the grape into the warm caramel, rotating it to ensure it’s completely coated. You want a nice, even layer of caramel all around the grape. Don’t worry if it’s not perfectly smooth; a little rustic charm is wonderful!
- Allow Excess Caramel to Drip Off: Once coated, lift the grape out of the caramel and hold it over the saucepan for a few seconds, gently rotating it. This allows any excess caramel to drip back into the pan, preventing puddles on your parchment paper and ensuring a thinner, more elegant coating. You can also gently scrape the bottom of the grape against the rim of the pan to remove any large drips.
- Add Optional Toppings (If Desired): If you’re using toppings, immediately after removing the grape from the caramel and letting the excess drip, gently roll the caramel-coated grape in your chosen topping (chopped nuts, mini chocolate chips, etc.). Lightly press the toppings onto the caramel to ensure they adhere well. You’ll need to work quickly here before the caramel sets too much.
- Place on Prepared Baking Sheet: Carefully place each dipped and, if applicable, topped grape onto your parchment-lined baking sheet. Make sure they are not touching each other to prevent them from sticking together as they cool. Repeat the process with the remaining grapes, working efficiently. You might find it helpful to have a small bowl of warm water nearby to clean your hands or the skewers if they get too sticky.
Finishing Touches and Setting Your Delicious Creation
- Allow to Cool and Set: Once all your “Caramel Apple Grapes” are dipped and placed on the baking sheets, allow them to cool completely at room temperature. This can take anywhere from 30 minutes to an hour, depending on the ambient temperature and humidity in your kitchen. Patience is a virtue here! The caramel needs to firm up and set properly before handling. Do not rush this by placing them directly into the refrigerator immediately, as extreme temperature changes can sometimes make the caramel cloudy or cause it to sweat.
- Chill for Optimal Firmness (Optional but Recommended): Once the caramel is firm to the touch at room temperature, you can transfer the baking sheets to the refrigerator for an additional 15-30 minutes. This will ensure the caramel is perfectly firm and chewy, and the grapes are refreshingly cool. This step makes them incredibly delightful to eat, providing a lovely textural contrast.
-
Serving Your “Caramel Apple Grapes”: These delightful treats are best enjoyed the same day they are made for optimal texture and freshness. The crispness of the grape combined with the chewy caramel is truly at its peak.
Storage Tips for Any Leftovers:
If you happen to have any leftovers (which is unlikely, as they’re so addictive!), you can store them in an airtight container in the refrigerator for up to 1-2 days. However, be aware that over time, the moisture from the grapes can start to break down the caramel, making it a bit softer. To mitigate this, you can place a piece of parchment paper between layers of grapes in your container to prevent sticking. Always bring them out of the fridge a few minutes before serving to allow the caramel to soften slightly for the best eating experience.
And there you have it! Your very own batch of homemade Caramel Apple Grapes, a whimsical and utterly delicious twist on a classic autumn treat. Enjoy every bite of these delightful morsels!
Conclusion:
So, there you have it, my friends! We’ve journeyed through the simple steps to create a truly unforgettable snack or dessert, and I truly hope you’re as excited to try it as I am to share it with you. This isn’t just another recipe; it’s an invitation to experience a burst of joy in every single bite. The magic of this dish lies in its brilliant simplicity and the incredible flavor combination that dances on your palate. Imagine that delightful pop of a crisp, juicy grape, perfectly enrobed in a luscious, sticky caramel, and then elevated with whatever delightful crunch you choose to add. It’s a symphony of textures and tastes that frankly, you just have to experience for yourself. I promise you, once you taste these incredible bites, you’ll wonder where they’ve been all your life, and they’ll quickly become a cherished favorite in your culinary repertoire. They are a testament to how simple ingredients, combined thoughtfully, can create something truly extraordinary and profoundly satisfying for virtually any occasion.
Why is this recipe an absolute must-try? Well, for starters, it’s an ingenious twist on a classic autumnal treat, transforming the sometimes-messy traditional caramel apple into a convenient, bite-sized delight. It’s the perfect solution for satisfying that sweet craving without the fuss, offering all the nostalgic flavors we adore in a refreshing and utterly irresistible package. It’s quick to prepare, requires minimal ingredients, and the outcome is consistently spectacular. Whether you’re looking for a clever after-school snack for the kids that feels like a special treat, a sophisticated yet playful dessert for your next dinner party, or just a little something sweet to brighten your own day, these bites fit the bill perfectly. They’re undeniably fun to make, a fantastic project for a lazy afternoon, and even more fun to eat! The contrast between the cool, tangy fruit and the warm, buttery sweetness of the caramel is simply divine, creating a truly harmonious flavor profile that is surprisingly sophisticated despite its playful appearance. It’s a recipe that appeals to all ages, from the pickiest eaters to the most discerning palates, and that versatility alone makes it incredibly valuable.
Now, let’s talk about making these beauties even more uniquely yours. While they are absolutely phenomenal on their own, served chilled and ready to be devoured, there are so many ways to customize and enhance your experience. Consider experimenting with a variety of toppings beyond just the classic crushed nuts. For a touch of elegance, a sprinkle of flaky sea salt over the caramel provides a wonderful counterpoint to the sweetness, elevating the flavor profile significantly. If you’re catering to a younger crowd, colorful sprinkles or mini chocolate chips can add an extra layer of fun and visual appeal. For a textural adventure, try toasted coconut flakes, crushed pretzels for a sweet and salty crunch, or even a dash of cinnamon sugar for that extra autumnal warmth. Don’t be afraid to mix and match! Imagine a platter with some coated in pecans, others in dark chocolate shavings, and a few with a festive sprinkle mix – a true feast for the eyes and the taste buds. You could also explore different types of grapes; while green grapes offer that delightful tartness, red or black grapes can introduce a deeper, sweeter note, making the entire experience even more versatile. And if you’re feeling adventurous, why not try a homemade salted caramel sauce for an even richer, more complex flavor? The possibilities for personalizing your batches of these delightful Caramel Apple Grapes are virtually endless, allowing you to tailor them precisely to your preferences and the occasion. They are also fantastic when served slightly frozen, offering a refreshing and almost ice-cream-like experience, perfect for warmer days.
So, what are you waiting for? I wholeheartedly encourage you to roll up your sleeves, gather your ingredients, and give this recipe a try this week. You won’t regret it! I truly believe that sharing delicious food is one of life’s greatest simple pleasures, and I’m so excited for you to experience that joy firsthand with these incredible treats. And when you do, please, please come back and share your creations with me! I absolutely adore seeing your culinary triumphs and hearing about your experiences in the kitchen. Did you discover a new favorite topping? Did you serve them at a party and get rave reviews? Or perhaps you simply enjoyed a quiet moment of bliss with a bowl all to yourself? Whatever your story, I want to hear it! Drop a comment below, tell me all about your glorious Caramel Apple Grapes, and let’s celebrate the magic of simple, delicious food together. Happy cooking, and even happier eating!
Caramel Apple Grapes: Sweet, Crunchy Dessert Treat!
Caramel Apple Grapes are an absolute revelation, transforming a beloved autumn classic into a delightful, bite-sized sensation. This ingenious twist offers all the irresistible flavor without the mess, combining the juicy snap of a fresh grape with luscious caramel, often finished with a sprinkle of crushed nuts or mini chocolate chips.
Ingredients
-
1 bag green grapes (larger size recommended)
-
1 (11 oz) bag caramel bits
-
2 Tablespoons heavy cream or water
-
1½ cups chopped peanuts
-
Toothpicks
Instructions
-
Step 1
Wash green grapes and remove from stems. Dry thoroughly on paper towels or a clean towel for 30-60 minutes; this is crucial for caramel adhesion. -
Step 2
Insert a sturdy toothpick into the stem end of each dry grape, ensuring it is secure. You’ll prepare about 50-60 skewered grapes. -
Step 3
Prepare your dipping station: Line baking sheets with parchment paper. Place the 1½ cups of chopped peanuts (or other desired toppings) into a shallow bowl. -
Step 4
Melt caramel: In a microwave-safe bowl, combine the 1 (11 oz) bag of caramel bits and 2 tablespoons of heavy cream or water. Microwave in 30-second intervals, stirring well after each, until smooth and fully melted. Alternatively, melt in a heavy-bottomed saucepan over low heat, stirring constantly. -
Step 5
Dip grapes: Take one skewered grape and carefully dip it into the warm, melted caramel, rotating for complete, even coating. Allow any excess caramel to drip back into the bowl. -
Step 6
Add toppings: Immediately roll the caramel-coated grape in the chopped peanuts, gently pressing them on to adhere well. Work quickly before the caramel sets. -
Step 7
Set and cool: Place each dipped and topped grape onto the prepared parchment-lined baking sheets, ensuring they don’t touch. Allow to cool and set completely at room temperature for 30-60 minutes. For optimal firmness, you can chill them in the refrigerator for an additional 15-30 minutes after setting at room temperature. -
Step 8
Serve: These treats are best enjoyed the same day. Store any leftovers in an airtight container in the refrigerator for up to 1-2 days, with parchment paper between layers to prevent sticking. Bring them out of the fridge a few minutes before serving.
Important Information
Nutrition Facts (Per Serving)
It is important to consider this information as approximate and not to use it as definitive health advice.
Allergy Information
Please check ingredients for potential allergens and consult a health professional if in doubt.