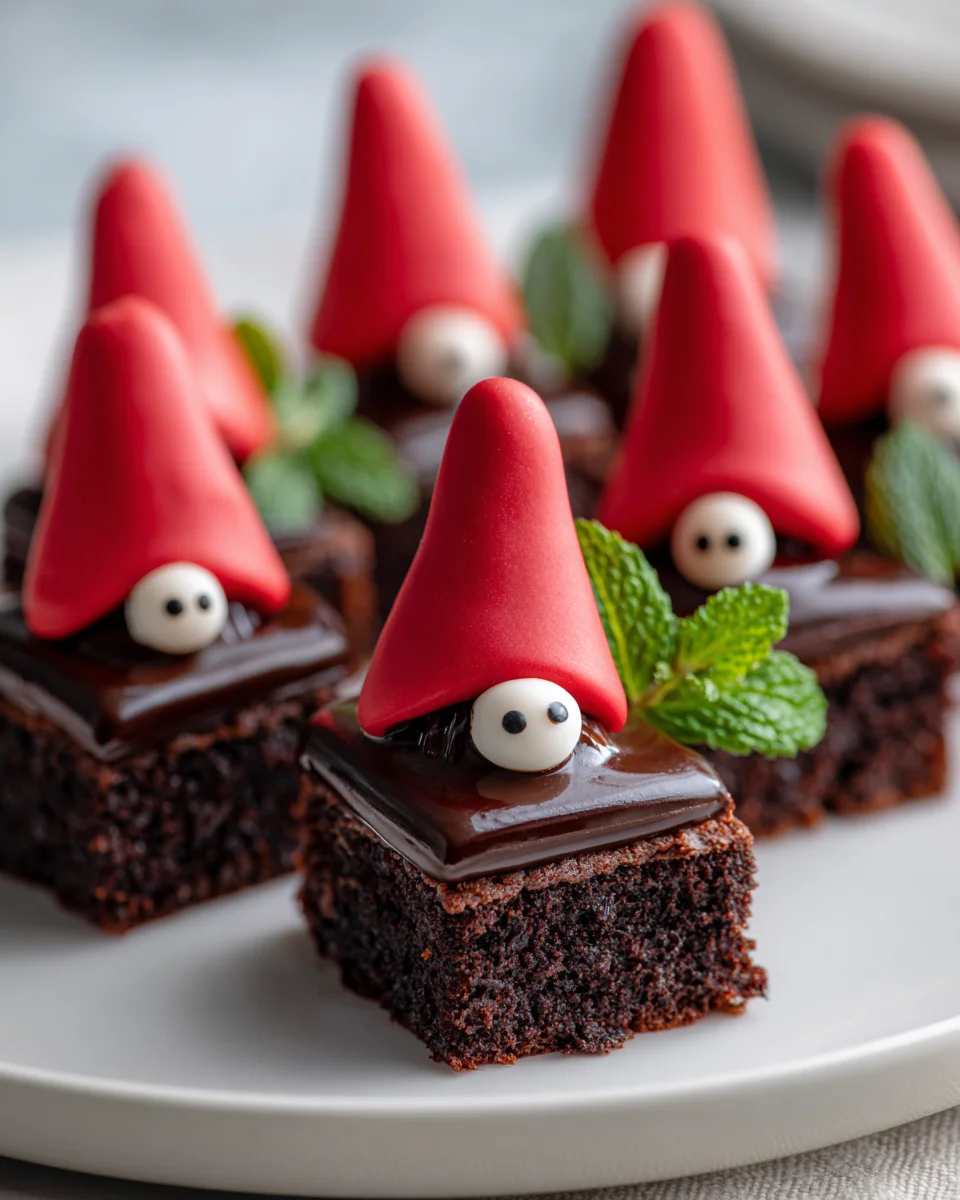
Brownie Bite Gnomes Recipe
Oh my goodness, I am so excited to share this with you! When I first stumbled upon the idea for this Brownie Bite Gnomes Recipe, I knew instantly that I had to bring it to life and share it with all of you. What makes this recipe truly special isn’t just the rich, fudgy brownie base – which, let’s be honest, is amazing on its own – but the incredible transformation it undergoes to become the most adorable, whimsical little gnomes you’ve ever seen! Forget plain brownies; these are bite-sized masterpieces of cuteness that are guaranteed to spark joy.
You are absolutely going to love making (and eating!) these. They bring such a smile to everyone’s face, whether you’re serving them at a party, making them for a special occasion, or just want to add a touch of magic to your everyday baking. Plus, they’re surprisingly simple to assemble, making them a fantastic project for bakers of all skill levels, and definitely one to get the kids involved with. Imagine tiny, delicious, chocolatey gnomes, complete with their little hats and beards, ready to delight your taste buds and your eyes.
In essence, this dish combines a perfectly baked, chewy brownie cut into individual portions with a simple, creative decorating scheme that turns each one into a charming, edible gnome character. It’s a delightful blend of classic comfort food and playful artistry, promising a treat that’s as fun to create as it is to devour. Get ready for some serious brownie magic!

Ingredient Notes
Oh, getting ready to make these adorable Brownie Bite Gnomes? That’s fantastic! The beauty of this recipe lies in its simplicity and the fun factor of assembling these little characters. We’re working with a few key players here, and I’ve got some thoughts on how to make them shine or swap them out if you need to.
The Brownie Bites
These are the foundation of our gnomes, literally! You can go a few routes here. My absolute favorite is to bake a batch of homemade brownies and then cut them into bite-sized squares once they’re completely cooled. This gives you control over the chewiness and flavor. I love a rich, fudgy brownie for this. If you’re short on time, don’t hesitate to use a good quality boxed brownie mix – just follow the package instructions and cut them into 1.5 to 2-inch squares. For an even quicker shortcut, many bakeries and grocery stores sell pre-made brownie bites in their dessert sections. Just make sure they’re fresh and sturdy enough to hold their shape for decorating. The key is to have a flat surface on at least one side for stability.
Frosting & Decorations
This is where the magic happens for our gnome features!
- Vanilla or Cream Cheese Frosting: You’ll need some white frosting for the gnome beards. I prefer a slightly stiffer consistency so it holds its shape when piped. You can use your favorite homemade vanilla buttercream or a good quality store-bought version. If using store-bought, sometimes whipping it for a minute can make it fluffier and easier to pipe.
- Candy Melts (for hats): These are fantastic for creating the pointy gnome hats because they set up firm and hold their shape beautifully. Red, green, or even blue candy melts work wonderfully. You can find them in most craft stores or baking supply aisles. If you can’t find candy melts, you can try using white chocolate dyed with food coloring, but be aware that white chocolate can be a bit trickier to work with for dipping and hardening. Alternatively, you could use small sugar cones dipped in frosting or even fondant cut into hat shapes.
- Miniature Noses: For their cute little noses, I love using small round candies like M&M’s, jelly beans, or even mini Nilla wafers. A small dab of regular frosting works just as well too if you want to keep it simple.
- Optional Embellishments:
- Shredded Coconut: To give the beards an extra textured, “fluffy” look, you can sprinkle a little shredded coconut over the white frosting. It really adds to the charm!
- Edible Candy Eyes: These are totally optional, as many gnomes are depicted with their hats pulled low over their eyes, but if you want to give your gnomes a bit more personality, tiny edible candy eyes are perfect.
- Sprinkles/Decorating Gels: A touch of green, red, or gold sprinkles can add a festive touch to the hats or bases.
Regarding substitutions, thankfully for these sweet treats, we don’t encounter ingredients like pork or alcohol. Any flavoring you might add to your brownies or frosting, like vanilla extract, is naturally a non-alcohol alternative in its common baking form. Just be sure to check labels if you have specific dietary needs.
Step-by-Step Instructions
Alright, let’s get these adorable Brownie Bite Gnomes assembled! This is where the fun really begins. Remember, there’s no right or wrong way to make a gnome, so let your creativity shine!
Step 1: Prepare Your Brownie Bites
First things first, make sure your brownie bites are completely cooled. If you baked them yourself, let them chill out on a wire rack until they are room temperature, or even better, pop them in the fridge for about 15-20 minutes to firm them up. This makes them much easier to handle and less likely to crumble during decoration. If you’re using store-bought, just take them out of their packaging. You want a flat top surface to work with. If your brownies have a rounded top, you can carefully slice off a thin layer to create a flat base.
Step 2: Melt the Candy Melts for the Hats
Now, let’s get those gnome hats ready. Place your desired color of candy melts (red, green, blue, etc.) into a microwave-safe bowl. Heat them in the microwave in 30-second intervals, stirring well after each interval, until the melts are smooth and fully melted. Be careful not to overheat them, as they can seize up and become clumpy. Alternatively, you can use a double boiler on the stovetop for a more controlled melt. Transfer the melted candy to a small, deep bowl or a mug – something easy for dipping.
Step 3: Create the Gnome Hats
Take one brownie bite. Dip one corner (or half of an edge, depending on the desired hat shape) of the brownie into the melted candy melts. You want to create a triangular or conical shape for the hat. You might need to use a small spoon or offset spatula to help shape the candy into a pointy hat. Once shaped, carefully lift the brownie, letting any excess candy drip off. Place the brownie bite onto a piece of parchment paper or a silicone mat, hat-side up, to allow the candy to set. Repeat with all your brownie bites. You can even try dipping the entire top corner of a brownie to make a taller, pointier hat. This is a great step to get the kids involved!
Step 4: Pipe the Beards
While your hats are setting up (which happens pretty quickly with candy melts), prepare your white frosting for the beards. Scoop the frosting into a piping bag fitted with a star tip (like a Wilton 1M or 21) or simply snip a small corner off a sturdy Ziploc bag for a more rustic look. Once the candy hats are firm to the touch, hold a brownie bite and pipe a “beard” of white frosting directly underneath the candy hat. You can make it as fluffy or as neat as you like. Some prefer a long, flowing beard, while others like a tighter, more compact look. If you like, gently sprinkle a little shredded coconut over the frosting beard for added texture before it sets.
Step 5: Add the Noses
The final touch for our gnome friends! Take your small round candies (M&M’s, jelly beans, etc.) or just a tiny dollop of frosting. Gently press or pipe one directly onto the frosting beard, just under the tip of the candy hat. This creates their adorable little nose peeking out from under the hat. If you’re adding optional candy eyes, place them just above the nose, on either side. Make sure everything is securely placed.
Step 6: Let Them Set
Once all your gnomes are decorated, let them sit at room temperature for about 15-30 minutes, or pop them into the fridge for 10 minutes, to allow the frosting to set firm. This will help them hold their shape and make them easier to handle and serve. And just like that, you’ve brought a whole whimsical village of Brownie Bite Gnomes to life!
Tips & Suggestions
Making these Brownie Bite Gnomes is such a joyful process, and I’ve picked up a few tricks along the way to make it even more delightful for you!
- Chill Your Brownies: I can’t stress this enough! Cold, firm brownie bites are much easier to handle and decorate without crumbling. If you’re cutting a sheet of brownies, let the whole sheet chill in the fridge for at least an hour before cutting into squares.
- Candy Melt Consistency: When melting your candy melts, if they seem too thick after melting, you can add a tiny bit of shortening (like Crisco) or a specialized candy thinning agent. Start with a quarter teaspoon and stir well. This will make dipping much smoother.
- Hat Shapes: Don’t feel limited to a simple triangular dip for the hats. You can experiment! Try dipping two adjacent corners to create a more rounded, hooded look, or even try dipping a small sugar cone in candy melts and then attaching it to the brownie with a dab of frosting.
- Piping Practice: If you’re new to piping, do a quick test run on a piece of parchment paper before going straight for your gnomes. This helps you get a feel for the pressure and flow, ensuring your gnome beards look fantastic.
- Color Coordination: Get creative with your hat colors! A mix of red, green, blue, or even brown candy melts can make your gnome village look vibrant and fun. Consider using sprinkles on the hats or adding a tiny decorative star for extra flair.
- Gnome Personalities: Give each gnome a unique personality! Some can have long, wispy beards, others short and neat. Some can have their hats tilted. This is where the charm really comes out.
- Kid-Friendly Activity: This recipe is absolutely perfect for getting kids involved in the kitchen. Let them pipe beards (they love it!), add noses, or even choose the hat colors. It’s a great way to spark their creativity.
- Stabilize Your Gnomes: If you plan to transport your gnomes or display them for an extended period, a tiny dab of frosting on the bottom of each brownie can help them stick to your serving platter or cake board, preventing them from toppling over.
Storage
You’ve put all that lovely effort into making these adorable Brownie Bite Gnomes, so let’s make sure they stay fresh and fabulous!
- Room Temperature: If your gnomes are made with shelf-stable ingredients (like regular brownies and buttercream made with butter and powdered sugar) and will be eaten within 1-2 days, they can be stored in an airtight container at cool room temperature. Avoid direct sunlight or very warm environments, as this can cause the frosting to soften and the candy melts to become sticky.
- Refrigeration: For longer storage, or if your frosting contains cream cheese or other perishable ingredients, it’s best to store your Brownie Bite Gnomes in an airtight container in the refrigerator. They will stay fresh for up to 5 days this way. Just be aware that refrigeration can sometimes make the brownies a little firmer.
- Serving from the Fridge: If stored in the fridge, I recommend taking them out about 15-30 minutes before serving. This allows the brownies to soften slightly and the frosting to come back to a perfect texture, making them much more enjoyable to eat.
- Freezing: If you’ve made a huge batch and want to enjoy them later, you can freeze undecorated brownie bites in an airtight container for up to 3 months. For decorated gnomes, freezing can be a bit tricky due to the candy melt hats and frosting. If you must freeze them, first flash-freeze them on a tray until solid (about 1-2 hours) to prevent the decorations from sticking, then transfer them to an airtight container. Thaw in the refrigerator overnight before bringing to room temperature. Be aware that colors might bleed slightly upon thawing.
- Prevent Sticking: When storing, especially if stacking, place a piece of parchment paper or wax paper between layers of gnomes to prevent the hats or beards from sticking to each other.
Enjoy your magical little Brownie Bite Gnomes!
Final Thoughts
And there you have it! I truly hope you’ve enjoyed this delightful journey into the whimsical world of our Brownie Bite Gnomes Recipe. What makes this recipe an absolute must-try isn’t just the rich, fudgy deliciousness of the brownie itself, but the sheer joy and creativity it brings to your kitchen. Imagine the smiles and gasps of delight when these adorable, edible gnomes make their appearance at your next gathering, or simply brighten a quiet afternoon. They’re surprisingly simple to assemble, making them a fantastic project for all ages – no complex steps, just pure fun and wonderfully delicious results. Forget complicated desserts; with the Brownie Bite Gnomes Recipe, you’re creating miniature works of edible art that are as charming to look at as they are satisfying to eat. I promise, once you bring these little characters to life, you’ll understand why they’re destined to become a beloved tradition. Get ready to sprinkle some pure magic into your baking!

Brownie Bite Gnomes Recipe: Delicious, Cute & Easy Fun!
- Total Time: 1 hour
- Yield: 24 gnomes
Description
This Brownie Bite Gnomes Recipe combines rich, fudgy brownies with creative decorating to create adorable edible gnomes. Perfect for any occasion, these bite-sized treats are sure to bring smiles to everyone’s faces.
Ingredients
- Brownies (homemade or boxed)
- Vanilla or Cream Cheese Frosting
- Candy Melts (red, green, or blue)
- Miniature Noses (M&M's, jelly beans, or mini Nilla wafers)
- Shredded Coconut (optional)
- Edible Candy Eyes (optional)
- Sprinkles/Decorating Gels (optional)
Instructions
- Make sure your brownie bites are completely cooled. If baked, let them chill on a wire rack until room temperature or refrigerate for 15-20 minutes.
- Place your desired color of candy melts into a microwave-safe bowl. Heat in 30-second intervals, stirring until smooth. Transfer melted candy to a small bowl for dipping.
- Dip one corner of a brownie bite into the melted candy to create a triangular or conical hat shape. Let excess candy drip off and place the brownie on parchment paper to set. Repeat with all brownie bites.
- Prepare white frosting for the beards by scooping it into a piping bag fitted with a star tip. Once the candy hats are firm, pipe a 'beard' of frosting underneath the hat.
- Press or pipe a small round candy onto the frosting beard for the nose. If using candy eyes, place them above the nose.
- Let the decorated gnomes sit at room temperature for 15-30 minutes or refrigerate for 10 minutes to allow the frosting to set.
- Prep Time: 30 mins
- Cook Time: 30 mins
- Category: Dessert
- Method: Baking and Decorating
- Cuisine: American
Nutrition
- Serving Size: 1 gnome
- Calories: 150
- Sugar: 12 g
- Sodium: 50 mg
- Fat: 7 g
- Saturated Fat: 4 g
- Unsaturated Fat: 2 g
- Trans Fat: 0 g
- Carbohydrates: 20 g
- Fiber: 1 g
- Protein: 2 g
- Cholesterol: 10 mg
Keywords: Chill your brownies for easier handling. Experiment with hat shapes and colors for unique gnome designs. This recipe is great for kids to help with decorating.