Black Forest Brownies Dessert is a delightful twist on the classic Black Forest cake, combining the rich, fudgy texture of brownies with the luscious flavors of cherries and chocolate. As a dessert lover, I can’t help but be captivated by the way this recipe brings together the best of both worlds. Originating from the Black Forest region in Germany, this dessert not only pays homage to its roots but also offers a modern take that is perfect for any occasion.
People adore Black Forest Brownies Dessert for its indulgent taste and satisfying texture. The combination of dark chocolate, sweet cherries, and a hint of whipped cream creates a symphony of flavors that dance on your palate. Plus, the convenience of making brownies means you can whip up this decadent treat in no time, making it an ideal choice for gatherings or a cozy night in. Join me as we dive into this scrumptious recipe that is sure to impress your family and friends!

Ingredients:
- 1 cup unsalted butter (2 sticks)
- 2 cups granulated sugar
- 4 large eggs
- 1 teaspoon vanilla extract
- 1 cup all-purpose flour
- 1 cup unsweetened cocoa powder
- 1 teaspoon baking powder
- 1/2 teaspoon salt
- 1 cup semi-sweet chocolate chips
- 1 cup pitted cherries (fresh or canned, drained)
- 1/2 cup cherry liqueur (optional)
- 1 cup whipped cream (for serving)
- Chocolate shavings (for garnish)
Preparing the Batter
- First, I preheat my oven to 350°F (175°C). This ensures that the brownies will bake evenly and come out perfectly fudgy.
- Next, I grab a large mixing bowl and melt the butter. I usually do this in the microwave in 30-second intervals, stirring in between until it’s completely melted.
- Once the butter is melted, I add the granulated sugar to the bowl. I mix it well with a whisk until it’s fully combined and looks glossy.
- Now, I crack in the four large eggs, one at a time, mixing well after each addition. I also add the vanilla extract at this stage, which gives the brownies a lovely aroma.
- In a separate bowl, I sift together the all-purpose flour, cocoa powder, baking powder, and salt. Sifting helps to aerate the dry ingredients and removes any lumps.
- Gradually, I add the dry mixture to the wet ingredients, folding it in gently with a spatula. I want to be careful not to overmix, as this can make the brownies tough.
- Once the batter is smooth and well combined, I fold in the semi-sweet chocolate chips. This adds an extra layer of chocolatey goodness to the brownies.
Incorporating the Cherries
- If I’m using fresh cherries, I wash and pit them before chopping them into halves. If I’m using canned cherries, I make sure they are well-drained to avoid excess moisture in the batter.
- I gently fold the cherries into the brownie batter, ensuring they are evenly distributed. If I’m feeling a bit indulgent, I might drizzle in some cherry liqueur at this point for an extra kick of flavor.
Baking the Brownies
- Now it’s time to prepare my baking pan. I line a 9×13 inch baking dish with parchment paper, leaving some overhang on the sides for easy removal later. I also lightly grease the parchment paper with a bit of butter or cooking spray.
- I pour the brownie batter into the prepared pan, spreading it evenly with a spatula. I make sure to smooth out the top so that they bake evenly.
- Next, I pop the pan into the preheated oven and bake for about 25-30 minutes. I like to check for doneness by inserting a toothpick into the center; it should come out with a few moist crumbs, but not wet batter.
- Once baked, I remove the brownies from the oven and let them cool in the pan for about 10 minutes. Then, I carefully lift them out using the parchment paper and transfer them to a wire rack to cool completely.
Assembling the Black Forest Brownies
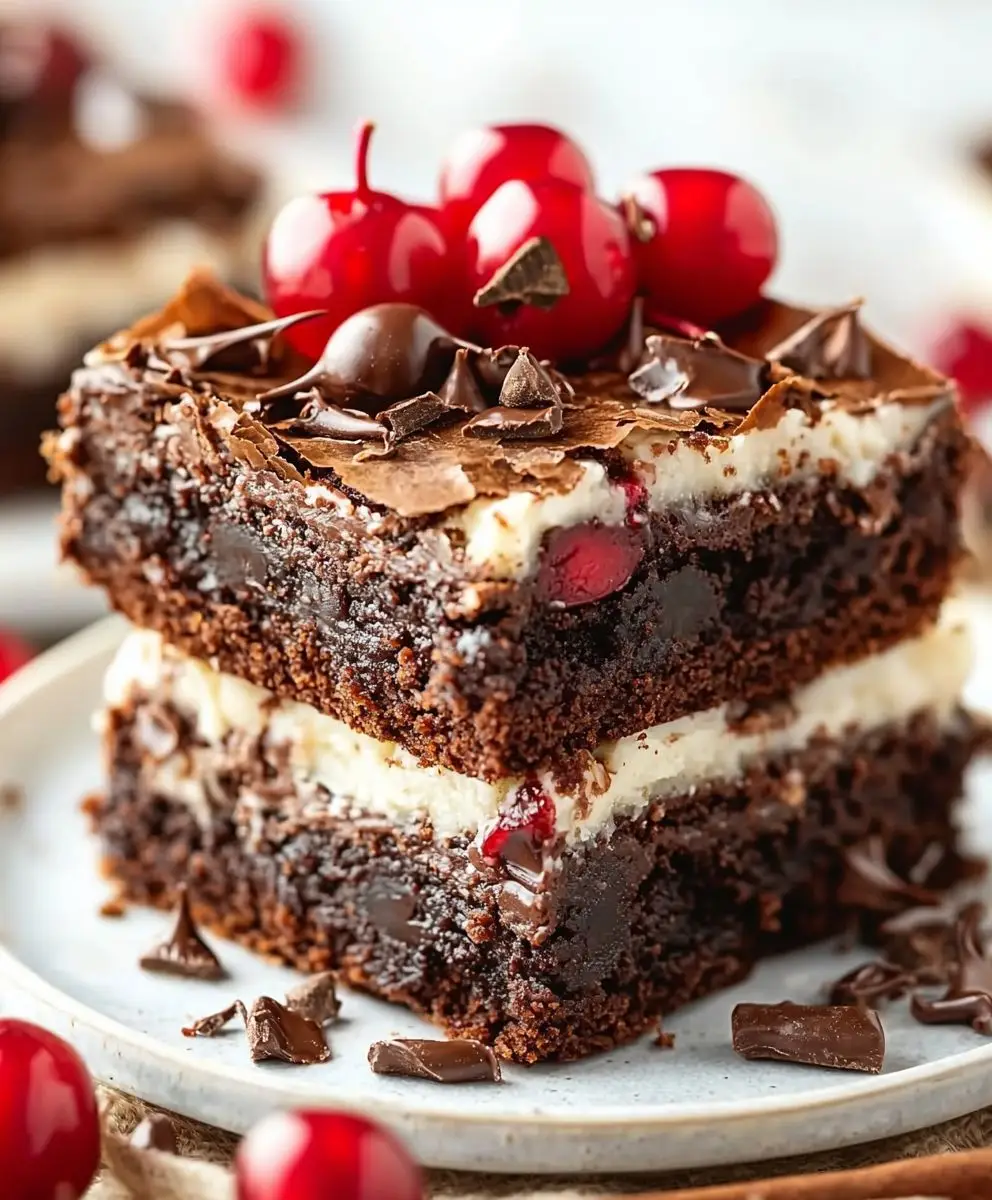
- Once the brownies are completely cool, I cut them into squares. I usually aim for about 24 squares, but you can make them larger or smaller depending on your preference.
- To serve, I place a brownie square on a plate and top it with a generous dollop of whipped cream. I love using freshly whipped cream, but store-bought works just fine too.
- For that classic Black Forest touch, I sprinkle some chocolate shavings on top of the whipped cream. I often use a vegetable peeler to shave off thin pieces from a chocolate bar.
- If I have any leftover cherries, I like to add a few on top for garnish. It
Conclusion:
In summary, these Black Forest Brownies are an absolute must-try for anyone who loves a rich, chocolatey dessert with a delightful twist. The combination of fudgy brownies, tart cherries, and a luscious whipped cream topping creates a symphony of flavors that will leave your taste buds dancing. Not only are they incredibly delicious, but they also offer a unique take on the classic Black Forest cake, making them a standout treat for any occasion. For serving suggestions, consider pairing these brownies with a scoop of vanilla ice cream or a dollop of extra whipped cream for an indulgent dessert experience. You can also experiment with variations by adding a splash of cherry liqueur to the brownie batter for an adult twist or swapping out the cherries for raspberries or strawberries if you prefer a different fruit flavor. The possibilities are endless! I encourage you to give this Black Forest Brownies recipe a try and share your experience with friends and family. Whether you’re hosting a gathering or simply treating yourself, these brownies are sure to impress. Don’t forget to snap a photo and tag me when you make them—I can’t wait to see your delicious creations! Happy baking! Print
Black Forest Brownies Dessert: A Decadent Twist on a Classic Treat
- Total Time: 50 minutes
- Yield: 24 squares 1x
Description
Savor the rich flavors of Black Forest Brownies, featuring fudgy chocolate brownies infused with juicy cherries, topped with fluffy whipped cream and chocolate shavings. Perfect for any celebration or as a delightful indulgence!
Ingredients
Scale- 1 cup unsalted butter (2 sticks)
- 2 cups granulated sugar
- 4 large eggs
- 1 teaspoon vanilla extract
- 1 cup all-purpose flour
- 1 cup unsweetened cocoa powder
- 1 teaspoon baking powder
- 1/2 teaspoon salt
- 1 cup semi-sweet chocolate chips
- 1 cup pitted cherries (fresh or canned, drained)
- 1/2 cup cherry liqueur (optional)
- 1 cup whipped cream (for serving)
- Chocolate shavings (for garnish)
Instructions
- Preheat your oven to 350°F (175°C).
- In a large mixing bowl, melt the butter in the microwave in 30-second intervals, stirring in between until fully melted.
- Add the granulated sugar to the melted butter and mix well with a whisk until glossy.
- Crack in the eggs one at a time, mixing well after each addition. Add the vanilla extract.
- In a separate bowl, sift together the flour, cocoa powder, baking powder, and salt.
- Gradually fold the dry mixture into the wet ingredients with a spatula, being careful not to overmix.
- Fold in the semi-sweet chocolate chips until well combined.
- If using fresh cherries, wash and pit them, then chop into halves. If using canned cherries, ensure they are well-drained.
- Gently fold the cherries into the brownie batter, and drizzle in cherry liqueur if desired.
- Line a 9×13 inch baking dish with parchment paper, leaving overhang for easy removal, and lightly grease it.
- Pour the brownie batter into the prepared pan, spreading it evenly.
- Bake in the preheated oven for 25-30 minutes, checking for doneness with a toothpick (should come out with a few moist crumbs).
- Remove from the oven and let cool in the pan for 10 minutes. Lift out using the parchment paper and transfer to a wire rack to cool completely.
- Once cooled, cut the brownies into squares (aim for about 24).
- Serve each brownie topped with a generous dollop of whipped cream.
- Garnish with chocolate shavings and any leftover cherries.
Notes
- For a richer flavor, consider using high-quality cocoa powder and chocolate chips.
- Feel free to adjust the amount of cherries based on your preference.
- The cherry liqueur is optional but adds a lovely depth of flavor.
- Prep Time: 20 minutes
- Cook Time: 30 minutes