Pumpkin Bread With Maple Glaze is more than just a seasonal treat; it’s a warm embrace on a cool autumn day, a fragrant invitation to cozy moments. I am absolutely delighted to share with you a recipe that consistently brings smiles and fills homes with an irresistible aroma. Imagine slicing into a perfectly moist, tender loaf, rich with the earthy sweetness of pumpkin and a symphony of warm spices like cinnamon, nutmeg, and ginger. Then, picture that slice adorned with a glossy, sweet maple glaze, dripping just enough to tantalize the taste buds and awaken your senses.
This beloved quick bread has roots deep in American baking traditions, often appearing on tables from early fall through the holidays, symbolizing harvest and hearth. The addition of a luscious maple glaze elevates the classic pumpkin bread to an extraordinary level, marrying the rustic charm of pumpkin with the distinct, comforting sweetness of pure maple syrup – a true testament to North American culinary delights. People adore this dish not just for its incredible taste and wonderfully soft, pillowy texture, but also for the sheer joy it brings. It’s the ultimate comfort food, perfect for a leisurely breakfast, an afternoon snack with a cup of coffee, or a delightful dessert after a family meal. You’ll quickly understand why this particular Pumpkin Bread With Maple Glaze recipe will become a cherished part of your autumnal baking repertoire, earning rave reviews from everyone who tries it. I promise, the ease of preparation combined with the sensational results will make it a household favorite.

Ingredients:
- For the Pumpkin Bread:
- 2 ½ cups (300g) all-purpose flour. I always recommend using a good quality unbleached all-purpose flour for the best texture in your Pumpkin Bread With Maple Glaze.
- 2 teaspoons baking soda. This acts as a primary leavening agent, giving our bread its beautiful rise and airy crumb.
- 1 teaspoon baking powder. Working in conjunction with baking soda, baking powder provides an extra lift, ensuring a light and tender loaf.
- 1 teaspoon ground cinnamon. Ah, cinnamon! It’s the star spice that truly defines the warm, comforting flavor profile of autumn baking.
- ½ teaspoon ground nutmeg. Nutmeg adds a wonderfully aromatic and slightly sweet note that complements the pumpkin perfectly.
- ½ teaspoon ground cloves. Just a hint of cloves brings a depth and warmth that elevates the spice blend to another level.
- ¼ teaspoon ground ginger (optional, but highly recommended for an extra kick). If you love a bit more spice, ginger is your friend, adding a subtle peppery warmth.
- 1 teaspoon fine sea salt. Salt is absolutely essential in baking; it balances the sweetness and enhances all the other flavors, making them pop.
- 1 ½ cups (300g) granulated sugar. This provides the primary sweetness and contributes to the bread’s tender texture.
- ½ cup (100g) packed light brown sugar. Brown sugar adds a deeper, more molasses-like sweetness and helps keep the bread wonderfully moist.
- 1 (15-ounce or 425g) can 100% pure pumpkin puree. Important: Make sure it’s pure pumpkin puree, not pumpkin pie filling, which already contains spices and sugar. This is the heart and soul of our Pumpkin Bread With Maple Glaze!
- ½ cup (120ml) vegetable oil, or other neutral oil like canola or grapeseed oil. Oil helps create an incredibly moist crumb that stays fresh longer than butter-based breads.
- 2 large eggs, at room temperature. Room temperature eggs emulsify better with other ingredients, leading to a smoother batter.
- 1 teaspoon pure vanilla extract. Vanilla is a flavor enhancer that rounds out the sweetness and spice, adding a layer of sophisticated warmth.
- 1 cup (150g) chopped pecans or walnuts (optional). If you love a bit of crunch, nuts are a fantastic addition, adding texture and a nutty flavor.
- ½ cup (85g) chocolate chips (optional). For a decadent twist, chocolate chips melt into delightful pockets of sweetness within the bread.
- For the Maple Glaze:
- 1 ½ cups (180g) powdered sugar (confectioners’ sugar), sifted. Sifting is key here to avoid any lumps in your smooth, dreamy glaze.
- 3-4 tablespoons pure maple syrup. This is the star of our glaze! Use pure maple syrup, not artificial pancake syrup, for the authentic, rich maple flavor that complements the pumpkin so beautifully.
- 2-3 tablespoons milk (whole milk or half-and-half works best) or water. This helps adjust the consistency of your glaze to pourable perfection.
- ½ teaspoon pure vanilla extract (optional). A touch of vanilla enhances the overall sweetness and aroma of the glaze.
For the Pumpkin Bread:
Step 1: Prepare Your Pan and Oven
First things first, let’s get our oven and baking pan ready. Preheat your oven to 350°F (175°C). This is a crucial initial step, as a properly preheated oven ensures your Pumpkin Bread With Maple Glaze begins baking immediately at the correct temperature, leading to a consistent rise and texture from the very start. While the oven preheats, take a moment to prepare your loaf pan. I typically use a 9×5-inch (23×13 cm) loaf pan. You can also divide the batter into two smaller 8×4-inch loaf pans if you prefer, which might slightly reduce baking time. To ensure your beautiful pumpkin bread doesn’t stick, generously grease the inside of the pan with butter or baking spray. Then, lightly dust it with a tablespoon or two of all-purpose flour, rotating the pan to coat all surfaces, and tapping out any excess flour. This creates a non-stick barrier that will allow your bread to slide out effortlessly once baked. If you have parchment paper, you can also line the bottom and two long sides of the pan with an overhang to create “slings” for easy removal, which is a method I particularly love for fuss-free extraction.
Step 2: Whisk Dry Ingredients Together
Now, let’s combine our dry ingredients. In a large mixing bowl, I carefully measure out the 2 ½ cups of all-purpose flour. Then, I add the 2 teaspoons of baking soda, 1 teaspoon of baking powder, and the wonderful array of spices: 1 teaspoon ground cinnamon, ½ teaspoon ground nutmeg, ½ teaspoon ground cloves, and my optional but highly recommended ¼ teaspoon of ground ginger. Finally, I sprinkle in 1 teaspoon of fine sea salt. Using a whisk, I thoroughly combine these ingredients. This step is more important than you might think! Sifting or whisking these dry ingredients together meticulously ensures that the leavening agents like baking soda and baking powder, as well as the glorious spices, are evenly distributed throughout the flour. This prevents pockets of unmixed ingredients and guarantees a uniform rise and balanced flavor in every single delightful slice of your Pumpkin Bread With Maple Glaze. I like to whisk for at least 30 seconds, really making sure everything is well incorporated. Set this bowl aside for now.
Step 3: Combine Wet Ingredients
In a separate, even larger mixing bowl, it’s time to bring together our wet ingredients, which are the essence of moisture and flavor for our pumpkin bread. I start by adding the 1 ½ cups of granulated sugar and the ½ cup of packed light brown sugar. The combination of these two sugars provides a layered sweetness and contributes to the bread’s incredibly tender crumb. Next, I pour in the entire 15-ounce can of 100% pure pumpkin puree. Remember, always double-check that it’s pure pumpkin puree and not pumpkin pie filling, as the latter contains added spices and sugars that would throw off our recipe. Then, I crack in the two large eggs, ensuring they are at room temperature as this helps them emulsify more effectively with the other liquids, creating a smoother and more cohesive batter. The ½ cup of vegetable oil goes in next, which is key for keeping our bread exceptionally moist. Finally, I add the 1 teaspoon of pure vanilla extract, which rounds out all the flavors beautifully. Using either a stand mixer fitted with the paddle attachment or an electric hand mixer, I beat these ingredients together on medium speed for about 2-3 minutes. I continue mixing until the mixture is beautifully smooth, well combined, and looks slightly lightened in color and texture. You’ll notice the sugars dissolving into the pumpkin mixture, creating a glossy, inviting base for our bread.
Step 4: Marry Wet and Dry Ingredients
Now comes the pivotal moment where we combine our wet and dry mixtures. With the mixer on low speed (or if you’re mixing by hand, with a sturdy spatula), I gradually add the dry ingredient mixture to the wet ingredients. I usually add about a third of the dry ingredients at a time, mixing just until no streaks of flour are visible before adding the next portion. This is a critical point: avoid overmixing! Overmixing develops the gluten in the flour too much, which can lead to a tough, dense pumpkin bread. We’re aiming for a tender, soft crumb. So, I mix only until the flour is just incorporated, and the batter comes together. A few small lumps are perfectly fine and quite common; don’t fret over them. The goal is simply to ensure there’s no dry flour left at the bottom of the bowl. Once everything is just combined, turn off the mixer.
Step 5: Add Optional Mix-ins (if using)
If you’ve decided to add some delicious optional mix-ins, now is the time! Gently fold in your 1 cup of chopped pecans or walnuts, or your ½ cup of chocolate chips, or even a combination of both. I love the textural contrast the nuts provide, and chocolate chips are always a welcome surprise in every bite. I use a spatula to fold them in until they are evenly distributed throughout the batter. Again, be gentle and don’t overmix. This is your chance to customize your Pumpkin Bread With Maple Glaze to your exact liking!
Step 6: Bake to Golden Perfection
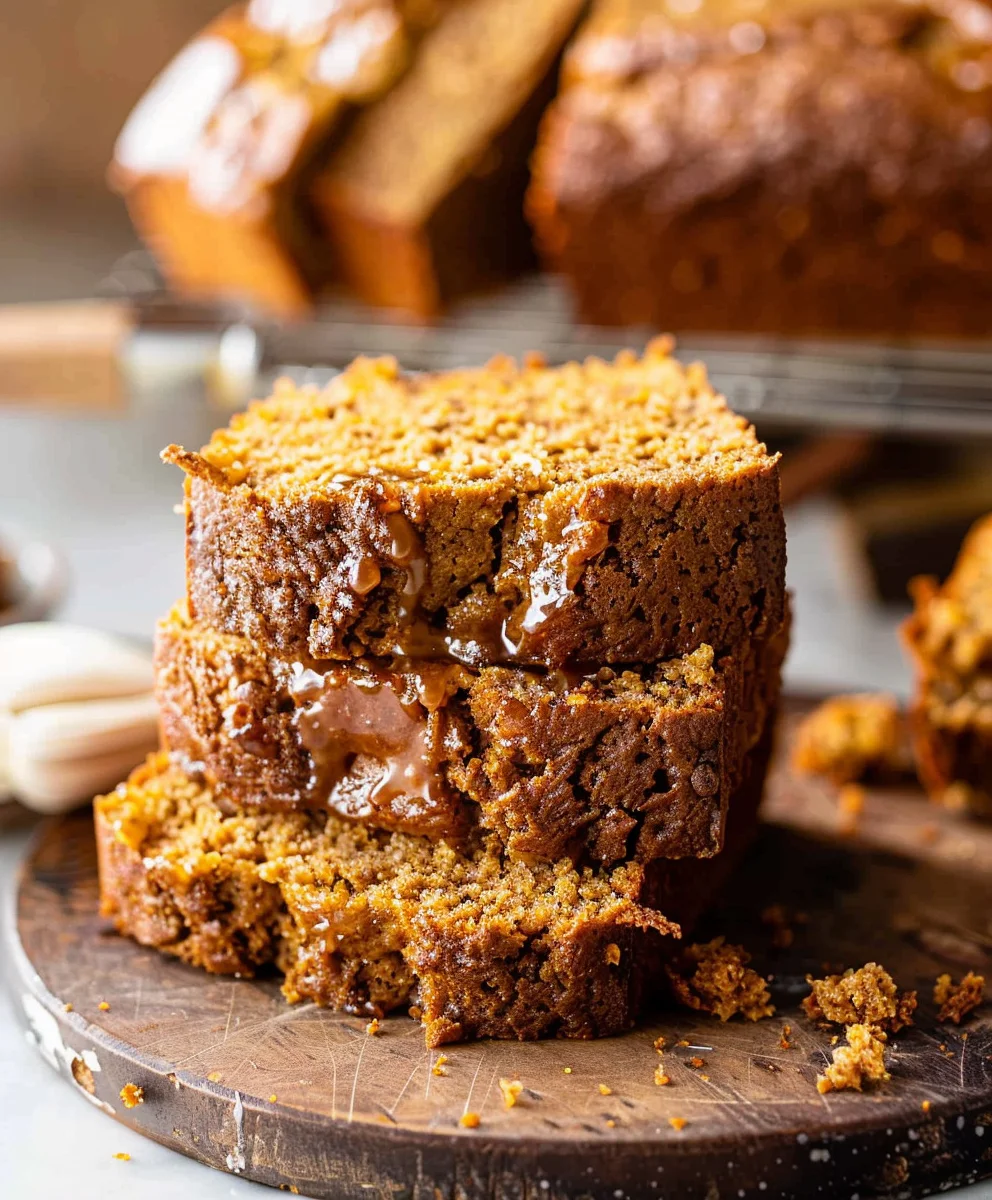
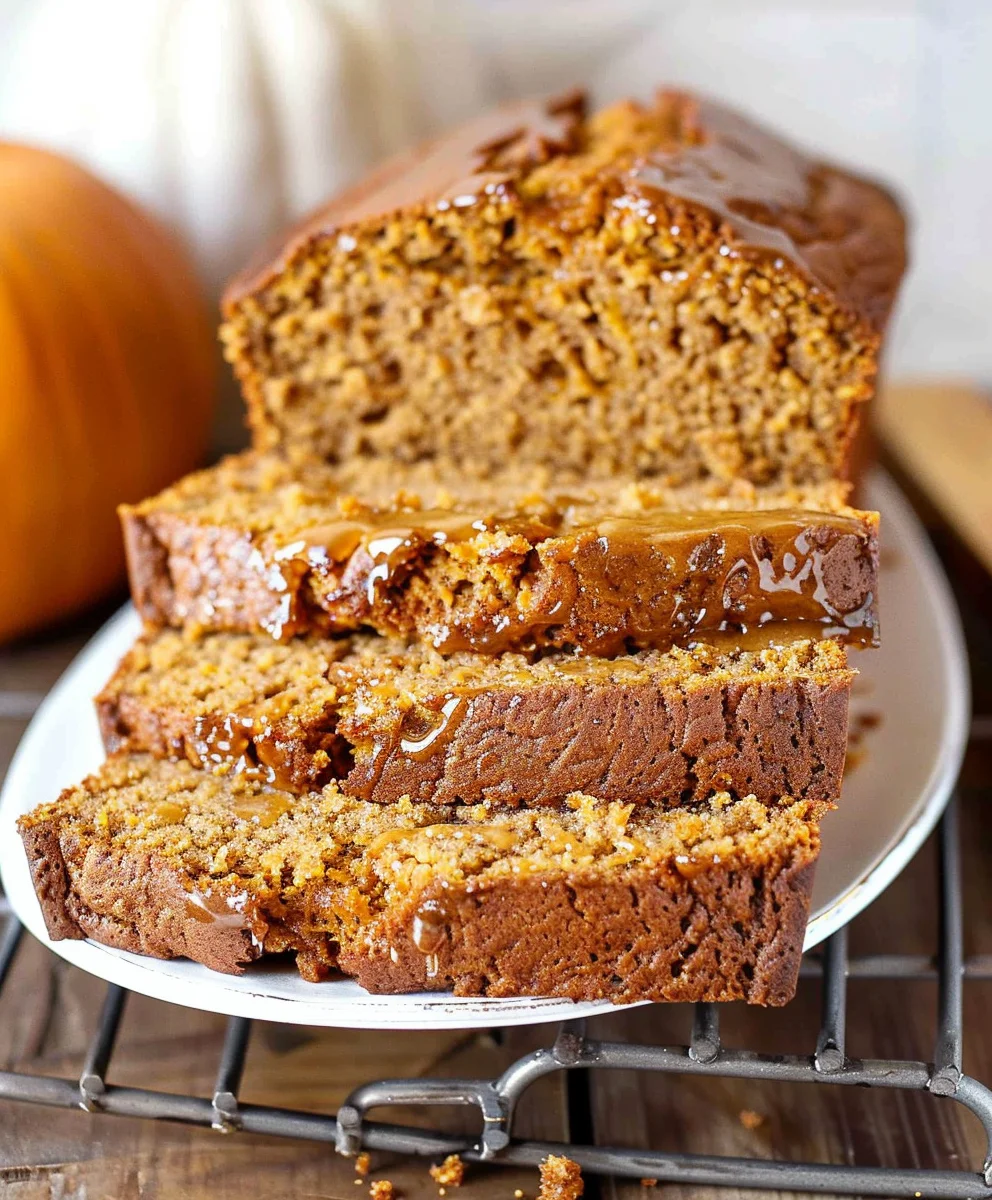
Carefully pour the rich, fragrant pumpkin bread batter into your prepared loaf pan(s), spreading it evenly with your spatula. I sometimes give the pan a gentle tap on the counter to settle the batter and release any large air bubbles. Place the pan in the center of your preheated 350°F (175°C) oven. The baking time will vary depending on your oven and the size of your loaf pan(s). For a standard 9×5-inch loaf, it typically takes anywhere from 60 to 75 minutes. If you’re using two smaller 8×4-inch pans, it might be closer to 45-55 minutes. I recommend checking the bread around the 55-minute mark. To test for doneness, insert a wooden skewer or a toothpick into the very center of the loaf. When it comes out clean or with only a few moist crumbs attached, your pumpkin bread is ready! Resist the urge to open the oven door too frequently, especially during the first 40 minutes, as this can cause the bread to sink. As the loaves bake, your kitchen will fill with the most incredible aroma – a warm, inviting blend of pumpkin, cinnamon, nutmeg, and cloves that truly captures the essence of autumn. Once baked, remove the pan from the oven and let it cool in the pan on a wire rack for about 15-20 minutes. This resting period allows the bread to set and firm up, making it easier to remove without breaking. After the initial cooling, carefully invert the bread onto the wire rack, remove the pan, and let the Pumpkin Bread With Maple Glaze cool completely before glazing. This is crucial for a smooth, non-melting glaze!
For the Maple Glaze:
Step 1: Gather Glaze Ingredients
While your glorious pumpkin bread is cooling, let’s whip up the star topping: our irresistible Maple Glaze. I get out a medium-sized bowl and gather my ingredients. First, I measure out 1 ½ cups of powdered sugar. It’s highly recommended to sift your powdered sugar before adding it to the bowl. This simple step ensures a perfectly smooth, lump-free glaze, which is exactly what we want for that professional finish. Then, I add the 3 to 4 tablespoons of pure maple syrup. I cannot stress enough the importance of using pure maple syrup here. The artificial pancake syrups simply won’t give you that rich, authentic, deep maple flavor that truly complements the pumpkin bread. Next, I add the 2 to 3 tablespoons of milk (I prefer whole milk or even half-and-half for a richer glaze, but water works too) and, if using, the ½ teaspoon of pure vanilla extract. The vanilla isn’t strictly necessary since the maple flavor is so prominent, but it adds another layer of warmth and sweetness that I find irresistible.
Step 2: Whisk Until Smooth
Using a small whisk, I combine all the glaze ingredients in the bowl. I start whisking gently at first to avoid a powdered sugar cloud in my kitchen! I continue to whisk vigorously until the mixture is completely smooth and free of any lumps. The consistency is key here. You’re looking for a glaze that is thick enough to coat the back of a spoon but still thin enough to drizzle beautifully over the pumpkin bread. It should be opaque and pourable, but not watery. If your glaze seems too thick, add more milk or water, one teaspoon at a time, until you reach your desired consistency. If, conversely, it’s too thin, simply whisk in an additional tablespoon or two of sifted powdered sugar until it thickens up to that perfect drizzling stage. I take my time with this step, ensuring every bit of powdered sugar is incorporated and the texture is just right. This smooth, glossy glaze is what truly transforms our already delicious pumpkin bread into an extraordinary “Pumpkin Bread With Maple Glaze” masterpiece!
Step 3: Glaze Your Beautiful Pumpkin Bread
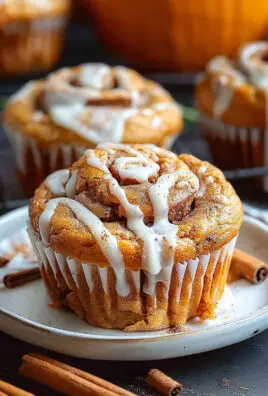
Once your Pumpkin Bread With Maple Glaze has completely cooled – and I mean completely! – it’s time for the crowning glory. If you try to glaze a warm loaf, the glaze will simply melt and soak into the bread, leaving you with a sticky mess rather than a beautiful, defined coating. So, patience is a virtue here. Place the cooled loaf on the wire rack over a baking sheet or a piece of parchment paper. This will catch any drips, making cleanup a breeze. Now, with a spoon or a small whisk, generously drizzle the glorious maple glaze all over the top of the pumpkin bread. I like to start with a steady stream down the middle and then create a crisscross or back-and-forth pattern for a rustic, yet elegant look. You can apply as much or as little glaze as you like. Some prefer a light drizzle, while others (like me!) love a thick, substantial layer of that sweet maple goodness. Let the glazed Pumpkin Bread With Maple Glaze sit for about 15-20 minutes, or until the glaze has set slightly. This allows it to firm up just enough so it won’t be too messy when you slice into it. The moment of truth has arrived! Slice your beautiful Pumpkin Bread With Maple Glaze with a serrated knife and prepare to indulge in the most wonderful taste of autumn.
Conclusion:
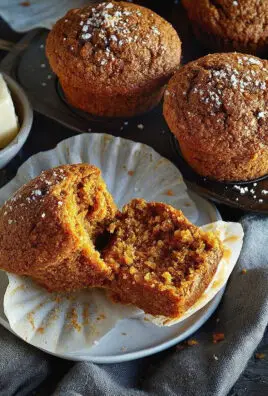
If there’s one recipe I’m truly passionate about sharing, it’s this one. I honestly believe that once you take your first bite, you’ll understand exactly why I call it a revelation. This isn’t just any baked good; it’s an experience, a warm hug on a plate, a symphony of autumn flavors that dances on your palate. The moment this loaf emerges from your oven, your entire home will be enveloped in the most intoxicating aroma of cinnamon, nutmeg, and ginger, hinting at the deliciousness to come. The texture is what truly sets it apart – incredibly moist, tender, and fluffy, a stark contrast to some dry, crumbly pumpkin breads I’ve encountered in the past. Every slice is a testament to perfect balance, where the earthy sweetness of pumpkin meets a delicate blend of spices, all crowned by that irresistible, subtly sweet, and slightly sticky Maple Glaze. It’s the kind of treat that brightens any day, makes a simple moment feel special, and creates lasting memories around the table. Trust me when I say, this Pumpkin Bread With Maple Glaze isn’t just good; it’s unforgettable.
Now, while this bread is absolutely divine straight out of the oven, or after it has cooled completely, its versatility is another reason I adore it so much. For a truly indulgent breakfast or brunch, I love to serve a thick slice slightly warmed, perhaps with a dollop of freshly whipped cream or a scoop of vanilla bean ice cream melting into it – a surprisingly delightful dessert pairing! It’s also fantastic alongside your morning coffee or afternoon tea, providing that perfect comforting treat to savor. Don’t be afraid to experiment with serving it with a side of cream cheese frosting, if you’re feeling extra decadent, or even a sprinkle of toasted pecans for added crunch. As for variations, the sky’s the limit! If you’re a nut lover, folding in a cup of chopped walnuts or pecans into the batter before baking adds a wonderful texture and nutty depth. Chocolate chip enthusiasts can certainly add a cup of dark or milk chocolate chips for a sweeter, more dessert-like version. I’ve even tried adding a tablespoon of candied ginger for a lovely spicy kick, which was a huge hit with my family. For those who prefer smaller portions or want to share easily, this recipe adapts beautifully to mini loaf pans or even muffin tins – just adjust your baking time accordingly. Imagine delightful little muffins, each with its own perfect swirl of Maple Glaze, ready to grab and go!
Your Culinary Adventure Awaits!
So, my friends, I truly hope I’ve convinced you that this Pumpkin Bread With Maple Glaze is not just another recipe to bookmark, but an essential addition to your baking repertoire. It’s comforting, it’s delicious, and it brings a unique kind of joy that only homemade baked goods can provide. Don’t let another autumn season pass without experiencing the magic of this particular loaf. Gather your ingredients, preheat your oven, and prepare to fill your home with the most incredible aromas. I promise you, the process is as rewarding as the first bite. Once you’ve baked it, I would absolutely love to hear about your experience! Did you add any special twists? What did your family and friends think? Share your stories, your photos, and your triumphs. Your feedback truly brightens my day and helps me connect with fellow baking enthusiasts like you. Happy baking, and enjoy every single crumb!
Pumpkin Bread With Maple Glaze
This recipe consistently brings smiles and fills homes with an irresistible aroma. Imagine slicing into a perfectly moist, tender loaf, rich with the earthy sweetness of pumpkin and a symphony of warm spices like cinnamon. It’s the ultimate comfort food, perfect for a leisurely breakfast, an afternoon snack, or a delightful dessert.
Ingredients
-
1/4 cup (55g) unsalted butter, melted
-
1/2 cup (65g) all-purpose flour
-
1/4 cup (50g) light brown sugar, packed
-
2 tbsp granulated sugar
-
1/2 tsp pumpkin pie spice
-
1 (15-ounce or 425g) can pure pumpkin puree
-
1 cup (200g) granulated sugar
-
1/2 cup (100g) light brown sugar, packed
-
1/2 cup (100ml) vegetable oil
-
2 large eggs
-
1/2 tsp vanilla extract
-
1/2 cup (110ml) milk
-
1 3/4 cups (230g) all-purpose flour
-
1 tsp baking soda
-
1 tsp cinnamon
Instructions
-
Step 1
Preheat your oven to 350°F (175°C). Generously grease and lightly flour a 9×5-inch (23×13 cm) loaf pan. -
Step 2
In a small bowl, combine 1/2 cup all-purpose flour, 1/4 cup packed light brown sugar, 2 tbsp granulated sugar, and 1/2 tsp pumpkin pie spice. Stir in 1/4 cup melted unsalted butter until crumbly. Set aside. -
Step 3
In a medium mixing bowl, whisk together 1 3/4 cups all-purpose flour, 1 tsp baking soda, and 1 tsp cinnamon. -
Step 4
In a large mixing bowl, whisk together 1 (15-ounce) can pure pumpkin puree, 1 cup granulated sugar, 1/2 cup packed light brown sugar, 1/2 cup vegetable oil, 2 large eggs, 1/2 tsp vanilla extract, and 1/2 cup milk until smooth and well combined. -
Step 5
Gradually add the dry ingredient mixture to the wet ingredients, mixing on low speed until just combined. Avoid overmixing to ensure a tender crumb. -
Step 6
Pour the batter into the prepared loaf pan. Sprinkle the streusel topping evenly over the batter. Place the pan in the center of the preheated oven and bake for 60-75 minutes, or until a wooden skewer inserted into the very center of the loaf comes out clean or with only a few moist crumbs attached. -
Step 7
Remove the pan from the oven and let the bread cool in the pan on a wire rack for about 15-20 minutes. After initial cooling, carefully invert the bread onto the wire rack, remove the pan, and let it cool completely.
Important Information
Nutrition Facts (Per Serving)
It is important to consider this information as approximate and not to use it as definitive health advice.
Allergy Information
Please check ingredients for potential allergens and consult a health professional if in doubt.