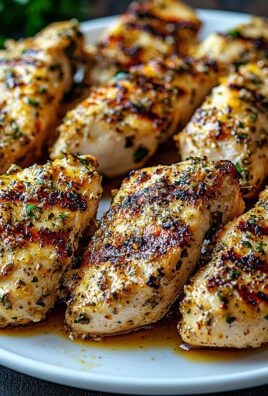
Best Crispy Dill Pickle Parmesan Chicken
Oh boy, are you in for a treat with this one! When I set out to create something truly memorable, I wanted to combine flavors that might seem a little unconventional but just work beautifully together. And let me tell you, this Best Crispy Dill Pickle Parmesan Chicken absolutely nails it. Forget everything you thought you knew about chicken dinners, because this recipe is a total game-changer.
What makes it so special, you ask? Well, it’s all about that incredible flavor explosion and unbeatable texture. We’re taking tender, juicy chicken and coating it in a magical blend of crispy goodness, infused with the tangy, briny zest of dill pickles and the salty, savory richness of Parmesan cheese. Seriously, every bite delivers that satisfying crunch followed by a burst of bold, delicious flavor that will have your taste buds singing. You’re going to absolutely love how this dish transforms simple chicken into an exciting, crave-worthy meal that’s perfect for any night of the week. Get ready to fall in love with your new favorite crispy chicken!

Ingredient Notes
Oh, you are in for a treat with this "Best Crispy Dill Pickle Parmesan Chicken"! The magic truly happens when you combine quality ingredients and let those dill pickle flavors shine. Here’s what you’ll need to gather from your pantry and fridge to make this culinary masterpiece a reality, along with some friendly substitution advice.
- Boneless, Skinless Chicken Breasts: I typically use two large chicken breasts, which I butterfly and then pound to about a ½-inch thickness. This ensures even cooking and a tender result. You could also use boneless, skinless chicken thighs for a juicier, richer flavor, or chicken tenders for quicker cooking and smaller portions.
- Dill Pickle Brine: This is our secret weapon! Don’t throw away that pickle juice. It infuses the chicken with that signature tangy dill flavor and helps keep it incredibly moist. Make sure it’s from a jar of good-quality dill pickles for the best taste.
- All-Purpose Flour: The first layer in our crispy coating. It provides a dry surface for the egg wash to adhere to. For a gluten-free option, a good 1:1 gluten-free flour blend works perfectly here.
- Eggs: Used for our egg wash, which acts as the "glue" for the breadcrumbs. I usually crack 2-3 large eggs, depending on the amount of chicken.
- Panko Breadcrumbs: These are non-negotiable for that "best crispy" texture! Panko breadcrumbs are flakier and absorb less oil than regular breadcrumbs, resulting in an incredibly airy and crunchy crust. If you absolutely can’t find panko, regular breadcrumbs will work in a pinch, but the crispiness won’t be quite the same. For an extra adventurous crunch, you could crush up some plain potato chips and mix them in!
- Parmesan Cheese: Freshly grated Parmesan is key here. It melts beautifully, adds a salty, savory depth, and contributes to the crispy texture. Pre-grated Parmesan in a shaker often contains anti-caking agents that can prevent it from melting as nicely. If you’re looking for a sharper flavor, Pecorino Romano cheese is a fantastic substitute.
- Fresh Dill: Chopped fresh dill adds an aromatic burst and enhances the pickle flavor. Don’t skip it! If fresh dill isn’t available, you can use about 1/3 the amount of dried dill, but the fresh herb really makes a difference.
- Garlic Powder & Onion Powder: These pantry staples bring foundational savory flavor to our breading mixture.
- Black Pepper & Salt: Seasoning is crucial at every stage. I recommend tasting your pickle brine before adding too much extra salt, as some can be quite salty already.
- Cooking Oil: For pan-frying, I prefer a neutral oil with a high smoke point, like vegetable, canola, or grapeseed oil. This ensures a golden, crispy crust without imparting unwanted flavors. If you’re baking or air frying, a good quality olive oil spray will be your friend.
- Optional but Recommended: Dijon Mustard: A tiny bit stirred into the egg wash adds a lovely tang and helps deepen the overall flavor profile without tasting overtly like mustard.
Step-by-Step Instructions
Let’s get cooking! Follow these simple steps to create your "Best Crispy Dill Pickle Parmesan Chicken." Trust me, it’s easier than you think to achieve that restaurant-quality crunch at home.
-
Step 1: Prepare the Chicken
Take your boneless, skinless chicken breasts and, if they’re thick, carefully butterfly them open. Then, place each piece between two sheets of plastic wrap or in a large zip-top bag. Using a meat mallet or the bottom of a heavy skillet, pound the chicken to an even ½-inch thickness. This ensures uniform cooking and tenderness. Pat the chicken pieces very dry with paper towels; this is crucial for the breading to stick properly.
-
Step 2: Marinate (Optional, but Recommended)
Place your pounded chicken breasts in a shallow dish or a zip-top bag. Pour about ½ cup of dill pickle brine over the chicken, ensuring each piece is coated. Let it marinate for at least 30 minutes in the refrigerator, or up to 2 hours. This step deeply infuses the chicken with that fantastic pickle flavor and moisture. Don’t marinate for too long, or the chicken can become too salty or develop a slightly rubbery texture.
-
Step 3: Set Up Your Dredging Station
While the chicken marinates, prepare your breading station. You’ll need three shallow dishes or pie plates:
- In the first dish, combine the all-purpose flour with ½ teaspoon garlic powder, ½ teaspoon onion powder, ¼ teaspoon salt, and ¼ teaspoon black pepper. Whisk to combine.
- In the second dish, crack your eggs. Add 2 tablespoons of dill pickle brine (from the jar, not from your chicken marinade), and a teaspoon of Dijon mustard (if using). Whisk well until thoroughly combined.
- In the third dish, combine the panko breadcrumbs, grated Parmesan cheese, chopped fresh dill, the remaining ½ teaspoon garlic powder, remaining ½ teaspoon onion powder, another ¼ teaspoon salt, and ¼ teaspoon black pepper. Mix everything thoroughly with your fingers to ensure the Parmesan and dill are evenly distributed.
-
Step 4: Breading the Chicken
Remove the chicken from the pickle brine marinade, letting any excess drip off. Do not rinse. Take one piece of chicken at a time and dredge it first in the seasoned flour, ensuring it’s completely coated. Shake off any excess. Next, dip it into the egg wash, letting any extra drip off. Finally, press the chicken firmly into the panko-Parmesan mixture, making sure to coat both sides thoroughly and pressing the breadcrumbs onto the chicken so they adhere well. Place the breaded chicken on a clean plate or wire rack. Repeat with the remaining chicken pieces. For best results, you can chill the breaded chicken in the refrigerator for 15-20 minutes; this helps the coating stick during cooking.
-
Step 5: Cook the Chicken
Pan-Frying Method:
Heat about ½ inch of cooking oil in a large, heavy-bottomed skillet (cast iron works wonderfully) over medium-high heat. The oil is ready when a sprinkle of panko sizzles immediately. Carefully place 1-2 breaded chicken pieces into the hot oil, ensuring not to overcrowd the pan (this can lower the oil temperature and lead to soggy chicken). Cook for 3-5 minutes per side, or until golden brown, crispy, and cooked through (internal temperature reaches 165°F/74°C). Adjust heat as needed to prevent burning. Remove cooked chicken to a wire rack set over a baking sheet to drain any excess oil and keep it crispy.
Baking Method:
Preheat your oven to 400°F (200°C). Lightly spray a wire rack set over a baking sheet with cooking spray. Arrange the breaded chicken on the rack in a single layer. Lightly spray the tops of the chicken with cooking oil. Bake for 20-25 minutes, flipping halfway through, or until golden brown, crispy, and cooked through (internal temperature 165°F/74°C). If you want extra crispiness, you can broil for the last 1-2 minutes, watching carefully to prevent burning.
Air Frying Method:
Preheat your air fryer to 375°F (190°C). Lightly spray the air fryer basket with cooking oil. Place 1-2 breaded chicken pieces in the basket in a single layer, ensuring they don’t overlap. Lightly spray the tops of the chicken with cooking oil. Air fry for 12-15 minutes, flipping halfway through, until golden brown, crispy, and cooked through (internal temperature 165°F/74°C).
-
Step 6: Serve
Let the cooked chicken rest for a minute or two before serving. Garnish with a sprinkle of fresh dill and perhaps a little extra grated Parmesan. Enjoy your incredibly crispy and flavorful Dill Pickle Parmesan Chicken!
Tips & Suggestions
To truly elevate your "Best Crispy Dill Pickle Parmesan Chicken" from great to absolutely unforgettable, I’ve gathered some of my favorite tips and serving suggestions. These little insights can make all the difference in achieving that perfect crispy crust and maximizing flavor.
- Pound it Thin & Even: Don’t skip pounding the chicken! This isn’t just about tenderness; it ensures your chicken cooks evenly and quickly, preventing some parts from drying out while others are still cooking. Aim for about ½ an inch thick.
- The Power of Brine: The dill pickle brine is your secret weapon for both flavor and moisture. Letting the chicken soak for a bit, and adding some to the egg wash, infuses that iconic tangy dill taste throughout. It’s truly what makes this dish stand out.
- Firm Breading is Key: When coating your chicken in the panko and Parmesan mixture, don’t be shy! Press it firmly onto the chicken on all sides. This helps create a robust crust that won’t fall off during cooking. Chilling the breaded chicken for 15-20 minutes before frying or baking also helps the coating adhere better.
- Don’t Overcrowd the Pan (or Air Fryer): Whether you’re pan-frying, baking, or air frying, resist the urge to cram too many pieces of chicken into your cooking vessel. Overcrowding lowers the temperature, which can lead to steaming instead of crisping, resulting in a soggy crust. Cook in batches if necessary.
- Maintain Oil Temperature: If pan-frying, keep an eye on your oil temperature. Too low, and the chicken will absorb too much oil and become greasy; too high, and the coating will burn before the chicken cooks through. Medium-high heat is usually perfect, allowing the crust to brown nicely as the chicken cooks.
- Serving Suggestions: This crispy chicken is incredibly versatile!
- Classic Comfort: Serve it alongside creamy mashed potatoes or a light potato salad and some roasted asparagus or green beans.
- Fresh & Light: Pair it with a simple green salad dressed with a lemon vinaigrette or a fresh cucumber and tomato salad.
- Sandwich Style: Slice it and serve it on a toasted bun with extra pickles, lettuce, and a smear of dill ranch or a zesty aioli for an epic sandwich.
- Dipping Sauce Love: A creamy dill ranch dressing, a homemade garlicky aioli, or even just extra pickle juice for dipping can take this dish to the next level.
- Garnish with Fresh Dill: A final sprinkle of fresh chopped dill before serving not only adds a lovely burst of color but also intensifies that signature dill aroma and flavor.
Storage
So, you’ve made a batch of this "Best Crispy Dill Pickle Parmesan Chicken" and somehow, you have leftovers! (It’s rare, I know, but it happens!) Here’s how to properly store and reheat it to maintain as much of that delicious crispiness as possible.
-
Refrigeration:
Once your chicken has cooled completely to room temperature (this is important to prevent sogginess and bacterial growth), place the leftover pieces in an airtight container. You can layer them with parchment paper if stacking multiple pieces to prevent them from sticking. Store in the refrigerator for up to 3-4 days.
-
Reheating:
To bring back that crispy texture, avoid the microwave if you can! Microwaving will heat the chicken but will likely make the breading soggy. My preferred methods for reheating are:
- Oven: Preheat your oven to 350°F (175°C). Place the chicken on a wire rack set over a baking sheet (this allows air to circulate and keeps the bottom crispy). Reheat for about 10-15 minutes, or until warmed through and the breading is crisp again.
- Air Fryer: This is my absolute favorite method for reheating! Preheat your air fryer to 350°F (175°C). Place the chicken in a single layer in the basket. Air fry for 5-8 minutes, flipping halfway through, until hot and crispy.
- Skillet: You can also reheat in a dry skillet over medium heat for a few minutes per side, being careful not to burn the crust.
-
Freezing Cooked Chicken:
This chicken freezes wonderfully! Once cooked and completely cooled, arrange the pieces in a single layer on a baking sheet and freeze for 1-2 hours, or until solid. This prevents them from sticking together. Once frozen, transfer the individual pieces to a freezer-safe bag or airtight container. They will keep well in the freezer for up to 2-3 months.
To reheat from frozen, you can bake it in a preheated oven at 375°F (190°C) for about 20-25 minutes, or air fry at 350°F (175°C) for 15-20 minutes, or until thoroughly heated through and crispy. Keep an eye on it to prevent over-browning.
-
Freezing Uncooked, Breaded Chicken:
If you want to prep ahead, you can bread the chicken as described in the instructions, then freeze the raw, breaded pieces. Place them on a baking sheet lined with parchment paper in a single layer and freeze until solid. Once frozen, transfer them to a freezer-safe bag or container. When you’re ready to cook, you can bake or air fry them directly from frozen. You’ll need to add an additional 10-15 minutes to the cooking time, and ensure the internal temperature reaches 165°F (74°C).

Final Thoughts
And there you have it, my friends! I truly believe that the Best Crispy Dill Pickle Parmesan Chicken is more than just a meal; it’s an experience that will delight your taste buds. The unique combination of that irresistible crunch, the bright, tangy zest of dill pickle, and the savory, cheesy goodness of Parmesan creates a flavor profile that is utterly addictive and truly unforgettable.
I absolutely insist you give this recipe a try. Whether you’re looking for a new family favorite, something special to impress guests, or just an exciting twist on a classic, the Best Crispy Dill Pickle Parmesan Chicken delivers on all fronts. It’s crispy, it’s flavorful, and it brings a smile to everyone’s face. I promise you, once you taste it, you’ll understand why I call it the “best” – it’s a true game-changer in your kitchen!

Best Crispy Dill Pickle Parmesan Chicken: Easy Recipe!
- Total Time: 45 minutes
- Yield: 4 servings 1x
Description
This Best Crispy Dill Pickle Parmesan Chicken combines tender chicken with a magical blend of crispy goodness and tangy dill pickle flavor. Every bite delivers a satisfying crunch and bold flavor, making it a crave-worthy meal for any night of the week.
Ingredients
- 2 large boneless, skinless chicken breasts (butterflied and pounded to ½-inch thickness)
- ½ cup dill pickle brine
- 1 cup all-purpose flour
- 2–3 large eggs
- 1 cup panko breadcrumbs
- ½ cup freshly grated Parmesan cheese
- 2 tablespoons chopped fresh dill
- 1 teaspoon garlic powder
- 1 teaspoon onion powder
- ½ teaspoon black pepper
- ½ teaspoon salt
- Cooking oil (for pan-frying, vegetable, canola, or grapeseed oil)
- Optional: 1 teaspoon Dijon mustard (for egg wash)
Instructions
- Step 1: Prepare the Chicken – Take your boneless, skinless chicken breasts and butterfly them open if thick. Place each piece between plastic wrap or in a zip-top bag and pound to an even ½-inch thickness. Pat the chicken dry with paper towels.
- Step 2: Marinate (Optional, but Recommended) – Place the pounded chicken in a shallow dish or zip-top bag. Pour ½ cup of dill pickle brine over the chicken and let it marinate for at least 30 minutes in the refrigerator.
- Step 3: Set Up Your Dredging Station – Prepare three shallow dishes: In the first dish, combine all-purpose flour, garlic powder, onion powder, salt, and black pepper. In the second dish, crack the eggs, add 2 tablespoons of dill pickle brine, and Dijon mustard, and whisk. In the third dish, combine panko breadcrumbs, grated Parmesan cheese, chopped dill, remaining garlic powder, onion powder, salt, and black pepper.
- Step 4: Breading the Chicken – Remove chicken from the pickle brine, letting excess drip off. Dredge each piece in the seasoned flour, then dip in the egg wash, and finally press into the panko-Parmesan mixture. Place on a clean plate or wire rack.
- Step 5: Cook the Chicken – For pan-frying, heat ½ inch of cooking oil in a skillet over medium-high heat. Cook chicken for 3-5 minutes per side until golden brown and cooked through. For baking, preheat oven to 400°F, arrange chicken on a wire rack, spray with oil, and bake for 20-25 minutes. For air frying, preheat air fryer to 375°F and air fry for 12-15 minutes.
- Step 6: Serve – Let the cooked chicken rest for a minute before serving. Garnish with fresh dill and extra grated Parmesan.
- Prep Time: 15 mins
- Cook Time: 30 mins
- Category: Dinner
- Method: Pan-frying, Baking, Air Frying
- Cuisine: American
Nutrition
- Serving Size: 1 piece
- Calories: 350
- Sugar: 1 g
- Sodium: 800 mg
- Fat: 20 g
- Saturated Fat: 5 g
- Unsaturated Fat: 15 g
- Trans Fat: 0 g
- Carbohydrates: 20 g
- Fiber: 1 g
- Protein: 30 g
- Cholesterol: 150 mg
Keywords: Pound the chicken thin for even cooking. Use dill pickle brine for flavor and moisture. Ensure firm breading by pressing it onto the chicken. Avoid overcrowding the pan or air fryer, and maintain oil temperature for best results.