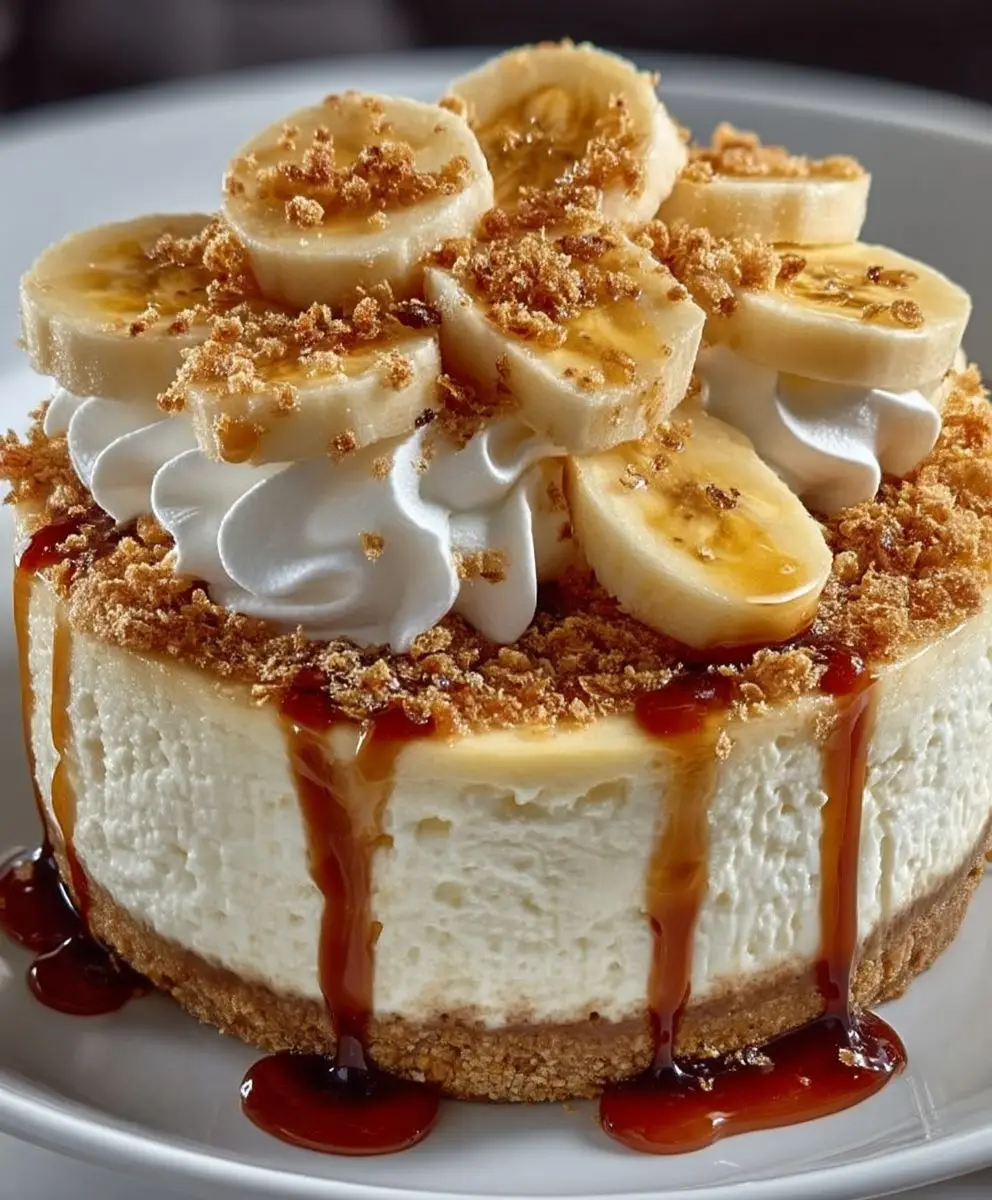
Banana Pudding Cheesecake: Prepare to be amazed! Imagine the creamy, dreamy texture of a classic cheesecake, swirled with the comforting flavors of homemade banana pudding. Yes, you read that right – it’s a dessert mashup of epic proportions, and it’s about to become your new favorite indulgence. This isn’t just a dessert; it’s an experience.
Banana pudding, a Southern staple, has roots that trace back to the late 19th century. It evolved from earlier English trifles and quickly became a beloved comfort food, often gracing family gatherings and potlucks. The addition of vanilla wafers and fresh bananas elevated it to iconic status. Now, we’re taking that beloved flavor profile and infusing it into the elegant world of cheesecake.
What makes this banana pudding cheesecake so irresistible? It’s the perfect balance of textures – the smooth, rich cheesecake base, the soft, sweet banana pudding swirls, and the satisfying crunch of vanilla wafers. The taste is a symphony of flavors – the tangy cream cheese, the sweet bananas, and the subtle vanilla notes. Plus, while it looks impressive, this recipe is surprisingly straightforward, making it perfect for both seasoned bakers and those just starting their dessert journey. Get ready to wow your friends and family with this unforgettable treat!

Ingredients:
- For the Crust:
- 1 ½ cups vanilla wafer crumbs (about 45 wafers)
- 5 tablespoons unsalted butter, melted
- 2 tablespoons granulated sugar
- For the Cheesecake Filling:
- 3 (8 ounce) packages cream cheese, softened
- 1 ½ cups granulated sugar
- ½ cup sour cream
- 1 teaspoon vanilla extract
- 4 large eggs
- For the Banana Pudding Layer:
- 1 (5.1 ounce) box instant vanilla pudding mix
- 3 cups cold milk
- 1 teaspoon banana extract (optional, but recommended!)
- 2 ripe bananas, sliced
- For the Topping:
- 2 cups heavy cream
- ¼ cup powdered sugar
- ½ teaspoon vanilla extract
- Vanilla wafers, for garnish
- Banana slices, for garnish
Preparing the Crust:
- Preheat your oven to 350°F (175°C). This is important for baking the crust evenly.
- In a food processor, pulse the vanilla wafers until they are finely ground into crumbs. If you don’t have a food processor, you can place the wafers in a large zip-top bag and crush them with a rolling pin. Make sure there are no large chunks!
- In a medium bowl, combine the vanilla wafer crumbs, melted butter, and granulated sugar. Mix well until the crumbs are evenly moistened. The mixture should resemble wet sand.
- Press the crumb mixture firmly into the bottom of a 9-inch springform pan. Use the bottom of a measuring cup or your fingers to create an even and compact crust. This will prevent the crust from crumbling when you slice the cheesecake.
- Bake the crust in the preheated oven for 8-10 minutes, or until lightly golden brown. This helps to set the crust and prevent it from becoming soggy.
- Remove the crust from the oven and let it cool completely while you prepare the cheesecake filling.
Making the Cheesecake Filling:
- In a large bowl, beat the softened cream cheese with an electric mixer until smooth and creamy. Make sure your cream cheese is truly softened; otherwise, you’ll end up with lumps in your cheesecake.
- Gradually add the granulated sugar and continue to beat until the mixture is light and fluffy. Scraping down the sides of the bowl occasionally ensures that all the ingredients are evenly incorporated.
- Add the sour cream and vanilla extract and mix until just combined. Be careful not to overmix at this stage, as it can cause the cheesecake to crack.
- Add the eggs one at a time, beating well after each addition. Again, avoid overmixing. Just mix until the eggs are incorporated.
- Pour the cheesecake filling over the cooled crust in the springform pan. Spread the filling evenly.
- Bake the cheesecake in the preheated oven for 55-70 minutes, or until the edges are set but the center still has a slight wobble. The baking time may vary depending on your oven, so keep an eye on it.
- Turn off the oven and let the cheesecake cool in the oven with the door slightly ajar for 1 hour. This helps prevent cracking by allowing the cheesecake to cool gradually.
- Remove the cheesecake from the oven and let it cool completely at room temperature.
- Cover the cheesecake with plastic wrap and refrigerate for at least 4 hours, or preferably overnight. This allows the cheesecake to set completely and develop its flavor.
Preparing the Banana Pudding Layer:
- In a large bowl, whisk together the instant vanilla pudding mix and cold milk until smooth.
- Stir in the banana extract (if using). This really enhances the banana flavor!
- Let the pudding mixture sit for 5 minutes to thicken.
- Gently fold in the sliced bananas. Be careful not to mash the bananas too much.
Assembling the Banana Pudding Cheesecake:
- Carefully remove the cheesecake from the springform pan. Run a thin knife around the edge of the pan before releasing the sides to ensure a clean release.
- Spread the banana pudding layer evenly over the top of the cheesecake.
Making the Whipped Cream Topping:
- In a large bowl, beat the heavy cream with an electric mixer until soft peaks form.
- Gradually add the powdered sugar and vanilla extract and continue to beat until stiff peaks form. Be careful not to overwhip, or the cream will turn grainy.
- Pipe or spread the whipped cream over the banana pudding layer. You can use a piping bag with a decorative tip for a more elegant look, or simply spread it with a spatula.
Garnishing and Serving:
- Garnish the cheesecake with vanilla wafers and banana slices. Get creative with your arrangement!
- Refrigerate the cheesecake for at least 30 minutes before serving to allow the whipped cream to set.
- Slice and serve. Enjoy!
Tips for Success:
- Use room temperature ingredients: Softened cream cheese and room temperature eggs will incorporate more easily and result in a smoother cheesecake.
- Don’t overmix: Overmixing can incorporate too much air into the batter, which can cause the cheesecake to crack during baking.
- Bake in a water bath (optional): For an even creamier cheesecake, you can bake it in a water bath. Wrap the bottom of the springform pan tightly in aluminum foil to prevent water from seeping in. Place the wrapped pan in a larger roasting pan and add hot water to the roasting pan until it reaches about halfway up the sides of the springform pan. Bake as directed.
- Let it cool gradually: Cooling the cheesecake slowly helps prevent cracking.
- Chill thoroughly: Chilling the cheesecake for at least 4 hours allows it to set completely and develop its flavor.
- Adjust sweetness to your liking: If you prefer a less sweet cheesecake, you can reduce the amount of sugar in the filling.
- Add a graham cracker crust: If you prefer a graham cracker crust, you can substitute graham cracker crumbs for the vanilla wafer crumbs.
- Make it ahead of time: This cheesecake can be made up to 2 days in advance. Just store it covered in the refrigerator.
Variations:
- Chocolate Banana Pudding Cheesecake: Add 1/4 cup of cocoa powder to the cheesecake filling and use chocolate wafers for the crust.
- Peanut Butter Banana Pudding Cheesecake: Add 1/2 cup of peanut butter to the cheesecake filling and drizzle peanut butter over the top of the whipped cream.
- Caramel Banana Pudding Cheesecake: Drizzle caramel sauce over the top of the whipped cream.
Conclusion:
This isn’t just another dessert; it’s a flavor explosion waiting to happen! The creamy, dreamy texture of the cheesecake, perfectly balanced with the sweet, comforting taste of banana pudding, makes this banana pudding cheesecake an absolute must-try. Seriously, if you’re looking for a show-stopping dessert that will have everyone begging for seconds, look no further. I promise, this recipe will become a new family favorite.
But why is it so special? It’s the combination of textures, the interplay of flavors, and the sheer decadence of each bite. The buttery graham cracker crust provides the perfect foundation for the rich cheesecake filling, which is then swirled with ribbons of luscious banana pudding. And let’s not forget the fresh banana slices and whipped cream topping – pure perfection!
Now, let’s talk serving suggestions. While this cheesecake is amazing on its own, there are a few ways to elevate the experience even further. For a truly indulgent treat, try drizzling a little caramel sauce over each slice. Or, if you’re feeling adventurous, sprinkle some chopped pecans or walnuts on top for added crunch. A dusting of cocoa powder also adds a touch of elegance.
And the variations? Oh, the possibilities are endless! If you’re a fan of chocolate, try adding some chocolate shavings to the whipped cream topping or even swirling some melted chocolate into the cheesecake batter. For a more tropical twist, consider using coconut flakes instead of nuts. You could even add a layer of vanilla wafers to the bottom of the crust for an extra dose of banana pudding flavor.
Another fun variation is to make individual mini cheesecakes! Simply use muffin tins lined with cupcake liners and adjust the baking time accordingly. These are perfect for parties or when you just want a small treat. You could even create a banana pudding cheesecake parfait by layering crumbled graham crackers, cheesecake filling, and banana pudding in a glass.
I’ve poured my heart and soul into perfecting this recipe, and I’m confident that you’ll love it as much as I do. It’s the perfect dessert for any occasion, from a casual weeknight dinner to a special celebration. It’s also surprisingly easy to make, even if you’re not an experienced baker. The step-by-step instructions are clear and concise, and I’ve included plenty of tips and tricks to ensure your success.
So, what are you waiting for? Grab your ingredients, preheat your oven, and get ready to create a masterpiece. I know you can do it! And once you’ve tasted the magic of this banana pudding cheesecake, you’ll be hooked.
I’m so excited for you to try this recipe! Please, please, please let me know how it turns out. Share your photos, your variations, and your feedback in the comments below. I can’t wait to hear about your experience and see your beautiful creations. Happy baking! I truly believe that baking is an act of love, and I hope this recipe brings you and your loved ones joy and happiness. Don’t be afraid to experiment and make it your own. After all, the best recipes are the ones that are made with love and shared with friends and family. So go ahead, give it a try, and let the deliciousness begin!
Banana Pudding Cheesecake: The Ultimate Dessert Recipe
This Banana Pudding Cheesecake combines creamy cheesecake with a classic banana pudding layer and whipped cream topping. A vanilla wafer crust supports a rich cream cheese filling, followed by a banana-infused pudding and garnished with whipped cream, vanilla wafers, and banana slices. Perfect for a decadent dessert!
Ingredients
This is a well-written and comprehensive recipe for Banana Pudding Cheesecake. Here’s a breakdown of its strengths and potential areas for improvement:
**Strengths:**
* **Clear and Concise Instructions:** The instructions are broken down into logical sections (Crust, Filling, Pudding, Topping, Assembly, Garnishing) making it easy to follow. Each step is clearly explained.
* **Detailed Ingredient List:** The ingredient list is specific, including quantities and even notes on the type of ingredient (e.g., “softened cream cheese,” “ripe bananas”). The inclusion of the number of wafers needed is helpful.
* **Helpful Equipment List:** Listing the necessary equipment is a great touch, especially for less experienced bakers.
* **Useful Tips for Success:** The “Tips for Success” section provides valuable advice for achieving the best results, addressing common cheesecake problems like cracking.
* **Creative Variations:** The “Variations” section offers interesting ideas for customizing the recipe.
* **Specific Times:** The recipe includes prep, cook, and chill times, which helps with planning.
* **Yield Information:** Knowing the yield (12 servings) is helpful for determining if the recipe is suitable for the occasion.
* **Temperature Conversion:** Including the Celsius equivalent for the oven temperature is a nice touch for international users.
**Potential Areas for Improvement:**
* **Water Bath Specifics:** While the “Tips” mention a water bath, it doesn’t provide specific instructions on how to create one. Adding a brief explanation (e.g., wrapping the springform pan in foil, placing it in a larger pan filled with hot water) would be beneficial.
* **Banana Browning:** Bananas tend to brown quickly. Suggesting a light coating of lemon juice on the banana slices in the pudding layer and for garnish could help prevent this.
* **Whipped Cream Stability:** Adding a stabilizer to the whipped cream (like cream cheese or gelatin) could help it hold its shape longer, especially if the cheesecake is made ahead of time. This could be mentioned in the “Tips” section.
* **Crust Thickness:** While the recipe specifies pressing the crumb mixture firmly, it doesn’t mention the desired thickness of the crust. Adding a note like “Press the crumb mixture firmly into an even layer about 1/4 inch thick” could be helpful.
* **Visual Cues for Doneness:** While the recipe mentions the edges being set and the center having a slight wobble, adding more visual cues for doneness would be helpful. For example, “The cheesecake should be lightly golden brown on top.”
* **Storage Instructions:** While it mentions making it ahead of time, it could benefit from more specific storage instructions, such as “Store the cheesecake, covered, in the refrigerator for up to 3 days.”
**Overall:**
This is a well-written and easy-to-follow recipe that is likely to produce a delicious Banana Pudding Cheesecake. The suggested improvements are minor and would simply enhance the recipe’s clarity and ensure even better results.
Instructions
- Preheat your oven to 350°F (175°C).
- In a food processor, pulse the vanilla wafers until they are finely ground into crumbs. Alternatively, place the wafers in a large zip-top bag and crush them with a rolling pin.
- In a medium bowl, combine the vanilla wafer crumbs, melted butter, and granulated sugar. Mix well until the crumbs are evenly moistened.
- Press the crumb mixture firmly into the bottom of a 9-inch springform pan.
- Bake the crust in the preheated oven for 8-10 minutes, or until lightly golden brown.
- Remove the crust from the oven and let it cool completely while you prepare the cheesecake filling.
- In a large bowl, beat the softened cream cheese with an electric mixer until smooth and creamy.
- Gradually add the granulated sugar and continue to beat until the mixture is light and fluffy. Scrape down the sides of the bowl occasionally.
- Add the sour cream and vanilla extract and mix until just combined.
- Add the eggs one at a time, beating well after each addition. Avoid overmixing.
- Pour the cheesecake filling over the cooled crust in the springform pan. Spread the filling evenly.
- Bake the cheesecake in the preheated oven for 55-70 minutes, or until the edges are set but the center still has a slight wobble.
- Turn off the oven and let the cheesecake cool in the oven with the door slightly ajar for 1 hour.
- Remove the cheesecake from the oven and let it cool completely at room temperature.
- Cover the cheesecake with plastic wrap and refrigerate for at least 4 hours, or preferably overnight.
- In a large bowl, whisk together the instant vanilla pudding mix and cold milk until smooth.
- Stir in the banana extract (if using).
- Let the pudding mixture sit for 5 minutes to thicken.
- Gently fold in the sliced bananas.
- Carefully remove the cheesecake from the springform pan. Run a thin knife around the edge of the pan before releasing the sides.
- Spread the banana pudding layer evenly over the top of the cheesecake.
- In a large bowl, beat the heavy cream with an electric mixer until soft peaks form.
- Gradually add the powdered sugar and vanilla extract and continue to beat until stiff peaks form.
- Pipe or spread the whipped cream over the banana pudding layer.
- Garnish the cheesecake with vanilla wafers and banana slices.
- Refrigerate the cheesecake for at least 30 minutes before serving.
- Slice and serve.
Notes
This is a well-written and comprehensive recipe for Banana Pudding Cheesecake. Here’s a breakdown of its strengths and potential areas for improvement:
**Strengths:**
* **Clear and Concise Instructions:** The instructions are broken down into logical sections (Crust, Filling, Pudding, Topping, Assembly) making it easy to follow. Each step is clearly explained.
* **Detailed Ingredient List:** The ingredient list is specific, including quantities and even notes on the type of ingredients (e.g., “softened cream cheese,” “ripe bananas”). It also provides helpful conversions (e.g., “1 ½ cups vanilla wafer crumbs (about 45 wafers)”).
* **Helpful Equipment List:** Listing the necessary equipment is a great addition, especially for less experienced bakers.
* **Troubleshooting Tips:** The “Tips for Success” section addresses common cheesecake issues like cracking and provides solutions.
* **Variations:** Offering variations provides inspiration and allows users to customize the recipe to their preferences.
* **Prep and Cook Times:** Providing estimated prep, cook, and chill times helps bakers plan accordingly.
* **Yield:** Knowing the yield helps determine if the recipe is suitable for the intended number of servings.
* **Good Formatting:** The use of headings, subheadings, and bullet points makes the recipe easy to read and scan.
**Potential Areas for Improvement:**
* **Water Bath Instructions:** While the “Tips for Success” mentions a water bath, it doesn’t provide specific instructions. If recommending it, a brief explanation of how to create a water bath would be beneficial. For example: “For a water bath, wrap the bottom of the springform pan tightly in aluminum foil. Place the wrapped pan in a larger roasting pan. Pour hot water into the roasting pan until it reaches halfway up the sides of the springform pan.”
* **Crust Thickness:** While the recipe instructs to press the crumb mixture firmly, it doesn’t specify a desired thickness. Adding a note like “Press the crumb mixture firmly into the bottom of the pan to create an even, approximately 1/4-inch thick crust” could be helpful.
* **Banana Slicing for Pudding:** Specifying the thickness of the banana slices for the pudding layer could be helpful. Something like “thinly sliced” or “1/4-inch thick slices” would provide more guidance.
* **Whipped Cream Stability:** Mentioning the use of a stabilizer in the whipped cream (like cornstarch or gelatin) could improve its longevity, especially if the cheesecake is being made ahead of time. Alternatively, suggesting making the whipped cream just before serving.
* **Storage Instructions:** While it mentions making it ahead, it could benefit from more specific storage instructions. For example: “Store the assembled cheesecake, covered, in the refrigerator for up to 2 days. For best results, add the whipped cream topping just before serving.”
* **Nutritional Information:** While not always necessary, including approximate nutritional information (calories, fat, sugar) would be a valuable addition for health-conscious bakers.
**Overall:**
This is a very good recipe that is well-written, easy to understand, and likely to produce a delicious Banana Pudding Cheesecake. The suggested improvements are minor and would simply enhance the recipe’s clarity and user-friendliness.