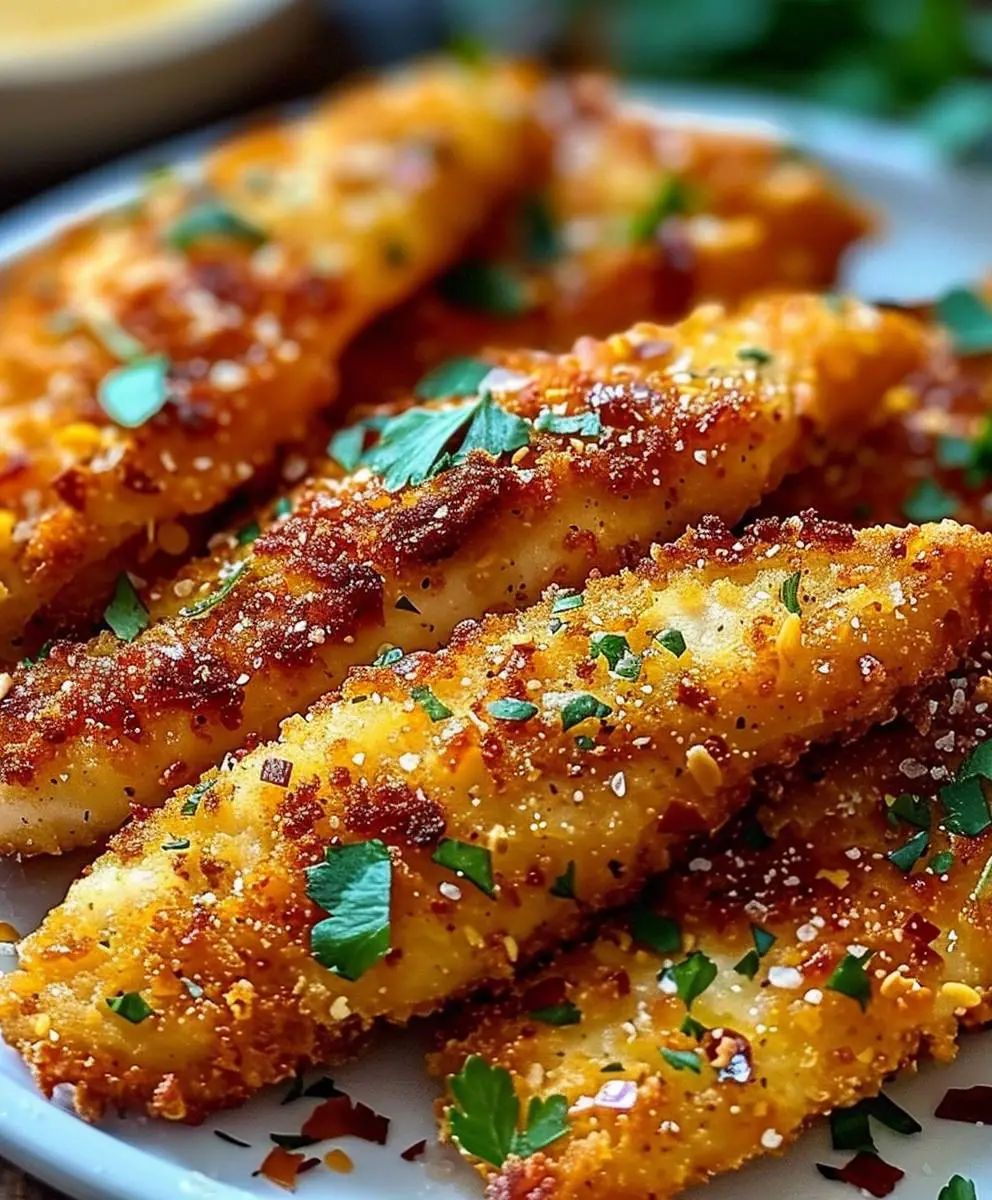
Baked Chicken Tenders: Crispy, juicy, and unbelievably easy to make, these aren’t your average chicken tenders! Forget the greasy, deep-fried versions – we’re bringing you a healthier and equally delicious alternative that will have everyone reaching for seconds. Have you ever craved that satisfying crunch of fried chicken but wanted to avoid the extra calories and mess? Well, you’re in the right place!
Chicken tenders, in their various forms, have become a staple in American cuisine, evolving from simple breaded cutlets to a beloved comfort food enjoyed by kids and adults alike. While traditionally fried, our baked chicken tenders offer a modern twist, retaining all the flavor and texture you crave without the added guilt.
What makes these baked chicken tenders so irresistible? It’s the perfect combination of a crispy, golden-brown exterior and a tender, juicy interior. The secret lies in our simple yet effective baking technique and a flavorful breading that’s packed with herbs and spices. Plus, they’re incredibly convenient! Perfect for a quick weeknight dinner, a fun appetizer for game day, or even a lunchbox treat, these baked chicken tenders are a versatile dish that everyone will love. Get ready to experience chicken tender perfection!

Ingredients:
- 2 lbs boneless, skinless chicken breasts, cut into 1-inch thick strips
- 1 cup all-purpose flour
- 1 teaspoon salt
- 1/2 teaspoon black pepper
- 1 teaspoon garlic powder
- 1 teaspoon onion powder
- 1 teaspoon paprika
- 1/2 teaspoon dried thyme
- 1/2 teaspoon dried oregano
- 2 large eggs
- 1/4 cup milk
- 1 1/2 cups panko breadcrumbs
- 1/2 cup grated Parmesan cheese
- 1/4 cup olive oil
- Cooking spray
Preparing the Chicken and Flour Mixture
Okay, let’s get started! First things first, we need to prepare our chicken and get our dry ingredients ready. This is a crucial step to ensure even coating and maximum flavor.
- Prepare the Chicken: Take your chicken breasts and cut them into strips that are about 1-inch thick. This size is perfect for even cooking and a satisfying bite. Make sure they’re relatively uniform in size so they cook at the same rate. If some are thicker than others, gently pound them with a meat mallet to even them out. This also helps tenderize the chicken.
- Combine Dry Ingredients: In a large bowl, whisk together the flour, salt, pepper, garlic powder, onion powder, paprika, thyme, and oregano. This is our flavorful flour mixture that will give the chicken a delicious crust. Make sure everything is well combined so that each tender gets an even coating of all the spices. I like to use a whisk to really get everything incorporated.
Preparing the Egg Wash and Panko Mixture
Now, let’s move on to the wet and crispy components! The egg wash helps the panko breadcrumbs adhere to the chicken, and the panko and Parmesan mixture creates a wonderfully crunchy and flavorful coating.
- Prepare the Egg Wash: In a separate bowl, whisk together the eggs and milk until well combined. The milk helps to thin out the eggs, creating a smoother wash that coats the chicken evenly. Make sure there are no streaks of egg yolk or white remaining.
- Prepare the Panko Mixture: In another bowl, combine the panko breadcrumbs and grated Parmesan cheese. Mix well. The Parmesan adds a salty, savory flavor and helps the breadcrumbs brown beautifully in the oven. I sometimes add a pinch of garlic powder to this mixture as well for an extra boost of flavor.
Coating the Chicken Tenders
This is where the magic happens! We’re going to coat the chicken in the flour mixture, then the egg wash, and finally the panko mixture. This three-step process ensures a perfectly crispy and flavorful baked chicken tender.
- Dredge in Flour: Take each chicken strip and dredge it in the flour mixture, making sure to coat it completely. Shake off any excess flour. This step helps the egg wash adhere properly. I find it helpful to use one hand for the dry ingredients and the other for the wet ingredients to avoid clumping.
- Dip in Egg Wash: Dip the floured chicken strip into the egg wash, ensuring it’s fully coated. Let any excess egg wash drip off.
- Coat in Panko Mixture: Finally, dredge the chicken strip in the panko mixture, pressing gently to ensure the breadcrumbs adhere well. Make sure the entire surface is covered in panko. This is what gives us that amazing crispy texture!
- Repeat: Repeat steps 5-7 with the remaining chicken strips until all are coated.
Baking the Chicken Tenders
We’re almost there! Now it’s time to bake these beauties to golden-brown perfection. The olive oil helps to crisp up the breadcrumbs and adds a touch of richness.
- Prepare the Baking Sheet: Preheat your oven to 400°F (200°C). Line a baking sheet with parchment paper for easy cleanup. Spray the parchment paper with cooking spray to prevent the chicken from sticking.
- Arrange Chicken on Baking Sheet: Arrange the coated chicken tenders in a single layer on the prepared baking sheet. Make sure they’re not overcrowded, as this can prevent them from browning properly.
- Drizzle with Olive Oil: Drizzle the chicken tenders with olive oil. This helps them get nice and crispy in the oven. You can use a pastry brush to evenly distribute the oil, or simply drizzle it from a spoon.
- Bake: Bake for 20-25 minutes, or until the chicken is cooked through and the breadcrumbs are golden brown. The internal temperature of the chicken should reach 165°F (74°C). I like to flip the tenders halfway through baking to ensure even browning on both sides.
Serving and Enjoying
Congratulations, you’ve made delicious baked chicken tenders! Now it’s time to serve them up and enjoy the fruits of your labor. These tenders are perfect as an appetizer, a main course, or even a snack. They’re also great for kids and adults alike!
- Let Rest: Remove the chicken tenders from the oven and let them rest for a few minutes before serving. This allows the juices to redistribute, resulting in a more tender and flavorful chicken.
- Serve: Serve the baked chicken tenders with your favorite dipping sauces, such as ketchup, honey mustard, ranch dressing, or barbecue sauce. They’re also delicious with a side of fries, coleslaw, or a salad.
- Enjoy! Dig in and enjoy your homemade baked chicken tenders! They’re crispy, flavorful, and so much healthier than the fried version.
Tips and Variations:
- Spice it up: Add a pinch of cayenne pepper to the flour mixture for a little heat.
- Add herbs: Experiment with different herbs, such as rosemary or sage, for a unique flavor.
- Use different cheese: Try using a different type of cheese, such as Pecorino Romano or Asiago, instead of Parmesan.
- Make it gluten-free: Use gluten-free flour and gluten-free panko breadcrumbs to make this recipe gluten-free.
- Air Fryer Option: You can also cook these in an air fryer! Preheat your air fryer to 375°F (190°C). Place the coated chicken tenders in the air fryer basket in a single layer, being careful not to overcrowd. Cook for 12-15 minutes, flipping halfway through, until golden brown and cooked through.
Storage Instructions:
Leftover baked chicken tenders can be stored in an airtight container in the refrigerator for up to 3-4 days. To reheat, bake in a preheated oven at 350°F (175°C) for 10-15 minutes, or until heated through. You can also reheat them in an air fryer for a few minutes to restore some of the crispiness.
Conclusion:
And there you have it! These Baked Chicken Tenders are truly a game-changer. Forget greasy, unhealthy fast food – this recipe delivers all the satisfying crunch and flavor you crave, without any of the guilt. I know, I know, it sounds too good to be true, but trust me, one bite and you’ll be hooked. The simplicity of the preparation combined with the incredible taste makes this a must-try for busy weeknights, picky eaters, or anyone looking for a healthier alternative to fried chicken.
But why are these Baked Chicken Tenders so special? It’s the perfect balance of crispy coating and juicy, tender chicken. The baking process ensures that the chicken is cooked through perfectly, while the breadcrumb mixture creates a delightful golden-brown crust that’s simply irresistible. Plus, you can customize the seasonings to your liking! Want a little kick? Add a pinch of cayenne pepper to the breadcrumb mixture. Prefer a more savory flavor? Try adding some garlic powder or onion powder. The possibilities are endless!
Beyond the incredible taste and ease of preparation, these Baked Chicken Tenders are incredibly versatile. They’re fantastic served as a main course with your favorite sides, like roasted vegetables, mashed potatoes, or a simple salad. But don’t stop there! They also make a delicious addition to wraps, salads, or even as a topping for pizza.
Here are a few serving suggestions to get you started:
Serving Suggestions:
* Classic Combo: Serve with your favorite dipping sauces, such as honey mustard, barbecue sauce, or ranch dressing. A side of crispy fries or sweet potato fries completes the meal.
* Chicken Tender Salad: Slice the baked chicken tenders and toss them with mixed greens, cherry tomatoes, cucumbers, and your favorite dressing.
* Chicken Tender Wraps: Wrap the chicken tenders in tortillas with lettuce, tomato, cheese, and a drizzle of your favorite sauce.
* Chicken Tender Pizza: Top your homemade or store-bought pizza crust with marinara sauce, mozzarella cheese, and sliced baked chicken tenders. Bake until golden brown and bubbly.
* Kid-Friendly Meal: Serve with mac and cheese and steamed broccoli for a quick and easy kid-approved dinner.
Variations:
* Spicy Chicken Tenders: Add a pinch of cayenne pepper or chili powder to the breadcrumb mixture for a spicy kick.
* Parmesan Chicken Tenders: Add grated Parmesan cheese to the breadcrumb mixture for a cheesy flavor.
* Gluten-Free Chicken Tenders: Use gluten-free breadcrumbs or crushed gluten-free crackers for a gluten-free option.
* Herb-Crusted Chicken Tenders: Add dried herbs, such as thyme, rosemary, or oregano, to the breadcrumb mixture for an herbaceous flavor.
* Lemon Pepper Chicken Tenders: Add lemon pepper seasoning to the breadcrumb mixture for a zesty flavor.
I truly believe that this recipe for Baked Chicken Tenders will become a staple in your kitchen. It’s a healthy, delicious, and easy way to enjoy a classic comfort food. So, what are you waiting for? Gather your ingredients, preheat your oven, and get ready to experience the best baked chicken tenders you’ve ever had!
I’m so excited for you to try this recipe! Once you do, I’d love to hear about your experience. Did you make any variations? What dipping sauces did you use? Share your photos and comments below! Let’s create a community of baked chicken tender enthusiasts! Happy cooking!
Baked Chicken Tenders: The Crispiest, Healthier Recipe You'll Ever Make
Crispy, flavorful baked chicken tenders coated in panko and Parmesan. A healthier, quick, and easy alternative to fried chicken!
Ingredients
Instructions
Recipe Notes
- Spice it up: Add a pinch of cayenne pepper to the flour mixture for a little heat.
- Add herbs: Experiment with different herbs, such as rosemary or sage, for a unique flavor.
- Use different cheese: Try using a different type of cheese, such as Pecorino Romano or Asiago, instead of Parmesan.
- Make it gluten-free: Use gluten-free flour and gluten-free panko breadcrumbs to make this recipe gluten-free.
- Air Fryer Option: Preheat your air fryer to 375°F (190°C). Place the coated chicken tenders in the air fryer basket in a single layer, being careful not to overcrowd. Cook for 12-15 minutes, flipping halfway through, until golden brown and cooked through.
- Storage Instructions: Leftover baked chicken tenders can be stored in an airtight container in the refrigerator for up to 3-4 days. To reheat, bake in a preheated oven at 350°F (175°C) for 10-15 minutes, or until heated through. You can also reheat them in an air fryer for a few minutes to restore some of the crispiness.