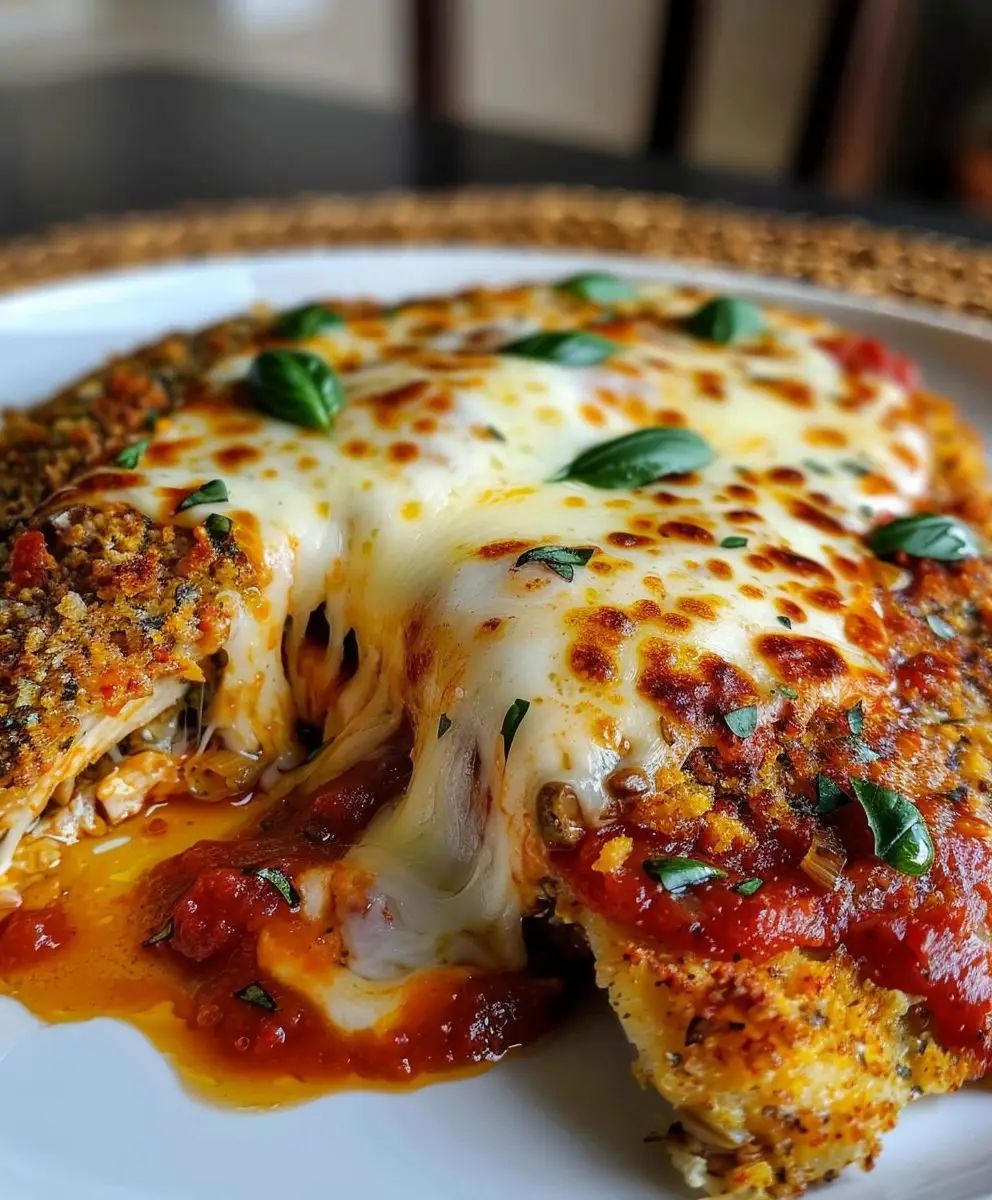
Baked Chicken Parmesan, a symphony of crispy, golden-brown chicken, tangy tomato sauce, and melted mozzarella, is a dish that transcends generations and continents. Have you ever craved a meal that’s both comforting and impressive, perfect for a weeknight dinner or a special occasion? This is it! Forget the greasy, heavy versions you might find elsewhere; we’re taking this classic to a whole new level with a healthier, yet equally delicious, baked rendition.
Chicken Parmesan, or Pollo alla Parmigiana, as it’s known in Italy, has a fascinating history. While its exact origins are debated, many believe it evolved from eggplant parmesan, brought to America by Italian immigrants. Over time, resourceful cooks substituted eggplant with chicken, creating the beloved dish we know today. It quickly became a staple in Italian-American cuisine, representing the ingenuity and resourcefulness of immigrant families.
What makes Baked Chicken Parmesan so irresistible? It’s the perfect combination of textures and flavors. The crispy coating gives way to tender, juicy chicken, while the rich tomato sauce adds a burst of acidity that complements the creamy mozzarella. People adore this dish because it’s satisfying, relatively easy to make, and always a crowd-pleaser. Plus, baking it instead of frying significantly reduces the fat content without sacrificing any of the flavor. Get ready to experience the ultimate comfort food!

Ingredients:
- Chicken: 4 boneless, skinless chicken breasts (about 6-8 ounces each)
- Eggs: 2 large eggs
- Breadcrumbs: 1 1/2 cups Italian seasoned breadcrumbs
- Parmesan Cheese: 1/2 cup grated Parmesan cheese, divided
- Garlic Powder: 1 teaspoon
- Onion Powder: 1/2 teaspoon
- Dried Oregano: 1/2 teaspoon
- Salt: 1/2 teaspoon, or to taste
- Black Pepper: 1/4 teaspoon, or to taste
- Olive Oil: 2 tablespoons, divided
- Marinara Sauce: 2 cups, your favorite brand or homemade
- Mozzarella Cheese: 8 ounces, shredded
- Fresh Basil: Optional, for garnish
Preparing the Chicken
Alright, let’s get started with prepping our chicken. This is a crucial step to ensure it’s tender and cooks evenly.
- Pound the Chicken: Place each chicken breast between two sheets of plastic wrap or in a large resealable bag. Using a meat mallet or rolling pin, pound the chicken to an even thickness of about 1/2 inch. This helps with even cooking and makes the chicken more tender. Don’t overdo it, though; you don’t want to tear the chicken.
- Prepare the Egg Wash: In a shallow dish, whisk together the eggs until they are well combined. A little air incorporated into the eggs will help them adhere to the chicken.
- Make the Breadcrumb Mixture: In another shallow dish, combine the breadcrumbs, 1/4 cup of the grated Parmesan cheese, garlic powder, onion powder, dried oregano, salt, and pepper. Mix well to ensure all the spices are evenly distributed. This breadcrumb mixture is what will give our chicken that delicious, crispy coating.
- Bread the Chicken: Now comes the fun part! Dip each chicken breast into the egg wash, making sure it’s fully coated. Then, dredge it in the breadcrumb mixture, pressing gently to ensure the breadcrumbs adhere to the chicken on all sides. You want a nice, even coating. Set the breaded chicken breasts aside on a clean plate or baking sheet.
Baking the Chicken
Now that our chicken is breaded, it’s time to bake it to golden perfection. Baking instead of frying keeps things healthier without sacrificing flavor!
- Preheat the Oven: Preheat your oven to 400°F (200°C). Make sure your oven is fully preheated before putting the chicken in; this helps the breadcrumbs crisp up nicely.
- Prepare the Baking Sheet: Lightly grease a baking sheet with 1 tablespoon of olive oil. This will prevent the chicken from sticking and help the bottom get nice and crispy.
- Bake the Chicken: Place the breaded chicken breasts on the prepared baking sheet, making sure they are not overcrowded. Drizzle the remaining 1 tablespoon of olive oil over the chicken. This will help the breadcrumbs brown evenly.
- Bake: Bake for 20-25 minutes, or until the chicken is cooked through and the breadcrumbs are golden brown. The internal temperature of the chicken should reach 165°F (74°C). Use a meat thermometer to check for doneness.
Assembling the Chicken Parmesan
The final step is to assemble our Chicken Parmesan. This is where all the flavors come together to create a truly satisfying dish.
- Add Marinara Sauce: Remove the baking sheet from the oven. Spoon about 1/4 cup of marinara sauce over each chicken breast, spreading it evenly. Don’t be shy with the sauce; it’s what makes this dish so flavorful.
- Add Mozzarella Cheese: Sprinkle the shredded mozzarella cheese evenly over the marinara sauce on each chicken breast. Then, sprinkle the remaining 1/4 cup of Parmesan cheese over the mozzarella. The combination of mozzarella and Parmesan creates a cheesy, gooey topping that’s irresistible.
- Broil (Optional): If you want the cheese to be extra bubbly and browned, you can broil the chicken for 1-2 minutes, or until the cheese is melted and lightly golden. Watch it carefully, as it can burn quickly under the broiler.
- Bake Again: Return the baking sheet to the oven and bake for another 5-10 minutes, or until the cheese is melted and bubbly.
- Rest: Remove the baking sheet from the oven and let the chicken rest for a few minutes before serving. This allows the cheese to set slightly and prevents it from being too runny.
Serving Suggestions
Now that your Chicken Parmesan is ready, it’s time to serve it up and enjoy! Here are a few serving suggestions to make it a complete meal:
- Pasta: Serve the Chicken Parmesan over your favorite pasta, such as spaghetti, linguine, or penne. Toss the pasta with some of the remaining marinara sauce for extra flavor.
- Vegetables: Pair the Chicken Parmesan with a side of steamed or roasted vegetables, such as broccoli, asparagus, or green beans. A simple salad also works well.
- Garlic Bread: Serve with warm garlic bread for dipping in the marinara sauce.
- Garnish: Garnish with fresh basil leaves for a pop of color and flavor.
Tips and Variations
Want to customize your Chicken Parmesan? Here are a few tips and variations to try:
- Use Different Cheeses: Experiment with different cheeses, such as provolone, fontina, or Asiago.
- Add Vegetables: Add sliced mushrooms, onions, or bell peppers to the marinara sauce for extra flavor and nutrients.
- Make it Spicy: Add a pinch of red pepper flakes to the breadcrumb mixture or marinara sauce for a little heat.
- Use Chicken Thighs: Substitute chicken thighs for chicken breasts for a richer, more flavorful dish. Just make sure to adjust the cooking time accordingly.
- Make it Gluten-Free: Use gluten-free breadcrumbs and gluten-free pasta to make this dish gluten-free.
- Air Fryer Option: You can also cook the breaded chicken in an air fryer for a healthier alternative. Preheat your air fryer to 375°F (190°C) and cook for 12-15 minutes, or until the chicken is cooked through and the breadcrumbs are golden brown. Then, top with marinara sauce and cheese and air fry for another 2-3 minutes, or until the cheese is melted and bubbly.
Make Ahead Instructions
Chicken Parmesan is a great dish to make ahead of time. Here’s how:
- Bread the Chicken: You can bread the chicken breasts ahead of time and store them in the refrigerator for up to 24 hours. Just make sure to cover them tightly with plastic wrap to prevent them from drying out.
- Assemble the Dish: You can also assemble the entire dish ahead of time, up to the point of baking. Cover the baking sheet with plastic wrap and store it in the refrigerator for up to 24 hours. When you’re ready to bake, simply remove the plastic wrap and bake as directed. You may need to add a few extra minutes to the baking time if the dish is cold.
Storage Instructions
Leftover Chicken Parmesan can be stored in the refrigerator for up to 3-4 days. To reheat, simply bake in a preheated oven at 350°F (175°C) for 15-20 minutes, or until heated through. You can also reheat it in the microwave, but the breadcrumbs may not be as crispy.
Enjoy!
I hope you enjoy this recipe for Baked Chicken Parmesan! It’s a classic dish that’s sure to please everyone at the table. Don’t be afraid to experiment with different variations and make it your own. Happy cooking!
Conclusion:
So, there you have it! This Baked Chicken Parmesan recipe is truly a game-changer, and I’m confident it will become a staple in your dinner rotation. Forget the greasy, heavy versions you might be used to. This recipe delivers all the classic flavors you crave – the tangy tomato sauce, the creamy mozzarella, and the crispy, golden-brown chicken – but in a healthier, easier-to-manage way. It’s the perfect weeknight meal, but impressive enough to serve to guests.
Why is this a must-try? Well, first and foremost, it’s incredibly delicious. The combination of flavors and textures is simply irresistible. Secondly, it’s surprisingly simple to make. The baking method eliminates the need for constant monitoring and flipping, freeing you up to focus on other things. And finally, it’s a crowd-pleaser! Everyone, from picky eaters to seasoned foodies, will love this dish.
Serving Suggestions and Variations
Now, let’s talk about how to serve this masterpiece! My personal favorite is to serve it over a bed of perfectly cooked spaghetti, tossed with a little extra tomato sauce and a sprinkle of fresh basil. But don’t feel limited to just spaghetti! It’s also fantastic with linguine, fettuccine, or even penne. For a lighter option, try serving it alongside a simple green salad with a vinaigrette dressing. A side of roasted vegetables, like broccoli or asparagus, would also complement the dish beautifully.
Looking for variations? The possibilities are endless! For a spicier kick, add a pinch of red pepper flakes to the breadcrumb mixture or the tomato sauce. If you’re a fan of garlic, add an extra clove or two to the sauce. You could also experiment with different types of cheese. Provolone or fontina would be delicious alternatives to mozzarella. For a richer flavor, try adding a dollop of ricotta cheese to each chicken breast before baking. And if you’re feeling adventurous, you could even try making your own homemade tomato sauce!
Another great variation is to use different types of breadcrumbs. Panko breadcrumbs will give you an extra crispy coating, while Italian-seasoned breadcrumbs will add even more flavor. You can also add grated Parmesan cheese to the breadcrumb mixture for an extra cheesy kick. If you’re gluten-free, simply use gluten-free breadcrumbs.
Don’t be afraid to get creative and experiment with different flavors and ingredients to create your own unique version of this classic dish. The most important thing is to have fun and enjoy the process!
Time to Get Cooking!
I truly believe that this Baked Chicken Parmesan recipe is one you’ll come back to again and again. It’s easy, delicious, and versatile – everything you could want in a weeknight meal. So, what are you waiting for? Head to the kitchen, gather your ingredients, and get cooking! I promise you won’t be disappointed.
And when you do try it, please, please, please let me know what you think! Share your photos and comments on social media using [Your Hashtag Here] or leave a review on the recipe page. I’m so excited to see your creations and hear about your experiences. Happy cooking!
Baked Chicken Parmesan: The Ultimate Recipe for Deliciousness
Crispy baked chicken parmesan with a golden breadcrumb crust, topped with marinara sauce and melted mozzarella cheese. A classic comfort food made easy!
Ingredients
Instructions
Recipe Notes
- Pounding the chicken ensures even cooking and tenderness.
- Baking instead of frying keeps the dish healthier.
- Use a meat thermometer to ensure the chicken is fully cooked.
- Broiling the cheese is optional but adds a nice browned finish.
- Experiment with different cheeses, vegetables, or spices to customize the recipe.
- For a gluten-free version, use gluten-free breadcrumbs and pasta.
- Breaded chicken can be prepared ahead of time and stored in the refrigerator for up to 24 hours.
- Leftover Chicken Parmesan can be stored in the refrigerator for up to 3-4 days.