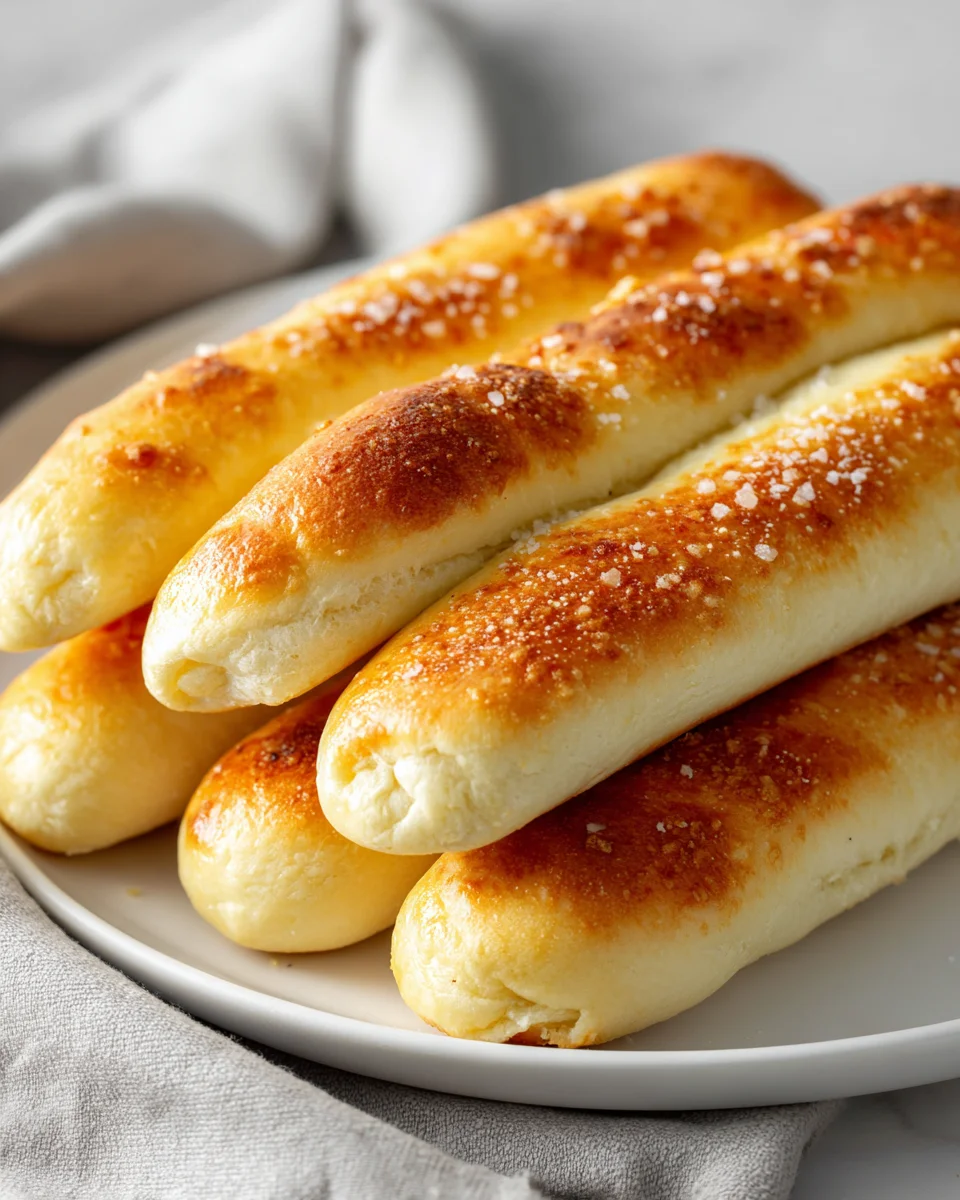
Olive Garden Breadsticks Recipe The Perfect Copycat
Oh my goodness, do I have a treat for you today! If you’re anything like me, you know that a trip to Olive Garden isn’t complete without those glorious, never-ending breadsticks. There’s just something about their warm, soft, garlicky goodness that keeps you reaching for more, isn’t there? Well, prepare to have your world rocked, because I’ve cracked the code.
This Olive Garden Breadsticks Recipe The Perfect Copycat is an absolute game-changer. What makes it so special, you ask? It’s not just a breadstick recipe; it’s the breadstick recipe that truly captures the magic of the original. We’re talking about that irresistible chew, that fluffy interior, and that incredible buttery garlic topping that makes your taste buds sing. You’ll love it because it means you can bring that beloved restaurant experience right into your own kitchen, any time you want! No waiting for a table, no limits on how many you can enjoy.
In a nutshell, this recipe guides you through creating beautifully golden-brown breadsticks that are incredibly soft on the inside, brushed with an aromatic garlic-infused butter, and finished with a delicate sprinkle of salt. They are the ultimate accompaniment to any meal, whether it’s a big bowl of pasta, a hearty beef stew, or even just a simple salad. Trust me, once you make these, you’ll wonder how you ever lived without this copycat perfection!

Ingredient Notes
Creating the perfect copycat Olive Garden breadsticks means understanding the role each ingredient plays in achieving that iconic soft, airy texture and savory garlic finish. I’ve broken down the key players here, along with a few substitution thoughts to ensure your baking success.
Flour
- All-Purpose Flour: This is my go-to for these breadsticks. It provides the ideal balance of structure and tenderness, mimicking the original perfectly. While bread flour would give you a chewier breadstick, and pastry flour a softer one, all-purpose hits that sweet spot we’re aiming for. I recommend using unbleached all-purpose flour for the best results, as it tends to have a slightly better flavor and texture for yeast breads.
- Substitution: If you only have bleached all-purpose flour, it will work just fine. If you want a slightly chewier breadstick, you can substitute up to half of the all-purpose flour with bread flour.
Yeast
- Active Dry Yeast: This recipe primarily relies on active dry yeast. It needs to be proofed (activated) in warm water with a little sugar, which is a satisfying step that confirms your yeast is alive and ready to make your dough rise beautifully.
- Substitution: You can absolutely use instant yeast. If using instant yeast, you can skip the proofing step and just mix it directly with the flour and other dry ingredients. Just make sure your water is still warm (around 120-130°F or 49-54°C) when you add it to the mixture. The quantity usually remains the same.
Water
- Warm Water: Crucial for activating your yeast. It needs to be warm enough to wake up the yeast, but not so hot that it kills it. I aim for bathwater temperature – around 105-115°F (40-46°C) for active dry yeast. If it’s too cool, the yeast won’t activate; too hot, and it will die, leaving you with flat breadsticks.
- Substitution: There isn’t really a substitute for water in this recipe, but getting the temperature right is paramount.
Sugar
- Granulated Sugar: A small amount of sugar doesn’t make the breadsticks sweet; rather, it acts as food for the yeast, helping it activate and produce that wonderful rise. It also contributes to the golden-brown crust.
- Substitution: Honey or maple syrup could technically work, but granulated sugar is the most neutral and traditional choice for this copycat recipe. Use equal amounts if substituting honey or maple syrup, but you might need to slightly reduce the water.
Salt
- Kosher Salt: Essential for flavor balance in the dough. Without salt, bread can taste bland. I also use a coarse salt, like kosher or sea salt, for the topping, as it provides that perfect textural crunch and burst of saltiness similar to the restaurant’s.
- Substitution: Regular table salt can be used, but use about half the amount by volume, as it’s finer and denser.
Olive Oil
- Light Olive Oil: Incorporating olive oil into the dough makes the breadsticks tender and adds a subtle richness. I use a light or extra light olive oil for a less dominant flavor, allowing the other ingredients to shine.
- Substitution: Any neutral oil like vegetable oil, canola oil, or sunflower oil can be used, but olive oil contributes to the authentic Italian-American profile.
Butter and Garlic Powder for Topping
- Unsalted Butter: Melted butter is brushed generously over the hot breadsticks, making them shiny and delicious. Unsalted butter allows you to control the final saltiness.
- Garlic Powder: This is the magic dust! Combined with salt and butter, it creates that unmistakable Olive Garden flavor. Don’t confuse it with garlic salt; garlic powder provides pure garlic flavor without excessive salt.
- Substitution: You can use salted butter if that’s all you have, just reduce the amount of added salt in your topping mixture. For the garlic powder, there’s no real substitute if you want that specific copycat flavor. Fresh minced garlic would be too strong and wouldn’t adhere the same way.
Step-by-Step Instructions
Follow these steps closely, and you’ll be pulling warm, irresistible Olive Garden-style breadsticks out of your oven in no time. Precision is key for that perfect copycat result!
-
Activate the Yeast
In a large mixing bowl or the bowl of a stand mixer, combine the warm water (105-115°F or 40-46°C) and granulated sugar. Sprinkle the active dry yeast over the top. Gently stir once or twice and let it sit for 5-10 minutes. You should see a foamy, bubbly layer form on the surface, which tells you your yeast is alive and ready to work its magic. If it doesn’t foam, your water might have been too hot or too cold, or your yeast might be expired. Start again with fresh yeast.
-
Prepare the Dough
Add the olive oil and 2 cups of the all-purpose flour to the yeast mixture. Mix on low speed with a dough hook (or by hand with a wooden spoon) until just combined. Then, add the salt and the remaining 1 to 1½ cups of flour, adding it gradually until a shaggy dough forms. You might not need all the flour; the goal is a dough that is soft but not overly sticky.
-
Knead the Dough
Increase the mixer speed to medium-low and knead the dough for 7-10 minutes until it becomes smooth, elastic, and pulls away from the sides of the bowl. If kneading by hand, turn the dough out onto a lightly floured surface and knead for 10-15 minutes until it reaches the same smooth, elastic consistency.
-
First Rise
Lightly grease a large bowl with a little olive oil. Transfer the dough to the bowl, turning it once to coat the entire surface. Cover the bowl with plastic wrap or a clean kitchen towel. Place it in a warm, draft-free spot for 1 to 1½ hours, or until the dough has doubled in size. A slightly warm oven (turned off, with just the light on) is an excellent spot for this.
-
Shape the Breadsticks
Once doubled, gently punch down the dough to release the air. Turn the dough out onto a lightly floured surface. Roll the dough into a large rectangle, about 1/2 inch thick (roughly 12×18 inches). Using a sharp knife or a pizza cutter, cut the dough into 1-inch wide strips. Carefully pick up each strip and gently stretch it to about 8-10 inches long. Arrange the shaped breadsticks on two large baking sheets lined with parchment paper, leaving about an inch between each one.
-
Second Rise
Cover the baking sheets loosely with plastic wrap or a clean towel and let the breadsticks rise in a warm spot for another 30-45 minutes, or until they look puffy and have nearly doubled in size again.
-
Preheat and Bake
While the breadsticks are doing their second rise, preheat your oven to 375°F (190°C). Once risen, bake the breadsticks for 12-15 minutes, or until they are light golden brown on top and bottom. Do not overbake; we want them soft, not crusty.
-
Prepare the Topping and Serve
While the breadsticks are baking, melt the unsalted butter in a small bowl. Stir in the garlic powder and coarse salt until well combined. As soon as the breadsticks come out of the oven, brush them generously with the melted garlic butter mixture. Serve immediately, warm from the oven, and enjoy your perfect copycat Olive Garden experience!
Tips & Suggestions
Achieving that “perfect copycat” status means paying attention to a few crucial details. Here are my favorite tips for making your Olive Garden breadsticks absolutely irresistible:
- Don’t Rush the Rise: Yeast dough loves warmth and time. If your kitchen is cool, your dough might take longer to rise. Be patient! A properly risen dough will yield light and airy breadsticks. If you try to bake it before it’s ready, your breadsticks will be dense.
- The “Windowpane Test” for Kneading: To check if your dough is adequately kneaded, pinch off a small piece (about the size of a golf ball). Gently stretch it with your fingers. If you can stretch it thin enough to see light through it without it tearing, it’s ready. This is called the “windowpane test,” and it indicates good gluten development, essential for that classic soft-chewy texture.
- Even Shaping is Key: Try to make your breadsticks as uniform in thickness and length as possible. This ensures they bake evenly. If some are thicker than others, you’ll end up with some perfectly done and others under or overbaked. Don’t worry if they’re not perfectly straight; a little rustic charm is fine!
- Don’t Overbake Them: Olive Garden breadsticks are known for being soft, not crispy or crunchy. Keep a close eye on them during the last few minutes of baking. They should be just lightly golden on the top and bottom. If you want them a little darker, you can bake for an extra minute or two, but remember that softer is generally better for this particular copycat.
- Brush While Hot: The garlic butter topping adheres best and soaks into the breadsticks more effectively when they are piping hot, straight out of the oven. This is what gives them that beautiful sheen and infuses them with flavor.
- Customize Your Topping: While the classic garlic powder and salt topping is what we’re aiming for, feel free to experiment once you’ve mastered the basic copycat. A sprinkle of dried parsley flakes mixed into the butter, or a touch of Parmesan cheese (sprinkled on after brushing) can add another layer of flavor.
- Serving Suggestions: These breadsticks are, of course, divine on their own. But they are also the perfect accompaniment to a hearty bowl of Zuppa Toscana (another Olive Garden copycat!), a classic spaghetti and meatballs, or any of your favorite Italian-inspired meals.
Storage
While these Olive Garden copycat breadsticks are undeniably best enjoyed fresh and warm from the oven, sometimes you might have leftovers (a rare occurrence in my house!) or want to get a head start. Here’s how to store them to keep them as delicious as possible:
At Room Temperature
- Baked Breadsticks: Once completely cooled, store your baked breadsticks in an airtight container or a large zip-top bag at room temperature. They will remain fresh for 1-2 days. To refresh them, wrap them loosely in foil and warm them in a 300°F (150°C) oven for about 5-7 minutes, or until soft and warm again. You can also microwave them for 10-20 seconds for a quicker warm-up, but they might become a little chewy.
Freezing
- Baked Breadsticks (My Preferred Method): For longer storage, you can freeze baked breadsticks. After they’ve cooled completely, arrange them in a single layer on a baking sheet and freeze until solid (this prevents them from sticking together). Once solid, transfer them to a freezer-safe bag or container, removing as much air as possible. They will keep well for up to 1 month. To reheat, you can let them thaw at room temperature for an hour, then warm them in a 350°F (175°C) oven for 8-10 minutes, or warm directly from frozen (might take an extra 5-10 minutes). Brush with a fresh layer of garlic butter after reheating for the best experience.
- Unbaked Dough: You can also freeze the dough after its first rise. Punch down the dough, shape it into a disc, and wrap it tightly in plastic wrap, then place it in a freezer-safe bag. It can be frozen for up to 2 weeks. To use, thaw the dough overnight in the refrigerator, then bring it to room temperature (about 1-2 hours) before proceeding with shaping, the second rise, and baking as per the instructions. This is a great meal prep hack!
No matter how you store them, there’s nothing quite like biting into a warm, soft, garlic-buttery breadstick that tastes just like the one you get at Olive Garden!
Final Thoughts
Finally, after diving into all the delicious details of the Olive Garden Breadsticks Recipe The Perfect Copycat, I truly hope you’re feeling inspired to get baking! There’s something incredibly satisfying about bringing the magic of your favorite restaurant breadsticks right into your own kitchen, and this recipe makes it wonderfully achievable. It isn’t just about making bread; it’s about recreating that warm, garlicky, buttery experience that we all crave, right in the comfort of your home.
I can confidently say that the Olive Garden Breadsticks Recipe The Perfect Copycat delivers on its promise. From the moment you pull these golden beauties from the oven to that first bite of fluffy, flavorful goodness, you’ll understand why this isn’t just any breadstick recipe – it’s the recipe. It’s perfect for impressing guests, delighting your family, or simply treating yourself to a little piece of Olive Garden heaven, no reservation required. Give it a try; I promise you won’t be disappointed!

Authentic Olive Garden Breadsticks Copycat Recipe Revealed!
- Total Time: 45 minutes
- Yield: 12 breadsticks 1x
Description
Enjoy the warm, soft, garlicky goodness of Olive Garden’s famous breadsticks right in your own kitchen with this perfect copycat recipe. These irresistible breadsticks are brushed with a buttery garlic topping and are the ultimate accompaniment to any meal.
Ingredients
- 2 1/4 teaspoons active dry yeast
- 1 1/2 cups warm water (105-115°F or 40-46°C)
- 1 tablespoon granulated sugar
- 2 tablespoons light olive oil
- 3 to 3 1/2 cups all-purpose flour
- 1 tablespoon kosher salt
- 1/4 cup unsalted butter, melted
- 1 teaspoon garlic powder
- Coarse salt for topping
Instructions
- In a large mixing bowl or the bowl of a stand mixer, combine the warm water and granulated sugar. Sprinkle the active dry yeast over the top. Gently stir once or twice and let it sit for 5-10 minutes until foamy.
- Add the olive oil and 2 cups of the all-purpose flour to the yeast mixture. Mix on low speed with a dough hook (or by hand with a wooden spoon) until just combined. Then, add the salt and the remaining 1 to 1½ cups of flour gradually until a shaggy dough forms.
- Increase the mixer speed to medium-low and knead the dough for 7-10 minutes until it becomes smooth and elastic. If kneading by hand, turn the dough out onto a lightly floured surface and knead for 10-15 minutes.
- Lightly grease a large bowl with olive oil. Transfer the dough to the bowl, turning it once to coat. Cover the bowl with plastic wrap or a clean kitchen towel and place it in a warm spot for 1 to 1½ hours, or until doubled in size.
- Once doubled, gently punch down the dough to release the air. Turn the dough out onto a lightly floured surface and roll it into a rectangle about 1/2 inch thick. Cut the dough into 1-inch wide strips and stretch each strip to about 8-10 inches long. Arrange on two large baking sheets lined with parchment paper.
- Cover the baking sheets loosely with plastic wrap or a clean towel and let the breadsticks rise for another 30-45 minutes until puffy.
- Preheat your oven to 375°F (190°C). Bake the breadsticks for 12-15 minutes until light golden brown on top and bottom.
- While baking, melt the unsalted butter in a small bowl and stir in the garlic powder and coarse salt. Brush the hot breadsticks with the melted garlic butter mixture as soon as they come out of the oven.
- Prep Time: 15 mins
- Cook Time: 30 mins
- Category: Appetizer
- Method: Baking
- Cuisine: Italian
Nutrition
- Serving Size: 1 breadstick
- Calories: 150
- Sugar: 1 g
- Sodium: 200 mg
- Fat: 5 g
- Saturated Fat: 1 g
- Unsaturated Fat: 4 g
- Trans Fat: 0 g
- Carbohydrates: 24 g
- Fiber: 1 g
- Protein: 4 g
- Cholesterol: 5 mg
Keywords: Make sure to activate the yeast properly for the best rise. Use unbleached all-purpose flour for better flavor, and don't rush the rising times for light and airy breadsticks.