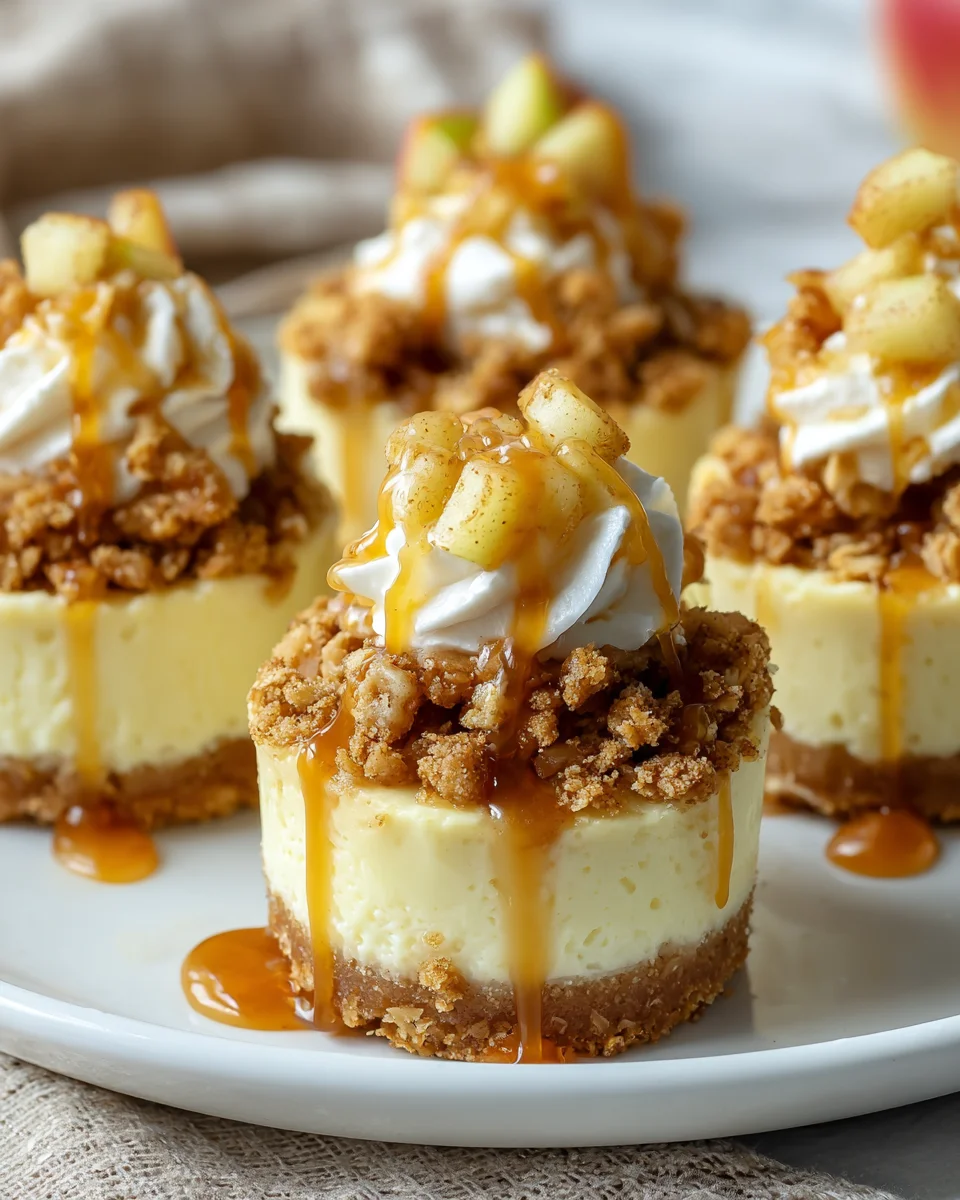
Apple Crisp Mini Cheesecakes are poised to become the star of your next gathering, offering an irresistible symphony of flavors and textures in one perfect, individual bite. Imagine the comforting embrace of a classic apple crisp, with its warm, cinnamon-spiced apples and buttery oat crumble, perfectly married with the smooth, tangy indulgence of a creamy cheesecake. This innovative dessert brilliantly fuses two universally adored treats, creating something truly special that appeals to every palate.
Both apple crisp and cheesecake have long held revered spots in the canon of beloved comfort desserts, each evoking feelings of warmth, celebration, and pure joy. The apple crisp, a quintessential autumn delight, and the cheesecake, a timeless symbol of rich indulgence, converge here to offer an experience that is both familiar and excitingly new. I believe you’ll find the convenience of these individual portions simply delightful, making them an ideal choice for entertaining without the fuss of slicing or serving large desserts.
People absolutely adore this dish not just for its stunning presentation, but for its exquisite balance. The tender, spiced apples provide a delightful chew, contrasting beautifully with the velvety cream cheese filling and the satisfying crunch of the streusel topping. Each bite delivers a harmonious blend of sweet, tart, and creamy, ensuring a memorable dessert experience. Prepare to impress your guests and satisfy your own sweet cravings with these exceptional Apple Crisp Mini Cheesecakes.

Ingredients:
Creating these delightful Apple Crisp Mini Cheesecakes is a joyful process, and having all your ingredients measured and ready to go will make it even smoother. I always recommend using full-fat dairy for cheesecakes – it truly makes all the difference in achieving that perfectly creamy, rich texture we all crave!
For the Graham Cracker Crust:
- 1 ½ cups (approximately 10-12 full sheets) finely crushed graham crackers
- ⅓ cup (5 ½ tablespoons) unsalted butter, melted
- 2 tablespoons granulated sugar
- ¼ teaspoon salt (fine sea salt works beautifully here)
For the Creamy Cheesecake Filling:
- 24 ounces (three 8-ounce blocks) full-fat cream cheese, softened at room temperature for at least 1-2 hours
- ¾ cup granulated sugar
- 2 large eggs, room temperature
- 1 teaspoon pure vanilla extract (the good stuff!)
- ¼ cup full-fat sour cream, room temperature
For the Spiced Apple Topping:
- 2 medium-sized (about 2 cups diced) Granny Smith apples, peeled, cored, and finely diced (approximately ¼-inch pieces)
- 1 tablespoon unsalted butter
- 2 tablespoons light brown sugar, packed
- ½ teaspoon ground cinnamon
- ¼ teaspoon ground nutmeg
- 1 teaspoon fresh lemon juice (this helps prevent browning and brightens the flavor)
For the Crunchy Oat Crisp Topping:
- ½ cup old-fashioned rolled oats (not instant!)
- ¼ cup all-purpose flour
- ¼ cup light brown sugar, packed
- ½ teaspoon ground cinnamon
- ¼ cup (½ stick) cold unsalted butter, cut into small cubes
Equipment You’ll Need:
Having the right tools at hand makes any baking project a breeze. For our Apple Crisp Mini Cheesecakes, I find these items indispensable:
- Standard 12-cup muffin tin
- Paper or foil cupcake liners (definitely recommend these for easy removal)
- Large mixing bowls (at least two)
- Small saucepan for the apples
- Electric hand mixer or stand mixer with paddle attachment
- Rubber spatula
- Measuring cups and spoons
- Rolling pin or food processor for crushing graham crackers
- Small baking sheet (optional, for catching any potential drips)
- Wire cooling rack
Preparing the Graham Cracker Crust:
The foundation of any good cheesecake is a solid, flavorful crust, and these mini cheesecakes are no exception. We’re going for a buttery, slightly sweet base that perfectly complements the creamy filling and spiced apple topping. This step is pretty straightforward, but attention to detail ensures a crust that holds together beautifully.
- First things first, let’s preheat our oven. Set it to 350°F (175°C). While the oven is warming up, line a standard 12-cup muffin tin with paper or foil cupcake liners. Trust me, these liners are a lifesaver for easy removal and cleanup!
- Next, we need to get our graham crackers nice and fine. You can do this in a couple of ways. My preferred method is using a food processor; just pulse until you have fine crumbs. If you don’t have a food processor, no worries! Place the graham crackers in a large zip-top bag, seal it, and use a rolling pin or the bottom of a heavy skillet to crush them into fine crumbs. The finer, the better, as this helps the crust bind together well.
- In a medium-sized mixing bowl, combine the finely crushed graham cracker crumbs, granulated sugar, and salt. Give it a good stir with a fork to ensure everything is evenly distributed. The salt is a secret weapon here; it really enhances the flavor of the graham crackers and prevents the crust from being overly sweet.
- Now, pour in the melted unsalted butter. Stir well with a spoon or spatula until all the crumbs are moistened and resemble wet sand. You want every single crumb coated, as this is what will bind our crust together.
- Divide the mixture evenly among the 12 lined muffin cups. I usually use about 1 heaping tablespoon per cup. Once distributed, use the back of a spoon, your fingers, or a small tamper to press the crumbs firmly and evenly into the bottom of each liner. This firm pressing is crucial! It prevents the crust from crumbling when you remove the cheesecakes. Make sure the crust is compact and flat.
- Pop the muffin tin into the preheated oven and bake for 5-7 minutes. This brief bake time helps to set the crust, making it sturdier and preventing it from getting soggy once the filling is added.
- Once baked, remove the crusts from the oven and let them cool completely on a wire rack while you prepare the cheesecake filling. It’s important they cool down; putting warm crusts into a cold cheesecake batter can lead to an uneven bake.
Crafting the Creamy Cheesecake Filling:
Ah, the heart of our mini cheesecakes – the rich, velvety smooth filling! This is where you want to pay extra attention to technique to achieve that signature melt-in-your-mouth texture. Remember my earlier advice: use full-fat cream cheese and sour cream! It truly makes all the difference in flavor and consistency.
- Before you even start mixing, ensure your cream cheese, eggs, and sour cream are all at room temperature. This is a non-negotiable step for a smooth, lump-free cheesecake batter. Cold ingredients will make your cream cheese lumpy and prone to overmixing.
- In a large mixing bowl, using an electric hand mixer or a stand mixer fitted with the paddle attachment, beat the softened cream cheese on medium-low speed for about 2-3 minutes. You want it to be super smooth and creamy, with no lumps at all. Scrape down the sides of the bowl frequently to ensure everything gets incorporated. This initial creaming is vital for a silky-smooth texture.
- Gradually add the granulated sugar to the cream cheese, beating on medium-low speed until just combined and smooth, about 1-2 minutes. Again, remember to scrape down the sides of the bowl. We’re aiming to incorporate the sugar without whipping too much air into the mixture, which can lead to cracks during baking.
- Next, add the eggs, one at a time. Beat on low speed after each addition, just until the yolk disappears into the mixture. Do not overmix at this stage! Overmixing once the eggs are added introduces too much air, which can cause your cheesecakes to puff up excessively in the oven and then sink or crack as they cool. We want a dense, creamy texture, not an airy one.
- Stir in the pure vanilla extract and the room temperature sour cream. Beat on the lowest speed just until they are fully incorporated, about 30 seconds. The sour cream adds a lovely tang and contributes significantly to the cheesecake’s creamy texture.
- Give the bowl a final scrape with your rubber spatula, ensuring there are no unmixed pockets at the bottom. Your cheesecake batter should be perfectly smooth and creamy. Set it aside while we prepare the delicious apple topping.
Creating the Spiced Apple Topping:
This warmly spiced apple topping is what truly makes these mini cheesecakes taste like a cozy apple crisp. The diced apples are lightly cooked, tender yet still holding their shape, infused with cinnamon and nutmeg, and brightened with a touch of lemon. It’s a simple step that adds a tremendous amount of flavor and texture.
- First, peel, core, and finely dice your Granny Smith apples into approximately ¼-inch pieces. Consistency in size is key here for even cooking. Granny Smiths are fantastic because their tartness balances the sweetness of the cheesecake and they hold their shape well when cooked.
- In a small saucepan over medium heat, melt the tablespoon of unsalted butter. Once the butter is shimmering, add the diced apples. Sauté for about 3-5 minutes, stirring occasionally, until the apples start to soften slightly but are still a bit firm. We don’t want mushy apples; we want them to retain some bite.
- Stir in the light brown sugar, ground cinnamon, and ground nutmeg. Continue to cook for another 2-3 minutes, stirring frequently, until the sugar has dissolved and the apples are tender-crisp. The spices will release their fragrant aromas, making your kitchen smell absolutely divine!
- Remove the saucepan from the heat and stir in the fresh lemon juice. This not only brightens the flavor profile of the apples but also helps prevent them from browning excessively. Allow the apple topping to cool completely before using it. You can even make this a day ahead and store it in the fridge.
Assembling the Crisp Topping:
No “Apple Crisp Mini Cheesecakes” would be complete without that signature crunchy, crumbly oat topping! This simple mixture adds a fantastic textural contrast and a lovely buttery, spiced flavor. It’s quick to whip up and makes all the difference.
- In another medium-sized mixing bowl, combine the old-fashioned rolled oats, all-purpose flour, light brown sugar, and ground cinnamon. Stir them together with a fork or your fingers until well combined.
- Add the cold unsalted butter, which you’ve cut into small cubes. Now, using your fingertips, a pastry blender, or two knives, cut the butter into the dry ingredients. You want to work quickly to prevent the butter from melting too much. Continue until the mixture resembles coarse crumbs, with some pea-sized pieces of butter remaining. This is what creates that wonderful crisp texture when baked. Don’t overmix; we want distinct crumbs.
- Set the crisp topping aside. It’s ready to go!
Baking and Cooling Your Mini Cheesecakes:
This is where all our hard work comes together! Baking cheesecakes can sometimes feel a bit intimidating, but with mini cheesecakes, it’s generally more forgiving. The key is gentle heat and patient cooling to prevent cracks and achieve that perfect creamy consistency. We’re going to layer our beautiful components and then let the oven do its magic.
- Reduce your oven temperature to 325°F (160°C). Lowering the temperature helps prevent cracking, as cheesecakes prefer a gentler bake.
- Optional but Recommended: For extra insurance against cracking and to ensure a super moist bake, you can create a water bath. Place a larger baking pan (like a roasting pan) on the bottom rack of your oven. You’ll add hot water to this pan later. Alternatively, if your muffin tin is sturdy and sealed well, you can place it directly into the larger pan and add hot water around it. For mini cheesecakes, I often skip putting the muffin tin in the water bath, but having a pan of water on a lower rack helps humidify the oven.
- Carefully spoon the prepared cheesecake filling over the baked graham cracker crusts in each lined muffin cup. Fill each cup about ⅔ full, leaving a little room for our apple and crisp toppings. I find using a small cookie scoop or a measuring cup makes this easier and ensures even portions.
- Once the filling is distributed, spoon about 1-2 teaspoons of the cooled spiced apple topping over the cheesecake batter in each cup. Gently spread it out a bit, but don’t press it down into the batter too much; it will sink slightly during baking, which is fine.
- Finally, sprinkle a generous amount of the oat crisp topping over the apples in each cup. You want a nice, even layer that will brown beautifully and provide that delightful crunch.
- Carefully place the muffin tin into your preheated 325°F (160°C) oven. If you’re using a water bath, carefully pour hot water into the larger pan until it reaches about halfway up the sides of the muffin tin.
- Bake for 20-25 minutes, or until the edges of the cheesecakes are just set and appear slightly puffed, but the centers still have a slight jiggle when you gently tap the muffin tin. Do not overbake! This is crucial for creamy cheesecakes. They will continue to set as they cool. The crisp topping should also be nicely golden brown.
- Once baked, turn off the oven and prop the oven door open slightly (about an inch or two) with a wooden spoon. Leave the cheesecakes in the cooling oven for another 10-15 minutes. This slow, gradual cooling helps prevent cracks and sudden temperature changes, which can cause the cheesecakes to sink.
- After this period, carefully remove the muffin tin from the oven and transfer it to a wire cooling rack. Let the mini cheesecakes cool completely at room temperature for at least 1 hour. They need this time to fully set up.
- Once completely cooled to room temperature, transfer the muffin tin to the refrigerator and chill the mini cheesecakes for at least 4 hours, or preferably overnight. Chilling is absolutely essential for cheesecakes; it allows them to firm up properly, develop their full flavor, and makes them much easier to remove from their liners without sticking.
Serving and Storage Suggestions:
After all your patient work, the best part is finally here: enjoying these incredible Apple Crisp Mini Cheesecakes! Serving them correctly and knowing how to store them ensures every bite is as perfect as the first.
- When you’re ready to serve, gently lift each mini cheesecake out of the muffin tin using the edges of the paper liners. If you used foil liners, they will peel away effortlessly. For paper liners, carefully peel them down before serving, or instruct your guests to do so.
- These mini cheesecakes are truly spectacular on their own, but if you want to elevate them even further, consider a few garnishes. A small dollop of homemade whipped cream on top, a sprinkle of extra cinnamon, or a drizzle of caramel sauce would be absolutely divine. Fresh mint leaves can also add a pop of color and freshness.
- Serve them chilled for the best texture and flavor. The cold enhances the creaminess of the cheesecake and the crunch of the crisp topping.
- Storage: Any leftover Apple Crisp Mini Cheesecakes should be stored in an airtight container in the refrigerator. They will keep beautifully for up to 3-4 days. The oat crisp topping might soften slightly over time, but the flavors will still be fantastic.
- These mini cheesecakes are also freezer-friendly! To freeze, place the chilled cheesecakes (without any added garnishes like whipped cream) on a baking sheet and freeze until solid, about 1-2 hours. Once firm, wrap each cheesecake individually in plastic wrap, then place them in an airtight freezer-safe container or bag. They can be frozen for up to 1 month. Thaw them overnight in the refrigerator before serving. This makes them a perfect make-ahead dessert for entertaining or just to have on hand for a sweet treat.
Conclusion:
I genuinely believe that these mini cheesecakes are more than just a dessert; they are a delightful experience waiting to happen. What makes them an absolute must-try? It’s that irresistible marriage of classic comfort and sophisticated presentation. Imagine sinking your teeth into a perfectly portioned, creamy, tangy cheesecake base, perfectly balanced by the sweet, spiced warmth of tender apples and a buttery, crumbly crisp topping. This isn’t just a cheesecake; it’s a celebration of textures and flavors in every single bite. The crispy streusel, the soft spiced apples, and the silky-smooth cheesecake create a symphony for your palate that is both familiar and excitingly new. I often find myself craving that comforting taste of a homemade apple crisp, but sometimes you want something a little more elegant, a little more ‘you.’ That’s where these Apple Crisp Mini Cheesecakes shine. They offer all the beloved flavors of autumn in an individual serving that feels incredibly special, whether you’re hosting a dinner party or simply treating yourself after a long week. They are undeniably charming and incredibly satisfying, proving that sometimes the best things really do come in small, perfectly formed packages.
Now, let’s talk about making these incredible little treats even more phenomenal. While these Apple Crisp Mini Cheesecakes are absolutely divine enjoyed just as they are, fresh from the fridge, don’t hesitate to elevate them further! For a truly decadent experience, I love to warm them ever so slightly in the microwave for about 15-20 seconds – just enough to soften the apples and warm the crisp topping, creating a wonderfully gooey center. Then, a generous dollop of freshly whipped cream, perhaps infused with a hint of vanilla or maple syrup, takes them to another level. A scoop of premium vanilla bean ice cream melting into the warm crisp topping is another heavenly pairing. And for those with a sweet tooth, a delicate drizzle of homemade caramel sauce or a sprinkle of toasted pecans adds an extra layer of indulgence. Want to get creative? While the classic apple crisp topping is paramount to the charm of these Apple Crisp Mini Cheesecakes, you could experiment with a spiced pear topping for a subtle twist, or even incorporate a few dried cranberries into the apple mixture for a touch of tartness and color. For the cheesecake base, a teaspoon of maple extract or a splash of bourbon (for an adult version!) can deepen the flavor profile. As for the crust, while a classic graham cracker crust is fantastic, imagine a ginger snap crust for a spicy kick or a shortbread cookie crust for a richer, buttery foundation. The possibilities are truly endless, allowing you to tailor this dessert to your exact preferences or whatever seasonal produce you have on hand.
I honestly can’t wait for you to experience the sheer joy of baking and tasting these. They are surprisingly simple to put together, making them accessible for bakers of all skill levels, but the results are always impressive.
Trust me when I say that the effort is minimal, but the reward is immense.
There’s a special kind of satisfaction that comes from pulling a batch of these beautiful Apple Crisp Mini Cheesecakes out of the oven, smelling the comforting aromas of cinnamon and baked apples filling your kitchen. So, please, dive into your kitchen, gather your ingredients, and give this recipe a try. I truly believe you’ll fall in love with them just as much as I have. And when you do, I would absolutely love to hear about your experience! Did you stick to the classic? Did you add your own unique twist? What did your friends and family think? Share your successes, your photos, and any brilliant variations you came up with. Connecting with you and seeing your culinary creations is one of the greatest joys for me. These Apple Crisp Mini Cheesecakes are designed to bring happiness, one perfectly delicious bite at a time. Go on, treat yourself and your loved ones!
Apple Crisp Mini Cheesecakes
Irresistible Apple Crisp Mini Cheesecakes fuse warm, cinnamon-spiced apples with creamy cheesecake for a perfect individual bite. A familiar yet exciting dessert that combines two beloved treats.
Ingredients
Instructions
Important Information
Nutrition Facts (Per Serving)
It is important to consider this information as approximate and not to use it as definitive health advice.
Allergy Information
Please check ingredients for potential allergens and consult a health professional if in doubt.