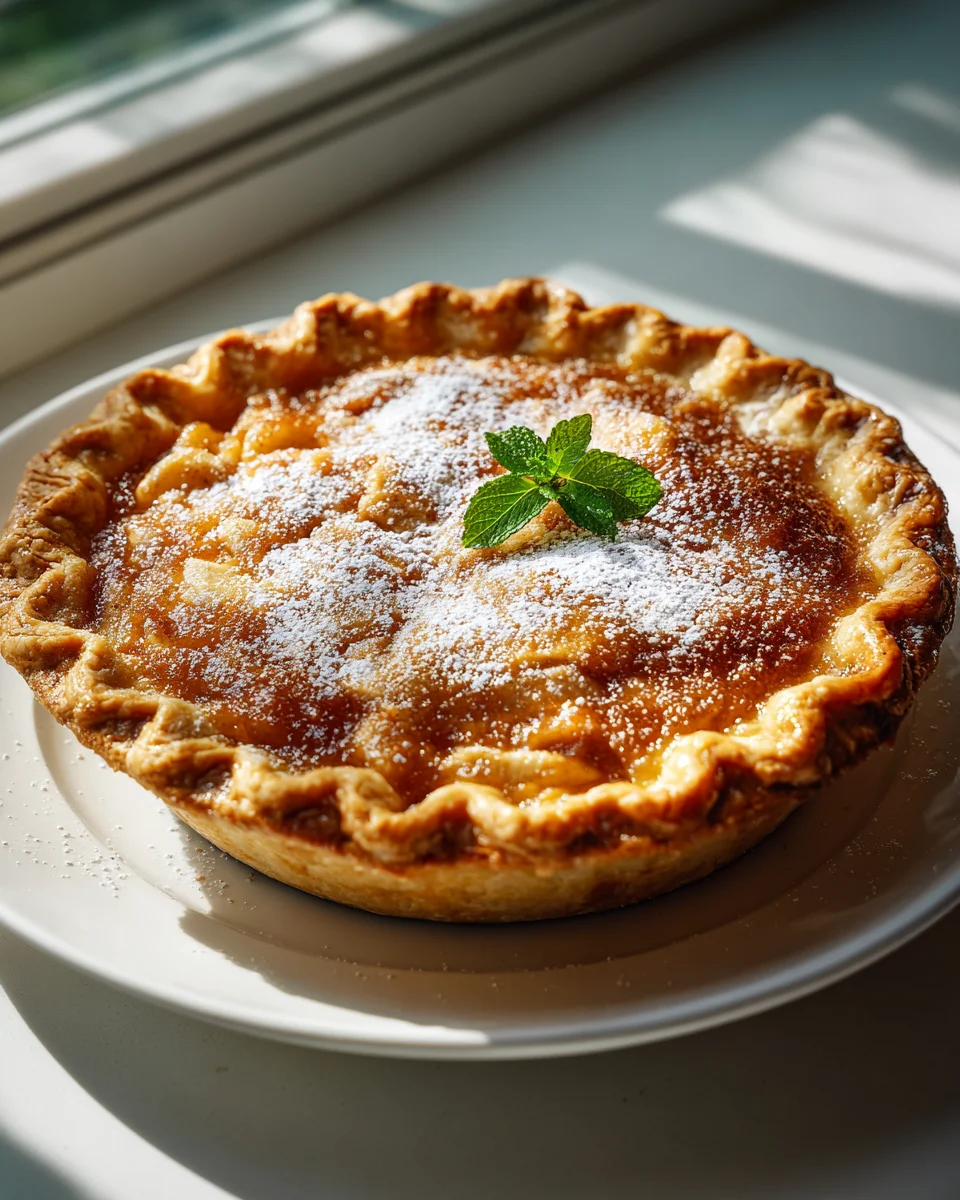
Apple Butter Pie
Oh boy, have I got a treat for you! Forget everything you thought you knew about apple pie, because today we’re diving into the incredibly comforting and utterly delicious world of Apple Butter Pie. This isn’t just another apple dessert; it’s a game-changer that takes all the warm, spiced coziness of autumn and bakes it into a flaky, golden crust. What makes it so special, you ask?
Well, unlike traditional apple pies that rely on chunky slices, this pie features a rich, velvety filling made from apple butter. This means you get an intensely concentrated apple flavor, smooth as silk, brimming with those familiar notes of cinnamon, nutmeg, and cloves, but with a depth that will truly surprise you. It’s like a hug in pie form, and frankly, who couldn’t use a little more of that?
You’ll absolutely love this Apple Butter Pie because it offers a sophisticated twist on a beloved classic. It’s incredibly satisfying, perfect for holiday gatherings, a cozy weekend treat, or simply when you’re craving something warm, spiced, and wonderfully unique. Imagine a creamy, spiced apple custard, baked to perfection in a buttery crust – that’s what awaits you. Get ready for a dessert that’s guaranteed to become a new family favorite!

Ingredient Notes
Making a truly memorable Apple Butter Pie relies on a few key ingredients working in harmony. Here’s what I reach for to get that perfect balance of spice, sweetness, and creamy texture.
- Pie Crust: You’ll need one 9-inch pie crust. I often use a good quality store-bought crust (frozen or refrigerated) for convenience. However, a homemade all-butter pie crust will truly elevate the experience with its flaky texture. Ensure it’s a single crust – we’re not doing a top crust here.
- Apple Butter: This is the star of our pie! Use a high-quality apple butter that’s rich, thick, and not overly sweet, as we’ll be adding more sugar. If you make your own, that’s wonderful; just be aware that homemade apple butter can vary in consistency and sweetness.
- Eggs: Large eggs are essential as the primary binder, giving the pie its custard-like texture and helping it set beautifully.
- Granulated Sugar & Brown Sugar: I prefer a combination of both. Granulated sugar provides sweetness, while a touch of brown sugar adds a deeper, molasses-rich note that complements the apple butter. Feel free to adjust the ratio based on your apple butter’s sweetness or your preference.
- All-Purpose Flour: A couple of tablespoons help thicken the filling, ensuring a firm yet tender set. You can substitute cornstarch (about 1 tablespoon) if you prefer a gluten-free option or a slightly clearer set.
- Spices: Ground cinnamon, nutmeg, cloves, and a pinch of allspice are non-negotiable for that warm, comforting apple butter flavor. Adjust these to your liking; always use fresh spices for the best aroma and taste.
- Vanilla Extract: A good quality pure vanilla extract enhances all the other flavors. Don’t skip it!
- Heavy Cream or Milk: Just a splash helps to create a silky-smooth, rich texture in the custard filling. Whole milk works perfectly well, or you can use a non-dairy alternative like almond or oat milk, though it might slightly alter the richness.
Step-by-Step Instructions
Baking an Apple Butter Pie is a wonderfully straightforward process, resulting in a dessert that tastes far more complex than the effort it takes. Follow these steps for a perfect pie every time!
Step 1: Prepare Your Crust and Preheat Oven
First, preheat your oven to 400°F (200°C). If using a frozen pie crust, let it thaw slightly according to package directions. If using a refrigerated one, simply unroll it into your 9-inch pie plate. Crimp the edges decoratively. While I usually skip blind baking due to the long bake time, if you prefer a crisper bottom crust, you can blind bake for 10-15 minutes, then cool slightly before adding the filling.
Step 2: Whisk the Filling Ingredients
In a large mixing bowl, crack in your large eggs and whisk them until lightly beaten. Add the granulated sugar and brown sugar, whisking thoroughly until the sugars are fully dissolved and well combined. Next, add the apple butter, stirring until it’s smoothly incorporated with the egg and sugar mixture. Then, sprinkle in the all-purpose flour, ground cinnamon, nutmeg, cloves, and allspice. Whisk everything together until no lumps of flour are visible and the spices are evenly distributed. Finally, pour in the vanilla extract and the heavy cream (or milk), stirring until the filling is perfectly smooth and homogenous.
Step 3: Pour and Bake
Carefully pour the prepared apple butter filling into your unbaked pie crust. Transfer the pie to your preheated oven. Bake at 400°F (200°C) for 15 minutes. This initial high heat helps to set the crust and the outer edges of the filling quickly. After 15 minutes, reduce the oven temperature to 350°F (175°C) and continue to bake for another 40-50 minutes, or until the center is just set. The edges should be firm and slightly puffed, but the very center will still have a slight jiggle when gently shaken. If the crust edges start to brown too quickly, loosely cover them with aluminum foil.
Step 4: Cool Completely
Cooling is absolutely critical for this pie! Once baked, carefully remove the pie from the oven and place it on a wire rack to cool completely to room temperature. This can take 2-3 hours. This allows the custard to set properly for clean, firm slices. Resist the temptation to cut into it early, as it will likely be too runny.
Tips & Suggestions
A few tips to help you master your Apple Butter Pie and ensure it turns out perfect every time:
- Don’t Overbake! This is crucial for custard-style pies. Overbaking can result in a dry, cracked, or rubbery filling. Remember, it should have a slight jiggle in the center when you remove it from the oven; it will continue to cook and set as it cools.
- Embrace the Cool Down: Patience during cooling is key for neat, beautiful slices. Allowing the pie to cool completely, ideally for at least 2-3 hours at room temperature, is essential for the custard to firm up properly.
- Customize Your Spices: While my recipe uses a classic blend, feel free to adjust to your preference. A tiny pinch of ground ginger or a whisper of cardamom can also be delightful. Just be mindful not to overpower the delicate apple butter flavor.
- Perfect Pairings: This pie is delicious on its own, but it truly shines with accompaniments. A dollop of freshly whipped cream, a scoop of good quality vanilla bean ice cream, or a drizzle of warm caramel sauce takes it to another level. For a savory contrast, a slice of sharp cheddar cheese is a traditional pairing for apple pies.
- Dealing with Apple Butter Consistency: Homemade apple butter consistency varies. If yours is very thin, you might consider adding an extra half-tablespoon of flour or cornstarch to the filling. If it’s exceptionally thick, a tiny splash more cream or milk might be needed for a smooth filling.
- Preventing Burnt Crust Edges: If pie crust edges brown too quickly, create a “pie shield” with aluminum foil. Cut out the center of a foil square, leaving a ring, and place it over the crust edges for the remainder of the baking time.
Storage
Proper storage ensures your Apple Butter Pie stays fresh and delicious for days to come.
- Room Temperature: Once completely cooled, an Apple Butter Pie can be kept loosely covered at room temperature for up to 1-2 days, especially in cooler, drier environments. However, I recommend refrigerating it after it’s fully set for freshness and food safety, especially in warmer climates.
- Refrigeration: For longer storage, or if you prefer a chilled pie, cover your Apple Butter Pie loosely with plastic wrap or aluminum foil and store it in the refrigerator. It will keep well for 3-4 days. The pie might firm up a bit more when chilled, which some people prefer for cleaner slices.
- Freezing: Yes, you can freeze Apple Butter Pie! Ensure it’s completely cooled, then wrap it tightly in several layers of plastic wrap, followed by aluminum foil. Label with the date; it can be frozen for up to 2-3 months. For individual slices, wrap each securely. Thaw overnight in the refrigerator (still wrapped) or for a few hours at room temperature.
- Reheating: If you prefer your pie warm, individual slices can be gently reheated in the microwave for 20-30 seconds, or in an oven preheated to 300°F (150°C) for about 10-15 minutes. Avoid overheating, as this can make the custard rubbery.
Final Thoughts
And there you have it! I truly believe that once you’ve experienced the comforting aroma and incredible taste of this dessert, you’ll understand why this Apple Butter Pie is so much more than just a sweet treat. It’s a genuine hug in pie form! The rich, spiced, and deeply concentrated apple butter filling, nestled in a tender, flaky crust, offers a unique flavor profile that sets it apart. This Apple Butter Pie isn’t just a recipe; it’s an invitation to savor the warmth and simple joys of home. I wholeheartedly encourage you to make it your own and discover the delightful magic within each slice. It’s a must-try that I promise will bring smiles to everyone who tastes it!

Apple Butter Pie: Easy Homemade Sweet & Creamy Fall Treat
- Total Time: 1 hour 15 minutes
- Yield: 8 servings 1x
Description
Experience the comforting and delicious world of Apple Butter Pie, a unique twist on a classic dessert. This rich, velvety pie features a smooth filling made from apple butter, perfect for any autumn gathering.
Ingredients
- 1 9-inch pie crust
- 1 cup apple butter
- 3 large eggs
- 1/2 cup granulated sugar
- 1/4 cup brown sugar
- 2 tablespoons all-purpose flour
- 1 teaspoon ground cinnamon
- 1/4 teaspoon nutmeg
- 1/4 teaspoon cloves
- 1/4 teaspoon allspice
- 1 teaspoon vanilla extract
- 1/4 cup heavy cream or milk
Instructions
- Preheat your oven to 400°F (200°C). If using a frozen pie crust, let it thaw slightly according to package directions. If using a refrigerated one, simply unroll it into your 9-inch pie plate and crimp the edges decoratively.
- In a large mixing bowl, crack in your large eggs and whisk them until lightly beaten. Add the granulated sugar and brown sugar, whisking thoroughly until the sugars are fully dissolved and well combined.
- Add the apple butter, stirring until it's smoothly incorporated with the egg and sugar mixture. Then, sprinkle in the all-purpose flour, ground cinnamon, nutmeg, cloves, and allspice. Whisk everything together until no lumps of flour are visible and the spices are evenly distributed.
- Pour in the vanilla extract and the heavy cream (or milk), stirring until the filling is perfectly smooth and homogenous.
- Carefully pour the prepared apple butter filling into your unbaked pie crust. Transfer the pie to your preheated oven and bake at 400°F (200°C) for 15 minutes.
- After 15 minutes, reduce the oven temperature to 350°F (175°C) and continue to bake for another 40-50 minutes, or until the center is just set. The edges should be firm and slightly puffed, but the very center will still have a slight jiggle when gently shaken.
- Once baked, carefully remove the pie from the oven and place it on a wire rack to cool completely to room temperature, which can take 2-3 hours.
- Prep Time: 15 mins
- Cook Time: 1 hour
- Category: Dessert
- Method: Baking
- Cuisine: American
Nutrition
- Serving Size: 1 slice
- Calories: 250
- Sugar: 20 g
- Sodium: 150 mg
- Fat: 12 g
- Saturated Fat: 7 g
- Unsaturated Fat: 3 g
- Trans Fat: 0 g
- Carbohydrates: 32 g
- Fiber: 1 g
- Protein: 3 g
- Cholesterol: 70 mg
Keywords: Don't overbake the pie to avoid a dry filling. Allowing the pie to cool completely is essential for neat slices. Customize your spices to your liking, and consider pairing with whipped cream or vanilla ice cream for an extra treat.