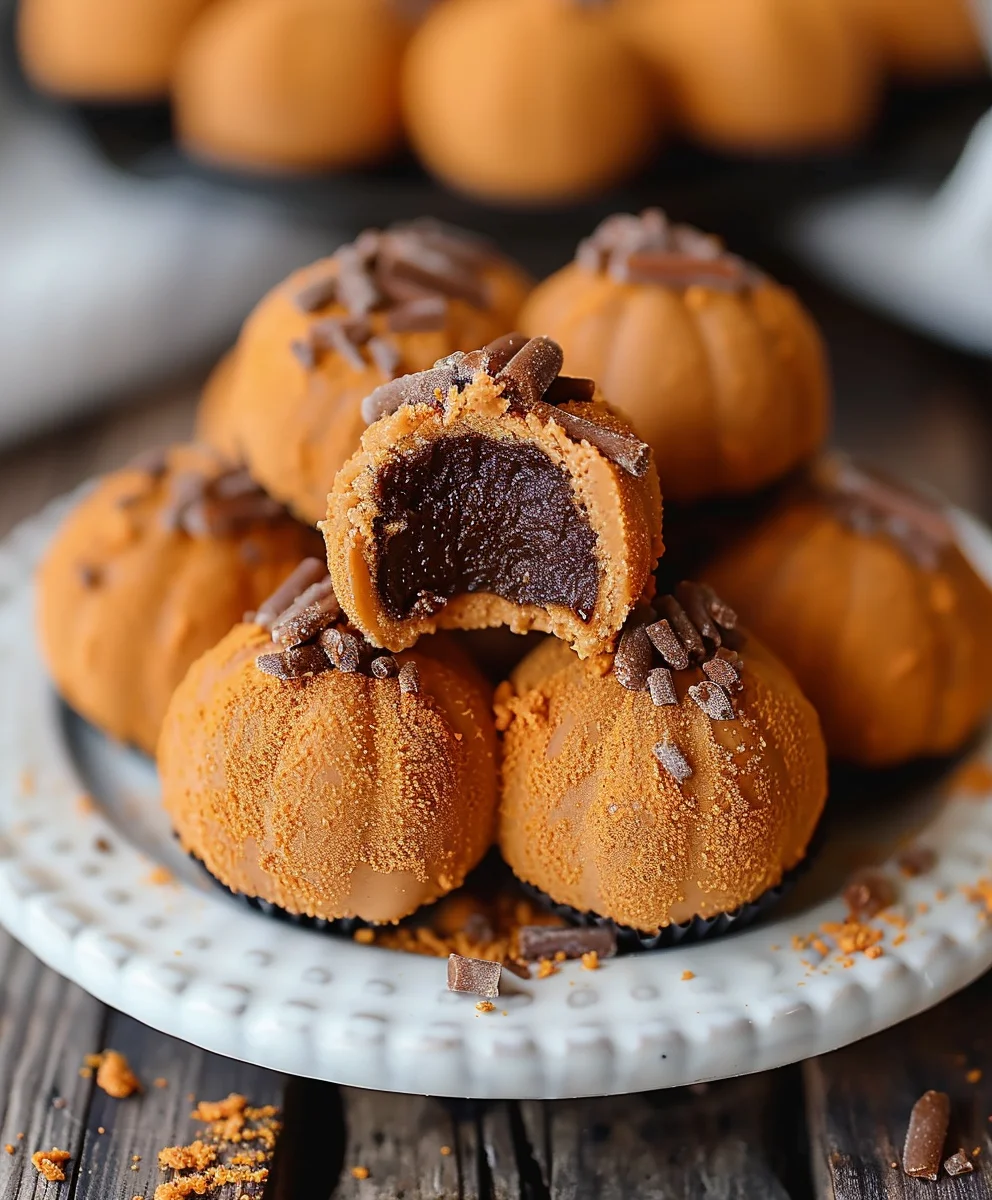
Pumpkin Cheesecake Truffles are more than just a dessert; they are a delightful embodiment of autumn’s embrace, a sophisticated bite of creamy, spiced perfection that captures the very essence of the harvest season. I often find myself gravitating towards recipes that offer both indulgence and a touch of nostalgic comfort, and these truffles fit that description perfectly. While cheesecake itself boasts a rich history dating back to ancient Greece, and pumpkin has been a beloved staple in American cuisine since colonial times, combining these iconic flavors into a bite-sized truffle is a relatively modern, brilliant innovation that brings joy to so many.
People adore this dish not only for its irresistible flavor profile – the sweet, earthy pumpkin perfectly balanced by the tangy cream cheese and a hint of warming spices – but also for its wonderfully smooth, melt-in-your-mouth texture. There’s something truly special about a treat that delivers all the decadent flavor of a classic pumpkin cheesecake without the fuss of baking an entire pie. These versatile Pumpkin Cheesecake Truffles are incredibly convenient, making them the ideal no-bake dessert for holiday gatherings, a thoughtful homemade gift, or simply a luxurious personal indulgence. I’m thrilled to guide you through creating these exquisite bites!

Ingredients:
- For the Pumpkin Cheesecake Base:
- 8 ounces (about 1 brick) full-fat cream cheese, softened to room temperature
- ½ cup pure pumpkin puree (not pumpkin pie filling)
- ½ cup powdered sugar (confectioners’ sugar), sifted
- 1 teaspoon pumpkin pie spice
- ½ teaspoon pure vanilla extract
- Pinch of salt
- 6-8 full graham crackers, finely crushed into crumbs (about ½ cup crumbs)
- For the Chocolate Coating:
- 12 ounces high-quality melting chocolate (milk, dark, or white chocolate, or a combination), finely chopped or in chip form
- 1 tablespoon coconut oil or shortening (optional, helps with smoothness and shine)
- For Decoration (Optional):
- Additional melted chocolate (contrasting color) for drizzling
- Festive sprinkles
- Chopped nuts (pecans or walnuts work beautifully)
- A dusting of powdered sugar
- Cinnamon sugar blend
Preparing the Pumpkin Cheesecake Base
- Prepare Your Workspace and Ingredients: Before we dive in, I always make sure my cream cheese is truly at room temperature. This is absolutely crucial for a smooth, lump-free base. If it’s too cold, you’ll end up with little cream cheese lumps in your truffles, and nobody wants that! I’ll also measure out all my other ingredients, so everything is ready to go. Don’t forget to get your graham crackers ready; you’ll want them finely crushed. I usually toss them in a food processor for a few seconds, or you can place them in a zip-top bag and crush them with a rolling pin – it’s a great stress reliever!
- Cream the Cream Cheese: In a medium-sized mixing bowl, using an electric mixer (either a stand mixer with the paddle attachment or a hand mixer), beat the softened cream cheese on medium speed for about 2-3 minutes. My goal here is to get it wonderfully light and fluffy, almost cloud-like. I’ll make sure to scrape down the sides of the bowl frequently with a spatula to ensure everything is evenly incorporated. This step is key for a silky-smooth truffle base.
- Add Pumpkin Puree and Flavorings: Once the cream cheese is beautifully fluffy, I’ll add the pumpkin puree, sifted powdered sugar, pumpkin pie spice, vanilla extract, and that tiny pinch of salt. Sifting the powdered sugar beforehand prevents lumps, which is a little extra step that really pays off for a smooth texture. I’ll start mixing on low speed to combine these ingredients, and then gradually increase to medium speed. Continue beating for another 2-3 minutes until the mixture is completely smooth, uniformly colored, and smells absolutely divine. Again, I’ll pause to scrape down the sides and bottom of the bowl to catch any unmixed bits.
- Incorporate Graham Cracker Crumbs: Now for the binder! With the mixer on low speed, I’ll gently fold in the finely crushed graham cracker crumbs. I only mix until they are just combined. You don’t want to overmix at this stage; we’re just looking for them to be evenly distributed throughout the pumpkin cheesecake mixture. The graham cracker crumbs are essential because they help to firm up the mixture, making it easier to roll into truffles later. They also add a lovely subtle flavor and texture that complements the pumpkin cheesecake perfectly.
- First Chill: This is a non-negotiable step, my friends! Once the base mixture is ready, I’ll cover the bowl tightly with plastic wrap and pop it into the refrigerator. It needs to chill for at least 2 hours, but honestly, 4 hours or even overnight is ideal. The longer it chills, the firmer it will become, and the easier it will be to roll into those perfect little truffle balls without them sticking excessively to your hands. Patience is a virtue here, I promise!
Chilling and Shaping the Truffles
- Prepare for Shaping: After the required chilling time, I’ll retrieve the pumpkin cheesecake mixture from the fridge. It should be quite firm now. I like to prepare my workspace by lining a baking sheet with parchment paper or a silicone mat. This will be where our shaped truffles rest before their final coating. I also sometimes have a small bowl of warm water and a clean towel nearby for rinsing my hands between batches if they get too sticky.
- Scoop and Roll: Using a small cookie scoop (I find a 1-tablespoon size works perfectly for bite-sized truffles), I’ll scoop out portions of the chilled mixture. With slightly damp or lightly powdered sugar-dusted hands, I gently roll each portion into a smooth, round ball. Don’t press too hard, just enough to form a compact sphere. Aim for consistency in size so they look uniform and will coat more evenly. If the mixture starts to get too soft while you’re rolling, don’t hesitate to pop it back into the fridge for 10-15 minutes to firm up again. This happens, especially if your kitchen is warm! I usually find I can roll about 25-30 truffles from this recipe, depending on the exact size.
- Second Chill: Once all your beautiful pumpkin cheesecake balls are rolled and neatly arranged on your prepared baking sheet, it’s time for another chill. This second chilling period is just as important as the first. We want them to be very firm and cold when they hit the warm chocolate coating. This prevents them from melting into the chocolate and helps the coating set quickly and evenly. I’ll place the baking sheet back into the refrigerator for at least 30 minutes, or even the freezer for 15-20 minutes, to ensure they are thoroughly chilled.
Preparing the Chocolate Coating
-
Melt the Chocolate: While our truffles are getting nice and cold, I’ll prepare the chocolate coating. There are two main ways I like to do this:
- Double Boiler Method (My Preferred Method for Control): I’ll set up a double boiler by placing a heatproof bowl (glass or metal) over a saucepan containing about an inch or two of simmering water. Make sure the bottom of the bowl does not touch the water. Add your chopped chocolate (and optional coconut oil/shortening, if using) to the bowl. Stir occasionally with a clean, dry spatula as the chocolate melts. This method provides gentle, even heat, reducing the risk of burning the chocolate. I’ll continue stirring until the chocolate is completely smooth and glossy, with no lumps remaining.
- Microwave Method (Quicker, but Requires More Attention): If I’m short on time, I’ll place the chopped chocolate (and optional coconut oil/shortening) in a microwave-safe bowl. I’ll microwave it in 30-second intervals, stirring thoroughly after each interval. It’s crucial to stir, even if it doesn’t look like it’s melting much at first. Chocolate retains its shape even when melted, so you need to stir to reveal its true consistency. Continue microwaving and stirring until the chocolate is smooth and fully melted. Be very careful not to overheat the chocolate, as it can seize and become unusable.
Once melted, I’ll remove the bowl from the heat (or microwave) and let it cool slightly for a minute or two. You want it warm enough to be fluid, but not so hot that it instantly melts your truffles.
Coating and Decorating the Truffles
- Set Up Your Coating Station: This is where things get a little bit messy, but in a fun way! I’ll set up my coating station before I start dipping. I’ll have the melted chocolate in a bowl, the chilled truffle balls on their baking sheet, and another clean baking sheet lined with parchment paper or a silicone mat ready for the coated truffles. If I’m using sprinkles or other decorations, I’ll have them in small bowls right next to my dipping area. A fork or a dedicated dipping tool is also essential here.
- Dip the Truffles: One by one, I’ll carefully drop a very cold pumpkin cheesecake truffle into the melted chocolate. Using my fork or dipping tool, I’ll completely submerge the truffle, then quickly lift it out. Gently tap the fork against the side of the bowl to allow any excess chocolate to drip off. This is important for a smooth, even coating and to avoid a thick “foot” of chocolate around the base. You might even use a second fork or a toothpick to help slide the truffle off the dipping fork onto the prepared baking sheet.
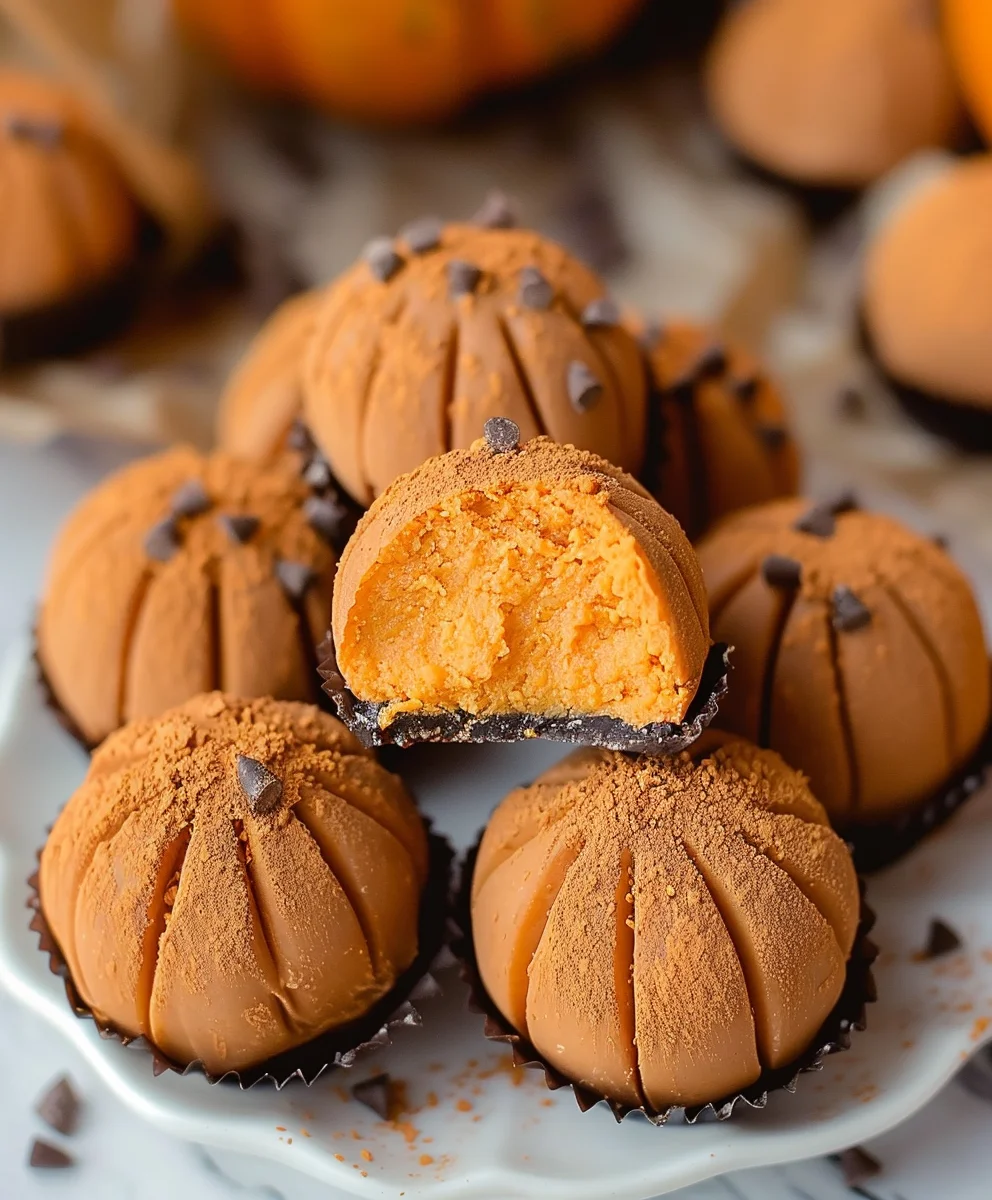
- Decorate Immediately: As soon as I place a coated truffle onto the parchment paper, I’ll immediately add any desired decorations. This is because the chocolate will start to set very quickly due to the coldness of the truffle. If I’m doing sprinkles, I’ll gently roll the truffle in a shallow bowl of sprinkles, or simply sprinkle them over the top. For a contrasting chocolate drizzle, I’ll transfer a small amount of melted chocolate to a piping bag with a very small tip, or even just a zip-top bag with a tiny corner snipped off, and drizzle it artfully over the set truffles once the main coating has hardened slightly. Chopped nuts or a dusting of cinnamon sugar can also be applied at this stage. Work relatively quickly, but don’t rush so much that you make a mess!
- Repeat and Re-melt: Continue this process, dipping and decorating the remaining truffles. If your melted chocolate starts to thicken as you work, which it often does, you can gently reheat it over the double boiler or in the microwave in short bursts, stirring until it’s fluid again. Make sure not to overheat it. If you run out of chocolate, don’t worry, just melt some more! It’s better to have a little extra than not enough for that perfect coating.
Final Chilling and Serving
- Final Set: Once all the truffles are coated and decorated, I’ll place the baking sheet back into the refrigerator. They need to chill for at least 30 minutes, or until the chocolate coating is completely firm and set. This will give them that satisfying snap when you bite into them.
- Serving and Storage: Once fully set, these Pumpkin Cheesecake Truffles are ready to be devoured! They are absolutely irresistible. For the best flavor and texture, I recommend storing them in an airtight container in the refrigerator. They will keep beautifully for up to 5-7 days. If you manage to make them last that long, that is! I find they are a fantastic make-ahead dessert for parties or just a delightful treat to have on hand. Sometimes, I even let them sit out at room temperature for about 10-15 minutes before serving to soften the cheesecake interior slightly, which can enhance the creamy texture. Experiment and see what you prefer!
Conclusion:
I’ve shared many recipes over the years, but I can confidently say that these Pumpkin Cheesecake Truffles are truly something special. They represent the perfect fusion of autumn’s quintessential flavors with the irresistible creaminess of a classic cheesecake, all wrapped up in a bite-sized, utterly delightful package. What makes them an absolute must-try isn’t just their incredible taste, but also their surprising simplicity. You might think such an elegant treat would require hours in the kitchen, but I promise you, the process is straightforward and incredibly rewarding. Imagine a rich, spiced pumpkin cheesecake filling, perfectly balanced in sweetness, then chilled to perfection before being dipped in a luscious chocolate coating. Each truffle is a little parcel of pure bliss, offering that comforting taste of pumpkin pie mixed with the luxurious texture of cheesecake, without the need for a fork. They are incredibly versatile, fitting perfectly into casual get-togethers or more formal dessert spreads.
The ease of preparation makes them accessible even for novice bakers, yet the sophisticated flavor profile and beautiful presentation will impress even the most discerning palates. They are truly the kind of dessert that elicits gasps of delight and requests for the recipe, making you feel like a culinary wizard with minimal effort. This recipe is designed to bring joy and deliciousness into your home with minimal stress, allowing you to savor the cozy flavors of the season in the most delightful way possible. From their velvety smooth interior to their crisp chocolate shell, every single bite is an adventure in flavor and texture, leaving a memorable impression that will have everyone asking for more. They’re also wonderfully portable, making them ideal for potlucks, holiday gatherings, or simply bringing a touch of homemade goodness to a friend’s house.
Serving Suggestions:
Once you’ve mastered the basic recipe for these wonderful truffles, the fun doesn’t have to stop there! These little gems are fantastic on their own, of course, but a few thoughtful pairings can elevate the experience even further. I love serving them alongside a steaming mug of strong, black coffee or a delicate herbal tea for an afternoon treat. For a sophisticated dessert platter, arrange them artfully with some fresh cranberries, a sprinkle of toasted pecans, or perhaps a few candied ginger pieces. They also make an incredible addition to a holiday dessert bar, offering a delightful alternative to traditional pies and cakes. Think about packaging a small box of them as a homemade gift – they travel beautifully and are always appreciated, a perfect gesture of warmth during the cooler months. For a truly indulgent experience, consider pairing them with a small glass of dessert wine or a festive sparkling cider.
Variations to Explore:
Don’t be afraid to experiment and make these truffles truly your own. While the classic dark chocolate coating is divine, you could also try a white chocolate dip, perhaps drizzled with a contrasting color for a beautiful visual effect. A sprinkle of sea salt on top of the chocolate before it sets can create an amazing sweet and savory contrast, enhancing the complex flavors. For an extra textural dimension, roll some of the truffles in finely crushed gingersnap cookies, chopped nuts (like pecans or walnuts), or even a spiced graham cracker crumb mixture after dipping them in chocolate. If you’re feeling adventurous, a tiny pinch of cayenne pepper in the pumpkin filling can add a subtle, warming kick that beautifully complements the sweetness and spice, creating an unexpected but delightful surprise. You could also experiment with different spice blends – perhaps a touch more cardamom or allspice, depending on your preference for an even deeper aromatic profile.
Another idea is to mix a tablespoon of finely chopped crystallized ginger into the pumpkin cheesecake base before chilling for a burst of zingy flavor and delightful chewiness. For a touch of elegance, consider garnishing with a delicate dusting of cocoa powder or a few edible gold flakes. The possibilities are truly endless, allowing you to tailor these treats to your exact taste and preferences, ensuring they become a staple in your seasonal baking repertoire. You could even try a milk chocolate coating for a sweeter, milder flavor profile that appeals to all ages, or mix in some mini chocolate chips directly into the cheesecake mixture for an extra chocolatey surprise within each bite.
So, there you have it – my enthusiastic endorsement for what I consider to be one of the most delightful and impressive yet simple desserts you can make this season. I genuinely hope you’re feeling inspired to roll up your sleeves and give these Pumpkin Cheesecake Truffles a try. They are more than just a dessert; they’re an experience, a little bite of seasonal joy that’s perfect for sharing. I promise, your taste buds (and your guests!) will thank you. When you do make them, I would absolutely love to hear about your experience. Did you try a fun variation? What did your friends and family think? Please feel free to share your thoughts, photos, and any tips you discovered along the way in the comments section below. Your feedback truly makes this community vibrant and helps us all become better bakers. Happy truffling!
Amazing Pumpkin Cheesecake Truffles
Pumpkin Cheesecake Truffles are a delightful embodiment of autumn’s embrace, a sophisticated bite of creamy, spiced perfection. These versatile truffles offer all the decadent flavor of a classic pumpkin cheesecake without the fuss of baking an entire pie, making them an ideal no-bake dessert for any occasion.
Ingredients
-
4 ounces cream cheese, softened
-
½ cup canned pumpkin puree
-
1 (14-ounce) can sweetened condensed milk
-
½ cup graham cracker crumbs
-
⅓ cup white chocolate chips
Instructions
-
Step 1
In a mixing bowl, beat softened cream cheese until light and fluffy. Add pumpkin puree, sweetened condensed milk, and vanilla extract (if using). Mix until smooth and well combined. Gently fold in the graham cracker crumbs until just incorporated. -
Step 2
Cover the mixture and refrigerate for at least 2 hours, or ideally 4 hours to overnight, until very firm. -
Step 3
Line a baking sheet with parchment paper. Scoop out 1-tablespoon portions of the chilled mixture and roll them into smooth, round balls. Place on the prepared baking sheet. -
Step 4
Refrigerate the shaped truffles for at least 30 minutes, or freeze for 15-20 minutes, to ensure they are thoroughly cold. -
Step 5
Gently melt the white chocolate chips using a double boiler or microwave method until completely smooth and fluid. Allow to cool slightly. -
Step 6
Dip each cold truffle into the melted chocolate, fully submerging it. Lift with a fork, tapping gently to remove excess chocolate. Transfer to the parchment-lined baking sheet. -
Step 7
Decorate immediately with sprinkles or other toppings, if desired. Refrigerate truffles for at least 30 minutes, or until the chocolate coating is completely firm and set. -
Step 8
Serve chilled. Store any leftover Pumpkin Cheesecake Truffles in an airtight container in the refrigerator for up to 5-7 days.
Important Information
Nutrition Facts (Per Serving)
It is important to consider this information as approximate and not to use it as definitive health advice.
Allergy Information
Please check ingredients for potential allergens and consult a health professional if in doubt.