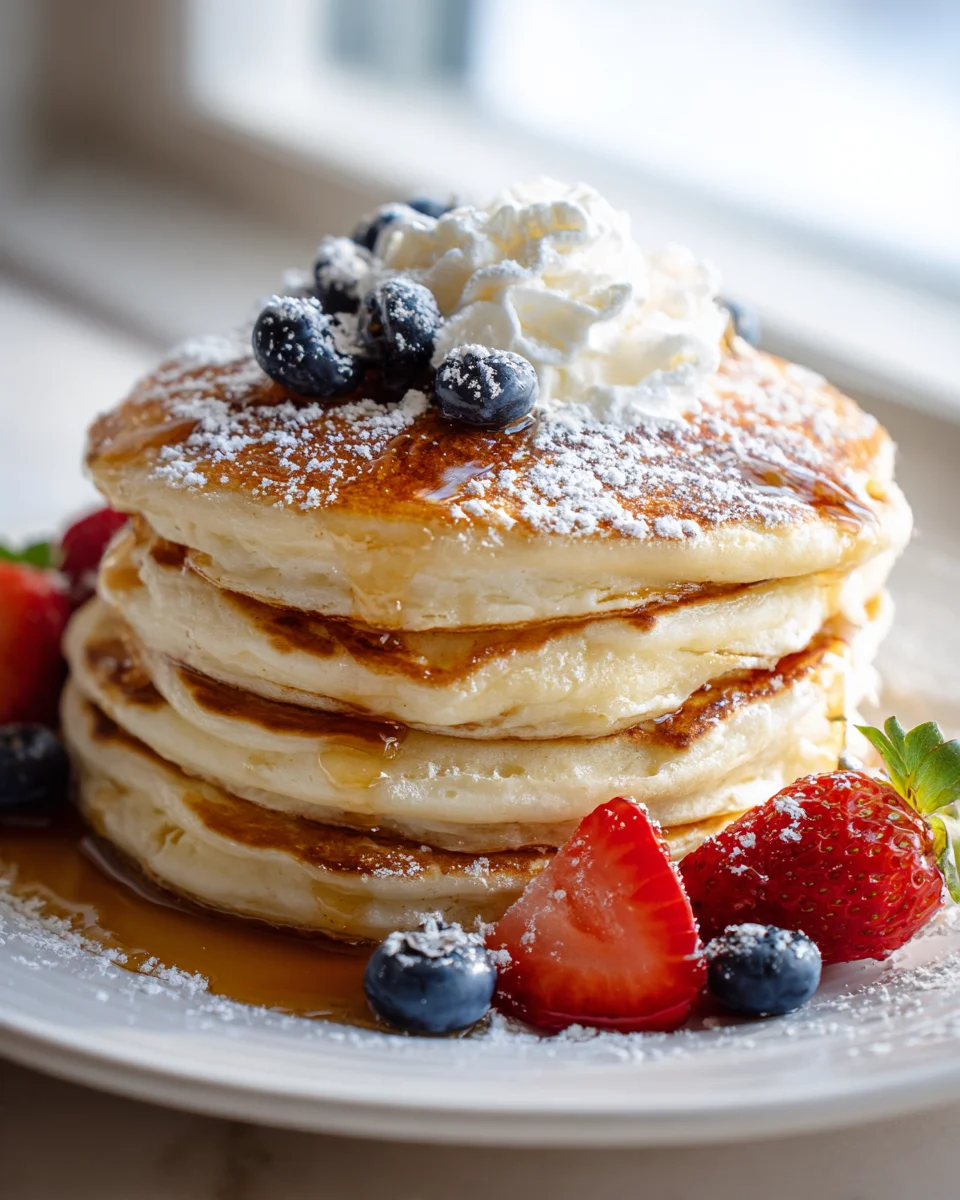
Fluffy Old Fashioned Buttermilk Pancakes
Oh, prepare yourselves for the absolute best way to start your day! I’m talking about these incredible Fluffy Old Fashioned Buttermilk Pancakes. This isn’t just any pancake recipe; it’s a journey back to the breakfasts of my childhood, full of warmth, comfort, and pure deliciousness. What makes these pancakes truly special is that perfect trifecta: the genuine fluffiness that makes them practically melt in your mouth, the subtle, delightful tang from the buttermilk that gives them an irresistible depth of flavor, and that wonderful golden-brown crust that’s just begging for syrup.
You are going to absolutely adore this recipe because it’s so much more than just a meal – it’s an experience. Imagine waking up to the aroma of these beauties sizzling on the griddle, promising a cozy morning filled with simple pleasures. They’re surprisingly easy to whip up, transforming a few basic ingredients into a stack of light, airy discs of joy. Each bite is a testament to the timeless appeal of a well-made pancake, promising a perfect canvas for all your favorite toppings, from a drizzle of maple syrup to a dollop of fresh fruit. Get ready to fall in love with your new go-to breakfast!

Ingredient Notes
There’s nothing quite like a stack of Fluffy Old Fashioned Buttermilk Pancakes to start a weekend morning! The secret to their incredible texture and classic tangy flavor lies in a few key ingredients. Here’s a little insight into what makes them so special, and how you can get creative with substitutions if needed.
- Buttermilk: This is the star of our show and absolutely essential for that characteristic tang and incredibly tender crumb. Buttermilk reacts with baking soda to create a lot of carbon dioxide bubbles, which are trapped in the batter, giving our pancakes their amazing lift and fluffiness. If you don’t have store-bought buttermilk on hand, don’t fret! You can easily make a substitute: just add 1 tablespoon of lemon juice or white vinegar to a liquid measuring cup, then fill it up to the 1-cup mark with regular milk (dairy or non-dairy). Stir it gently and let it sit for about 5-10 minutes until it slightly curdles. While this works in a pinch, for the best old-fashioned flavor, I always recommend genuine buttermilk.
- All-Purpose Flour: Standard all-purpose flour works beautifully here, providing the perfect balance of structure and tenderness. If you’re looking to incorporate some whole grains, you could substitute up to half of the all-purpose flour with whole wheat pastry flour. Just be aware that this will result in a slightly denser pancake, moving a bit away from that super fluffy texture we’re aiming for with this old-fashioned recipe.
- Baking Soda & Baking Powder: These two leavening agents work in tandem to create maximum fluffiness. Baking soda specifically reacts with the acidity in the buttermilk, while baking powder provides an extra boost of lift, ensuring our pancakes are wonderfully airy. Don’t skip either! Make sure both are fresh for the best results; old leavening agents won’t give you that desired rise.
- Granulated Sugar: We use just a touch of sugar to enhance the overall flavor and help with that beautiful golden-brown crust. It’s not so much that the pancakes become overly sweet, but just enough to round out the tang of the buttermilk.
- Eggs: Eggs act as a binder, provide structure, and contribute to the richness of the batter. They also add a bit of moisture and help the pancakes achieve a lovely, uniform texture.
- Melted Butter: A little bit of melted unsalted butter folded into the batter adds richness and moisture, contributing to a more tender and flavorful pancake. You can substitute with a neutral oil like vegetable or canola oil if you prefer, or a dairy-free butter alternative for a dairy-free version, but butter truly gives them that old-fashioned charm.
- Salt: Just a pinch of salt is crucial for balancing the sweetness and tang, enhancing all the other flavors in the pancake.
- Vanilla Extract (Optional but Recommended): A splash of vanilla extract isn’t strictly necessary but adds a wonderful warmth and depth to the flavor, really leaning into that “old-fashioned” vibe. I rarely make them without it!
Step-by-Step Instructions
Making Fluffy Old Fashioned Buttermilk Pancakes is surprisingly simple, but there are a few key steps to ensure they turn out perfectly fluffy every time. Follow along, and you’ll be enjoying a delicious stack in no time!
- Prepare Your Dry Ingredients: In a large mixing bowl, whisk together the all-purpose flour, granulated sugar, baking powder, baking soda, and salt. Whisking ensures that all the leavening agents are evenly distributed, which is crucial for uniform lift and fluffiness.
- Combine Your Wet Ingredients: In a separate medium-sized bowl, lightly whisk the eggs until just combined. Then, add the buttermilk, melted butter (make sure it’s not too hot, or it might cook the eggs!), and vanilla extract (if using). Whisk everything together until well combined.
- Gently Combine Wet and Dry: This is arguably the most critical step for fluffy pancakes! Pour the wet ingredients into the bowl with the dry ingredients. Using a whisk or a rubber spatula, gently fold and stir until just combined. It’s absolutely okay if there are still some lumps in the batter – in fact, lumpy batter is a sign of perfectly mixed pancake batter! Overmixing will develop the gluten in the flour, resulting in tough, chewy pancakes instead of light, fluffy ones. Stop stirring as soon as the dry streaks of flour disappear.
- Rest the Batter (Optional but Recommended): For even fluffier pancakes, let the batter rest at room temperature for about 5-10 minutes. This allows the flour to fully hydrate and the leavening agents to begin their work, resulting in a more tender and airy final product.
- Heat Your Griddle or Pan: While the batter rests, heat a non-stick griddle or a large heavy-bottomed skillet over medium heat. You want it hot enough so that a drop of water sizzles and evaporates immediately, but not so hot that the pancakes burn. Lightly grease the surface with a small amount of butter, vegetable oil, or cooking spray.
- Cook the Pancakes: Pour about ¼ cup of batter for each pancake onto the hot griddle. You can cook a few at a time, depending on the size of your griddle.
- Watch for Bubbles: Let the pancakes cook for 2-3 minutes on the first side, or until you see bubbles forming on the surface and the edges look set and slightly dry. This is your cue to flip!
- Flip and Finish: Carefully flip each pancake with a spatula and cook for another 1-2 minutes on the second side, or until golden brown and cooked through.
- Serve Immediately: Transfer the cooked pancakes to a plate and serve warm with your favorite toppings. If you’re cooking for a crowd, you can keep finished pancakes warm on a baking sheet in a preheated oven set to a low temperature (around 200°F / 95°C) while you finish the rest of the batch.
Tips & Suggestions
Achieving that perfect stack of Fluffy Old Fashioned Buttermilk Pancakes is an art, but these tips will make you a master in no time!
- Do NOT Overmix the Batter: I can’t stress this enough! Overmixing is the number one culprit for tough pancakes. A few lumps in your batter are perfectly fine, even desirable. Mix only until the dry ingredients are just incorporated.
- Rest Your Batter: Allowing the batter to rest for 5-10 minutes at room temperature gives the flour time to fully hydrate and allows the gluten to relax. This leads to a more tender texture and helps the leavening agents work their magic more effectively, resulting in even fluffier pancakes.
- Preheat Your Griddle Properly: A consistent, even heat is key for beautifully golden-brown pancakes that are cooked through. Test your griddle by sprinkling a few drops of water on it; if they sizzle and disappear quickly, your griddle is ready. If they just sit there, it’s not hot enough. If they immediately evaporate with a lot of smoke, it’s too hot. Adjust the heat as needed.
- Use the Right Amount of Fat: Don’t drown your griddle in butter or oil. A thin, even layer is all you need to prevent sticking and encourage beautiful browning. Too much fat can lead to greasy pancakes or uneven browning.
- Know When to Flip: The tell-tale signs are bubbles forming and popping on the surface of the pancake, and the edges looking dry and slightly set. Don’t flip too early, or your pancake won’t be fully cooked on the inside and won’t have developed a good crust.
- Keep Them Warm: If you’re making a big batch, preheat your oven to its lowest setting (around 200°F or 95°C) and place cooked pancakes on a wire rack set over a baking sheet. This keeps them warm and prevents them from getting soggy while you finish the rest.
- Old-Fashioned Topping Ideas: For that truly old-fashioned experience, serve your fluffy pancakes with pure maple syrup, a pat of good quality butter, and maybe some fresh seasonal berries. Whipped cream and a dusting of powdered sugar are also delightful additions.
- Add-Ins: Feel free to customize! Gently fold in about ½ cup of fresh blueberries, chocolate chips, or thinly sliced bananas into the batter just before cooking. Avoid adding too many, as it can weigh down the pancakes.
Storage
While Fluffy Old Fashioned Buttermilk Pancakes are best enjoyed fresh off the griddle, sometimes you have leftovers, or you want to make a big batch for future quick breakfasts. Here’s how to store them effectively:
- Refrigeration:
- Once your cooked pancakes have completely cooled to room temperature, stack them with a piece of parchment paper or wax paper in between each pancake to prevent them from sticking together.
- Place the stack in an airtight container or a heavy-duty freezer bag.
- They will keep well in the refrigerator for up to 2-3 days.
- Freezing:
- Freezing is an excellent option for longer storage. First, make sure the pancakes are completely cool.
- Lay them in a single layer on a baking sheet and flash freeze for about 30 minutes to an hour, or until firm. This prevents them from sticking together once stacked.
- Once firm, stack them with parchment paper in between each pancake.
- Transfer the stack to a freezer-safe bag or airtight container. Squeeze out as much air as possible if using a bag to prevent freezer burn.
- Frozen pancakes will maintain their best quality for up to 1-2 months. They are still safe to eat after this, but the quality might diminish.
- Reheating:
- Toaster or Toaster Oven: This is my favorite method for reheating frozen or refrigerated pancakes, as it helps them regain a bit of their crispiness. Pop them in for a few minutes until heated through and lightly crisped.
- Microwave: For a quick reheat, place a few pancakes on a microwave-safe plate. Microwave on high for 30-60 seconds, or until heated through. Be careful not to overcook, as they can become tough.
- Oven: Preheat your oven to 350°F (175°C). Place pancakes in a single layer on a baking sheet and cover loosely with foil to prevent drying out. Bake for about 5-10 minutes, or until warmed through.
Final Thoughts
There’s something truly magical about a stack of homemade pancakes, and I truly believe my recipe for Fluffy Old Fashioned Buttermilk Pancakes captures that magic perfectly. These aren’t just any pancakes; they are a celebration of classic comfort, a promise of light, airy interiors, and that signature tangy sweetness that only real buttermilk can provide. I find that once you experience the incredible texture and unforgettable flavor of these Fluffy Old Fashioned Buttermilk Pancakes, you’ll understand why they’ve been a beloved breakfast staple for generations. They’re simply perfect for creating those cherished morning memories, whether for a special weekend brunch or just a heartwarming start to a busy day. So go ahead, gather your ingredients, and prepare to be delighted. I promise, your taste buds will thank you for indulging in this timeless, utterly delicious treat!

Best Fluffy Old-Fashioned Buttermilk Pancakes Recipe
- Total Time: 25 minutes
- Yield: 4 servings 1x
Description
Start your day with these incredible Fluffy Old Fashioned Buttermilk Pancakes that are light, airy, and full of delightful flavor. This recipe captures the essence of a cozy breakfast, promising a perfect canvas for your favorite toppings.
Ingredients
- 1 cup buttermilk
- 1 cup all-purpose flour
- 1 tablespoon granulated sugar
- 1 teaspoon baking powder
- 1/2 teaspoon baking soda
- 1/4 teaspoon salt
- 1 large egg
- 2 tablespoons melted butter
- 1 teaspoon vanilla extract (optional but recommended)
Instructions
- In a large mixing bowl, whisk together the all-purpose flour, granulated sugar, baking powder, baking soda, and salt.
- In a separate medium-sized bowl, lightly whisk the eggs until just combined. Then, add the buttermilk, melted butter, and vanilla extract (if using). Whisk everything together until well combined.
- Pour the wet ingredients into the bowl with the dry ingredients. Using a whisk or a rubber spatula, gently fold and stir until just combined. It's okay if there are still some lumps in the batter.
- For even fluffier pancakes, let the batter rest at room temperature for about 5-10 minutes.
- While the batter rests, heat a non-stick griddle or a large heavy-bottomed skillet over medium heat. Lightly grease the surface with a small amount of butter, vegetable oil, or cooking spray.
- Pour about ¼ cup of batter for each pancake onto the hot griddle.
- Let the pancakes cook for 2-3 minutes on the first side, or until you see bubbles forming on the surface and the edges look set and slightly dry.
- Carefully flip each pancake with a spatula and cook for another 1-2 minutes on the second side, or until golden brown and cooked through.
- Transfer the cooked pancakes to a plate and serve warm with your favorite toppings.
- Prep Time: 10 mins
- Cook Time: 15 mins
- Category: Breakfast
- Method: Griddling
- Cuisine: American
Nutrition
- Serving Size: 1 pancake
- Calories: 150
- Sugar: 1 g
- Sodium: 200 mg
- Fat: 5 g
- Saturated Fat: 3 g
- Unsaturated Fat: 2 g
- Trans Fat: 0 g
- Carbohydrates: 22 g
- Fiber: 1 g
- Protein: 4 g
- Cholesterol: 30 mg
Keywords: Do NOT overmix the batter; a few lumps are perfectly fine. Allowing the batter to rest helps achieve a more tender texture. Preheat your griddle properly for even cooking.