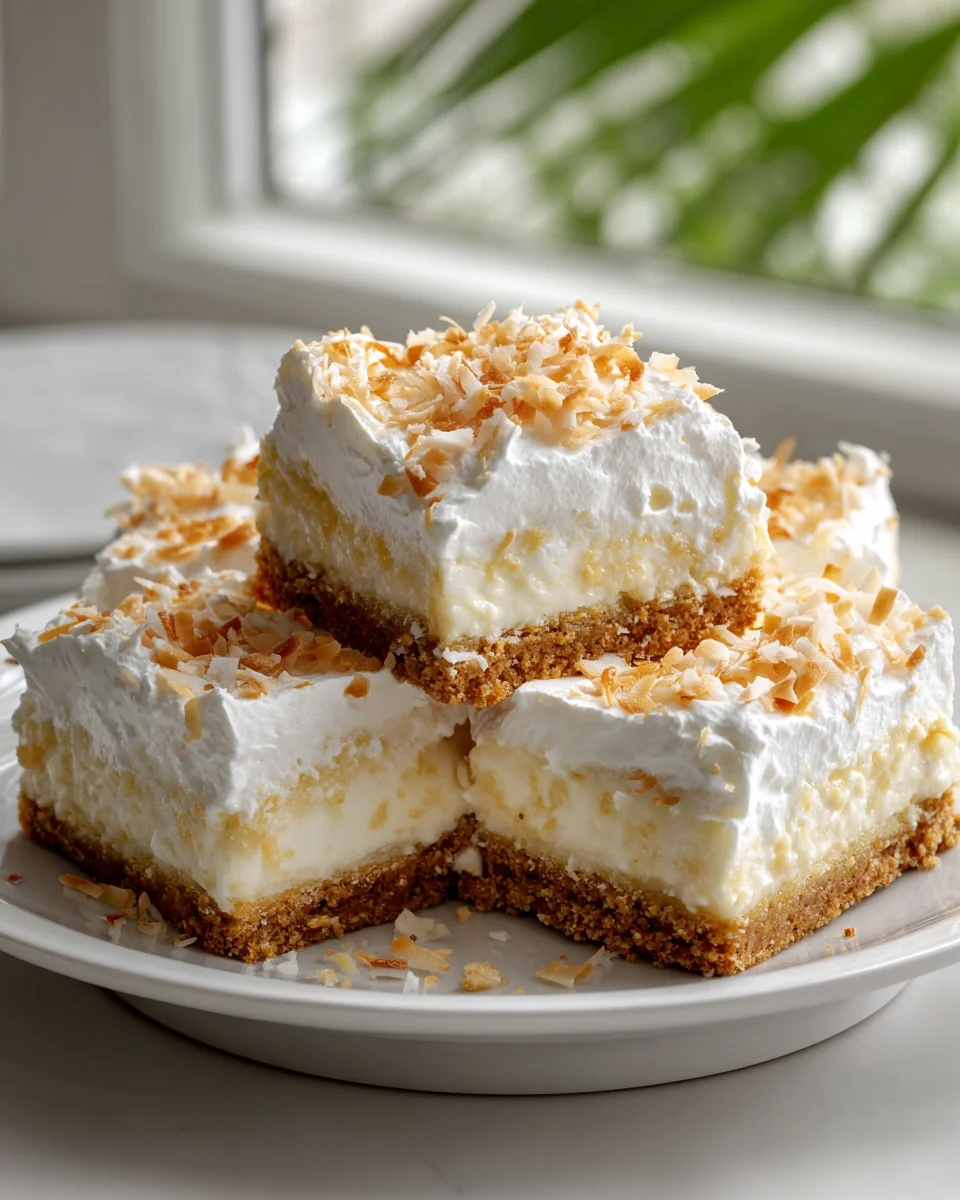
Coconut Cream Dream Bars
Coconut Cream Dream Bars—just the name itself promises something truly special, and believe me, these bars deliver on every single level! I’ve been perfecting this recipe because I wanted to create the ultimate treat for coconut lovers, and I truly believe these are it. What makes them so special, you ask? It’s all about the dreamy layers and the rich, authentic coconut flavor that shines through in every single bite.
You’re going to fall head over heels for the incredibly satisfying combination of textures and tastes. Imagine sinking your teeth into a perfectly golden, buttery shortbread crust, which then gives way to a thick, luscious, and utterly creamy coconut filling that melts in your mouth. To top it all off, I like to add a delicate, airy whipped topping, often finished with a sprinkle of toasted coconut for that extra crunch and aroma. It’s pure tropical bliss in a convenient bar form!
These aren’t just a dessert; they’re an experience. They’re impressive enough to bring to any gathering, yet deceptively simple to put together in your own kitchen. Prepare yourself for compliments, because once you make these Coconut Cream Dream Bars, they’ll become a much-requested favorite, offering a little slice of paradise whenever you need it most.

Ingredient Notes
Oh, my friends, these Coconut Cream Dream Bars are truly a slice of heaven, and it all starts with choosing the right ingredients. I’m going to walk you through the stars of this show and offer a few helpful substitutions so everyone can enjoy these decadent treats.
- Full-Fat Coconut Cream: This is the absolute hero of our dream bars, giving them that incredibly rich, velvety texture and deep coconut flavor. I always recommend using a good quality, full-fat canned coconut cream (or the thick cream scooped from the top of a chilled can of full-fat coconut milk). Don’t confuse this with “light” coconut milk or coconut beverage, as they simply won’t yield the same luxurious consistency. The higher fat content is key for that dreamy, firm-yet-creamy filling.
- Sweetened Condensed Milk: This isn’t just for sweetness; it contributes to the signature smooth, dense, and slightly chewy texture of the filling. If you’re looking for a dairy-free option, a good quality sweetened condensed coconut milk works beautifully as a 1:1 substitute. I’ve personally tried a few, and they make these bars just as magical.
- Shredded Coconut: For that delightful chew and an extra burst of coconut flavor, I use unsweetened shredded coconut in the filling and sometimes a sprinkle of toasted coconut on top. If you prefer a finer texture, you can opt for desiccated coconut. If you only have sweetened, reduce the amount of sugar slightly in the crust, but for the filling, sticking to unsweetened allows you more control over the overall sweetness.
- Butter (Unsalted): For the crust, unsalted butter is my go-to. It gives us control over the saltiness and results in a wonderfully rich and tender base. If you’re going dairy-free, a solid vegan butter stick works perfectly here. Just ensure it’s a brand known for baking well.
- All-Purpose Flour: This forms the sturdy, crumbly base of our bars. For my gluten-free friends, a 1:1 gluten-free baking flour blend (make sure it contains xanthan gum) performs remarkably well. The texture of the crust will still be fantastic!
- Powdered Sugar: I use powdered sugar for the crust because it blends in more smoothly than granulated sugar, creating a more tender and cohesive dough.
- Eggs: Eggs act as a binder and help the filling set beautifully, contributing to its creamy texture. There isn’t a direct vegan substitute that achieves the exact same result in terms of texture for this specific type of bar, but for those avoiding eggs, you could experiment with a cornstarch or arrowroot slurry, though it might slightly alter the final creaminess.
- Vanilla Extract: A good quality vanilla extract really enhances all the other flavors, adding a warm, aromatic depth that completes the profile. I’d avoid artificial vanilla for these bars if possible, as the natural flavor truly shines.
Step-by-Step Instructions
Alright, let’s get down to the delicious details! Follow these steps, and you’ll be on your way to enjoying your very own batch of Coconut Cream Dream Bars. I promise, it’s simpler than you might think!
- Step 1: Preheat and Prep Your Pan. First things first, preheat your oven to 350°F (175°C). Then, line a 9×13 inch baking pan with parchment paper, leaving an overhang on the sides. This parchment paper sling is your best friend for easily lifting the cooled bars out of the pan.
- Step 2: Make the Crust. In a medium bowl, combine your all-purpose flour, powdered sugar, and a pinch of salt. Add the melted unsalted butter and mix until crumbs form and the mixture is moist. I like to use my hands for this to ensure everything is evenly incorporated.
- Step 3: Press and Par-Bake the Crust. Press the crumb mixture firmly and evenly into the bottom of your prepared pan. Really get in there and press it down well to form a compact crust. Bake this crust for 15-18 minutes, or until it’s lightly golden around the edges. This par-baking step is crucial for preventing a soggy bottom!
- Step 4: Prepare the Coconut Cream Filling. While the crust is par-baking, in a large bowl, whisk together the full-fat coconut cream, sweetened condensed milk, eggs, and vanilla extract until smooth. Then, gently fold in the shredded coconut.
- Step 5: Assemble and Bake the Bars. Once the crust is lightly golden, carefully remove the pan from the oven. Pour the prepared coconut cream filling evenly over the warm crust. Return the pan to the oven and bake for another 25-30 minutes, or until the edges are set and the center is just slightly jiggly when gently shaken. It will firm up as it cools.
- Step 6: Cool Completely (This is Critical!). This is arguably the most important step for perfectly sliceable bars! Allow the bars to cool completely at room temperature on a wire rack for at least 1-2 hours. Then, transfer the pan to the refrigerator and chill for a minimum of 4 hours, or ideally, overnight. Trust me, the wait is worth it for that clean slice and firm texture.
- Step 7: Slice and Serve. Once thoroughly chilled, use the parchment paper overhang to lift the entire slab of bars out of the pan. Place it on a cutting board. For really clean cuts, I like to use a sharp knife that has been warmed under hot water and wiped dry between each slice. Cut into squares or rectangles of your desired size. Garnish with a sprinkle of toasted shredded coconut if you wish, and prepare for bliss!
Tips & Suggestions
To ensure your Coconut Cream Dream Bars live up to their name, I’ve got a few extra nuggets of wisdom for you. These tips will help you achieve that perfect balance of texture and flavor!
- Chilling is Non-Negotiable: I cannot stress this enough – do NOT skip or shorten the chilling time. These bars need ample time in the refrigerator to set properly. If you try to cut them too soon, they will be messy and won’t hold their shape. Patience is a virtue, especially when it comes to dream bars!
- Don’t Overbake the Filling: Keep an eye on the filling during the second bake. You want it set around the edges but still a little bit jiggly in the very center. It will continue to cook and set as it cools, resulting in that perfectly creamy, not rubbery, texture.
- For the Ultimate Coconut Flavor: If you’re a true coconut fiend like me, gently toast some extra shredded coconut in a dry pan over medium-low heat until golden. Sprinkle this on top of the bars just before serving. The aroma and crunch are out of this world!
- Clean Cuts Every Time: As mentioned in the instructions, a hot, clean knife is your best friend. Heat it under hot water, wipe it completely dry, make a cut, then repeat the process. This prevents the filling from sticking and gives you beautiful, professional-looking slices.
- Add a Zesty Twist: For a delightful brightness, try adding the zest of one lime to your coconut cream filling. It adds a lovely counterpoint to the sweetness and really elevates the flavor profile without overpowering the coconut.
- Experiment with Toppings: While amazing on their own, consider a light drizzle of melted white chocolate, a dusting of cocoa powder, or even a few fresh berries (like raspberries or blueberries) just before serving for an extra flourish.
- Use Good Quality Coconut Cream: Seriously, this makes all the difference. Look for brands that clearly state “full-fat coconut cream” or those where the cream separates significantly when chilled. It’s the foundation of the bar’s luxurious texture.
Storage
You’ll want to keep these Coconut Cream Dream Bars fresh and delicious for as long as possible (though I doubt they’ll last very long!). Here’s how I recommend storing them to maintain their perfect texture and taste:
- Refrigeration is Key: Due to the dairy and egg content in the creamy filling, these bars absolutely must be stored in the refrigerator. I always keep them in an airtight container to prevent them from drying out or absorbing any odors from other foods in your fridge.
- How Long Do They Last?: When stored properly in the refrigerator, your Coconut Cream Dream Bars will stay fresh and delightful for up to 3-4 days. The flavor actually deepens a bit on the second day, which I think is a wonderful bonus!
- Serving Temperature: I find these bars are best served chilled, straight from the refrigerator. The firm, cool texture is part of what makes them so dreamy and refreshing.
- Can You Freeze Them?: While technically possible, I generally don’t recommend freezing these bars for extended periods. The texture of the creamy filling can change slightly upon thawing, potentially becoming a bit grainier or watery. If you must freeze them, wrap individual bars tightly in plastic wrap, then place them in an airtight freezer-safe container for up to 1 month. Thaw them overnight in the refrigerator before serving.
- Preventing Stickiness: If you’re stacking the bars in a container, I suggest placing a small piece of parchment paper or wax paper between layers to prevent them from sticking together.
Final Thoughts
And there you have it – the delightful journey to creating your very own Coconut Cream Dream Bars! I truly believe this recipe is an absolute game-changer for anyone who adores tropical flavors and luscious, multi-layered textures. The way the rich, creamy coconut filling melts in your mouth, perfectly balanced with the satisfying crust and delightful topping, makes these Coconut Cream Dream Bars an unforgettable treat. They’re not just a dessert; they’re a little slice of paradise, promising to transport you to a blissful state with every single bite. I urge you to whip up a batch soon; you won’t regret experiencing the pure joy and deliciousness of these incredible Coconut Cream Dream Bars!

Coconut Cream Dream Bars: Heavenly No-Bake Dessert!
- Total Time: 1 hour 5 minutes
- Yield: 12 servings 1x
Description
Coconut Cream Dream Bars are a delightful treat for coconut lovers, featuring dreamy layers and rich coconut flavor. These bars combine a buttery shortbread crust with a creamy coconut filling and a light whipped topping for a tropical experience.
Ingredients
- 1 can full-fat coconut cream
- 1 can sweetened condensed milk
- 2 large eggs
- 1 teaspoon vanilla extract
- 1 cup unsweetened shredded coconut
- 1 1/2 cups all-purpose flour
- 1/2 cup powdered sugar
- 1/2 cup unsalted butter
- Pinch of salt
Instructions
- Step 1: Preheat your oven to 350°F (175°C) and line a 9×13 inch baking pan with parchment paper, leaving an overhang on the sides.
- Step 2: In a medium bowl, combine all-purpose flour, powdered sugar, and a pinch of salt. Add melted unsalted butter and mix until crumbs form and the mixture is moist.
- Step 3: Press the crumb mixture firmly and evenly into the bottom of your prepared pan. Bake for 15-18 minutes, or until lightly golden around the edges.
- Step 4: While the crust is par-baking, whisk together full-fat coconut cream, sweetened condensed milk, eggs, and vanilla extract in a large bowl until smooth. Gently fold in shredded coconut.
- Step 5: Once the crust is lightly golden, pour the coconut cream filling evenly over the warm crust. Return the pan to the oven and bake for another 25-30 minutes, or until the edges are set and the center is slightly jiggly.
- Step 6: Allow the bars to cool completely at room temperature on a wire rack for at least 1-2 hours, then chill in the refrigerator for a minimum of 4 hours, or ideally, overnight.
- Step 7: Once thoroughly chilled, lift the slab of bars out of the pan using the parchment paper overhang. Cut into squares or rectangles and garnish with toasted shredded coconut if desired.
- Prep Time: 20 mins
- Cook Time: 45 mins
- Category: Dessert
- Method: Baking
- Cuisine: Tropical
Nutrition
- Serving Size: 1 bar
- Calories: 250
- Sugar: 20 g
- Sodium: 150 mg
- Fat: 15 g
- Saturated Fat: 10 g
- Unsaturated Fat: 3 g
- Trans Fat: 0 g
- Carbohydrates: 30 g
- Fiber: 2 g
- Protein: 3 g
- Cholesterol: 50 mg
Keywords: Chilling is non-negotiable; do not skip or shorten the chilling time. For the ultimate coconut flavor, toast some extra shredded coconut for garnish. Clean cuts can be achieved with a hot knife.