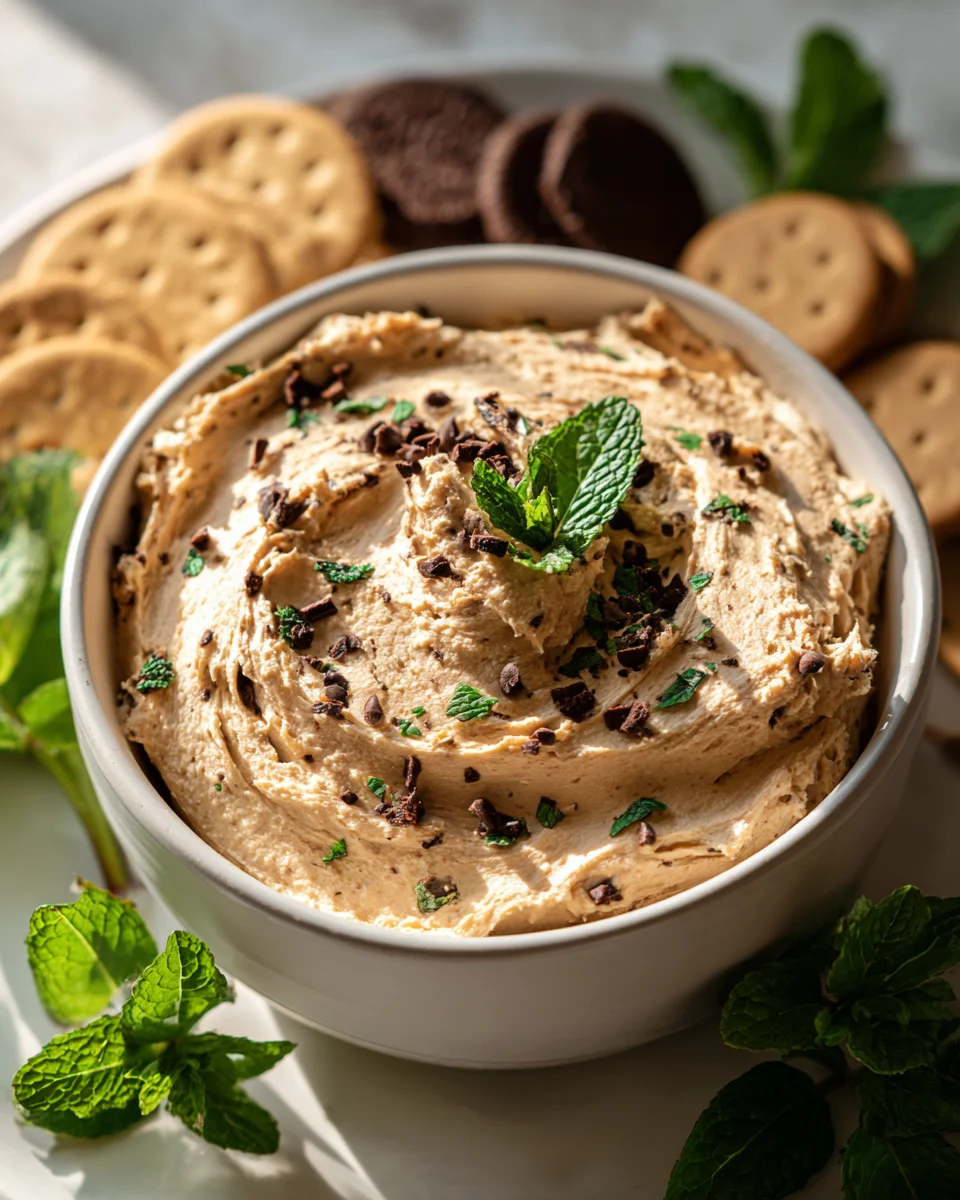
Peppermint Cookie Dough Dip
Peppermint Cookie Dough Dip! Oh my goodness, get ready to fall head over heels for the most delightful, festive, and utterly irresistible dessert dip you’ve ever spooned into your mouth. This isn’t just any cookie dough dip; it’s a vibrant, cool, and creamy celebration of peppermint and chocolate that will instantly become a new favorite!
What makes this Peppermint Cookie Dough Dip so incredibly special, you ask? Well, first off, it’s entirely edible and gloriously no-bake, meaning you can dive right in without a moment’s hesitation (yes, it’s safe to eat raw thanks to heat-treated flour and no eggs!). I’ve taken all the best parts of a classic chocolate chip cookie dough – that rich, sweet, comforting flavor – and infused it with a refreshing burst of cool peppermint, creating a magical combination that feels both wonderfully nostalgic and excitingly new.
I just know you’re going to adore this recipe because it’s ridiculously easy to whip up, perfect for last-minute gatherings, holiday parties, or simply satisfying that intense sweet craving that hits out of nowhere. Imagine a fluffy, sweet, mint-infused base, generously studded with mini chocolate chips, just waiting to be scooped up with your favorite cookies, fruit slices, or graham crackers. It’s a pure joy to share, a guaranteed crowd-pleaser, and a truly unique way to enjoy the beloved flavors of the season. Get ready to dip, delight, and declare this Peppermint Cookie Dough Dip your new go-to treat!

Ingredient Notes
Creating the perfect Peppermint Cookie Dough Dip relies on a few key ingredients, each playing an important role in achieving that dreamy, scoopable texture and festive flavor. Here’s a rundown of what you’ll need and some thoughts on substitutions.
- Unsalted Butter: I always reach for unsalted butter so I can control the amount of salt in my dip. Make sure it’s fully softened to room temperature – this is absolutely crucial for achieving that light, fluffy base when you cream it with the cream cheese. If it’s too cold, your dip will be lumpy and won’t have that smooth, irresistible texture. If you only have salted butter, you can use it, but omit any extra salt you might be tempted to add.
- Cream Cheese: Just like the butter, your full-fat cream cheese needs to be completely softened. I prefer full-fat for the richest, creamiest dip, but a reduced-fat version can work in a pinch, though the texture might be slightly less decadent. Always ensure it’s at room temperature before you start mixing to prevent lumps and ensure a silky-smooth consistency. For a dairy-free option, there are some fantastic plant-based cream cheeses and butters available that work wonderfully in this recipe, just be sure to choose brands known for their creamy texture.
- Powdered Sugar: Also known as confectioners’ sugar, this is what gives our dip its sweetness and contributes to that wonderfully smooth, no-grainy texture. Granulated sugar won’t dissolve properly and will leave your dip feeling gritty, so definitely stick to powdered sugar here. You can adjust the amount to your personal sweetness preference; I usually start with the recommended amount and add more if I feel it needs it.
- Vanilla Extract: A classic for a reason! Vanilla enhances all the other flavors without overpowering them. Use good quality pure vanilla extract for the best results.
- Peppermint Extract: This is the star of our show, giving the dip its signature cool, minty flavor. Be careful with peppermint extract – a little goes a long way! It’s very potent. I recommend starting with a small amount, mixing, tasting, and then adding more in tiny increments until you reach your desired peppermint punch. It’s much easier to add more than to try and tone down an overly minty dip.
- Milk: A small splash of milk (any kind works, dairy or non-dairy like almond or oat milk) helps to achieve the perfect, scoopable consistency. You might not need much, or you might need a little more, depending on how soft your butter and cream cheese are and how thick you prefer your dip. Add it a teaspoon at a time until it’s just right.
- Heat-Treated All-Purpose Flour: This is a crucial ingredient for any raw “cookie dough” dip for food safety reasons. Raw flour can contain harmful bacteria, so we need to heat treat it first. Don’t skip this step! To heat treat, simply spread your flour on a baking sheet and bake at 300°F (150°C) for about 5-7 minutes, or until it reaches 160°F (71°C). Let it cool completely before using. Alternatively, you can microwave it in a microwave-safe bowl for 30-60 second intervals, stirring well after each, until it reaches the same temperature. Once cooled, it’s safe to use in your raw dip.
- Mini Chocolate Chips: These add delightful pockets of chocolatey goodness. Mini chips work best in a dip, ensuring you get some chocolate in every bite without being too chunky. You can use semi-sweet, dark, or even milk chocolate chips. White chocolate chips would also be a lovely addition or substitution for a different flavor profile. If you don’t have chips, finely chopped chocolate from a bar works just as well.
- Crushed Peppermint Candies or Candy Canes: This is for both flavor and fantastic texture! The crushed candy canes provide a lovely crunch and an extra burst of peppermint. I like to fold some in and then sprinkle extra on top for presentation. Make sure they are finely crushed so they distribute well throughout the dip.
Step-by-Step Instructions
Making this Peppermint Cookie Dough Dip is incredibly straightforward, perfect for a quick festive treat! Here’s how I put it together:
- Prepare the Flour: First things first, we need to heat treat our all-purpose flour. Spread the flour evenly on a baking sheet and bake it in a preheated oven at 300°F (150°C) for 5-7 minutes, or until it reaches an internal temperature of 160°F (71°C). This makes it safe for raw consumption. Let it cool completely to room temperature before moving on.
- Cream Butter and Cream Cheese: In a large mixing bowl, using an electric mixer, beat together the softened unsalted butter and softened cream cheese on medium speed. Continue mixing until the mixture is light, fluffy, and completely smooth, with no lumps of cream cheese visible. This usually takes about 2-3 minutes. Scrape down the sides of the bowl as needed.
- Add Wet Ingredients and Sweetener: Reduce the mixer speed to low. Gradually add the powdered sugar, a cup at a time, mixing until fully incorporated and smooth. Once all the sugar is in, add the vanilla extract and peppermint extract. Remember my advice about peppermint extract – start small! Mix until everything is well combined and fragrant. Taste a tiny bit to check the peppermint level and add more if you like, mixing after each addition.
- Incorporate Flour: Slowly add the cooled, heat-treated flour to the mixture, continuing to mix on low speed until just combined. Be careful not to overmix at this stage; we just want it incorporated.
- Adjust Consistency with Milk: If the dip appears too thick or stiff, add milk one teaspoon at a time, mixing after each addition, until you reach your desired creamy, scoopable consistency. The goal is a texture that’s thick enough to hold its shape but easy to dip into.
- Fold in Mix-ins: Remove the bowl from the mixer. With a spatula, gently fold in the mini chocolate chips and about half of the crushed peppermint candies or candy canes. You want these distributed throughout the dip.
- Chill: Cover the bowl with plastic wrap and refrigerate the Peppermint Cookie Dough Dip for at least 30 minutes. This chilling time allows the flavors to meld together and helps the dip firm up to the perfect consistency.
- Serve: Once chilled, transfer the dip to a serving bowl. Sprinkle the remaining crushed peppermint candies on top for a festive finish.
Tips & Suggestions
I absolutely adore this Peppermint Cookie Dough Dip, and over time, I’ve gathered a few tips and tricks to make it even more special and ensure you get the most out of every delicious scoop!
- Don’t Skimp on Chilling Time: I know it’s tempting to dive right in, but letting the dip chill for at least 30 minutes, or even an hour, really makes a difference. It allows all those lovely peppermint and vanilla flavors to deepen and meld, and it helps the dip firm up to a perfect scoopable consistency. A well-chilled dip is simply superior!
- Master the Peppermint: Peppermint extract can be quite strong, so my golden rule is to start with less than you think you need and add more incrementally. Seriously, a few drops can make a huge impact. Taste as you go! You want a refreshing minty kick, not something that overwhelms your taste buds.
- Serving Suggestions Galore: This dip is incredibly versatile for serving! My absolute favorite dippers include graham crackers, vanilla wafers, or shortbread cookies. For a healthier option, apple slices or strawberries are fantastic. Pretzels offer a delightful sweet and salty contrast that I highly recommend trying. You could even serve it with some brownie bites or chocolate cookies for an extra chocolatey experience.
- Make It Festive: To really lean into the holiday spirit, a tiny drop or two of red food coloring can transform your dip into a beautiful pink hue, making it even more visually appealing. Or, simply add a generous sprinkle of festive red and green sprinkles on top before serving.
- Planning Ahead: This dip is a fantastic make-ahead treat! You can prepare it a day or two in advance and store it in the refrigerator. Just give it a good stir before serving, and if it’s too firm, let it sit out at room temperature for 10-15 minutes to soften slightly.
- Taste Test Throughout: As with any good recipe, frequent tasting is key! Adjust the sweetness, the peppermint, and even the consistency as you go. It’s your dip, make it perfect for your palate.
- Consider Variations: While the classic is amazing, feel free to get creative! You could swap out the mini chocolate chips for white chocolate chips for a different flavor profile, or even add a touch of almond extract alongside the peppermint for a more complex holiday flavor.
- Presentation Matters: Serve this dip in a pretty bowl! A clear glass bowl really lets those colorful chocolate chips and crushed peppermints shine through. Garnish with whole candy canes or a sprig of fresh mint if you want to be extra fancy.
Storage
Once you’ve whipped up this delicious Peppermint Cookie Dough Dip, proper storage is key to keeping it fresh and tasty for as long as possible. Here’s what I recommend:
- Refrigeration is Essential: Because this dip contains dairy products like cream cheese and butter, it must be stored in the refrigerator. Do not leave it out at room temperature for more than two hours, especially if your kitchen is warm.
- Airtight Container: To maintain its freshness and prevent it from absorbing any other odors from your fridge, transfer any leftover dip into an airtight container. A tightly sealed container will also help to prevent it from drying out and forming a crust on top.
- Shelf Life: When stored properly in an airtight container in the refrigerator, your Peppermint Cookie Dough Dip will stay fresh and delicious for about 3 to 5 days. I find it’s often best within the first 2-3 days when the textures are optimal.
- Serving After Storage: When you’re ready to enjoy the dip after it’s been refrigerated, you might find it has firmed up quite a bit. Simply take it out of the fridge about 15-20 minutes before you plan to serve it. This allows it to soften slightly, bringing it back to that perfectly scoopable consistency. You can also give it a good stir with a spoon or spatula to re-mix the ingredients and bring it back to life.
- Freezing (Generally Not Recommended): While technically you could freeze this dip, I generally don’t recommend it. Dips made with cream cheese and butter tend to undergo significant textural changes when frozen and then thawed. The cream cheese can become grainy or watery, separating and losing its smooth, creamy consistency. For the best enjoyment, I suggest making this dip fresh and consuming it within its refrigerated shelf life.
Final Thoughts
And just like that, you’re ready to indulge in something truly special! I can’t express enough how much I adore this Peppermint Cookie Dough Dip. It’s not just a dessert; it’s a joyful spoonful of festive cheer, incredibly simple to prepare, yet so wonderfully decadent. From holiday parties to a simple pick-me-up, this Peppermint Cookie Dough Dip is a guaranteed crowd-pleaser and a personal favorite for good reason. I truly believe you’ll find it an irresistible treat that brings smiles to every face. So go ahead, whip up a batch – your taste buds will thank you!

Peppermint Cookie Dough Dip: Easy No-Bake Dessert Recipe
- Total Time: 22 minutes
- Yield: 8 servings 1x
Description
Indulge in the delightful Peppermint Cookie Dough Dip, a festive and creamy treat that’s perfect for any gathering. This no-bake dessert combines the nostalgic flavors of cookie dough with a refreshing peppermint twist.
Ingredients
- 1 cup Unsalted Butter, softened
- 8 oz Cream Cheese, softened
- 2 cups Powdered Sugar
- 1 tsp Vanilla Extract
- 1/2 tsp Peppermint Extract (or to taste)
- 1–2 tbsp Milk (as needed)
- 1 cup Heat-Treated All-Purpose Flour
- 1/2 cup Mini Chocolate Chips
- 1/2 cup Crushed Peppermint Candies or Candy Canes
Instructions
- Prepare the Flour: First things first, we need to heat treat our all-purpose flour. Spread the flour evenly on a baking sheet and bake it in a preheated oven at 300°F (150°C) for 5-7 minutes, or until it reaches an internal temperature of 160°F (71°C). This makes it safe for raw consumption. Let it cool completely to room temperature before moving on.
- Cream Butter and Cream Cheese: In a large mixing bowl, using an electric mixer, beat together the softened unsalted butter and softened cream cheese on medium speed. Continue mixing until the mixture is light, fluffy, and completely smooth, with no lumps of cream cheese visible. This usually takes about 2-3 minutes. Scrape down the sides of the bowl as needed.
- Add Wet Ingredients and Sweetener: Reduce the mixer speed to low. Gradually add the powdered sugar, a cup at a time, mixing until fully incorporated and smooth. Once all the sugar is in, add the vanilla extract and peppermint extract. Remember my advice about peppermint extract – start small! Mix until everything is well combined and fragrant. Taste a tiny bit to check the peppermint level and add more if you like, mixing after each addition.
- Incorporate Flour: Slowly add the cooled, heat-treated flour to the mixture, continuing to mix on low speed until just combined. Be careful not to overmix at this stage; we just want it incorporated.
- Adjust Consistency with Milk: If the dip appears too thick or stiff, add milk one teaspoon at a time, mixing after each addition, until you reach your desired creamy, scoopable consistency. The goal is a texture that’s thick enough to hold its shape but easy to dip into.
- Fold in Mix-ins: Remove the bowl from the mixer. With a spatula, gently fold in the mini chocolate chips and about half of the crushed peppermint candies or candy canes. You want these distributed throughout the dip.
- Chill: Cover the bowl with plastic wrap and refrigerate the Peppermint Cookie Dough Dip for at least 30 minutes. This chilling time allows the flavors to meld together and helps the dip firm up to the perfect consistency.
- Serve: Once chilled, transfer the dip to a serving bowl. Sprinkle the remaining crushed peppermint candies on top for a festive finish.
- Prep Time: 15 mins
- Cook Time: 7 mins
- Category: Dessert
- Method: No-Bake
- Cuisine: American
Nutrition
- Serving Size: 1/4 cup
- Calories: 200
- Sugar: 18 g
- Sodium: 150 mg
- Fat: 10 g
- Saturated Fat: 6 g
- Unsaturated Fat: 4 g
- Trans Fat: 0 g
- Carbohydrates: 25 g
- Fiber: 0 g
- Protein: 2 g
- Cholesterol: 30 mg
Keywords: Don't skimp on chilling time to enhance flavors and texture. Adjust peppermint extract gradually to avoid overpowering the dip. This dip pairs well with graham crackers, fruit slices, or cookies.