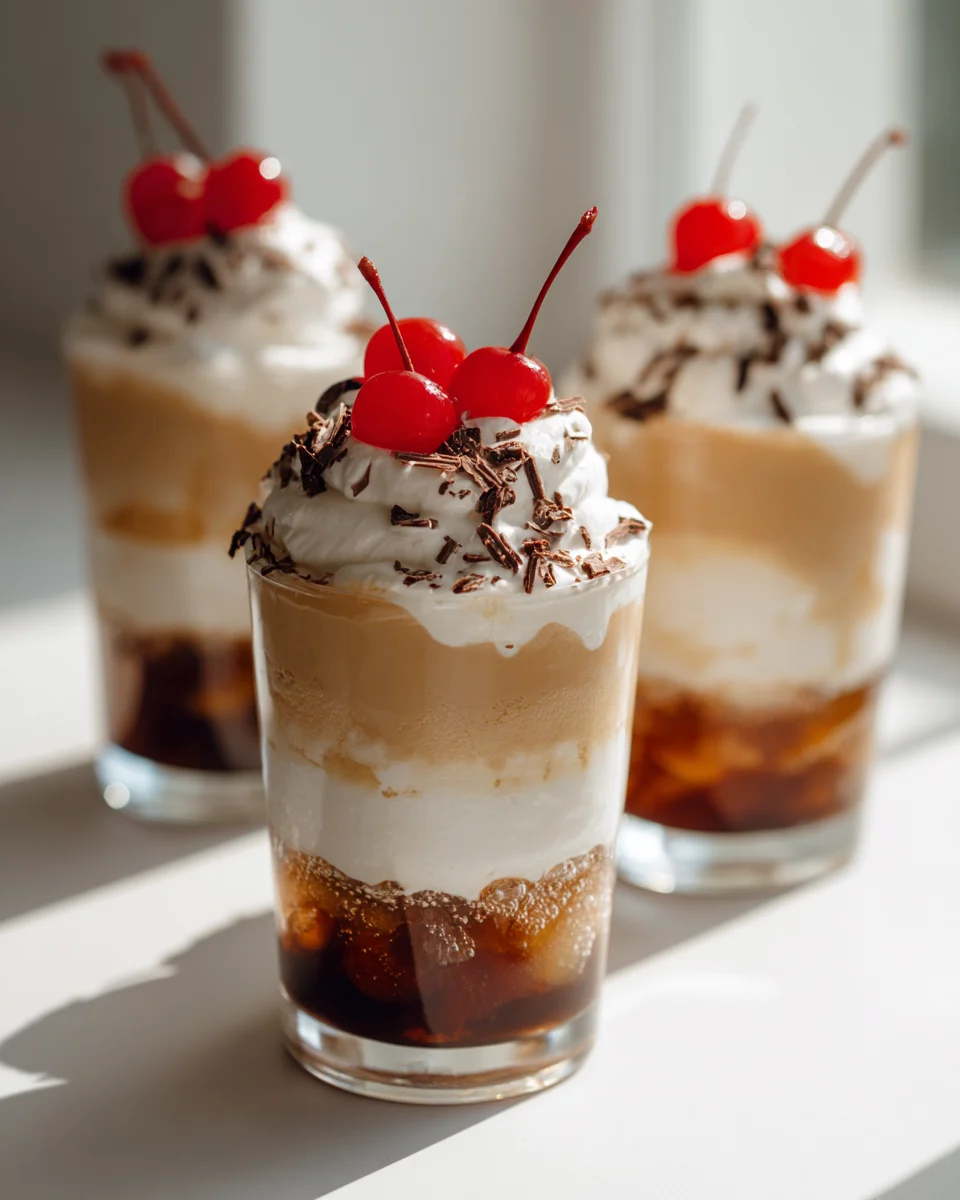
Layered Dirty Soda Parfait Cups are here to shake up your summer (or any season, really!) drink game. I’m absolutely thrilled to share this recipe because it takes the viral dirty soda trend and elevates it into something truly spectacular – and incredibly fun to eat and drink. What makes these parfait cups so special, you ask? Well, it’s all about that gorgeous visual appeal and the delightful interplay of textures and flavors. We’re not just pouring a drink; we’re crafting a personal, deconstructed dessert experience where every sip and scoop is an adventure.
You’re going to adore these because they’re ridiculously customizable, refreshingly sweet, and an absolute showstopper for any gathering, from a casual backyard BBQ to a cozy movie night. Imagine your favorite soda (think cola, lemon-lime, or even a cream soda base) artfully layered with swirls of creamy goodness – maybe a scoop of vanilla ice cream, a dollop of whipped cream, or a rich non-dairy creamer, all topped with fun, colorful garnishes. It’s a vibrant, fizzy, and wonderfully creamy treat that feels like a party in a cup. Get ready to impress your friends and treat yourself to something truly unique and delicious!

Ingredient Notes
Creating delicious Layered Dirty Soda Parfait Cups is all about balancing those fizzy, sweet, and creamy elements. Here’s a rundown of the key ingredients I love to use and some fantastic substitutions so you can make them perfectly your own!
- Your Favorite Soda Base: This is where the “dirty soda” magic begins! I often reach for a classic cola, Dr. Pepper, or even a lemon-lime soda like Sprite or 7-Up. The key is to pick a soda you genuinely enjoy drinking on its own.
- Substitutions: For a lighter option, diet sodas work beautifully. You can also experiment with flavored sparkling waters, though you might want to add a little extra syrup to boost the sweetness if going that route. Root beer or cream soda also make fantastic, unique bases!
- Creamer Element: This is what gives your dirty soda its signature creamy cloudiness. My go-to is usually half-and-half, but full-fat coconut cream or even a quality non-dairy coffee creamer (vanilla or coconut flavored) can be absolutely divine. Sweetened condensed milk is another rich option, especially when whisked with a splash of milk or water to thin it slightly.
- Substitutions: For a dairy-free parfait, oat milk, almond milk, or cashew milk can be used, though they might be thinner than traditional creamers. If using a thinner milk, consider chilling it extra well or adding a touch of whipped topping into the layer for extra body.
- Flavor Syrups: This is where you can truly customize your parfait. Coconut syrup is a quintessential dirty soda flavor, often paired with cola or Dr. Pepper. Lime juice or lime syrup is another classic pairing, adding a bright, zesty contrast. Cherry syrup, vanilla syrup, or even a hint of peach syrup can elevate your drink.
- Substitutions: Sugar-free versions of these syrups are readily available. You can also use fruit purées (like muddled berries) or even a few dashes of a non-alcohol alternative like a NA amaretto syrup for a more complex, grown-up flavor profile.
- Optional Layers & Toppings: This is where the “parfait” really shines! I love adding fresh fruit like raspberries, blueberries, or halved cherries between layers. A dollop of whipped cream on top is a must, and for some crunch, consider graham cracker crumbs, crushed shortbread cookies, or even a sprinkle of chopped pecans.
- Substitutions: Don’t be shy about experimenting! Frozen fruit works well, just be aware it might chill your parfait a bit more. Instead of cookies, try crushed pretzels for a sweet and salty kick, or even a spoonful of your favorite granola.
Step-by-Step Instructions
Crafting these Layered Dirty Soda Parfait Cups is super fun and visually rewarding! Here’s how I put them together to ensure beautiful, distinct layers every time:
- Gather and Chill Your Ingredients: Trust me on this one – having everything cold is crucial for the best flavor and for maintaining those distinct layers. I like to pop my sodas, creamers, and even the parfait glasses into the fridge an hour or so before I plan to assemble.
- Prepare Your Creamer Mixture: In a small bowl, whisk together your chosen creamer (e.g., half-and-half or coconut cream) with any syrups you want to infuse into this layer. For a classic dirty soda, I often mix 1/4 cup half-and-half with 1 tablespoon of coconut syrup and a squeeze of fresh lime juice per parfait. Taste and adjust sweetness as needed.
- Start with a Flavor Base (Optional but Recommended): For an extra flavor punch and to give the subsequent layers something to cling to, I often start with a small splash of soda or a spoonful of a concentrated syrup (like cherry or lime) at the very bottom of my clear parfait glass. This is just enough to cover the bottom – maybe 1-2 tablespoons.
- First Cream Layer: Carefully spoon about 2-3 tablespoons of your prepared creamer mixture over the flavor base (or directly into the bottom of the glass if skipping step 3). Try to keep it as neat as possible against the sides of the glass for that layered look.
- Add Your First Soda Layer: This is a delicate step! Slowly and gently pour about 1/4 to 1/3 cup of your chosen cold soda over the creamer layer. I find pouring it over the back of a spoon held just above the creamer helps to prevent it from mixing too quickly and preserves the separation. Watch the bubbles!
- Introduce Your “Solid” Layer (Optional): If you’re using fruit, cookie crumbs, or nuts, this is a great time for the first addition. Sprinkle a small amount (1-2 tablespoons) evenly over the soda layer. This also helps to create a visual break.
- Repeat the Layers: Continue layering, alternating between the creamer mixture, soda, and any solid additions. I typically aim for 2-3 full sets of layers, depending on the size of my parfait glass. Remember to pour the soda gently each time!
- Top it Off: Once your glass is nearly full, finish with a generous dollop of whipped cream. I love to use a piping bag for a beautiful swirl, but a spoon works just as well.
- Garnish and Serve Immediately: Now for the fun part! Garnish your Layered Dirty Soda Parfait Cups with extra fruit, a sprinkle of cookie crumbs, a fresh lime slice, or even a fun straw. Serve these beauties immediately while they’re still wonderfully fizzy and cold.
Tips & Suggestions
To truly elevate your Layered Dirty Soda Parfait Cups, here are a few of my favorite tips and suggestions:
- Pre-Chill Everything: I can’t stress this enough! Chilled ingredients and glasses are your best friends for preventing immediate mixing and keeping your parfaits refreshing.
- Go for Clear Glassware: Part of the joy of a parfait is seeing those beautiful layers! Use tall, clear glasses, mason jars, or even wine glasses to showcase your creation.
- Experiment with Soda & Syrup Combos: Don’t be afraid to get creative! Try a cherry cola with vanilla creamer, or a root beer with a hint of caramel syrup. The possibilities are endless.
- Gentle Pouring is Key: When adding the soda, pouring it slowly over the back of a spoon minimizes disturbance to the layers below. This is my secret to neat, distinct lines.
- For a “Grown-Up” Twist (Non-Alcohol Alternative): While these are inherently fun, you can give them a sophisticated edge by incorporating non-alcohol alternative syrups. Think about using a splash of non-alcoholic bitters or a non-alcohol spirit flavoring (like a NA rum or bourbon essence) in your creamer layer for a more complex aroma and taste without any actual alcohol.
- Sweetness Adjustment: Taste your creamer mixture before layering. Sodas are already sweet, so adjust the amount of added syrup to your preference.
- Serve Immediately: These parfaits are at their absolute best when the soda is still fizzy and the layers are distinct. Have them ready to go as soon as they’re assembled!
Storage
Layered Dirty Soda Parfait Cups are definitely a “make and serve” kind of treat. Because of the carbonation in the soda and the delicate nature of the layers, they don’t hold up well for long-term storage once assembled.
- Best Consumed Fresh: For optimal fizz, distinct layers, and overall deliciousness, I highly recommend enjoying your parfaits within 15-30 minutes of assembly. Any longer, and the soda will start to lose its carbonation, and the layers may begin to meld together.
- Prepping Components Ahead: If you want to get a head start, you can absolutely prep individual components:
- Mix your creamer and syrup combination and store it in an airtight container in the fridge for up to 24 hours.
- Wash and chop any fresh fruit and keep it in a sealed container in the refrigerator.
- Crush any cookies or nuts and store them at room temperature until ready to use.
- Chill your sodas and glasses well in advance.
- Assembling Just Before Serving: By having all your components ready to go, you can quickly assemble these parfaits right before your guests arrive or when you’re ready for a refreshing treat. This ensures the best possible experience!
Final Thoughts
And there you have it! I truly hope you’re feeling inspired to whip up these incredible Layered Dirty Soda Parfait Cups. This isn’t just another dessert or drink; it’s a truly unique, customizable, and wonderfully refreshing experience all in one gorgeous package. From their vibrant layers to the delightful blend of your favorite dirty soda flavors, these parfaits are a feast for both the eyes and the taste buds. They’re the perfect show-stopping treat for any gathering, or simply a fantastic way to elevate a quiet moment into something special. Trust me, once you dive into the delicious layers of these Layered Dirty Soda Parfait Cups, you’ll understand why this recipe is an absolute must-try!

Layered Dirty Soda Parfait Cups: Easy Drink Dessert!
- Total Time: 15 minutes
- Yield: 4 servings
Description
Layered Dirty Soda Parfait Cups are a fun and customizable treat that combines your favorite soda with creamy layers and delightful toppings. This vibrant dessert is perfect for any gathering or a cozy night in!
Ingredients
- Your Favorite Soda Base (cola, Dr. Pepper, lemon-lime soda like Sprite or 7-Up)
- Half-and-half (or full-fat coconut cream, or non-dairy coffee creamer)
- Coconut syrup
- Fresh lime juice
- Flavor syrups (cherry syrup, vanilla syrup, peach syrup)
- Fresh fruit (raspberries, blueberries, halved cherries)
- Whipped cream
- Graham cracker crumbs, crushed shortbread cookies, or chopped pecans
Instructions
- Gather and Chill Your Ingredients: Chill sodas, creamers, and parfait glasses in the fridge for an hour before assembling.
- Prepare Your Creamer Mixture: Whisk together your chosen creamer with any syrups you want to infuse into this layer.
- Start with a Flavor Base (Optional but Recommended): Add a small splash of soda or a spoonful of concentrated syrup at the bottom of the glass.
- First Cream Layer: Spoon about 2-3 tablespoons of your prepared creamer mixture over the flavor base.
- Add Your First Soda Layer: Slowly pour about 1/4 to 1/3 cup of your chosen cold soda over the creamer layer.
- Introduce Your 'Solid' Layer (Optional): Sprinkle a small amount of fruit, cookie crumbs, or nuts over the soda layer.
- Repeat the Layers: Continue layering with creamer mixture, soda, and solid additions for 2-3 full sets of layers.
- Top it Off: Finish with a generous dollop of whipped cream.
- Garnish and Serve Immediately: Garnish with extra fruit, cookie crumbs, or a fresh lime slice and serve while fizzy.
- Prep Time: 15 mins
- Cook Time: 0 mins
- Category: Dessert
- Method: No cooking required
- Cuisine: American
Nutrition
- Serving Size: 1 parfait cup
- Calories: 250
- Sugar: 35 g
- Sodium: 50 mg
- Fat: 10 g
- Saturated Fat: 5 g
- Unsaturated Fat: 3 g
- Trans Fat: 0 g
- Carbohydrates: 40 g
- Fiber: 1 g
- Protein: 2 g
- Cholesterol: 20 mg
Keywords: Chill all ingredients and glasses for the best results. Experiment with different soda and syrup combinations for unique flavors. Serve immediately for optimal fizz and distinct layers.