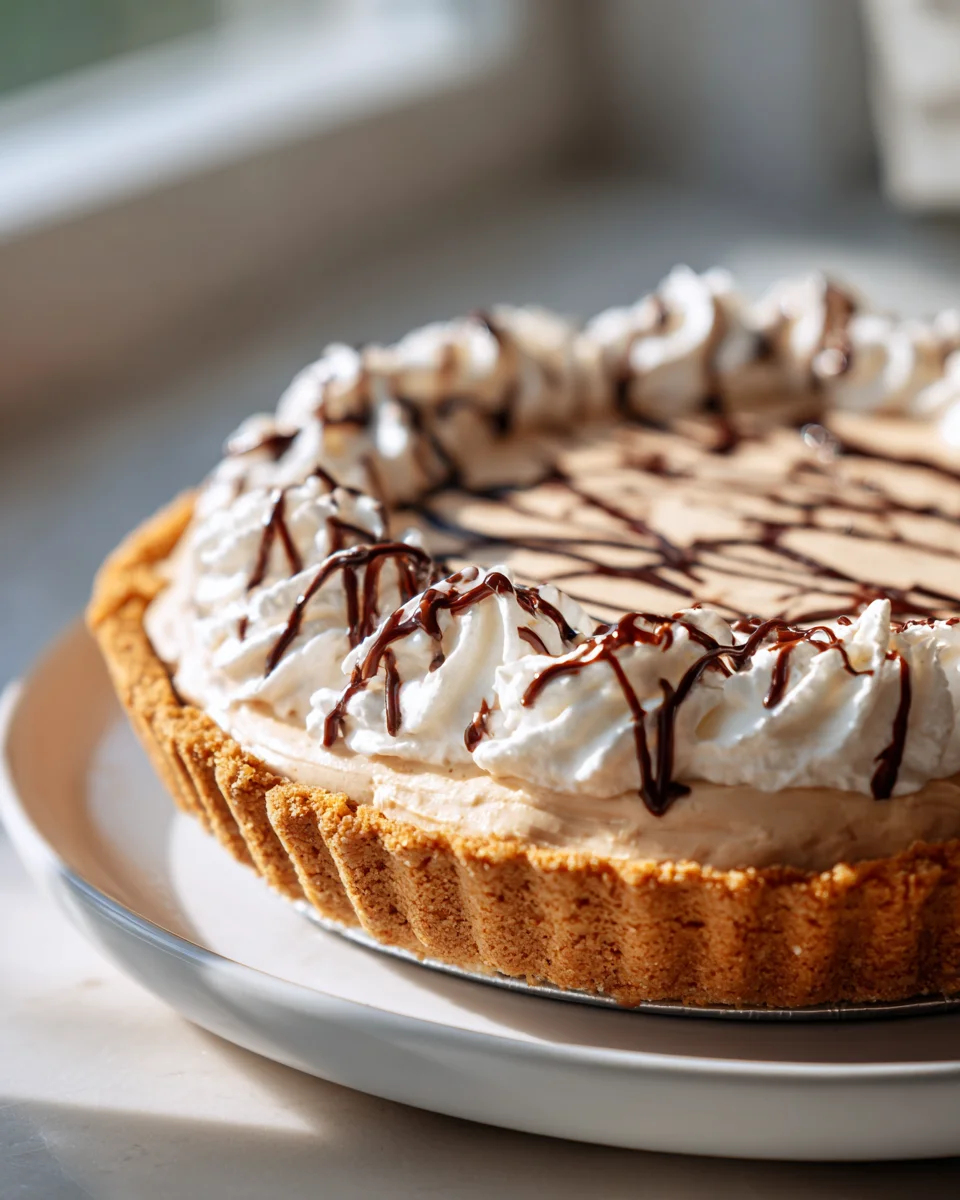
No Bake Peanut Butter Pie
Oh my goodness, get ready to meet your new favorite dessert: No Bake Peanut Butter Pie! As someone who absolutely adores a good sweet treat but doesn’t always want to fire up the oven, this recipe is an absolute game-changer. What makes this pie truly special is right there in the name – no baking required! That means you can whip up a wonderfully rich, creamy, and utterly delightful dessert without breaking a sweat, perfect for those warm days or when you just need a fuss-free indulgence.
I know you’re going to love this because it brings together that irresistible classic combination of peanut butter goodness in a chilled, luxurious pie that practically makes itself. It’s incredibly easy to make, calling for simple ingredients and minimal effort, yet it delivers maximum flavor impact. Imagine a silky-smooth, decadent peanut butter filling, nestled in a crisp crust, all chilled to perfection. It’s the kind of dessert that gets rave reviews every single time, and honestly, who can resist a slice of pure peanut butter bliss that tastes like it took hours, but only took minutes to assemble? Let’s get to it!

Ingredient Notes
Crafting the perfect No Bake Peanut Butter Pie relies on a few key ingredients, each playing a crucial role in achieving that irresistibly creamy, rich, and utterly delightful dessert. Here’s a rundown of what you’ll need and some thoughts on substitutions.
- Graham Cracker Crust: This is the classic foundation for our No Bake Peanut Butter Pie. Its buttery, slightly sweet crunch provides a lovely contrast to the smooth filling. You can absolutely use a store-bought pre-made crust for convenience – no judgment here! If you prefer a homemade touch, simply crush graham crackers (or digestive biscuits), mix with melted butter and a touch of sugar, then press into a pie dish and chill. For a chocolatey twist, an Oreo cookie crust or chocolate wafer crust works beautifully as well. Just make sure it’s well chilled before adding the filling.
- Creamy Peanut Butter: The star of our show! I highly recommend using a smooth, processed creamy peanut butter (like Jif or Skippy) for the best texture in this No Bake Peanut Butter Pie. Natural peanut butter, while delicious, can sometimes separate or have a grittier texture, which might affect the overall creaminess of the filling. If you do opt for natural, ensure it’s very well stirred before measuring, and be aware you might need to slightly adjust the amount of powdered sugar for sweetness, as natural varieties are often less sweet.
- Cream Cheese: Full-fat cream cheese is your best friend here. It provides essential tang, richness, and structure to the pie filling, helping it set up beautifully. Make sure it’s completely softened to room temperature before you start mixing. This is critical for achieving a lump-free, silky-smooth filling. Using cold cream cheese will result in a clumpy mess! While you could use a reduced-fat cream cheese, the filling might be a little less firm and rich.
- Powdered Sugar (Confectioners’ Sugar): This fine sugar dissolves easily, ensuring a smooth, non-gritty texture in our No Bake Peanut Butter Pie filling and whipped cream. It’s essential for both sweetness and consistency. Granulated sugar will make your filling grainy, so stick with powdered sugar.
- Heavy Whipping Cream: This is what gives our No Bake Peanut Butter Pie its light, airy, and luscious texture. Whipped to stiff peaks, it transforms the dense peanut butter mixture into something ethereal. Don’t skimp on the fat content – you need at least 36% for proper whipping. For a dairy-free alternative, well-chilled full-fat coconut cream (from a can, scoop out the thick cream only) can be whipped, but it will impart a subtle coconut flavor.
- Vanilla Extract: A touch of vanilla enhances all the other flavors, adding depth and warmth to the No Bake Peanut Butter Pie. Don’t skip it!
- Toppings (Optional): Get creative! Chocolate syrup, finely chopped roasted peanuts, mini chocolate chips, peanut butter cups, or extra whipped cream all make fantastic garnishes for your finished No Bake Peanut Butter Pie.
Step-by-Step Instructions
Making this No Bake Peanut Butter Pie is surprisingly simple, with just a few key steps to ensure a perfectly smooth and creamy result. Get ready for a delicious treat with minimal effort!
- Prepare Your Crust & Chill: If you’re using a store-bought graham cracker crust, great! If making your own, combine graham cracker crumbs, melted butter, and a tablespoon or two of sugar. Press firmly into a 9-inch pie plate. Regardless of which you choose, place the crust in the refrigerator for at least 30 minutes to firm up. A chilled crust is key for a sturdy No Bake Peanut Butter Pie.
- Whip the Cream: In a large, very clean mixing bowl (preferably chilled, along with your whisk attachments!), pour in the cold heavy whipping cream. Add about 1/4 cup of the powdered sugar and the vanilla extract. Beat on medium-high speed until stiff peaks form. Be careful not to over-beat, or you’ll end up with butter! Once whipped, set aside, preferably in the fridge, while you prepare the peanut butter filling. This homemade whipped cream is going to make our No Bake Peanut Butter Pie extra light.
- Make the Peanut Butter Base: In a separate large mixing bowl, beat the softened cream cheese and the remaining powdered sugar together on medium speed until the mixture is completely smooth and creamy, with no lumps. This usually takes 2-3 minutes. Scrape down the sides of the bowl as needed. Once smooth, add the creamy peanut butter and beat again until well combined and fluffy. This forms the rich heart of our No Bake Peanut Butter Pie.
- Fold in the Whipped Cream: This is where the magic happens and our No Bake Peanut Butter Pie gets its signature airy texture. Gently, using a rubber spatula, fold about half of your prepared whipped cream into the peanut butter mixture. Use a gentle lifting and folding motion to incorporate it without deflating the air you worked so hard to whip into the cream. Once mostly combined, fold in the remaining whipped cream until no streaks remain. Be careful not to overmix!
- Fill the Crust & Chill: Spoon the entire peanut butter filling mixture into your chilled graham cracker crust. Use your spatula to spread it evenly and smooth out the top. Now comes the hardest part: waiting! Place the No Bake Peanut Butter Pie back into the refrigerator to chill for at least 4-6 hours, or preferably overnight. This chilling time is absolutely essential for the pie to set properly and become sliceable.
- Serve & Enjoy: Once your No Bake Peanut Butter Pie is thoroughly chilled and firm, it’s ready to serve! You can garnish it with your favorite toppings like a drizzle of chocolate syrup, a sprinkle of chopped peanuts, or extra dollops of whipped cream just before serving. Slice with a sharp knife (running it under hot water and wiping dry between slices can help achieve clean cuts).
Tips & Suggestions
To ensure your No Bake Peanut Butter Pie is an absolute triumph, here are a few extra pointers and creative ideas to make it truly spectacular:
-
- Room Temperature Cream Cheese is Non-Negotiable: I cannot stress this enough! Cold cream cheese will result in lumps, no matter how long you beat it. Take it out of the fridge at least an hour before you plan to start, or cut it into smaller cubes to speed up the softening process. This is the secret to a silky smooth No Bake Peanut Butter Pie filling.
- Chill Your Whipping Bowl and Whisk: For the best, most stable whipped cream, place your mixing bowl and whisk attachment in the freezer for 10-15 minutes before whipping. Cold tools help the cream whip faster and hold its peaks longer, ensuring a light and airy No Bake Peanut Butter Pie.
- Gentle Folding is Key: When incorporating the whipped cream into the peanut butter mixture, use a light hand and a folding motion rather than stirring vigorously. You want to maintain as much of that lovely air as possible, which contributes to the fluffy texture of this No Bake Peanut Butter Pie. Overmixing will deflate the cream and make your pie dense.
- Don’t Rush the Chill Time: I know it’s hard to wait, but the chilling period is crucial for your No Bake Peanut Butter Pie to set up properly. Aim for at least 4-6 hours, but overnight is truly best. A well-chilled pie will slice beautifully and hold its shape.
- Customize Your Crust: While graham cracker is classic, feel free to experiment! A chocolate cookie crust (made from crushed Oreos or chocolate wafers) is phenomenal with peanut butter. A shortbread cookie crust could also add a unique flavor profile to your No Bake Peanut Butter Pie.
- Flavor Enhancements: For an extra kick, try adding a tablespoon of finely chopped roasted peanuts directly into the filling for a textural contrast. You could also stir in a handful of mini chocolate chips for a chocolate-peanut butter explosion within your No Bake Peanut Butter Pie.
- Clean Slices: To get perfectly clean slices of your No Bake Peanut Butter Pie, use a sharp knife. For the neatest cuts, dip the knife in hot water and wipe it clean between each slice.
- Adjust Sweetness to Your Liking: Taste the peanut butter mixture before folding in all the whipped cream (since you’ve already added some powdered sugar to the cream). If you prefer a sweeter No Bake Peanut Butter Pie, you can add an extra tablespoon or two of powdered sugar at this stage. Remember, you can always add more, but you can’t take it away!
Storage
Once you’ve indulged in a slice (or two!) of your amazing No Bake Peanut Butter Pie, proper storage ensures it stays fresh and delicious for future cravings.
- Refrigeration: Because our No Bake Peanut Butter Pie contains dairy (cream cheese and heavy cream), it must be stored in the refrigerator. Cover the pie tightly with plastic wrap or aluminum foil to prevent it from absorbing any odors from the fridge and to keep it from drying out. When stored correctly, your No Bake Peanut Butter Pie will stay fresh and delicious for 3-4 days in the refrigerator.
- Freezing: This No Bake Peanut Butter Pie freezes beautifully, making it a fantastic make-ahead dessert!
- Whole Pie: Once completely chilled and firm, wrap the entire pie (still in its pie plate) tightly with at least two layers of plastic wrap, followed by a layer of aluminum foil. This prevents freezer burn. It can be frozen for up to 1-2 months.
- Individual Slices: For convenient portioning, you can slice the fully set pie first. Place individual slices on a plate or baking sheet and freeze until firm (about 1-2 hours). Then, wrap each slice tightly in plastic wrap and place them in an airtight freezer-safe container or freezer bag. This way, you can grab just one slice whenever a craving strikes!
- Thawing: If thawing a frozen No Bake Peanut Butter Pie (whole or slices), transfer it to the refrigerator and let it thaw slowly for several hours, or overnight for a whole pie. Avoid thawing at room temperature for food safety reasons and to maintain the pie’s texture. Once thawed, enjoy within 2-3 days.
- Avoid Freezing Toppings: If you plan to freeze your No Bake Peanut Butter Pie, it’s best to add any fresh whipped cream, chocolate syrup, or chopped peanuts just before serving, as these toppings might not fare well in the freezer.
Final Thoughts
Well, there you have it! I truly hope you’re as excited as I am about this incredible No Bake Peanut Butter Pie. It’s more than just a dessert; it’s a guaranteed crowd-pleaser that delivers big on flavor without any of the fuss of an oven. The creamy, rich peanut butter filling nestled in that crunchy crust is pure bliss, and the fact that it comes together so easily makes it an absolute winner in my book.
I promise, once you take that first decadent bite of this No Bake Peanut Butter Pie, you’ll understand why it’s become a beloved staple. It’s perfect for any occasion – from a casual family treat to a show-stopping finish for your next gathering. Go ahead, give it a try; your taste buds will thank you!

No Bake Peanut Butter Pie: Easy & Delicious Dessert!
- Total Time: 15 minutes
- Yield: 8 servings 1x
Description
This No Bake Peanut Butter Pie is a rich and creamy dessert that requires no baking, making it the perfect treat for warm days. With simple ingredients and minimal effort, you can create a pie that delivers maximum flavor impact.
Ingredients
- 1 graham cracker crust (store-bought or homemade)
- 1 cup creamy peanut butter
- 8 oz full-fat cream cheese, softened
- 1 cup powdered sugar (confectioners' sugar)
- 1 cup heavy whipping cream
- 1 tsp vanilla extract
- Optional toppings: chocolate syrup, finely chopped roasted peanuts, mini chocolate chips, peanut butter cups, extra whipped cream
Instructions
- Prepare Your Crust & Chill: If you're using a store-bought graham cracker crust, great! If making your own, combine graham cracker crumbs, melted butter, and a tablespoon or two of sugar. Press firmly into a 9-inch pie plate. Regardless of which you choose, place the crust in the refrigerator for at least 30 minutes to firm up.
- Whip the Cream: In a large, very clean mixing bowl (preferably chilled, along with your whisk attachments!), pour in the cold heavy whipping cream. Add about 1/4 cup of the powdered sugar and the vanilla extract. Beat on medium-high speed until stiff peaks form. Set aside in the fridge while you prepare the peanut butter filling.
- Make the Peanut Butter Base: In a separate large mixing bowl, beat the softened cream cheese and the remaining powdered sugar together on medium speed until smooth and creamy, about 2-3 minutes. Add the creamy peanut butter and beat until well combined and fluffy.
- Fold in the Whipped Cream: Gently fold about half of your prepared whipped cream into the peanut butter mixture using a rubber spatula. Once mostly combined, fold in the remaining whipped cream until no streaks remain.
- Fill the Crust & Chill: Spoon the entire peanut butter filling mixture into your chilled graham cracker crust. Spread it evenly and smooth out the top. Place the pie back into the refrigerator to chill for at least 4-6 hours, or preferably overnight.
- Serve & Enjoy: Once your No Bake Peanut Butter Pie is thoroughly chilled and firm, it's ready to serve! Garnish with your favorite toppings and slice with a sharp knife.
- Prep Time: 15 mins
- Cook Time: 0 mins
- Category: Dessert
- Method: No Bake
- Cuisine: American
Nutrition
- Serving Size: 1 slice
- Calories: 350
- Sugar: 25 g
- Sodium: 250 mg
- Fat: 25 g
- Saturated Fat: 10 g
- Unsaturated Fat: 15 g
- Trans Fat: 0 g
- Carbohydrates: 30 g
- Fiber: 2 g
- Protein: 6 g
- Cholesterol: 30 mg
Keywords: Ensure your cream cheese is at room temperature to avoid lumps. Chill your mixing bowl and whisk for the best whipped cream. Don't rush the chill time for the pie to set properly.