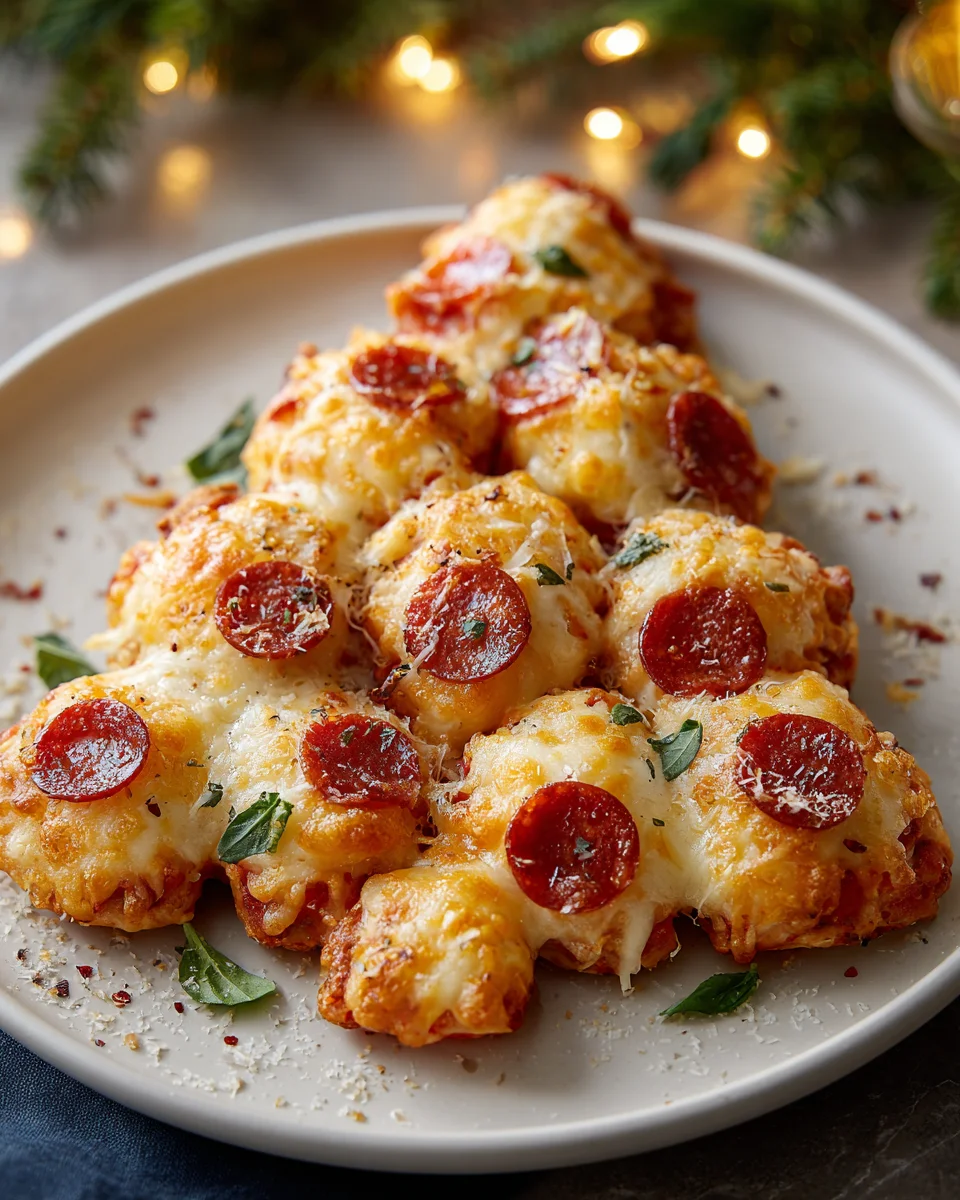
Christmas Pizza Bites
Oh my goodness, get ready to fall in love with these Christmas Pizza Bites! Seriously, if you’re looking for a crowd-pleasing, festive appetizer that screams “holiday fun,” then you’ve found it. I absolutely adore these because they take everything we love about classic pizza and shrink it down into adorable, irresistible, bite-sized packages, perfect for the most wonderful time of the year.
What makes these so special, you ask? Well, beyond being incredibly delicious, they’re designed with the holidays in mind. Imagine miniature pizzas, shimmering with melted mozzarella, dotted with festive red and green toppings like mini beef pepperoni and vibrant bell peppers, all nestled on a crispy crust. They’re super easy to whip up, meaning less stress for you during the busy season, and they’re always a hit with both kids and adults. Trust me, your guests (or just your hungry family!) will absolutely adore popping these savory little morsels. They’re the ultimate easy-to-grab party snack, ensuring everyone gets a taste of cheesy, Christmassy goodness without needing a knife and fork. I promise these will become a new holiday tradition in your home!

Ingredient Notes
Oh, the holidays are here, and what better way to celebrate than with delicious, festive bites? For our Christmas Pizza Bites, I’ve chosen ingredients that not only taste amazing but also bring those wonderful red and green Christmas colors right to your appetizer platter. This recipe is all about convenience without sacrificing that homemade touch, making it perfect for busy holiday gatherings!
The Dough: Crescent Roll Magic
For the base of our bites, I absolutely love using pre-made refrigerated crescent roll dough. It’s incredibly easy to work with, bakes up beautifully golden and flaky, and really saves time – which we all need during the festive season! Its slightly buttery flavor is a fantastic complement to the savory toppings. We’ll be unrolling it and pressing the seams together to form a sheet, then cutting it into perfect little squares for our bites.
- Substitutions: If you prefer, you could certainly use store-bought puff pastry dough for an even flakier bite, or even a pre-made pizza dough if you’re looking for a chewier crust. Just be sure to roll them out thinly enough for bite-sized portions.
The Sauce: Classic Pizza Flavor
A good quality marinara or pizza sauce is the heart of any pizza, even mini ones! I recommend using your favorite brand, something with a rich tomato flavor and a good balance of herbs. It’s the perfect canvas for our festive toppings.
- Substitutions: For a different twist, you could try a garlic herb white sauce for a "White Christmas" vibe, or even a vibrant pesto for an extra burst of green and fresh basil flavor.
The Cheese: Melted Goodness
Mozzarella cheese is non-negotiable for me when it comes to pizza bites. Its mild flavor and fantastic melt make it the ideal choice. I usually opt for pre-shredded whole milk mozzarella for convenience, but if you have a block of low-moisture mozzarella, shredding it yourself often results in an even creamier melt.
- Substitutions: Feel free to experiment with other cheeses like provolone, a blend of Italian cheeses, or even a sprinkle of Parmesan on top for a sharper flavor.
The Toppings: Festive & Flavorful
This is where we really bring the "Christmas" into our pizza bites! I focus on vibrant red and green ingredients that cook quickly and taste great in small portions.
- Beef Pepperoni: For that classic pizza taste and a pop of festive red! I specifically use beef pepperoni as a delicious and savory choice that everyone loves. Just be sure to dice it finely so it distributes well on our small bites.
- Green Bell Pepper: Finely diced green bell pepper not only adds a wonderful crunch and fresh flavor but also provides that essential Christmas green.
- Baby Spinach: A little finely chopped baby spinach wilts beautifully and adds another layer of green goodness and nutrients without overpowering the other flavors.
- Optional additions: For an extra festive touch, consider adding a tiny pinch of dried cranberries (they get lovely and chewy) or some finely crumbled cooked lean ground beef seasoned with Italian herbs if you want a heartier bite.
- Substitutions for Toppings:
- For the red: Sun-dried tomatoes (chopped), finely diced red onion, or even a tiny bit of roasted red pepper.
- For the green: Chopped fresh basil, finely chopped chives, or a hint of dried oregano and rosemary.
- For meat: Cooked ground turkey or finely diced cooked chicken work wonderfully. For a vegetarian option, sautéed finely diced mushrooms or black olives are excellent choices.
Having these key ingredients ready makes the assembly process smooth and enjoyable. Let’s get cooking!
Step-by-Step Instructions
Creating these Christmas Pizza Bites is a really fun and straightforward process. I’ll walk you through each step to ensure your bites turn out perfectly golden, cheesy, and bursting with festive flavor!
- Preheat and Prep: First things first, let’s get our oven ready. Preheat your oven to 375°F (190°C). While it’s heating up, line two large baking sheets with parchment paper. This is a game-changer for easy cleanup and preventing sticking. I always make sure I have my parchment paper ready!
- Prepare Your Dough: Unroll your two cans of refrigerated crescent roll dough onto a clean, lightly floured surface or directly onto one of your parchment-lined baking sheets. I find it easiest to work with them side-by-side. Carefully press the seams of each triangle together to form two solid rectangles. Then, place one rectangle on top of the other, aligning them as best as you can. Gently press the seams between the two layers together as well, creating one thicker, unified sheet of dough. You can use a rolling pin to gently smooth it out a bit, aiming for a rectangle roughly 10×14 inches.
- Cut the Bites: Now for the "bites" part! Using a pizza cutter or a sharp knife, cut the large dough rectangle into 24 even squares. I usually cut it in half lengthwise, then into 12 squares across each half. Aim for pieces that are about 2×2 inches. These are the perfect size for a single, satisfying bite!
- Arrange on Baking Sheets: Carefully transfer your dough squares to the prepared baking sheets, leaving a little space between each one. Don’t worry if they aren’t perfectly uniform; homemade charm is part of the fun!
- Add the Sauce: Spoon about ½ to 1 teaspoon of marinara or pizza sauce onto the center of each dough square. I like to spread it gently, leaving a small border around the edges so the crust can puff up nicely.
- Layer the Cheese: Next up, the glorious cheese! Sprinkle a generous pinch of shredded mozzarella over the sauce on each bite. Don’t be shy – melted cheese is essential!
- Top with Festive Goodies: Now for our Christmas colors! Evenly distribute the finely diced beef pepperoni, green bell pepper, and chopped baby spinach over the cheese on each bite. I always try to get a little bit of red and green on every single one.
- Bake to Golden Perfection: Place your baking sheets in the preheated oven. Bake for 12-15 minutes, or until the edges of the dough are golden brown and puffed up, and the cheese is beautifully melted and bubbly. Keep an eye on them, as oven temperatures can vary!
- Cool and Serve: Once they’re out of the oven, let the Christmas Pizza Bites cool on the baking sheets for a few minutes before transferring them to a serving platter. They’ll be hot, and this brief cooling period helps the cheese set a little. I often garnish with a sprinkle of fresh parsley or a dash of dried Italian seasoning for an extra touch before serving.
And there you have it! A platter full of festive, delicious Christmas Pizza Bites, ready to bring cheer to your holiday table. Enjoy!
Tips & Suggestions
I’ve made these Christmas Pizza Bites countless times, and I’ve picked up a few tricks along the way to make them even better and simplify your holiday hosting. Here are my go-to tips and creative suggestions:
- Don’t Overfill: This is a critical tip for any bite-sized appetizer! Resist the urge to pile on too many toppings. Overfilling can make the bites soggy, hard to eat, and cause toppings to slide off during baking. A thin layer of sauce, a good pinch of cheese, and a small amount of finely diced toppings are perfect. Remember, we’re aiming for elegance and manageability in a single bite.
- Cookie Cutter Fun: If you’re feeling extra festive and have a little more time, use small Christmas-themed cookie cutters (stars, trees, bells) instead of cutting squares. Just be aware that this might leave some dough scraps, which you can re-roll and cut again, or simply bake plain for a little savory breadstick! This is especially fun if you have kids helping out.
- Make Ahead Magic: You can definitely do some prep work in advance! Chop all your toppings the day before and store them in separate airtight containers in the fridge. You can even assemble the bites on the parchment-lined baking sheets, then cover them loosely with plastic wrap and refrigerate for up to 2-3 hours before baking. Just add a couple of extra minutes to the baking time if baking from chilled. I love this trick for stress-free party day!
- Serving with a Dip: While these bites are fantastic on their own, offering a dipping sauce can elevate the experience. A warm marinara sauce is always a hit, but I also love serving them with a creamy ranch dip or even a garlic aioli. It adds another layer of flavor and makes them even more interactive for guests.
- Kid-Friendly Assembly Line: This recipe is fantastic for getting the kids involved! Set up an assembly line with the dough squares, small bowls of sauce, cheese, and toppings. Kids love spooning, sprinkling, and creating their own mini pizzas. It’s a great way to bond and get some extra help during the busy holiday season.
- The Golden Crust: For an extra golden-brown and slightly crisper crust, you can very lightly brush the exposed dough edges with a little olive oil or an egg wash (one egg beaten with a tablespoon of water) before adding the toppings and baking. This isn’t strictly necessary, but it does add a lovely finish.
- Spice It Up (or Not!): If you like a little heat, a tiny sprinkle of red pepper flakes on some of the bites can be a welcome addition for adult palates. Just be sure to label them if serving alongside non-spicy ones! For a more aromatic flavor, a pinch of dried oregano or Italian seasoning mixed into your sauce can boost the taste profile.
- Platter Presentation: Arrange your finished Christmas Pizza Bites on a festive platter. I often alternate them with some fresh basil leaves or small sprigs of rosemary for a vibrant, aromatic display that really screams “holiday party!” A tiered serving tray also looks fantastic for appetizers like these.
These little nuggets of joy are designed to be easy, delicious, and adaptable. Don’t be afraid to make them your own!
Storage
While these Christmas Pizza Bites are almost guaranteed to disappear quickly, it’s good to know how to store any potential leftovers or how to prep them for future enjoyment. I’ve got you covered!
Storing Cooked Leftovers
If by some miracle you have any Christmas Pizza Bites left after your gathering (it rarely happens in my house!), they store quite well. Let them cool completely to room temperature first. Then, place them in an airtight container. I usually layer them with a piece of parchment paper between layers to prevent sticking. Store them in the refrigerator for up to 3-4 days. They’re great for a quick snack or a lunchbox treat the next day!
Reheating for Best Results
For the best texture and flavor when reheating, I always recommend using the oven or a toaster oven. A microwave will heat them through, but the dough might become a bit soft and chewy rather than flaky.
- Oven/Toaster Oven: Preheat your oven or toaster oven to 350°F (175°C). Place the leftover bites on a baking sheet and heat for about 5-8 minutes, or until the cheese is melted and bubbly again, and the crust is crisp.
- Air Fryer: An air fryer also works wonderfully for reheating! Set it to 325°F (160°C) and cook for 3-5 minutes, checking frequently to ensure they don’t burn. They’ll come out perfectly crispy.
Freezing (Baked)
You can absolutely freeze baked Christmas Pizza Bites, making them excellent candidates for future party prep or quick snacks!
- Cool Completely: Ensure the bites are entirely cooled after baking.
- Flash Freeze: Arrange the cooled bites in a single layer on a baking sheet and place them in the freezer for about 1-2 hours, or until they are solid. This step prevents them from sticking together when stored.
- Transfer to Bag/Container: Once frozen solid, transfer the bites to a freezer-safe airtight container or a heavy-duty freezer bag. They can be stored in the freezer for up to 1-2 months.
To Reheat from Frozen: When you’re ready to enjoy them, preheat your oven to 375°F (190°C). Place the frozen bites on a baking sheet and bake for 10-15 minutes, or until heated through and crisp. There’s no need to thaw them first!
Having a stash of these festive bites in the freezer is a fantastic way to be ready for unexpected guests or just to treat yourself during the busy holiday season!
Final Thoughts
I truly believe our Christmas Pizza Bites are a total must-try for your holiday season! There’s just something incredibly special about these little morsels that perfectly captures the festive spirit. Imagine vibrant colors and classic pizza flavors, all wrapped up in a fun, bite-sized package – that’s the magic of our Christmas Pizza Bites. They are the ultimate crowd-pleaser, perfect for cozy family gatherings or a lively holiday party. I promise, once you experience the joy of making and sharing these delightful Christmas Pizza Bites, they’ll become a cherished part of your annual traditions. Get ready to spread some serious holiday cheer, one delicious bite at a time!

Festive Christmas Pizza Bites: Easy Beef Party Appetizers!
- Total Time: 30 minutes
- Yield: 24 bites 1x
Description
These Christmas Pizza Bites are the perfect crowd-pleasing appetizer for your holiday gatherings. With their cheesy goodness and festive toppings, they are sure to be a hit with both kids and adults alike!
Ingredients
- 2 cans refrigerated crescent roll dough
- ½ to 1 teaspoon marinara or pizza sauce
- shredded whole milk mozzarella cheese
- finely diced beef pepperoni
- finely diced green bell pepper
- finely chopped baby spinach
- optional: dried cranberries
- optional: finely crumbled cooked lean ground beef seasoned with Italian herbs
Instructions
- Preheat your oven to 375°F (190°C) and line two large baking sheets with parchment paper.
- Unroll the crescent roll dough onto a clean, lightly floured surface. Press the seams together to form two solid rectangles, then stack them and press the seams together again to create one thicker sheet of dough.
- Cut the dough into 24 even squares, approximately 2×2 inches.
- Transfer the dough squares to the prepared baking sheets, leaving space between each one.
- Spoon about ½ to 1 teaspoon of marinara or pizza sauce onto the center of each dough square.
- Sprinkle a generous pinch of shredded mozzarella cheese over the sauce on each bite.
- Evenly distribute the finely diced beef pepperoni, green bell pepper, and chopped baby spinach over the cheese on each bite.
- Bake in the preheated oven for 12-15 minutes, or until the edges are golden brown and the cheese is melted and bubbly.
- Let the Christmas Pizza Bites cool on the baking sheets for a few minutes before transferring them to a serving platter.
- Prep Time: 15 mins
- Cook Time: 15 mins
- Category: Appetizer
- Method: Baking
- Cuisine: American
Nutrition
- Serving Size: 1 bite
- Calories: 100
- Sugar: 1 g
- Sodium: 200 mg
- Fat: 6 g
- Saturated Fat: 2 g
- Unsaturated Fat: 3 g
- Trans Fat: 0 g
- Carbohydrates: 8 g
- Fiber: 1 g
- Protein: 4 g
- Cholesterol: 10 mg
Keywords: Don't overfill the bites to prevent sogginess. You can use cookie cutters for fun shapes, and consider serving with a dipping sauce like marinara or ranch for added flavor.