Coffee Butter Cookies
Coffee Butter Cookies aren’t just any ordinary treat; they’re a little moment of pure bliss. I’m so excited to share this recipe with you because it perfectly marries two of my favorite things: rich, comforting coffee and velvety, decadent butter. It’s that irresistible combination that makes these cookies truly stand out from the crowd.
Imagine the aroma filling your kitchen as these bake – a warm, inviting scent that instantly makes you feel cozy. And the taste? Oh, you’ll absolutely adore the way the subtle coffee notes dance with the creamy butter, creating a flavor profile that’s sophisticated yet utterly comforting. They’re perfect for dunking in your morning non-alcoholic coffee, accompanying an afternoon tea, or simply enjoying as a delightful pick-me-up.
So, what exactly are we making? Think delicate, crisp-edged cookies with a tender, melt-in-your-mouth center, each bite delivering a beautiful balance of sweet, buttery goodness and a gentle, aromatic coffee kick. They’re surprisingly simple to make, yet they taste incredibly gourmet, making them ideal for impressing guests or just treating yourself to something truly special.

Ingredient Notes
Making truly exceptional Coffee Butter Cookies starts with understanding the role each ingredient plays. I’ve found that using quality ingredients makes all the difference in achieving that perfect buttery, coffee-infused delight.
- Unsalted Butter: This is the star of our “butter cookies,” so don’t skimp! I always opt for unsalted butter so I can control the salt content in the recipe. It needs to be softened to room temperature – not melted, not too cold. This allows it to cream beautifully with the sugar, creating a light and airy base for our cookies. If you only have salted butter, you can use it, but reduce the added salt by about ¼ teaspoon. For a dairy-free alternative, a good quality plant-based butter substitute can work, but be aware that the flavor and texture might be slightly different.
- Granulated Sugar: This provides sweetness and contributes to the crisp texture. I generally stick to granulated sugar for classic butter cookies. Powdered sugar can make them meltier, while brown sugar will add a chewier texture and a molasses note that might compete with the coffee. If you need to reduce sugar, you can try, but it will affect the texture and spread of the cookies.
- All-Purpose Flour: My go-to for most cookie recipes. It provides structure without making the cookies tough. Make sure to measure it correctly, either by weight (my preferred method for accuracy) or by spooning it into your measuring cup and leveling it off. Over-packed flour can lead to dense, dry cookies. For a gluten-free option, a 1:1 gluten-free baking blend can often be substituted, but results can vary, and you might need to adjust liquid slightly.
- Instant Espresso Powder or Instant Coffee Granules: This is where our coffee magic happens! I highly recommend using instant espresso powder if you can find it, as it delivers a more intense, rich coffee flavor without adding excess liquid. Instant coffee granules also work well, just make sure they dissolve completely. Don’t use brewed coffee, as it will add too much moisture and throw off the dough consistency. You can adjust the amount based on how strong you like your coffee flavor – I usually start with a tablespoon and go from there.
- Egg Yolk: While some butter cookie recipes use a whole egg, I prefer using just an egg yolk. It adds richness, tenderness, and helps bind the dough without adding too much moisture, which can make the cookies spread too much. This contributes to that melt-in-your-mouth texture we’re aiming for. If you don’t have an egg yolk, you can try replacing it with 1-2 teaspoons of milk or cream, but the texture will be slightly less rich.
- Vanilla Extract: A classic flavor enhancer that complements the coffee beautifully. A good quality vanilla extract really brings out the deeper notes in the cookie. For a different twist, you could try a touch of almond extract, but I find vanilla to be the perfect companion to coffee here.
- Salt: Just a pinch of fine sea salt is essential to balance the sweetness and enhance all the other flavors. It brightens everything up and prevents the cookies from tasting one-dimensional.
Step-by-Step Instructions
Crafting these Coffee Butter Cookies is a delightful process, and I’ll walk you through each step to ensure you get perfect results every time. Remember, precision and patience are key!
- Prepare Your Coffee: In a small bowl or ramekin, dissolve the instant espresso powder or instant coffee granules in about 1 teaspoon of very hot water. Stir until completely dissolved and allow it to cool slightly. This pre-dissolving step ensures even coffee distribution throughout the dough and prevents gritty bits.
- Cream Butter and Sugar: In a large mixing bowl, using an electric mixer (stand mixer with paddle attachment or a hand mixer), cream together the softened unsalted butter and granulated sugar on medium speed. Beat for 3-5 minutes until the mixture is light, fluffy, and pale in color. This step incorporates air, which is crucial for a tender cookie. Scrape down the sides of the bowl frequently.
- Add Egg Yolk, Coffee, and Vanilla: Beat in the egg yolk, the cooled dissolved coffee mixture, and the vanilla extract. Mix on medium speed until just combined. Be careful not to overmix at this stage; we just want everything incorporated.
- Combine Dry Ingredients: In a separate medium bowl, whisk together the all-purpose flour and salt. Whisking ensures they are evenly distributed, so you don’t end up with pockets of salt or plain flour.
- Gradually Add Dry to Wet: With the mixer on low speed, gradually add the dry ingredients to the wet ingredients, a third at a time. Mix only until just combined and no streaks of flour remain. Overmixing the dough once the flour is added can develop the gluten too much, leading to tough cookies.
- Chill the Dough: This step is non-negotiable for butter cookies! Gather the dough into a ball, flatten it slightly into a disk, wrap it tightly in plastic wrap, and refrigerate for at least 1-2 hours, or preferably overnight. Chilling helps the butter firm up, preventing the cookies from spreading too much during baking, and also allows the flavors (especially the coffee!) to deepen.
- Preheat Oven and Prepare Baking Sheets: Once your dough is sufficiently chilled, preheat your oven to 350°F (175°C). Line two baking sheets with parchment paper or silicone baking mats.
- Shape the Cookies: There are a few ways to shape these.
- For Sliced Cookies: On a lightly floured surface, roll the chilled dough into a log about 1.5-2 inches in diameter. Wrap it in plastic wrap and chill again briefly if it gets too soft. Then, slice the log into ¼-inch thick rounds.
- For Piped Cookies: If your dough is pliable enough after chilling, you can transfer it to a piping bag fitted with a large star tip. Pipe various shapes (rosettes, S-shapes, swirls) onto the prepared baking sheets. This method often requires the dough to be slightly less chilled.
- For Rolled Cookies: Roll the dough out to about ¼-inch thickness on a lightly floured surface and use cookie cutters to cut out shapes.
Place the shaped cookies about 1 inch apart on the prepared baking sheets.
- Bake: Bake for 10-15 minutes, or until the edges are lightly golden and the centers are just set. Baking time will vary depending on the size and thickness of your cookies and your oven. For even baking, I often rotate the baking sheets halfway through the baking time.
- Cool: Let the cookies cool on the baking sheets for 5 minutes before transferring them to a wire rack to cool completely. They will firm up as they cool.
Tips & Suggestions
To really master these Coffee Butter Cookies and make them truly your own, I’ve gathered some of my favorite tips and suggestions. These insights can elevate your baking experience and the final product.
- Don’t Rush the Chill: I cannot stress this enough – chilling the dough is paramount for butter cookies. The cold butter in the dough ensures the cookies hold their shape beautifully and don’t spread into flat puddles. It also gives the flavors, especially the coffee, time to meld and deepen, resulting in a more complex and satisfying taste. If your kitchen is warm, or if you’re piping, you might need to chill the dough intermittently.
- Adjust Coffee Intensity: The beauty of this recipe is its adaptability. If you’re a serious coffee lover, feel free to add an extra half-teaspoon to a full teaspoon of instant espresso powder for a bolder coffee punch. Conversely, if you prefer a subtle hint of coffee, you can slightly reduce the amount. Always taste a tiny bit of the dissolved coffee mixture before adding to the dough to gauge its strength.
- Use Quality Butter: Since butter is such a prominent flavor in these cookies, using a high-quality unsalted butter will genuinely make a difference. European-style butters with higher fat content can give a richer flavor and a slightly more tender crumb, but any good quality butter will work well.
- Avoid Overmixing: Once you add the flour, mix just until combined. Overmixing develops the gluten in the flour, which can lead to tough, chewy cookies instead of the delicate, tender butter cookies we desire.
- Even Baking is Key: For uniform browning and texture, I always rotate my baking sheets halfway through the baking time. This helps compensate for any hot spots in your oven.
- Creative Shaping: Don’t limit yourself to simple rounds! This dough is versatile. Try using decorative cookie cutters for festive shapes, or if you’re feeling adventurous, pipe the dough using a large star tip to create beautiful swirls and rosettes. A cookie press is also fantastic for making intricate designs with butter cookie dough.
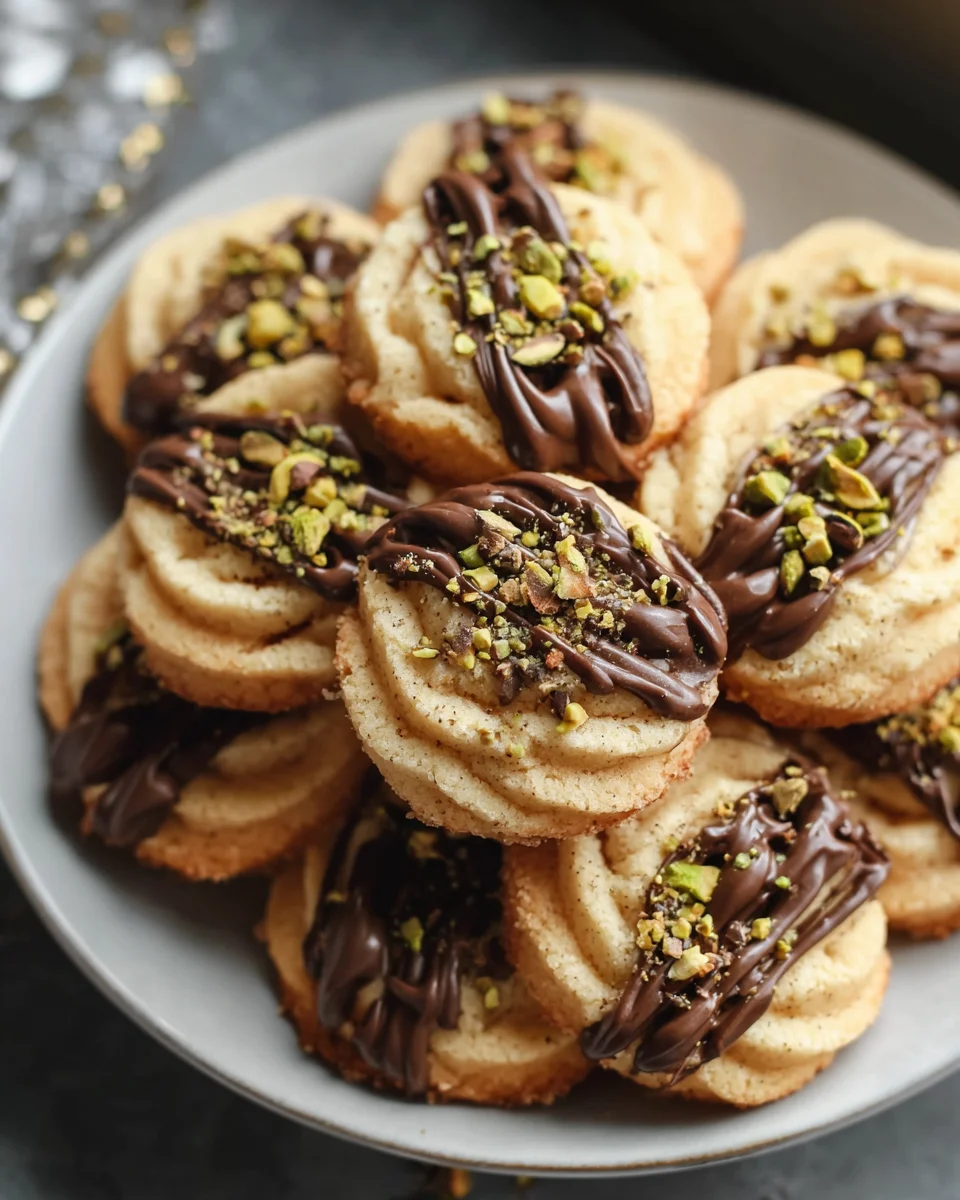
- Enhance with Chocolate: Coffee and chocolate are a match made in heaven. Once the cookies are completely cooled, you can drizzle them with melted dark or white chocolate. A light sprinkling of finely chopped roasted coffee beans on top of the chocolate drizzle would also be a lovely touch for added texture and flavor.
- Coffee Glaze Option: For an extra layer of coffee flavor, consider making a simple coffee glaze. Whisk together 1 cup of powdered sugar with 1-2 tablespoons of strongly brewed (and cooled) coffee or dissolved instant espresso powder, until smooth and pourable. Drizzle over the cooled cookies.
- Pairing Suggestion: These Coffee Butter Cookies are absolutely divine served alongside a hot cup of coffee, espresso, or even a glass of cold milk. They’re also perfect for an afternoon tea spread.
Storage
Properly storing your delicious Coffee Butter Cookies ensures they stay fresh and retain their wonderful flavor and texture for as long as possible. I want you to enjoy every last crumb!
- At Room Temperature: Once completely cooled, store the Coffee Butter Cookies in an airtight container at room temperature. A cookie tin or a plastic container with a tight-fitting lid works perfectly. They will stay fresh and crisp for up to 5-7 days. To maintain their crispness, I sometimes add a slice of plain bread to the container – the cookies absorb moisture from the bread rather than the air. Just remember to replace the bread every couple of days.
- In the Refrigerator: While not strictly necessary for short-term storage, if your kitchen is particularly warm or humid, you can store them in an airtight container in the refrigerator for up to 1-2 weeks. However, they might lose a little bit of their crispness and become slightly chewier. I usually let them come to room temperature for about 15-20 minutes before serving if they’ve been refrigerated.
- Freezing Baked Cookies: These cookies freeze beautifully! Once completely cooled, arrange them in a single layer on a baking sheet and freeze for about an hour until solid. Then, transfer the frozen cookies to a freezer-safe airtight container or a heavy-duty freezer bag. Layer them with parchment paper between layers to prevent sticking. They will keep well in the freezer for up to 2-3 months. When you’re ready to enjoy them, simply take out as many as you need and let them thaw at room temperature for about 15-30 minutes.
- Freezing Dough: If you’ve made a larger batch of dough or want to prepare ahead, you can freeze the unbaked dough. Form the dough into a log (if planning to slice them) or into small individual balls. Wrap the log or balls tightly in plastic wrap, then place them in a freezer-safe bag or container. The dough can be frozen for up to 3 months. When ready to bake, you can either thaw the dough in the refrigerator overnight and then slice/shape and bake as usual, or for sliced cookies, you can often slice the frozen log (it might be a bit harder) and bake directly, adding a couple of extra minutes to the baking time.
- Avoid Softening: If you’ve glazed or drizzled your cookies with chocolate, make sure the glaze or chocolate is completely set before stacking them or placing them in a container. This prevents them from sticking together or smudging.
Final Thoughts
There’s something truly magical about the aroma of freshly baked cookies filling your home, and I hope you’ve enjoyed every moment of bringing these delightful treats to life. When it comes to creating a truly memorable and distinctive flavor profile, these Coffee Butter Cookies absolutely shine. They are more than just a cookie; they are an invitation to a moment of pure bliss.
I genuinely believe that the deep, aromatic essence of coffee, perfectly infused into a lusciously buttery base, creates an unparalleled taste experience. Each bite of these Coffee Butter Cookies delivers a sophisticated harmony that is both comforting and exciting. Whether you’re a devoted coffee lover or simply someone who appreciates a finely crafted treat, you’ll find yourself reaching for another one of these irresistible cookies.
So, please, don’t miss out on the joy of baking and tasting these extraordinary Coffee Butter Cookies. I promise you, their exquisite balance and melt-in-your-mouth texture will make them an instant favorite in your recipe collection. Happy baking, my friends, and prepare to fall in love with every crumb!