Red Velvet Cinnamon Rolls
Red Velvet Cinnamon Rolls! Oh my goodness, get ready to fall head over heels for the most delightful fusion dessert you never knew you needed! I’m absolutely thrilled to share this recipe with you because it takes two of my all-time favorite treats – the decadent, show-stopping Red Velvet cake and the warm, comforting, irresistible cinnamon roll – and merges them into something truly magical.
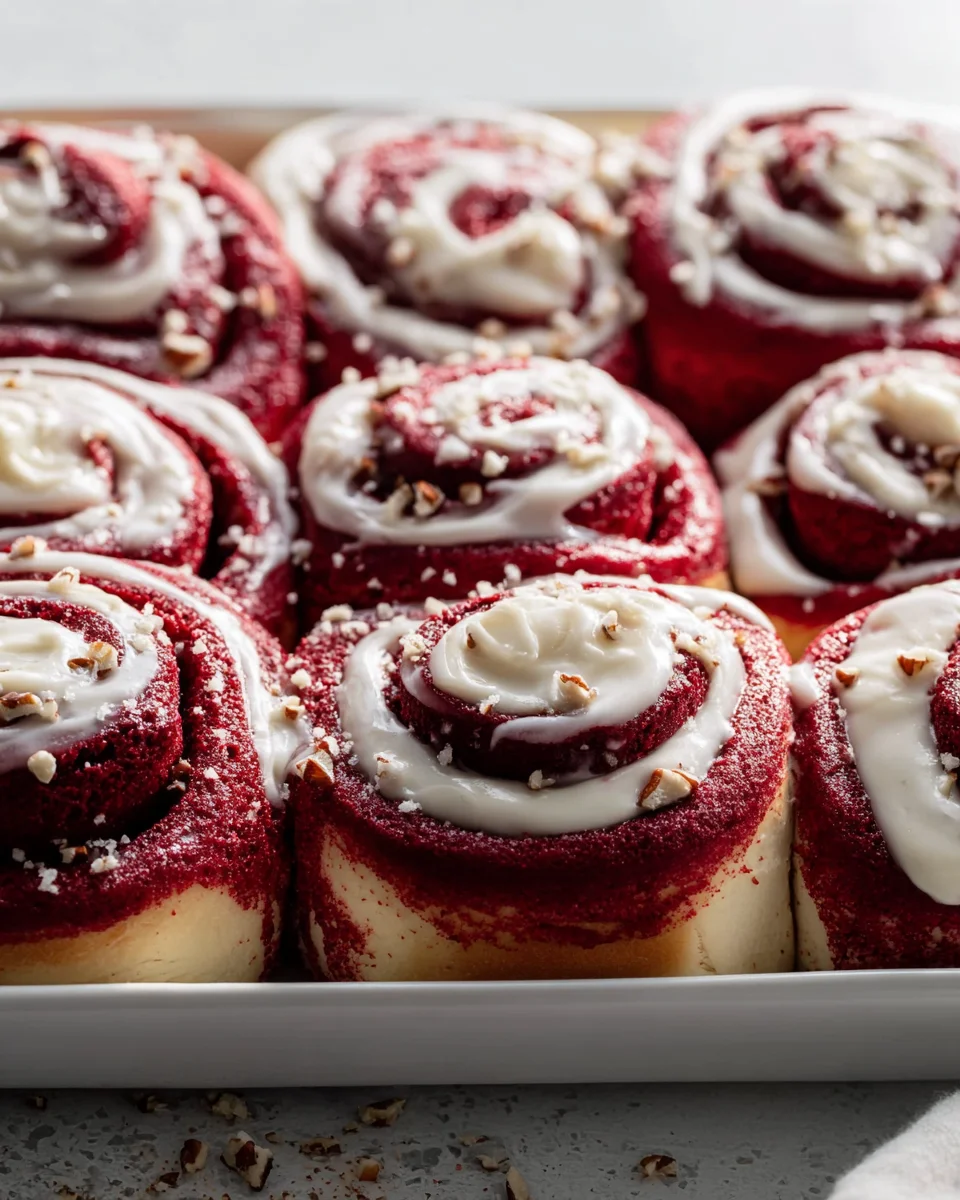
So, what makes these particular rolls so incredibly special? Imagine a fluffy, tender, and oh-so-vibrant red velvet dough, with that characteristic subtle cocoa flavor, lovingly swirled with a rich, buttery cinnamon-sugar filling. As they bake, your kitchen will fill with the most heavenly aroma, and once they emerge golden and puffy from the oven, they get generously crowned with a luxurious, tangy cream cheese frosting that perfectly balances the sweetness.
You are going to absolutely adore making and eating these! They’re an absolute showstopper for any brunch, holiday breakfast, or just a truly indulgent weekend treat. They offer the comforting familiarity of a classic cinnamon roll but with an exciting, elegant twist that will impress everyone who tries them. Prepare yourself for soft, pillowy rolls, bursting with flavor, and topped with that irresistible creamy goodness. Trust me, these are more than just a pastry; they’re an experience waiting to happen!

Ingredient Notes
For our show-stopping Red Velvet Cinnamon Rolls, the key is balancing that beautiful crimson hue with the subtle tang and hint of cocoa that defines red velvet, all wrapped up in a wonderfully soft, sweet cinnamon roll. Getting the ingredients right is the first step to success!
Dough Ingredients
- All-Purpose Flour: I always reach for all-purpose flour for these rolls. It strikes the perfect balance between tenderness and chewiness, giving that classic cinnamon roll texture. While you could experiment with bread flour for a chewier roll or cake flour for an incredibly delicate crumb, I find all-purpose is the most reliable. Remember, measuring your flour correctly—spooning it into the measuring cup and leveling it—is crucial for the right dough consistency!
- Active Dry Yeast: My go-to for these rolls. It needs to be proofed in warm milk first, which is a great way to ensure it’s alive and ready to make your rolls wonderfully fluffy. If you have instant yeast on hand, you can skip the proofing step and just mix it directly with your dry ingredients, but I still love seeing those little bubbles form to confirm my yeast is happy!
- Warm Milk: This is essential for activating the yeast and developing a soft, pliable dough. I recommend whole milk for richness, but any milk (including non-dairy alternatives like almond or oat milk) will work beautifully. Just ensure it’s between 105-115°F (40-46°C).
- Granulated Sugar: This feeds the yeast, helping the dough rise, and adds sweetness to the rolls themselves.
- Unsalted Butter: Adds incredible flavor and tenderness to the dough. Make sure it’s melted and then slightly cooled before adding to your wet ingredients. For a dairy-free option, good quality vegan butter substitutes work wonderfully.
- Egg: A large egg adds richness, structure, and helps keep the rolls tender and moist.
- Vanilla Extract: A key flavor in red velvet! Use good quality vanilla. For those avoiding alcohol, there are many excellent non-alcohol vanilla extract options available that deliver fantastic flavor.
- Red Food Coloring: This is where the magic happens for the ‘red’ in red velvet! I highly recommend using a high-quality gel food coloring, like Wilton or AmeriColor. You’ll need a fair amount to get that deep, vibrant crimson without making your dough too wet. Liquid food coloring can work in a pinch, but you might need more, and the color might not be as intense. While natural colorings like beet powder or juice can be used, be aware that the final color might be more muted or brownish-red, and they can sometimes impart a subtle earthy flavor.
- Unsweetened Cocoa Powder: This might seem counterintuitive for a red velvet recipe, but it’s absolutely vital! Just a couple of tablespoons of unsweetened cocoa powder (natural or Dutch-processed) don’t make the rolls taste like chocolate rolls. Instead, they provide that subtle, signature ‘tang’ and depth that defines the ‘velvet’ in red velvet, creating a complex flavor profile that complements the vanilla and helps enhance the red color.
- Salt: A pinch of salt balances the sweetness and enhances all the other flavors in the dough.
Filling Ingredients
- Brown Sugar: Its molasses notes pair wonderfully with the cinnamon, creating that classic sweet, slightly caramel-like filling. Light or dark brown sugar both work.
- Ground Cinnamon: Of course, for cinnamon rolls, a generous amount of fresh, fragrant ground cinnamon is non-negotiable!
- Unsalted Butter (softened): Spreading softened butter over the dough before adding the sugar and cinnamon mixture helps hold the filling in place and adds richness.
Cream Cheese Glaze Ingredients
- Cream Cheese (softened): For that iconic tangy cream cheese glaze, make sure your cream cheese is full-fat and softened to room temperature. This will give you the smoothest, most luxurious glaze. If you’re looking for a dairy-free option, many brands now offer excellent vegan cream cheese alternatives that perform very well.
- Unsalted Butter (softened): A little softened butter makes the glaze extra rich and creamy.
- Powdered Sugar: Also known as confectioners’ sugar, this is essential for a smooth, lump-free glaze.
- Vanilla Extract: Another dash of vanilla elevates the flavor of the glaze. Again, non-alcohol vanilla extract works perfectly here.
- Milk or Cream: Just a tablespoon or two to thin the glaze to your desired consistency.
Step-by-Step Instructions
Let’s get baking! Here’s how I make my irresistible Red Velvet Cinnamon Rolls, from start to finish. Take your time, enjoy the process, and soon you’ll have a batch of these beauties ready to devour!
-
Activate the Yeast
In a large bowl (or the bowl of your stand mixer), combine the warm milk, 1 teaspoon of granulated sugar, and the active dry yeast. Give it a gentle stir and let it sit for 5-10 minutes. You should see it become foamy and bubbly—that means your yeast is active and ready to work its magic!
-
Prepare the Dough
While the yeast is activating, in a separate medium bowl, whisk together the flour, cocoa powder, remaining granulated sugar, and salt. Once your yeast is foamy, add the melted and cooled butter, egg, vanilla extract, and red food coloring to the yeast mixture. Stir until well combined, ensuring the red color is evenly distributed.
Gradually add the dry ingredients to the wet ingredients, mixing on low speed with a stand mixer (using the dough hook attachment) or with a wooden spoon until a shaggy dough forms. Increase speed to medium-low and knead for 5-8 minutes, or knead by hand on a lightly floured surface for 8-10 minutes, until the dough is smooth, elastic, and pulls away from the sides of the bowl. It should be slightly sticky but manageable.
-
First Rise
Lightly grease a large bowl with cooking spray or a little oil. Transfer the dough to the bowl, turning it once to coat the top. Cover the bowl with plastic wrap or a clean kitchen towel and place it in a warm, draft-free spot. Let the dough rise for 1 to 1.5 hours, or until it has doubled in size. This step is crucial for light and fluffy rolls!
-
Prepare the Filling and Shape the Rolls
Once the dough has doubled, gently punch it down to release the air. Lightly flour your work surface and roll the dough out into a large rectangle, approximately 18×12 inches (45×30 cm). The dough should be about 1/4 inch thick.
Spread the softened butter evenly over the entire surface of the dough, leaving a small border (about 1/2 inch) on one of the long edges. In a small bowl, mix together the brown sugar and ground cinnamon. Sprinkle this mixture evenly over the buttered dough.
Starting from the long edge opposite the butter-free border, carefully and tightly roll the dough into a log. Once rolled, pinch the seam closed to seal it.
-
Slice the Rolls
Using a very sharp, un-serrated knife or, my preferred method, unflavored dental floss, slice the log into 12 equal pieces, each about 1.5 inches thick. To use floss, slide a piece under the log, cross the ends over the top, and pull to cut cleanly. This helps maintain a perfect circular shape.
-
Second Rise
Lightly grease a 9×13 inch (23×33 cm) baking dish. Arrange the sliced rolls snugly in the prepared dish. Cover the dish with plastic wrap or a clean kitchen towel and let them rise again in a warm place for another 30-45 minutes, or until they look visibly puffy and have nearly doubled in size.
-
Bake the Rolls
While the rolls are on their second rise, preheat your oven to 375°F (190°C). Once the rolls have risen, remove the cover and bake for 20-25 minutes, or until they are golden brown on top and cooked through. They should feel lightly firm to the touch.
-
Make the Cream Cheese Glaze
While the rolls are baking or cooling slightly, prepare the glaze. In a medium bowl, beat together the softened cream cheese and softened butter until smooth and creamy (I use an electric mixer). Gradually add the powdered sugar, beating until fully incorporated. Stir in the vanilla extract. Add milk or cream, 1 tablespoon at a time, until the glaze reaches your desired consistency – it should be thick but pourable.
-
Glaze and Serve
Once the rolls are out of the oven, let them cool in the baking dish for about 5-10 minutes. Then, generously spread the cream cheese glaze over the warm rolls. The warmth of the rolls will slightly melt the glaze, allowing it to seep into all those delicious crevices. Serve immediately and enjoy!
Tips & Suggestions
Crafting the perfect Red Velvet Cinnamon Rolls is an art, and a few little tricks can make all the difference. Here are my top tips to ensure your rolls are a showstopper every time!
- Achieving that Vibrant Red: Don’t be shy with the red food coloring! I find that a good quality gel food coloring (rather than liquid) gives the most vibrant, true red velvet hue. Add it gradually until you reach your desired shade. Remember, the cocoa powder will slightly deepen the color, so aim for a bright red in the dough itself.
- The “Velvet” Secret: That touch of unsweetened cocoa powder is non-negotiable for the authentic red velvet flavor. It provides a subtle tang and depth that complements the vanilla and makes these rolls unique, distinguishing them from a simple red-dyed cinnamon roll.
- Perfect Dough Consistency: The dough should be soft, pliable, and slightly sticky, but not so sticky that it’s unmanageable. Resist the urge to add too much extra flour during kneading or rolling, as this can make your rolls dry and tough. A lightly floured surface is all you need.
- Warmth for Rising: Yeast loves warmth! If your kitchen is cool, you can create a warm environment for your dough to rise. My go-to method is placing the covered bowl in a slightly warm (but turned off) oven with just the oven light on, or in a microwave with a cup of hot water beside it.
- Clean Cuts with Floss: For perfectly shaped, evenly sized cinnamon rolls, unflavored dental floss is your best friend. It slices through the dough without squishing it, giving you beautiful, round rolls every time. A very sharp, non-serrated knife works too, but floss is foolproof!
- Don’t Overbake: Overbaking is the enemy of tender cinnamon rolls. Start checking for doneness at the lower end of the baking time. The rolls should be golden brown on top and feel light and puffy. A quick test with an instant-read thermometer should show an internal temperature of around 190-200°F (88-93°C) for perfect doneness.
- Adjusting Glaze Consistency: Your cream cheese glaze should be thick enough to cling to the rolls but thin enough to spread easily. If it’s too thick, add a tiny splash more milk (or cream) until it’s just right. If it’s too thin, a tablespoon or two more powdered sugar will thicken it up.
- Make-Ahead Option (Overnight Rise): Want fresh rolls in the morning without the early wake-up call? After slicing and arranging the rolls in the baking dish for their second rise, cover them tightly with plastic wrap and refrigerate overnight (up to 12 hours). The next morning, pull them out, let them sit at room temperature for 30-60 minutes while your oven preheats, then bake as directed.
- Serve Warm: While they are delicious at any temperature, Red Velvet Cinnamon Rolls are absolutely heavenly when served warm, fresh from the oven, with the glaze slightly melted and gooey.
Storage
You’ve put all that effort into making these gorgeous Red Velvet Cinnamon Rolls, so let’s make sure you know how to keep them fresh and delicious for as long as possible!
- At Room Temperature (Glazed): If your rolls are glazed, they’re best enjoyed within 1-2 days. Store them in an airtight container at room temperature. The glaze will start to set, but the rolls will remain soft and flavorful.
- In the Refrigerator (Glazed): For longer storage, you can keep glazed Red Velvet Cinnamon Rolls in an airtight container in the refrigerator for up to 5 days. Be aware that the rolls might dry out a little, and the texture of the glaze will become firmer when cold.
- In the Refrigerator (Unglazed): If you plan to enjoy them over several days, consider storing the rolls unglazed. Keep them in an airtight container in the fridge for up to 5 days. When you’re ready for one, simply warm it up and then apply fresh glaze.
- Freezing Baked Cinnamon Rolls (Unglazed): This is a fantastic option for meal prep! Once your rolls are baked and completely cooled, but before glazing, wrap individual rolls tightly in plastic wrap, then place them in a freezer-safe bag or container. They will keep well in the freezer for up to 1 month. When you’re ready for a treat, thaw a roll (or a few) at room temperature, then warm in the microwave for 30-60 seconds or in a preheated oven (300°F/150°C) for 10-15 minutes, then glaze and enjoy!
- Freezing Unbaked Cinnamon Rolls: You can also freeze the rolls before baking. After you’ve sliced them and arranged them in your baking dish, cover the dish tightly with plastic wrap and then with aluminum foil. Freeze for up to 2-3 weeks. When you’re ready to bake, transfer the frozen rolls to the refrigerator overnight to thaw. In the morning, let them sit at room temperature for 30-60 minutes to proof, then bake as directed. Alternatively, for a quick bake from frozen (though the rise might not be as robust), you can sometimes place them directly in a cold oven, then set it to 350°F (175°C) and bake for a longer time, around 30-40 minutes, but letting them thaw and proof is always best.
- Reheating: To reheat glazed rolls, a quick zap in the microwave for 15-30 seconds works wonders to soften them up and make the glaze gooey again. For unglazed rolls, you can also pop them in a preheated oven (300°F/150°C) for about 5-10 minutes.
Final Thoughts
There’s something truly special about bringing together two universally loved treats, and these Red Velvet Cinnamon Rolls are the epitome of that culinary magic. I honestly believe that once you experience the joy of baking and tasting these, they’ll earn a permanent spot in your recipe collection.
Imagine the soft, fluffy dough, infused with that signature red velvet cocoa flavor, swirled with a generous filling of cinnamon sugar, and then crowned with a luscious, tangy cream cheese frosting. Every single bite of these Red Velvet Cinnamon Rolls is a perfect harmony of comfort and decadence. They are an absolute showstopper for any breakfast, brunch, or even as a delightful dessert. I promise you, the smiles and compliments you’ll receive when you serve these unique and utterly delicious rolls will make every moment spent in the kitchen completely worthwhile. Go ahead, treat yourself and your loved ones to this extraordinary experience!