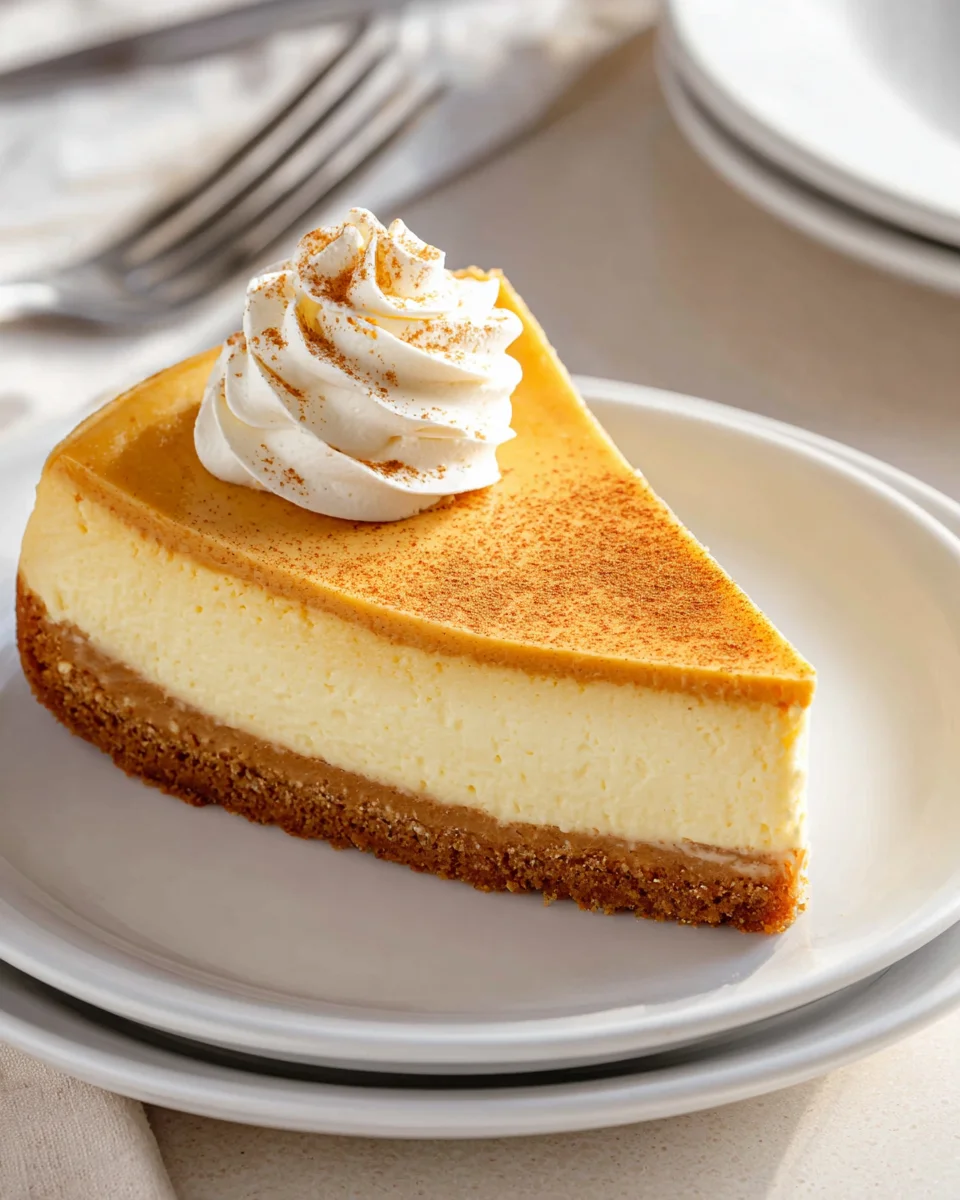
Pumpkin Pie Cheesecake, a dessert that masterfully marries two of the most beloved sweet treats, is truly a showstopper for any occasion. Imagine sinking your fork into a rich, creamy cheesecake base, infused with the comforting, warm spices of a classic pumpkin pie, all resting atop a perfectly crisp graham cracker crust. This isn’t just a dessert; it’s an experience, a delightful fusion that brings together the very best of both worlds. While traditional pumpkin pie holds a deep cultural significance, particularly during autumn celebrations and holidays like Thanksgiving in North America, and cheesecake boasts a storied history dating back to ancient Greece, the ingenious combination of the two is a relatively modern marvel that has quickly captured hearts. People adore this dish not only for its incredible taste—the perfect balance of tangy cream cheese, sweet pumpkin puree, and aromatic spices like cinnamon, nutmeg, and ginger—but also for its luxurious, velvety texture that melts in your mouth. It offers the comforting nostalgia of pumpkin pie with the sophisticated elegance and satisfying richness of a cheesecake. I’m incredibly excited to guide you through creating this irresistible Pumpkin Pie Cheesecake that promises to be the star of your dessert table and earn rave reviews from everyone who tastes it.

Ingredients:
- For the Graham Cracker Crust:
- 1 ½ cups (about 15-18 full sheets) graham cracker crumbs (finely crushed)
- ¼ cup granulated sugar
- 6 tablespoons unsalted butter, melted
- For the Cheesecake Layer:
- 24 ounces (three 8-ounce packages) cream cheese, softened to room temperature
- 1 cup granulated sugar
- 2 tablespoons all-purpose flour
- 1 teaspoon pure vanilla extract
- ½ cup sour cream, at room temperature
- 3 large eggs, at room temperature
- For the Pumpkin Pie Layer:
- 15 ounces (one standard can) pumpkin puree (not pumpkin pie filling)
- ½ cup packed light brown sugar
- ¼ cup granulated sugar
- 1 teaspoon ground cinnamon
- ½ teaspoon ground ginger
- ¼ teaspoon ground nutmeg
- ⅛ teaspoon ground cloves (or a pinch of allspice)
- ½ teaspoon pure vanilla extract
- 2 large eggs, at room temperature
- ½ cup evaporated milk (or heavy cream)
- For the Optional Whipped Cream Topping:
- 1 ½ cups cold heavy cream
- ¼ cup powdered sugar (confectioners’ sugar)
- 1 teaspoon pure vanilla extract
Let’s Get Baking This Delicious Pumpkin Pie Cheesecake!
Get ready to create a truly spectacular dessert that combines the best of two beloved classics: the rich, creamy texture of a cheesecake and the warm, comforting spices of a pumpkin pie. This Pumpkin Pie Cheesecake is an absolute showstopper, perfect for holiday gatherings or any time you’re craving something extra special. Trust me, the effort is well worth it for this incredible treat!
-
Prepping Your Pan and Oven for Success:
Before we dive into mixing, let’s get our workspace ready. First, preheat your oven to 350°F (175°C). It’s important to give your oven enough time to reach and maintain the correct temperature for even baking. Next, grab a 9-inch springform pan. This type of pan is essential for easy removal of cheesecakes. To prepare it, generously butter or spray the bottom and sides with non-stick cooking spray. For extra security against leaks, especially if you plan to use a water bath, wrap the outside bottom and sides of the springform pan tightly with several layers of heavy-duty aluminum foil. Make sure the foil extends all the way up the sides to form a protective barrier. This prevents any water from seeping into your crust and making it soggy, which is the last thing we want!
-
Crafting the Perfect Graham Cracker Crust:
Now, let’s make that wonderfully crunchy foundation. In a medium-sized bowl, combine your finely crushed graham cracker crumbs with the granulated sugar. You want the crumbs to be as fine as possible, so if you’re crushing them yourself (rather than buying pre-crushed), a food processor works wonders for this. Pour in the melted butter and stir everything together until the crumbs are evenly moistened. It should have the consistency of wet sand. Now, firmly press this mixture into the bottom of your prepared springform pan. Use the back of a spoon or the bottom of a flat-bottomed measuring cup to compact it tightly and evenly. Make sure it forms a consistent layer across the entire bottom of the pan. A well-compacted crust is key to preventing crumbling later!
-
Pre-Baking the Crust:
Once your crust is firmly in place, pop the pan into your preheated 350°F (175°C) oven and bake it for 8-10 minutes. This brief pre-bake helps to set the crust, making it sturdy and preventing it from becoming soggy once the wet filling is added. When it’s done, remove it from the oven and set it aside on a wire rack to cool slightly while you prepare the cheesecake filling. Keep the oven temperature at 350°F (175°C) for now, as we’ll be using it again shortly.
-
Whipping Up the Dreamy Cheesecake Layer:
This is where the magic truly begins! In the large bowl of a stand mixer fitted with the paddle attachment (or using a hand mixer), beat your softened cream cheese on medium speed until it is incredibly smooth and creamy. This can take about 2-3 minutes. It’s crucial that your cream cheese is at room temperature to achieve this lump-free texture. Cold cream cheese will result in a lumpy batter, no matter how long you beat it. Scrape down the sides of the bowl frequently to ensure everything is evenly incorporated.
-
Adding Sweetness and Structure to the Cheesecake:
With the cream cheese nice and smooth, gradually add the granulated sugar, continuing to beat on medium-low speed until it’s just combined. Don’t overmix at this stage! Next, sprinkle in the all-purpose flour. The flour acts as a stabilizer, helping to prevent cracks in your cheesecake, which is a common concern. Beat until the flour is just incorporated, scraping down the bowl again. Then, mix in the pure vanilla extract and the room-temperature sour cream. Sour cream adds a lovely tang and helps create that signature creamy, velvety texture. Beat on low speed until everything is smoothly blended.
-
Incorporating the Eggs (The Gentle Touch):
Now for the eggs. Add them one at a time, beating on very low speed just until each egg is incorporated before adding the next. The key here is gentle mixing. Overmixing the batter once the eggs are added can incorporate too much air, which can cause the cheesecake to puff up too much during baking and then crack as it cools. Scrape down the bowl one last time to ensure uniformity. Your cheesecake batter should be silky smooth and free of lumps.
-
First Bake of the Cheesecake Layer (Water Bath Method):
Carefully pour the cheesecake batter over your cooled graham cracker crust in the prepared springform pan. Gently tap the pan on your counter a few times to release any large air bubbles. Now, let’s talk about the water bath. This is a game-changer for cheesecakes, providing a moist, even baking environment that virtually guarantees a crack-free top and a super creamy texture. Place your foil-wrapped springform pan inside a larger roasting pan. Carefully pour hot water into the roasting pan, ensuring the water comes about halfway up the sides of the springform pan. Be careful not to splash water into the cheesecake itself! Carefully transfer the entire roasting pan with the water bath and cheesecake to your preheated 350°F (175°C) oven.
-
Partially Baking the Cheesecake Layer and Oven Adjustment:
Bake the cheesecake in the water bath for 20-25 minutes. After this initial bake, the edges should be set, but the center will still be quite jiggly. This is exactly what we want! Very carefully remove the roasting pan from the oven. Keep the cheesecake in the water bath for a moment. Now, gently remove the springform pan from the water bath, being cautious not to burn yourself. Place the springform pan directly onto a wire rack. At this point, you’ll want to reduce your oven temperature to 325°F (160°C). This lower temperature is ideal for the gentler baking required for the pumpkin layer of your Pumpkin Pie Cheesecake.
-
Creating the Aromatic Pumpkin Pie Layer:
While your cheesecake layer is cooling slightly, it’s time to prepare the fragrant pumpkin layer. In a separate medium-sized bowl, combine the pumpkin puree (make sure it’s pure pumpkin, not pie filling!), light brown sugar, granulated sugar, ground cinnamon, ground ginger, ground nutmeg, and ground cloves (or allspice). Stir until all the spices and sugars are thoroughly mixed into the pumpkin, forming a uniform, spiced paste. This combination of spices is what gives your Pumpkin Pie Cheesecake that iconic autumn flavor.
-
Adding Eggs and Liquid to the Pumpkin Mixture:
Once your pumpkin mixture is well-combined, whisk in the pure vanilla extract. Then, crack in the two large eggs, one at a time, whisking well after each addition until fully incorporated. Finally, pour in the evaporated milk (or heavy cream) and whisk until the mixture is completely smooth and cohesive. You want a smooth, pourable consistency for an even layer.
-
Layering the Pumpkin onto the Cheesecake:
Now for the careful assembly! Gently pour the prepared pumpkin mixture evenly over the partially baked cheesecake layer. Take your time to spread it smoothly with the back of a spoon or an offset spatula if needed, ensuring it covers the entire surface right up to the edges. This creates that beautiful two-tone effect when sliced, making your Pumpkin Pie Cheesecake visually stunning as well as delicious.
-
Finishing the Bake:
Carefully return the springform pan (without the water bath this time, unless your oven is very dry and you prefer to keep a small pan of water for humidity) to your oven, which should now be at 325°F (160°C). Bake for an additional 50-60 minutes. The cheesecake is done when the outer edges are set and appear slightly puffed, but the very center (about a 2-inch circle) still has a slight jiggle to it when you gently shake the pan. Don’t overbake, as this can lead to cracks! The residual heat will continue to cook the center as it cools.
-
The All-Important Cooling Process:
Once baked, turn off your oven but leave the cheesecake inside with the oven door propped open a few inches (use a wooden spoon to hold it) for 1 hour. This slow cooling helps prevent drastic temperature changes that can cause the cheesecake to crack. After an hour, remove the cheesecake from the oven and place it on a wire rack to cool completely to room temperature. This can take several hours, so be patient!
-
Chilling for Perfection:
Once cooled to room temperature, cover the springform pan loosely with plastic wrap and transfer the Pumpkin Pie Cheesecake to the refrigerator. Chill for a minimum of 6-8 hours, or preferably overnight. This chilling time is absolutely critical; it allows the cheesecake to fully set, firm up, and develop its rich flavor and perfect texture. Resist the temptation to cut into it early!
-
Preparing the Optional Whipped Cream Topping:
Just before serving, let’s make that luscious topping! In a large, chilled bowl (chilling the bowl and beaters in the freezer for 10-15 minutes can help tremendously), combine the cold heavy cream, powdered sugar, and pure vanilla extract. Using an electric mixer (stand or hand mixer) fitted with the whisk attachment, beat on medium-high speed until firm peaks form. Be careful not to overbeat, or you’ll end up with butter!
-
Serving Your Masterpiece:
Once the Pumpkin Pie Cheesecake is fully chilled, run a thin knife around the edge of the pan before releasing the springform sides. This helps to prevent sticking and creates clean edges. You can spread the whipped cream generously over the top of the entire cheesecake or pipe individual dollops onto each slice. For an extra festive touch, you can dust with a little extra cinnamon or grate some fresh nutmeg over the top. Slice your magnificent Pumpkin Pie Cheesecake with a sharp knife, wiping the blade clean between each cut for the cleanest slices. Serve and enjoy the ultimate holiday dessert!
-
Storage Tips:
Any leftover Pumpkin Pie Cheesecake should be covered tightly with plastic wrap and stored in the refrigerator for up to 4-5 days. While it’s best enjoyed fresh, the flavors can sometimes deepen beautifully after a day or two in the fridge. You can also freeze individual slices, wrapped tightly in plastic wrap and then foil, for up to 1-2 months. Thaw frozen slices in the refrigerator overnight before serving.
Conclusion:
Well, my friends, we’ve journeyed through the steps of creating what I genuinely believe is one of the most magnificent desserts you’ll ever have the pleasure of tasting and sharing. This isn’t just a dessert; it’s an experience, a delightful fusion that takes two beloved classics and elevates them into something truly extraordinary. If you’ve been looking for that show-stopping finale for your next dinner party, a comforting treat for a cozy evening in, or simply an excuse to indulge in pure deliciousness, then look no further. This recipe for Pumpkin Pie Cheesecake is an absolute game-changer, promising to deliver a harmonious blend of creamy, tangy cheesecake and the warm, spiced embrace of classic pumpkin pie. I can confidently say that once you take that first bite, you’ll understand exactly why I’m so enthusiastic about it.
The magic truly lies in how perfectly the rich, velvety texture of the cheesecake complements the earthy sweetness of the pumpkin and the aromatic symphony of fall spices. Imagine that smooth, luxurious filling, resting atop a perfectly crisp, buttery crust, each spoonful a revelation. It’s comforting yet sophisticated, familiar yet exciting. Preparing this dessert isn’t just about following instructions; it’s about crafting joy in your kitchen, filling your home with the most incredible aromas, and ultimately presenting a masterpiece that will undoubtedly elicit gasps of delight and requests for second helpings. Trust me, the effort, though rewarding, is minimal compared to the incredible satisfaction you and your loved ones will experience with every slice. This isn’t just another recipe to add to your collection; it’s destined to become a cherished tradition.
Perfect Pairings and Serving Suggestions
While this decadent dessert is undeniably perfect on its own, there are several ways to elevate the experience even further. My absolute favorite is a generous dollop of freshly whipped cream, lightly sweetened and perhaps with a hint of vanilla or even a dash of cinnamon. The lightness of the cream cuts through the richness of the cheesecake beautifully. For those with a sweeter tooth, a drizzle of warm caramel sauce or a sprinkle of toasted pecans or walnuts adds a fantastic textural contrast and an extra layer of nutty flavor.
Don’t be afraid to get creative here! A dusting of cocoa powder, a fine grating of dark chocolate, or even a few candied ginger pieces could add an unexpected yet delightful twist. It also pairs wonderfully with a hot cup of coffee, a steaming mug of spiced apple cider, or a glass of dessert wine, making it a versatile choice for any gathering or quiet moment of indulgence.
Explore Your Culinary Creativity with Variations
One of the things I love most about baking is the opportunity for personal expression, and this Pumpkin Pie Cheesecake recipe is wonderfully adaptable. Feeling adventurous? Consider experimenting with the crust. A gingersnap crust would lend an even deeper, spicier note, while a shortbread crust offers a more delicate, buttery base. For a gluten-free option, simply use gluten-free graham crackers or a nut-based crust. You can also play with the spice blend in the filling; perhaps you prefer a more pronounced ginger kick, or a subtle hint of cardamom.
Think about adding mix-ins! A handful of mini chocolate chips swirled into the batter, or even a layer of chopped candied cranberries could add both visual appeal and a burst of flavor. For individual servings, try baking the cheesecake in muffin tins lined with paper cups – perfect for parties or portion control. The possibilities are truly endless, allowing you to tailor this incredible dessert to your exact preferences and surprise your guests with your unique touch.
So, what are you waiting for? I wholeheartedly encourage you to roll up your sleeves, gather your ingredients, and embark on this incredibly rewarding baking adventure. This isn’t just a recipe; it’s an invitation to create lasting memories, share delicious moments, and truly impress everyone who tastes it. Once you’ve made this fantastic Pumpkin Pie Cheesecake, I would absolutely love to hear about your experience! Did you stick to the recipe, or did you put your own unique spin on it? Please share your triumphs, your serving suggestions, and especially your photos with me. Your culinary journey is inspiring, and I can’t wait to celebrate your baking successes together. Happy baking, everyone!
Dreamy Pumpkin Pie Cheesecake
A delightful fall dessert merging the rich, creamy texture of cheesecake with the warm, comforting spices of pumpkin pie, all on a crisp graham cracker crust.
Ingredients
Instructions
Important Information
Nutrition Facts (Per Serving)
It is important to consider this information as approximate and not to use it as definitive health advice.
Allergy Information
Please check ingredients for potential allergens and consult a health professional if in doubt.