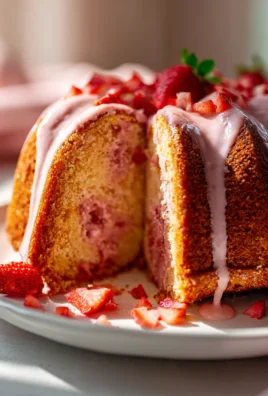
S’mores Rolls offer a truly inventive way to enjoy a beloved classic, transforming the iconic campfire treat into a convenient, delicious pastry that you can savor anytime, anywhere. I often find myself dreaming of that perfect combination of gooey marshmallow, melting chocolate, and crunchy graham cracker, but sometimes the campfire isn’t an option, or I’m simply looking for a less messy experience. That’s precisely where this recipe shines, capturing all the nostalgia and flavor of a traditional s’more in an easy-to-handle roll perfect for any occasion.
The original s’more has a rich history, believed to have originated with the Girl Scouts in the 1920s, quickly becoming a symbol of camaraderie and simple outdoor pleasures across America. While we adore that tradition, innovation allows us to bring those cherished flavors into new, exciting forms. People absolutely adore these S’mores Rolls because they deliver that irresistible taste and texture without the fuss. Imagine biting into a warm, flaky pastry, revealing pockets of rich, molten chocolate and sweet, toasted marshmallow, all complemented by the subtle crunch of graham cracker. It’s comfort food at its finest, promising a smile with every single bite, whether enjoyed for breakfast, dessert, or a delightful snack.

Ingredients:
-
For the Enriched Yeast Dough:
- 1 cup (240ml) whole milk: Warmed to 105-115°F (40-46°C). This specific temperature is crucial for activating the yeast without killing it.
- 2 ¼ teaspoons (1 packet or 7g) active dry yeast: Make sure it’s fresh and within its expiration date. Old yeast will prevent your rolls from rising beautifully.
- ¼ cup (50g) granulated sugar, plus a pinch: The pinch for proofing the yeast, the rest for sweetness and tenderizing the dough.
- ½ teaspoon salt: Balances the sweetness and enhances the flavor of the dough. Don’t skip it!
- 1 large egg: Room temperature. Adds richness, color, and helps bind the dough.
- ¼ cup (57g) unsalted butter: Melted and slightly cooled. Adds flavor and moisture to the dough, making it wonderfully tender.
- 3 to 3 ½ cups (360-420g) all-purpose flour: Divided. Start with 3 cups and add more only as needed. Too much flour can make your rolls dry and tough.
-
For the S’mores Filling:
- ½ cup (113g) unsalted butter: Softened to room temperature. This will be the base for our luscious filling.
- ¾ cup (150g) light brown sugar: Packed. Adds a caramel-like sweetness and moisture to the filling.
- 1 teaspoon vanilla extract: Pure vanilla extract will give the best flavor.
- 1 ½ cups (about 12-15 sheets) graham cracker crumbs: Finely crushed. You can use a food processor or place them in a bag and crush with a rolling pin. We want a fine crumb for even distribution.
- 1 cup (170g) semi-sweet chocolate chips or chopped chocolate: You can use milk chocolate for a sweeter s’mores experience or dark chocolate for a richer contrast.
- 2 cups (113g) mini marshmallows: These will be added towards the end of baking for that quintessential gooey s’mores topping.
-
For the Vanilla Glaze (Optional, but highly recommended!):
- 1 ½ cups (180g) powdered sugar: Sifted to prevent lumps for a smooth glaze.
- 2-3 tablespoons (30-45ml) whole milk or heavy cream: Start with 2 tablespoons and add more a tiny bit at a time until you reach your desired consistency.
- ½ teaspoon vanilla extract: Enhances the sweetness of the glaze.
Preparing the Enriched Yeast Dough
- Activate the Yeast: In a large mixing bowl (or the bowl of your stand mixer), combine the warmed milk, a pinch of granulated sugar, and the active dry yeast. Give it a gentle stir. Let this mixture sit for 5-10 minutes. You’ll know your yeast is active and ready to go when it becomes foamy and bubbly on the surface. If it doesn’t foam, your yeast might be old or your milk wasn’t the right temperature, and you’ll need to start again with fresh yeast. This step is crucial for light and airy S’mores Rolls!
- Combine Wet Ingredients: Once the yeast is active, add the remaining ¼ cup of granulated sugar, salt, room temperature egg, and the melted and slightly cooled butter to the yeast mixture. Whisk everything together until it’s well combined. Ensure the butter isn’t too hot, as it could kill the active yeast.
- Gradually Add Flour: Begin adding the all-purpose flour, about 1 cup at a time. If using a stand mixer with a dough hook, mix on low speed until the flour is incorporated. If mixing by hand, use a sturdy spoon or spatula. Continue adding flour until the dough starts to come together and pull away from the sides of the bowl. It should still be slightly sticky, but manageable. Avoid adding too much flour at this stage, as it can lead to dry and tough rolls.
- Knead the Dough: Turn the dough out onto a lightly floured surface. Knead the dough for 8-10 minutes. If using a stand mixer, let the dough hook do the work for about 6-8 minutes on medium-low speed. You’re looking for a dough that is smooth, elastic, and springs back when gently poked. A properly kneaded dough develops gluten, which gives the rolls their structure and chewiness. Don’t rush the kneading process; it’s vital for a perfect texture.
- First Rise (Bulk Fermentation): Lightly grease a clean large bowl with a little oil or non-stick spray. Place the kneaded dough into the bowl, turning it once to coat the top. Cover the bowl tightly with plastic wrap or a clean kitchen towel. Place the bowl in a warm, draft-free spot. A slightly warm oven (turned off, perhaps after preheating for a few minutes and then turned off completely, or with just the oven light on) is an excellent spot. Let the dough rise for 1 to 1 ½ hours, or until it has doubled in size. Patience is key during this rise, allowing the yeast to develop flavor and air pockets.
Preparing the S’mores Filling Components
- Prepare the Graham Cracker Crumbs: While your dough is rising, it’s the perfect time to get your filling ready. Place the graham crackers in a food processor and pulse until you have fine crumbs. Alternatively, place them in a large zip-top bag and use a rolling pin to crush them finely. We want a fine, even consistency so they distribute well and don’t create overly chunky bits in your rolls.
- Chop Chocolate (if using bars): If you’re using chocolate bars instead of chips, now is the time to roughly chop them into small, bite-sized pieces. Aim for pieces similar in size to chocolate chips for even melting and distribution within the S’mores Rolls.
- Prepare the Marshmallows: Measure out your mini marshmallows. These will be added later, so just have them ready to go.
Assembling the S’mores Rolls
- Punch Down the Dough: Once the dough has doubled in size, gently punch it down to release the air. This step helps redistribute the yeast and creates a more even texture in your final rolls.
- Roll Out the Dough: Lightly flour your clean work surface and your rolling pin. Turn the dough out onto the floured surface. Using your rolling pin, roll the dough into a large rectangle, approximately 18 inches long by 12 inches wide (45cm x 30cm). Aim for an even thickness across the entire rectangle, about ¼ inch thick. An evenly rolled dough ensures uniform S’mores Rolls.
- Prepare and Spread the Filling Base: In a small bowl, cream together the softened unsalted butter, light brown sugar, and vanilla extract until smooth and well combined. This is your sticky, sweet base that holds everything together.
- Spread the Filling: Generously and evenly spread the butter-brown sugar mixture over the entire surface of the rolled-out dough, leaving a small ½-inch border along one of the long edges. This border will help seal the roll later.
- Add Graham Crackers and Chocolate: Sprinkle the finely crushed graham cracker crumbs evenly over the butter-brown sugar layer. Then, scatter the chocolate chips or chopped chocolate over the graham cracker crumbs. Try to get an even distribution so every bite of your S’mores Roll has all the classic flavors!
- Roll Up the Dough: Starting from the long edge opposite the ½-inch border, carefully and tightly roll the dough into a log. Take your time to roll it up snugly, pressing gently as you go to ensure the filling stays inside and there are no large air pockets. A tight roll makes for beautiful, spiral S’mores Rolls.
- Slice the Rolls: Once you have a tight log, use a sharp, un-serrated knife or, even better, unflavored dental floss to slice the log into individual rolls. For dental floss, slide it under the log, cross the ends over the top, and pull to create clean cuts. Aim for about 12-15 rolls, each approximately 1 to 1 ½ inches thick. Using dental floss creates perfectly round, un-squashed S’mores Rolls.
- Arrange for Second Rise: Lightly grease a 9×13-inch baking dish. Arrange the sliced S’mores Rolls in the prepared dish, leaving a little space between each roll for them to expand during the second rise and baking.
- Second Rise (Proofing): Cover the baking dish loosely with plastic wrap or a clean kitchen towel. Place it back in your warm, draft-free spot for another 30-45 minutes, or until the rolls have visibly puffed up and are almost doubled in size. They should look soft and pillowy.
Baking the S’mores Rolls
- Preheat Oven: While your S’mores Rolls are completing their second rise, preheat your oven to 375°F (190°C). This ensures the oven is at the correct temperature when the rolls go in, preventing them from drying out or over-proofing.
- Initial Bake: Uncover the S’mores Rolls and place the baking dish into the preheated oven. Bake for 18-22 minutes, or until the rolls are light golden brown on top and cooked through. The exact time will depend on your oven.
- Add Marshmallows for the S’mores Finish: After the initial bake, carefully remove the S’mores Rolls from the oven. Evenly sprinkle the mini marshmallows over the tops of the hot rolls. Return the dish to the oven and continue baking for another 5-8 minutes, or until the marshmallows are puffed, golden brown, and wonderfully gooey. Keep a close eye on them during this stage, as marshmallows can go from perfectly toasted to burnt very quickly! This step is where the magic truly happens, transforming them into authentic S’mores Rolls.
- Cool Slightly: Once baked to perfection, remove the S’mores Rolls from the oven. Let them cool in the baking dish for about 5-10 minutes. This short cooling period allows them to set slightly, making them easier to handle and serve.
Finishing Touches: The Vanilla Glaze
- Prepare the Vanilla Glaze: While the rolls are cooling slightly, whisk together the sifted powdered sugar, 2 tablespoons of milk or cream, and vanilla extract in a small bowl. Continue adding more milk or cream, ½ teaspoon at a time, until you achieve a smooth, pourable glaze consistency. You want it thick enough to coat the rolls but thin enough to drizzle beautifully.
- Glaze the S’mores Rolls: Drizzle the vanilla glaze generously over the warm (but not piping hot) S’mores Rolls. The warmth of the rolls will help the glaze melt slightly and soak in, adding an extra layer of sweetness and moisture.
- Serve Warm: These S’mores Rolls are absolutely best served warm, ideally within an hour or two of baking. The gooey marshmallows and melted chocolate create an irresistible treat that’s perfect for breakfast, brunch, or a delightful dessert. Enjoy your homemade S’mores Rolls!

Conclusion:
Well, my friends, we’ve reached the sweet end of our journey through this incredible recipe, and I truly hope you’re feeling inspired to get into the kitchen. If there’s one recipe I could implore you to try, it’s this one. Why is it a must-try, you ask? Because it effortlessly captures the magic of a campfire classic, transforming it into a convenient, utterly delightful, and incredibly impressive treat that’s perfect for any occasion. Imagine: no smoke in your eyes, no sticky fingers from roasting sticks, just pure, unadulterated s’mores bliss, all wrapped up in a warm, golden package. The combination of that perfectly toasted marshmallow, the rich, melting chocolate, and the tender, slightly crisp exterior is an irresistible symphony of textures and flavors that will transport you straight back to happy childhood memories, or create brand new ones.
This recipe isn’t just about making dessert; it’s about crafting an experience. It’s about the comforting aroma that will fill your kitchen as they bake, drawing everyone in with anticipation. It’s about the joy of pulling one apart, seeing the gooey strands of marshmallow and chocolate stretching enticingly. And it’s about that first bite – a burst of warmth, sweetness, and nostalgia all rolled into one. It’s simple enough for a weeknight treat, yet elegant enough to serve at your next gathering. Trust me, these are going to be a new favorite in your dessert repertoire, earning you rave reviews from anyone lucky enough to try them.
Now, let’s talk about enjoying these beauties. While they are absolutely divine eaten warm, fresh from the oven, there are so many ways to elevate your experience. For a truly decadent treat, I highly recommend serving them with a scoop of premium vanilla bean ice cream. The contrast between the warm, gooey interior of the S’mores Rolls and the cold, creamy ice cream is simply heavenly. A light dusting of powdered sugar adds a touch of elegance, or for the true chocolate lovers, a drizzle of extra chocolate sauce or a swirl of caramel takes them to another level. They also pair wonderfully with a tall glass of cold milk, a hot cup of coffee, or even a sophisticated port wine for an adult-friendly dessert.
And the fun doesn’t stop there! These S’mores Rolls are incredibly versatile, inviting you to experiment with variations. Don’t be afraid to get creative! Instead of classic milk chocolate, why not try dark chocolate for a richer flavor, or white chocolate for a sweeter twist? You could even tuck in mini peanut butter cups for a delightful chocolate-peanut butter fusion. For an extra layer of texture, consider adding a sprinkle of chopped nuts – pecans or walnuts would be fantastic. Feeling fruity? A thin slice of banana or a few fresh raspberries inside before baking can add a wonderful fresh counterpoint to the sweetness. You could also experiment with different types of bread products for the wrapping, like a buttery puff pastry for a flakier bite. Whether you stick to the classic design or venture into new flavor combinations, the core deliciousness of these S’mores Rolls remains unbeatable.
So, what are you waiting for? This is your invitation to bring a little bit of magic into your kitchen. Gather your ingredients, follow the steps, and prepare to be amazed by how easy and rewarding this recipe is. I promise, it’s a decision your taste buds will thank you for. I absolutely adore seeing your culinary creations, so please, once you’ve whipped up your own batch, don’t hesitate to share your experience with me! Drop a comment below, tell me what you thought, or even better, share a photo of your beautiful creations. I’d love to hear about any variations you tried or serving suggestions you discovered. Happy baking, and enjoy every single gooey, chocolatey bite!
Irresistible S’mores Rolls: Your New Favorite Dessert!
S’mores Rolls offer a truly inventive way to enjoy a beloved classic, transforming the iconic campfire treat into a convenient, delicious pastry that you can savor anytime, anywhere. This recipe captures all the nostalgia and flavor of a traditional s’more in an easy-to-handle roll perfect for any occasion.
Ingredients
Instructions
Important Information
Nutrition Facts (Per Serving)
It is important to consider this information as approximate and not to use it as definitive health advice.
Allergy Information
Please check ingredients for potential allergens and consult a health professional if in doubt.