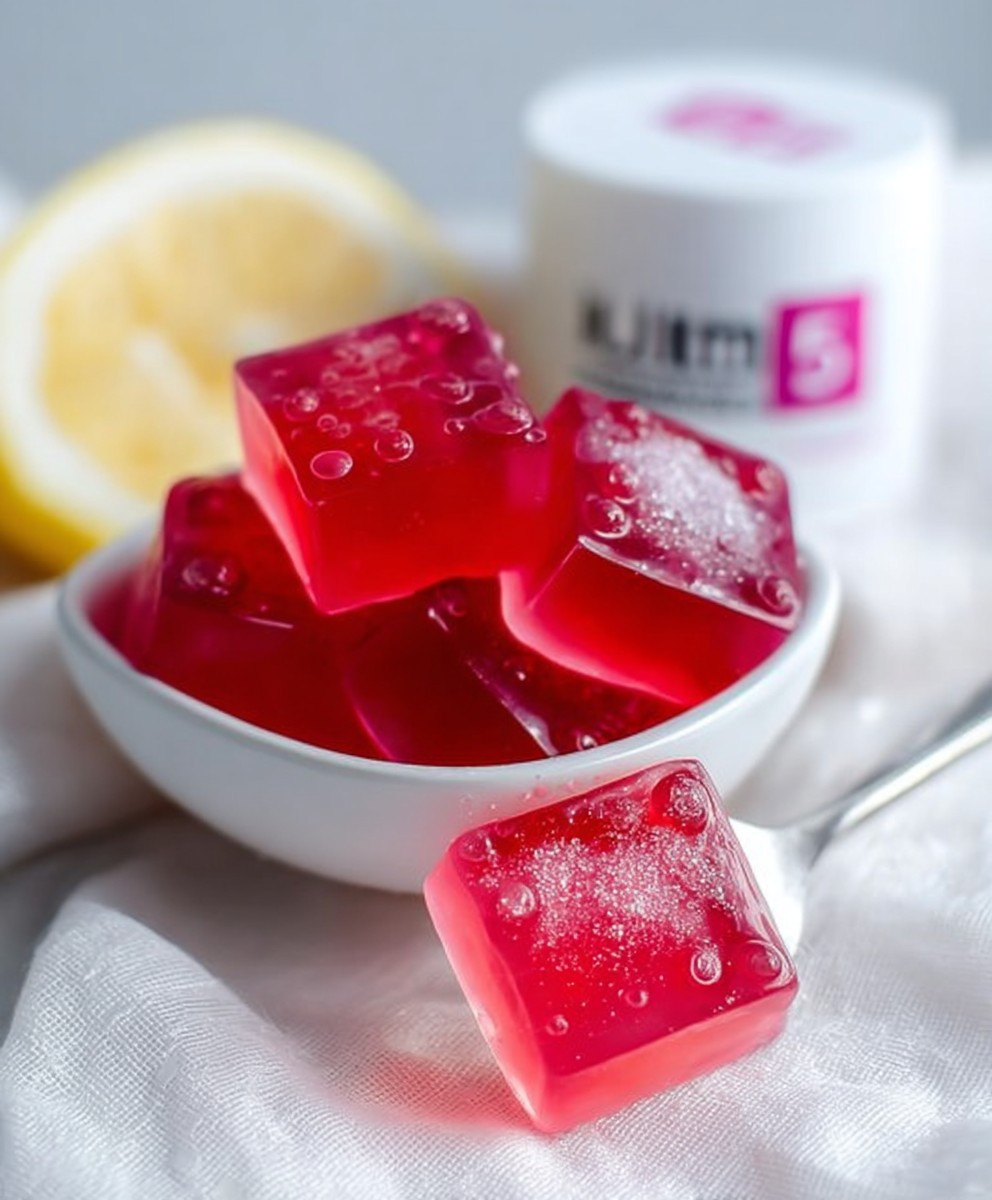
Electrolyte Raspberry Lemonade Gummies: Prepare to revolutionize your hydration game with a treat that’s as delicious as it is beneficial! Forget those chalky electrolyte powders and sugary sports drinks. We’re diving headfirst into a world of vibrant flavor and revitalizing goodness with these homemade gummies. Imagine sinking your teeth into a chewy, tangy burst of raspberry lemonade, all while replenishing essential electrolytes. Sounds too good to be true? Trust me, it’s not!
Gummies, in their simplest form, have been around for centuries, evolving from medicinal candies to the delightful treats we know and love. But these aren’t your average gummy bears. We’re taking a modern, health-conscious twist on a classic, crafting a recipe that caters to active lifestyles and those seeking a refreshing way to stay hydrated. These Electrolyte Raspberry Lemonade Gummies are perfect for post-workout recovery, a midday pick-me-up, or even a fun way to encourage kids to drink more fluids.
What makes these gummies so irresistible? It’s the perfect balance of sweet and tart, the satisfying chewiness, and the knowledge that you’re nourishing your body with every bite. The raspberry lemonade flavor is universally appealing, and the added electrolytes provide a boost of energy and help maintain proper fluid balance. Plus, they’re incredibly convenient to make and store, making them a go-to snack for busy individuals. Get ready to ditch the artificial ingredients and embrace a healthier, tastier way to hydrate!

Ingredients:
- 1 cup fresh or frozen raspberries
- 1 cup fresh lemon juice (approximately 6-8 lemons)
- 1/2 cup water
- 1/4 cup honey (or maple syrup for a vegan option)
- 4 tablespoons gelatin powder (unflavored)
- 1/4 teaspoon sea salt (for electrolytes)
- Optional: 1/4 teaspoon magnesium citrate powder (for added electrolytes)
- Optional: 1/4 teaspoon potassium chloride powder (for added electrolytes)
- Optional: 1-2 tablespoons additional honey or maple syrup, to taste
- Optional: Lemon zest for garnish
Preparing the Raspberry Lemonade Base
- Puree the Raspberries: In a blender or food processor, combine the raspberries and water. Blend until completely smooth. If using frozen raspberries, you may need to let them thaw slightly before blending.
- Strain the Raspberry Puree: Place a fine-mesh sieve over a bowl. Pour the raspberry puree into the sieve and use a spoon or spatula to press the puree through, extracting as much juice as possible. This step removes the seeds, resulting in a smoother gummy texture. Discard the seeds.
- Combine Juices: In a medium saucepan, combine the strained raspberry juice and fresh lemon juice.
- Add Sweetener and Salt: Stir in the honey (or maple syrup) and sea salt. If you’re using the optional magnesium citrate and potassium chloride powders, add them now as well.
- Taste and Adjust: Give the mixture a taste. If it’s too tart for your liking, add a tablespoon or two of additional honey or maple syrup until you reach your desired sweetness. Remember that the gelatin will slightly dilute the sweetness, so it’s better to err on the side of being slightly sweeter than you think you need.
Blooming the Gelatin
- Prepare the Gelatin: In a small bowl, sprinkle the gelatin powder over 1/2 cup of cold water. Let it sit for about 5-10 minutes. This process is called “blooming” the gelatin, and it allows the gelatin granules to absorb the water and swell, which is essential for creating a smooth, firm gummy texture. You’ll notice the mixture becoming thick and jelly-like.
Cooking and Combining
- Heat the Juice Mixture: Place the saucepan with the raspberry lemonade mixture over low heat. Gently warm the mixture, stirring occasionally, until it’s just heated through. Do not boil! Boiling can affect the gelling properties of the gelatin.
- Dissolve the Gelatin: Once the juice mixture is warm, add the bloomed gelatin to the saucepan. Stir constantly until the gelatin is completely dissolved. Make sure there are no lumps of gelatin remaining. This may take a few minutes, so be patient and keep stirring gently.
- Remove from Heat: Once the gelatin is fully dissolved, remove the saucepan from the heat.
- Skim off any Foam: If any foam has formed on the surface of the mixture, use a spoon to gently skim it off. This will help create clearer, more visually appealing gummies.
Molding and Setting
- Prepare Your Molds: You can use silicone gummy bear molds, silicone ice cube trays, or any other small silicone molds you have on hand. Lightly grease the molds with coconut oil or cooking spray to prevent the gummies from sticking. This step is crucial for easy removal.
- Pour the Mixture: Carefully pour the raspberry lemonade gelatin mixture into the prepared molds. You can use a small measuring cup or a dropper to fill the molds evenly.
- Remove Air Bubbles: Gently tap the molds on the counter to release any trapped air bubbles. This will help create smoother, more uniform gummies.
- Chill to Set: Place the filled molds in the refrigerator for at least 2-3 hours, or preferably overnight, to allow the gummies to set completely. The longer they chill, the firmer they will become.
Demolding and Storing
- Demold the Gummies: Once the gummies are firm, gently remove them from the molds. If they are sticking, you can try loosening the edges with a toothpick or small spatula. You can also briefly dip the bottom of the mold in warm water to help release the gummies.
- Optional: Garnish with Lemon Zest: If desired, sprinkle a little lemon zest over the gummies for added flavor and visual appeal.
- Store the Gummies: Store the electrolyte raspberry lemonade gummies in an airtight container in the refrigerator. They will keep for up to 1-2 weeks.
Tips for Success
- Use High-Quality Gelatin: The quality of the gelatin will affect the texture of the gummies. Opt for a good-quality, unflavored gelatin powder for the best results.
- Don’t Overheat the Gelatin: Overheating the gelatin can weaken its gelling properties, resulting in soft or runny gummies. Keep the heat low and gentle when dissolving the gelatin.
- Adjust Sweetness to Your Preference: The amount of honey or maple syrup can be adjusted to suit your taste. Start with the recommended amount and then add more as needed.
- Experiment with Flavors: Feel free to experiment with other fruit juices and flavors. You can try using different berries, citrus fruits, or even herbal infusions.
- Add Vitamin C: For an extra boost, you can add a pinch of ascorbic acid (vitamin C powder) to the mixture. Vitamin C can also help preserve the color of the gummies.
- Vegan Option: To make these gummies vegan, substitute the gelatin with agar-agar powder. You’ll need to adjust the amount of agar-agar powder according to the package instructions, as it has different gelling properties than gelatin.
Troubleshooting
- Gummies are too soft: This could be due to not using enough gelatin, overheating the gelatin, or not chilling the gummies long enough. Make sure to use the correct amount of gelatin and avoid overheating it. Chill the gummies for at least 2-3 hours, or preferably overnight.
- Gummies are too hard: This could be due to using too much gelatin. Reduce the amount of gelatin in your next batch.
- Gummies are sticky: This could be due to not using enough sweetener or not storing the gummies properly. Make sure to use enough honey or maple syrup and store the gummies in an airtight container in the refrigerator.
- Gummies are cloudy: This could be due to air bubbles in the mixture. Gently tap the molds on the counter to release any trapped air bubbles before chilling.
Electrolyte Considerations
- Sea Salt: Provides sodium chloride, a key electrolyte lost through sweat.
- Magnesium Citrate: Magnesium is important for muscle function and energy production.
- Potassium Chloride: Potassium is crucial for nerve function and fluid balance.
- Adjust Electrolytes: You can adjust the amount of electrolytes based on your individual needs and activity level. If you’re sweating heavily, you may need to add more electrolytes. However, be mindful of the taste, as too much can make the gummies taste salty or bitter.
Conclusion:
These Electrolyte Raspberry Lemonade Gummies are more than just a tasty treat; they’re a game-changer for anyone looking to boost hydration and replenish electrolytes in a fun and delicious way. Seriously, forget those chalky sports drinks! The vibrant raspberry and zesty lemon flavors perfectly complement each other, creating a refreshing experience that will have you reaching for more. And the best part? You know exactly what’s going into them – no artificial colors, flavors, or questionable ingredients.
I truly believe this recipe is a must-try for several reasons. First, it’s incredibly easy to make. The steps are straightforward, and you probably already have most of the ingredients in your pantry. Second, it’s incredibly versatile. Whether you’re an athlete needing a post-workout boost, someone struggling to stay hydrated during the summer heat, or simply looking for a healthier alternative to sugary snacks, these gummies are the perfect solution. Third, and perhaps most importantly, they actually taste amazing! The natural sweetness of the raspberries combined with the tartness of the lemon creates a flavor explosion that will tantalize your taste buds.
But the fun doesn’t stop there! Feel free to experiment with different variations to suit your preferences. For a sweeter treat, you could add a touch of honey or maple syrup. If you prefer a more intense lemon flavor, add a bit more lemon zest. You could even try using different types of berries, like strawberries or blueberries, for a unique twist. For a vegan option, simply substitute the gelatin with agar-agar powder, following the package instructions for the correct ratio.
Serving suggestions are endless! These gummies are perfect as a pre- or post-workout snack, a midday pick-me-up, or even a fun treat for kids. Pack them in your gym bag, take them on hikes, or simply keep them in the fridge for a refreshing and healthy snack anytime. They’re also a great addition to lunchboxes or party favors.
Ready to make your own batch of Electrolyte Raspberry Lemonade Gummies?
I’m confident that you’ll love this recipe as much as I do. It’s a simple, healthy, and delicious way to stay hydrated and replenish electrolytes. Don’t be afraid to get creative with the variations and make them your own.
I’m so excited for you to try this recipe! Once you’ve made your own batch of these delightful Electrolyte Raspberry Lemonade Gummies, I’d love to hear about your experience. What variations did you try? What did you think of the flavor? Did they help you stay hydrated? Share your photos and comments in the comments section below. I can’t wait to see what you create! Happy gummy-making!
Electrolyte Raspberry Lemonade Gummies: The Ultimate Hydration Boost
Homemade electrolyte gummies bursting with raspberry lemonade flavor! These healthy treats are perfect for post-workout recovery or a refreshing snack.
Ingredients
Instructions
Recipe Notes
- Use High-Quality Gelatin: The quality of the gelatin will affect the texture of the gummies. Opt for a good-quality, unflavored gelatin powder for the best results.
- Don’t Overheat the Gelatin: Overheating the gelatin can weaken its gelling properties, resulting in soft or runny gummies. Keep the heat low and gentle when dissolving the gelatin.
- Adjust Sweetness to Your Preference: The amount of honey or maple syrup can be adjusted to suit your taste. Start with the recommended amount and then add more as needed.
- Experiment with Flavors: Feel free to experiment with other fruit juices and flavors. You can try using different berries, citrus fruits, or even herbal infusions.
- Add Vitamin C: For an extra boost, you can add a pinch of ascorbic acid (vitamin C powder) to the mixture. Vitamin C can also help preserve the color of the gummies.
- Vegan Option: To make these gummies vegan, substitute the gelatin with agar-agar powder. You’ll need to adjust the amount of agar-agar powder according to the package instructions, as it has different gelling properties than gelatin.
- Gummies are too soft: This could be due to not using enough gelatin, overheating the gelatin, or not chilling the gummies long enough. Make sure to use the correct amount of gelatin and avoid overheating it. Chill the gummies for at least 2-3 hours, or preferably overnight.
- Gummies are too hard: This could be due to using too much gelatin. Reduce the amount of gelatin in your next batch.
- Gummies are sticky: This could be due to not using enough sweetener or not storing the gummies properly. Make sure to use enough honey or maple syrup and store the gummies in an airtight container in the refrigerator.
- Gummies are cloudy: This could be due to air bubbles in the mixture. Gently tap the molds on the counter to release any trapped air bubbles before chilling.
- Sea Salt: Provides sodium chloride, a key electrolyte lost through sweat.
- Magnesium Citrate: Magnesium is important for muscle function and energy production.
- Potassium Chloride: Potassium is crucial for nerve function and fluid balance.
- Adjust Electrolytes: You can adjust the amount of electrolytes based on your individual needs and activity level. If you’re sweating heavily, you may need to add more electrolytes. However, be mindful of the taste, as too much can make the gummies taste salty or bitter.