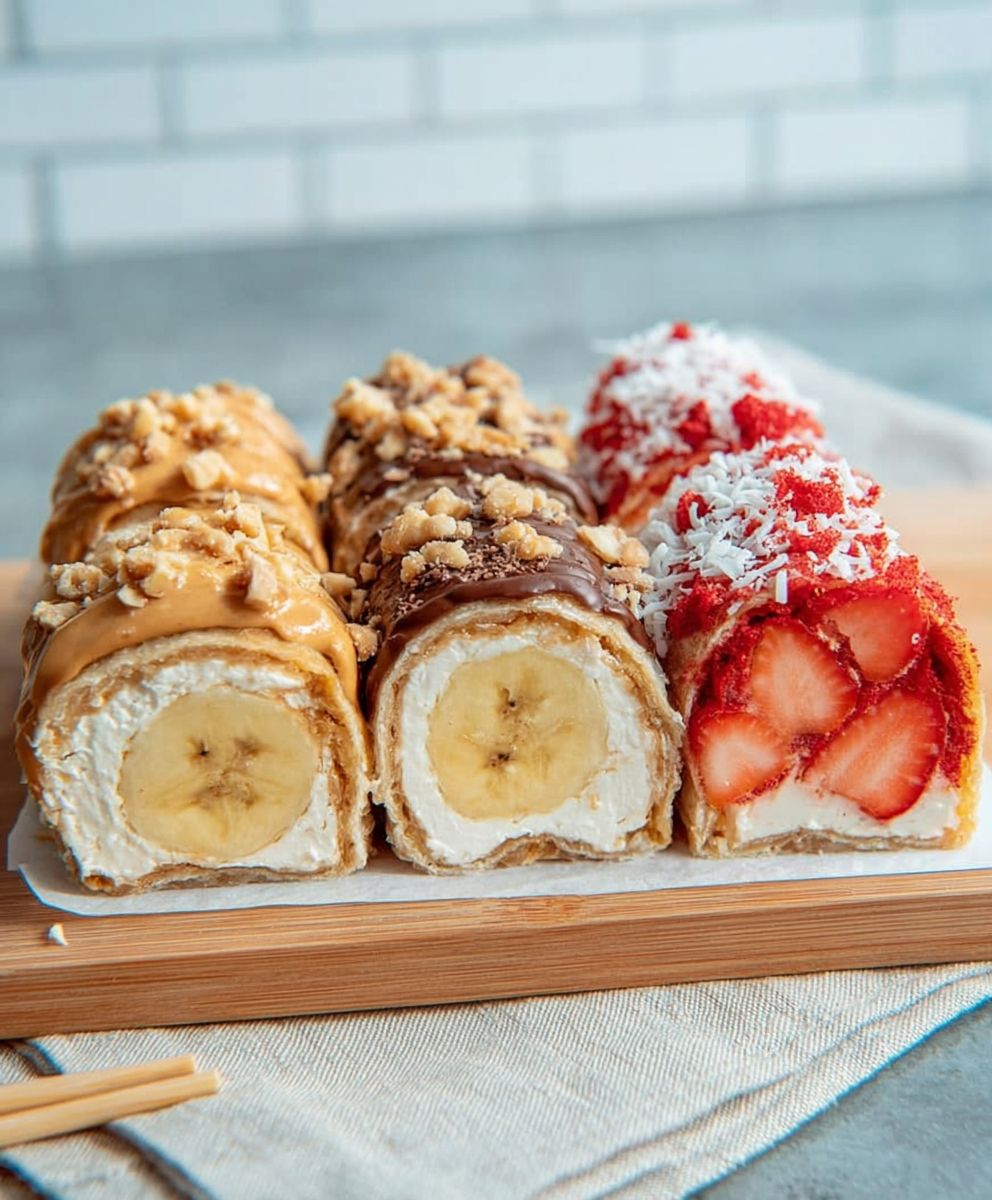
Easy banana sushi rolls: Prepare to be amazed by this delightful and incredibly simple treat that will revolutionize your snacking game! Forget complicated recipes and hours in the kitchen; these banana sushi rolls are ready in minutes and are perfect for kids and adults alike. Imagine a creamy, sweet banana embraced by a smooth, spreadable filling and then rolled in your favorite toppings – it’s a burst of flavor and fun in every bite!
While not traditional sushi in the Japanese sense, the concept of wrapping ingredients in a roll has been adapted and reimagined across cultures for centuries. This playful take on the idea brings a healthy and accessible twist to the table. The beauty of easy banana sushi rolls lies in their versatility. You can customize them with endless combinations of spreads and toppings to suit your taste and dietary needs.
People adore this dish because it’s quick, easy, and satisfying. The soft texture of the banana combined with the crunch of toppings like granola or nuts creates a delightful sensory experience. Plus, it’s a fantastic way to get kids involved in the kitchen and encourage them to eat fruit. Whether you’re looking for a healthy breakfast, a fun afternoon snack, or a creative dessert, these banana sushi rolls are sure to be a hit!

Ingredients:
- 2 large ripe bananas
- 1/2 cup peanut butter (creamy or crunchy, your preference!)
- 1/4 cup honey (optional, for extra sweetness)
- 1/4 cup chocolate hazelnut spread (like Nutella, optional)
- 1 cup granola (any flavor, but I like a mix of oats, nuts, and dried fruit)
- 1/2 cup shredded coconut (unsweetened or sweetened, toasted or untoasted)
- 1/4 cup chopped nuts (almonds, walnuts, pecans, or a mix)
- 1/4 cup mini chocolate chips
- 1/4 cup sprinkles (because why not?)
- Plastic wrap or parchment paper
Preparing the Bananas:
- Peel the bananas: Carefully peel both bananas. Make sure you don’t bruise them too much in the process! We want them to look nice and presentable.
- Pat them dry: Gently pat the bananas dry with a paper towel. This helps the peanut butter (or whatever spread you’re using) adhere better.
Coating the Bananas:
- Spread the peanut butter: Using a butter knife or spatula, evenly spread the peanut butter over the entire surface of one banana. Don’t be shy! A generous layer is key. If you’re using honey, drizzle it over the peanut butter now. This adds a lovely sweetness and helps the toppings stick even better.
- Spread the chocolate hazelnut spread (optional): If you’re using chocolate hazelnut spread, repeat the process with the second banana. This gives you a nice variety of flavors.
Preparing the Toppings:
- Prepare your workspace: Lay out a large sheet of plastic wrap or parchment paper. This will make the rolling process much easier and less messy.
- Combine toppings (optional): If you want a mix of toppings on each roll, you can combine them in a shallow dish. For example, you could mix the granola, shredded coconut, chopped nuts, and mini chocolate chips together. This creates a “topping mix” that’s easy to roll the bananas in.
- Prepare individual toppings: Alternatively, you can keep each topping separate in its own bowl. This allows you to create more distinct “sushi rolls” with different flavor profiles.
Rolling the Bananas in Toppings:
- Roll the peanut butter banana: Gently place the peanut butter-covered banana onto the prepared plastic wrap or parchment paper.
- Coat with toppings: Carefully roll the banana in your chosen toppings. Press gently to ensure the toppings adhere well to the peanut butter. If you’re using a topping mix, roll the banana until it’s completely coated. If you’re using individual toppings, you can roll it in one topping at a time, or create sections with different toppings. Get creative!
- Roll the chocolate hazelnut banana (optional): Repeat the rolling process with the chocolate hazelnut-covered banana, using your desired toppings.
Wrapping and Chilling:
- Wrap tightly: Once both bananas are coated in toppings, wrap them tightly in the plastic wrap or parchment paper. This helps them hold their shape and prevents the toppings from falling off.
- Chill in the freezer: Place the wrapped bananas in the freezer for at least 30 minutes. This will firm them up and make them easier to slice. You can freeze them for longer if you want a more frozen treat, but I find that 30-60 minutes is the sweet spot.
Slicing and Serving:
- Remove from freezer: After chilling, remove the bananas from the freezer.
- Unwrap carefully: Unwrap the bananas carefully, being mindful of any loose toppings.
- Slice into “sushi”: Using a sharp knife, slice the bananas into 1-inch thick “sushi” pieces. The colder the bananas, the cleaner the slices will be. If they’re too soft, pop them back in the freezer for a few more minutes.
- Arrange on a plate: Arrange the banana “sushi” pieces on a plate. You can get fancy and create a visually appealing arrangement, or just pile them up – it’s up to you!
- Add extra toppings (optional): Sprinkle a few extra toppings on top of the “sushi” for added visual appeal and flavor. A few extra chocolate chips, a sprinkle of coconut, or a drizzle of honey can really elevate the presentation.
- Serve immediately: Serve the banana “sushi” immediately. They’re best enjoyed cold, before they start to soften.
Tips and Variations:
- Nut Butter Alternatives: Don’t like peanut butter? No problem! You can use almond butter, cashew butter, sunflower seed butter, or any other nut or seed butter you prefer.
- Topping Variations: The possibilities for toppings are endless! Consider using crushed pretzels, dried cranberries, chopped dates, chia seeds, flax seeds, or even crushed cookies.
- Vegan Option: To make this recipe vegan, use a vegan chocolate hazelnut spread and ensure your granola and other toppings are also vegan-friendly.
- Add Protein: For an extra boost of protein, add a scoop of protein powder to your peanut butter or chocolate hazelnut spread before coating the bananas.
- Dipping Sauces: Serve the banana “sushi” with dipping sauces like melted chocolate, caramel sauce, or a fruit puree.
- Make it a Meal Prep: Prepare a batch of banana “sushi” on the weekend and store them in the freezer for a quick and healthy snack throughout the week. Just be sure to wrap them individually to prevent them from sticking together.
- For the Kids: Get the kids involved in making this recipe! They’ll love spreading the peanut butter and rolling the bananas in toppings. It’s a fun and healthy activity that everyone can enjoy.
Enjoy your delicious and easy banana sushi rolls! They’re a perfect treat for kids and adults alike.
Conclusion:
This isn’t just another snack; it’s a mini-adventure in your kitchen! These Easy Banana Sushi Rolls are a must-try because they’re ridiculously simple, incredibly satisfying, and endlessly customizable. Seriously, what’s not to love? We’re talking about a healthy treat that even the pickiest eaters will devour, and you can whip it up in mere minutes. Forget complicated recipes and hours spent slaving away – this is instant gratification at its finest.
But beyond the ease and speed, these little rolls are packed with potential. The creamy banana provides a naturally sweet base, while the toppings add texture and flavor that will tantalize your taste buds. Think of it as a blank canvas for your culinary creativity!
Looking for serving suggestions? The possibilities are truly endless! For a protein boost, try rolling your banana in a thin layer of peanut butter or almond butter before adding your toppings. This also helps the toppings adhere better. If you’re feeling fancy, drizzle a little honey or maple syrup over the finished rolls for an extra touch of sweetness.
And speaking of toppings, don’t limit yourself to just sprinkles and chocolate chips! Get creative with chopped nuts, shredded coconut, crushed pretzels, granola, or even dried fruit. For a more sophisticated twist, try dipping the rolls in melted dark chocolate and sprinkling them with sea salt. The combination of sweet and salty is simply divine!
For a fun and healthy breakfast option, slice the banana rolls into smaller pieces and add them to your yogurt or oatmeal. They’ll add a burst of flavor and a satisfying crunch. You can even pack them in your lunchbox for a quick and easy snack on the go.
If you’re looking to make these Easy Banana Sushi Rolls even more visually appealing, try using different colored sprinkles or arranging the toppings in a pattern. You can also use a sharp knife to create decorative cuts in the banana before rolling it up.
I truly believe that this recipe is a game-changer for busy parents, health-conscious individuals, and anyone who’s looking for a quick and delicious snack. It’s a fun and interactive way to get kids involved in the kitchen, and it’s a great way to sneak in some extra fruit into their diet.
So, what are you waiting for? Gather your ingredients, unleash your inner chef, and get rolling! I promise you won’t be disappointed. And once you’ve tried this recipe, I’d love to hear about your experience. What toppings did you use? What variations did you try? Did your kids love it? Share your photos and stories in the comments below! Let’s create a community of banana sushi roll enthusiasts and inspire each other with our creative creations. I am confident that you will find this recipe to be a delightful addition to your snack repertoire. Happy rolling!
Easy Banana Sushi Rolls: A Fun & Healthy Snack Recipe
Fun and easy banana sushi rolls! A healthy and customizable treat with bananas, peanut butter (or Nutella), and your favorite toppings. Perfect for kids and adults!
Ingredients
Instructions
Recipe Notes
- Nut Butter Alternatives: Use almond butter, cashew butter, or sunflower seed butter instead of peanut butter.
- Topping Variations: Try crushed pretzels, dried cranberries, chopped dates, chia seeds, flax seeds, or crushed cookies.
- Vegan Option: Use vegan chocolate hazelnut spread and vegan-friendly toppings.
- Add Protein: Mix protein powder into the peanut butter or chocolate hazelnut spread.
- Dipping Sauces: Serve with melted chocolate, caramel sauce, or fruit puree.
- Meal Prep: Prepare a batch and store individually wrapped in the freezer.
- Kid-Friendly: Get kids involved in spreading and rolling!