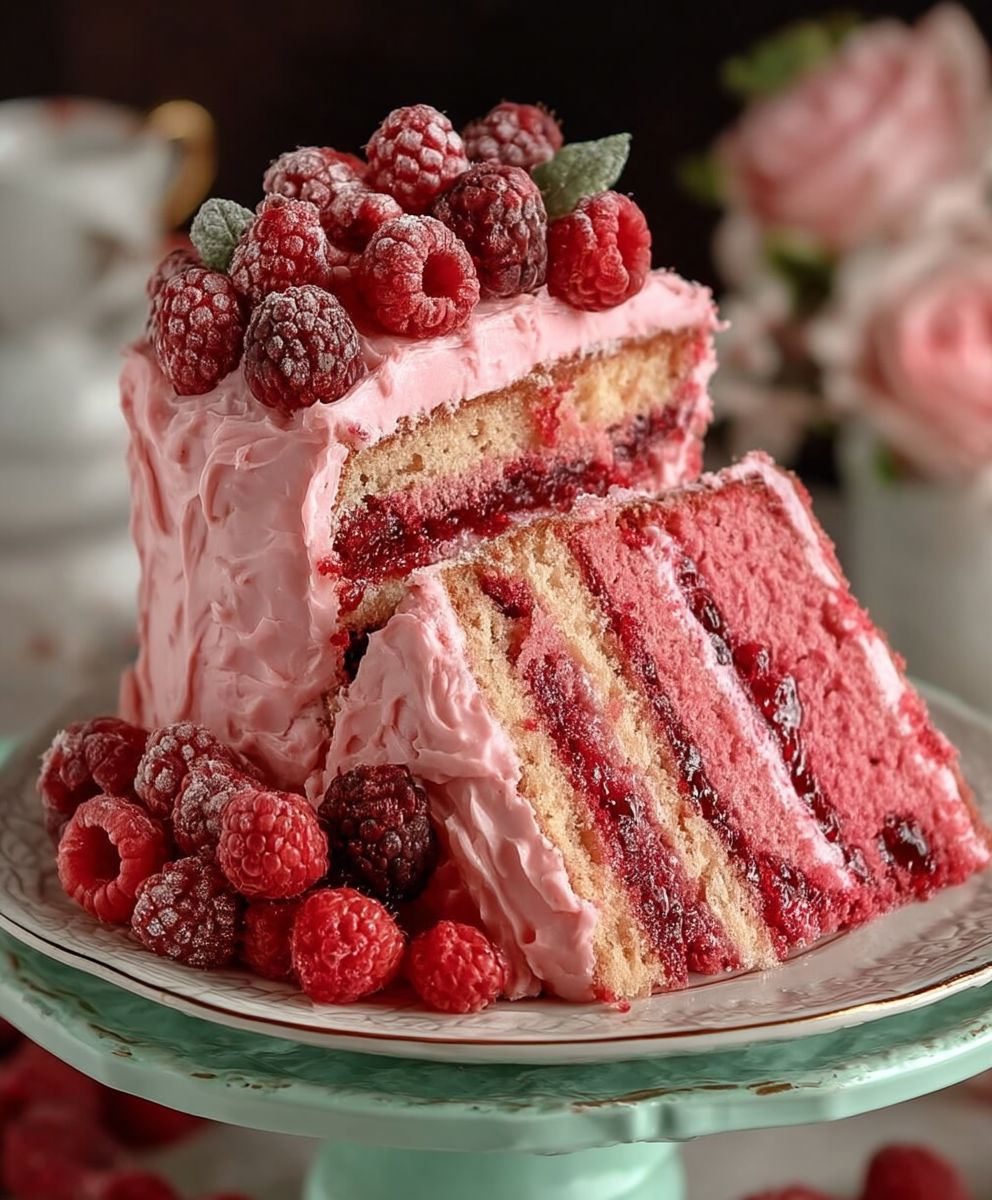
Raspberry Layer Cake: just the name conjures up images of elegant celebrations and delightful indulgence, doesn’t it? Imagine sinking your fork into layers of moist, tender cake, separated by a luscious, tangy raspberry filling and topped with a cloud of creamy frosting. This isn’t just a dessert; it’s an experience!
Layer cakes, in general, have a rich history, evolving from simpler cakes in the 19th century as baking technology improved and ingredients became more readily available. The addition of raspberries, with their vibrant color and refreshing tartness, elevates this classic to something truly special. While the exact origins of Raspberry Layer Cake are difficult to pinpoint, its popularity speaks volumes about its enduring appeal.
What is it about this cake that makes it so irresistible? Perhaps it’s the perfect balance of sweet and tart, the contrasting textures of the soft cake and the smooth filling, or simply the visual appeal of those beautiful layers. Whatever the reason, a well-made Raspberry Layer Cake is guaranteed to be a crowd-pleaser. It’s perfect for birthdays, anniversaries, or any occasion that calls for a touch of sweetness and sophistication. I’m excited to share my version of this timeless classic with you, complete with tips and tricks to ensure your cake is a showstopper!

Ingredients:
- For the Cake Layers:
- 3 cups all-purpose flour
- 1 tablespoon baking powder
- 1/2 teaspoon baking soda
- 1 teaspoon salt
- 1 cup (2 sticks) unsalted butter, softened
- 2 cups granulated sugar
- 4 large eggs
- 1 teaspoon vanilla extract
- 1 1/4 cups buttermilk
- For the Raspberry Filling:
- 1 (12 ounce) package fresh raspberries
- 1/2 cup granulated sugar
- 1 tablespoon lemon juice
- 1 tablespoon cornstarch
- 2 tablespoons water
- For the Swiss Meringue Buttercream:
- 6 large egg whites
- 1 1/2 cups granulated sugar
- 1 1/2 cups (3 sticks) unsalted butter, softened
- 1 teaspoon vanilla extract
- Pinch of salt
- Optional Garnish:
- Fresh raspberries
- Powdered sugar
- Edible flowers
Preparing the Cake Layers
Okay, let’s get started with the foundation of our masterpiece – the cake layers! This is where the magic begins, and trust me, it’s easier than it looks.
- Preheat and Prep: First things first, preheat your oven to 350°F (175°C). While the oven is warming up, grease and flour three 9-inch round cake pans. I like to use baking spray with flour already in it – it’s a lifesaver! Make sure you get every nook and cranny to prevent sticking. You can also line the bottom of each pan with parchment paper rounds for extra insurance.
- Dry Ingredients: In a large bowl, whisk together the flour, baking powder, baking soda, and salt. Whisking is key here to ensure everything is evenly distributed. We don’t want any pockets of baking powder!
- Cream Butter and Sugar: In a separate large bowl (or the bowl of your stand mixer), cream together the softened butter and granulated sugar until light and fluffy. This usually takes about 3-5 minutes on medium speed. The mixture should be noticeably lighter in color and texture. This step is crucial for creating a tender cake.
- Add Eggs: Beat in the eggs one at a time, making sure each egg is fully incorporated before adding the next. After all the eggs are in, stir in the vanilla extract.
- Alternate Wet and Dry: Gradually add the dry ingredients to the wet ingredients, alternating with the buttermilk. Begin and end with the dry ingredients. So, add about 1/3 of the dry ingredients, then 1/2 of the buttermilk, then another 1/3 of the dry ingredients, then the remaining buttermilk, and finally the last 1/3 of the dry ingredients. Mix until just combined. Be careful not to overmix! Overmixing develops the gluten in the flour, which can result in a tough cake.
- Divide and Bake: Divide the batter evenly among the prepared cake pans. I like to use a kitchen scale to ensure each pan has the same amount of batter. This will help the layers bake evenly. Bake for 25-30 minutes, or until a wooden skewer inserted into the center comes out clean.
- Cool Completely: Let the cakes cool in the pans for 10 minutes before inverting them onto a wire rack to cool completely. Make sure the cakes are completely cool before frosting, or the frosting will melt!
Making the Raspberry Filling
While the cakes are cooling, let’s whip up that delicious raspberry filling. This adds a burst of fresh, fruity flavor that perfectly complements the buttercream.
- Combine Ingredients: In a medium saucepan, combine the raspberries, sugar, and lemon juice.
- Cook Down: Cook over medium heat, stirring occasionally, until the raspberries break down and the mixture thickens slightly. This usually takes about 10-15 minutes.
- Thicken with Cornstarch: In a small bowl, whisk together the cornstarch and water to create a slurry. Pour the slurry into the raspberry mixture and stir constantly until the filling thickens. This should only take a minute or two.
- Cool Completely: Remove from heat and let the raspberry filling cool completely. As it cools, it will thicken even more.
Preparing the Swiss Meringue Buttercream
Now for the star of the show – the Swiss Meringue Buttercream! This frosting is silky smooth, not too sweet, and incredibly stable. It’s a bit more involved than other frostings, but trust me, it’s worth the effort.
- Combine Egg Whites and Sugar: In a heatproof bowl (like stainless steel or glass) set over a saucepan of simmering water (make sure the bottom of the bowl doesn’t touch the water), combine the egg whites and sugar.
- Whisk and Heat: Whisk constantly until the sugar is completely dissolved and the mixture is hot to the touch. You should not feel any sugar granules when you rub a bit of the mixture between your fingers. This usually takes about 5-7 minutes.
- Whip to Stiff Peaks: Remove the bowl from the heat and transfer the mixture to the bowl of your stand mixer fitted with the whisk attachment. Beat on high speed until stiff, glossy peaks form and the bowl is cool to the touch. This can take 8-10 minutes, so be patient! The meringue needs to be completely cool before adding the butter, or it will melt.
- Add Butter Gradually: With the mixer on medium speed, add the softened butter one tablespoon at a time, making sure each tablespoon is fully incorporated before adding the next. The mixture may look curdled at first, but don’t worry! Just keep mixing, and it will eventually come together into a smooth, creamy buttercream.
- Add Vanilla and Salt: Once all the butter is added and the buttercream is smooth, add the vanilla extract and salt. Mix until combined.
Assembling the Raspberry Layer Cake
Alright, we’ve made it to the final stage! Time to put all our hard work together and create a beautiful and delicious Raspberry Layer Cake.
- Level the Cakes: If your cake layers are uneven, use a serrated knife to level them. This will ensure your cake is stable and looks professional.
- First Layer: Place one cake layer on a cake stand or serving plate. Spread a generous layer of Swiss Meringue Buttercream over the top of the cake layer.
- Raspberry Filling: Pipe a dam of buttercream around the edge of the cake layer to prevent the raspberry filling from spilling out. Then, spread a layer of the cooled raspberry filling inside the buttercream dam.
- Second Layer: Carefully place the second cake layer on top of the raspberry filling. Repeat the buttercream and raspberry filling layers.
- Third Layer: Place the final cake layer on top.
- Crumb Coat: Apply a thin layer of buttercream all over the cake. This is called a crumb coat, and it helps to seal in any loose crumbs. Chill the cake in the refrigerator for at least 30 minutes to allow the crumb coat to set.
- Final Frosting: Once the crumb coat is set, apply a final, thicker layer of buttercream all over the cake. Smooth the frosting with an offset spatula or cake smoother.
- Decorate: Decorate the cake as desired. You can use fresh raspberries, powdered sugar, edible flowers, or any other decorations you like.
- Chill and Serve: Chill the cake in the refrigerator for at least 30 minutes before serving. This will help the frosting set and make the cake easier to slice.
Conclusion:
This Raspberry Layer Cake isn’t just a dessert; it’s an experience. From the delicate crumb of the cake layers to the vibrant burst of raspberry in every bite, it’s a symphony of flavors and textures that will leave you and your guests utterly delighted. I truly believe this recipe is a must-try for anyone who loves baking, or simply appreciates a truly exceptional cake. It’s the perfect centerpiece for birthdays, anniversaries, or even just a special weekend treat.
But what truly sets this cake apart is its versatility. While the classic raspberry filling is divine, don’t be afraid to experiment! Imagine swapping the raspberry jam for a homemade raspberry curd for an even more intense fruity flavor. Or, for a richer, more decadent experience, try adding a layer of white chocolate ganache between the cake layers. You could even incorporate fresh raspberries into the buttercream frosting for a pop of color and an extra burst of freshness.
Serving Suggestions and Variations:
* Classic Presentation: Serve chilled with a dollop of whipped cream or a scoop of vanilla ice cream. A few fresh raspberries scattered around the plate add a touch of elegance.
* Berry Medley: For a more complex flavor profile, consider using a mix of raspberries, blueberries, and strawberries in the filling.
* Chocolate Raspberry Dream: Add cocoa powder to the cake batter for a chocolate raspberry version. A chocolate ganache drizzle on top would be the perfect finishing touch.
* Lemon Raspberry Twist: Incorporate lemon zest into the cake batter and add a touch of lemon juice to the raspberry filling for a bright and zesty twist.
* Individual Cakes: Bake the batter in muffin tins for individual raspberry cupcakes, perfect for parties or smaller gatherings.
I’ve poured my heart and soul into perfecting this recipe, and I’m confident that you’ll be thrilled with the results. The combination of the light, airy cake, the tangy raspberry filling, and the smooth, creamy frosting is simply irresistible. It’s a cake that’s sure to impress, no matter the occasion.
So, what are you waiting for? Gather your ingredients, preheat your oven, and get ready to create a truly unforgettable Raspberry Layer Cake. I know it might seem a little daunting at first, but trust me, the process is just as rewarding as the final product. And remember, baking is all about having fun and experimenting, so don’t be afraid to put your own personal touch on it.
I’m so excited for you to try this recipe! Once you’ve baked your own Raspberry Layer Cake, I would absolutely love to hear about your experience. Did you make any variations? What did your friends and family think? Share your photos and stories in the comments below – I can’t wait to see your creations! Happy baking!
Raspberry Layer Cake: A Delicious & Easy Recipe
Moist vanilla cake layers with homemade raspberry filling and silky Swiss Meringue Buttercream. Perfect for special occasions!
Ingredients
Instructions
Recipe Notes
- Use a kitchen scale to ensure cake layers are even.
- Make sure cakes are completely cool before frosting.
- Don’t overmix the cake batter.
- The Swiss Meringue Buttercream may look curdled at first, but keep mixing and it will come together.
- Chilling the cake before serving helps the frosting set and makes it easier to slice.