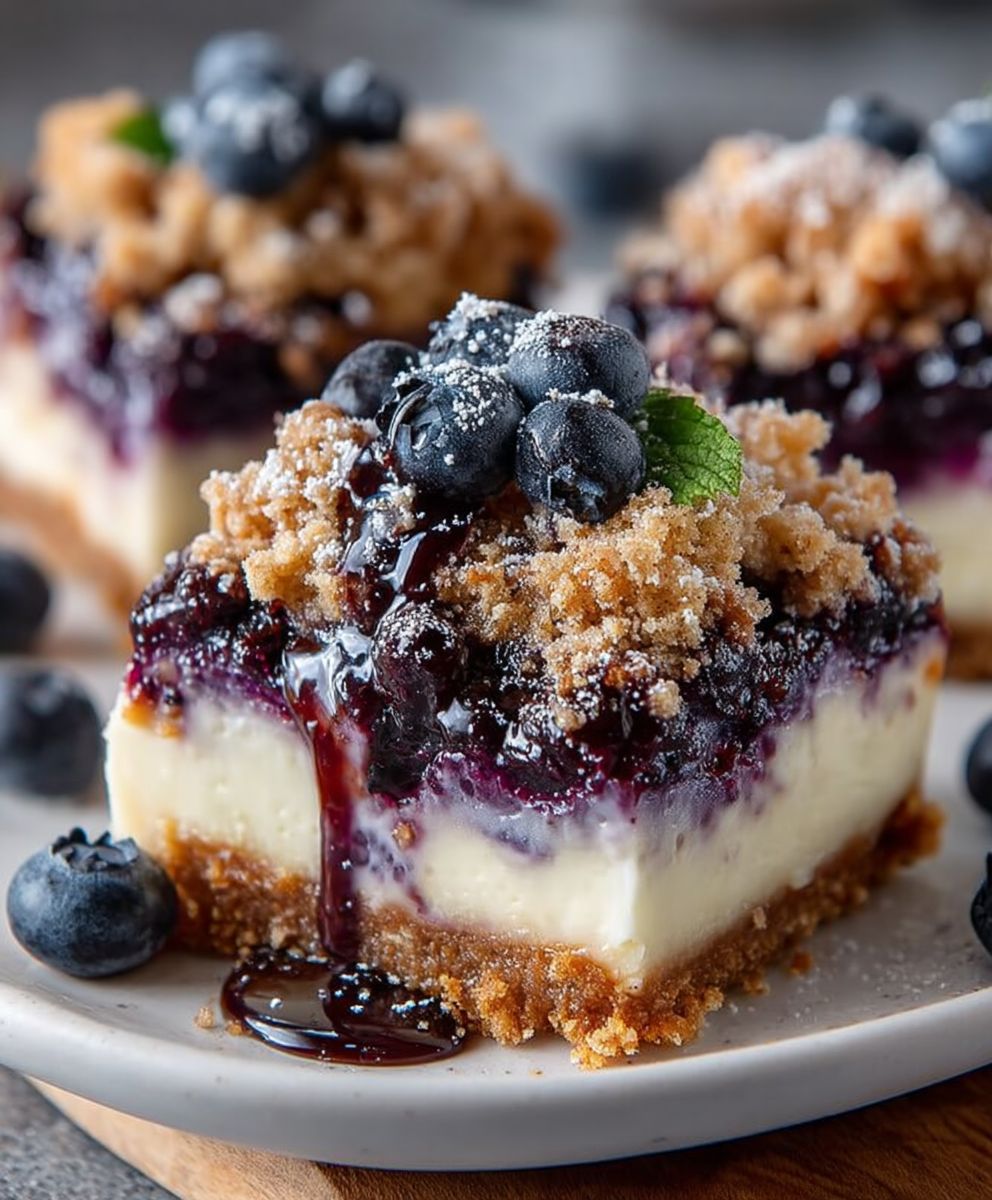
Blueberry crisp cheesecake bars are the dessert mashup you didn’t know you needed, but will quickly become obsessed with! Imagine the creamy, tangy delight of a classic cheesecake swirled together with the warm, comforting flavors of a blueberry crisp. It’s a symphony of textures and tastes that will have everyone begging for seconds.
While the exact origins of combining cheesecake and fruit crisps are somewhat hazy, both desserts have rich histories. Cheesecake, in its various forms, dates back to ancient Greece, while fruit crisps gained popularity in America during the colonial era, offering a resourceful way to use seasonal fruits. This modern fusion brings together the best of both worlds, creating a truly unforgettable treat.
What makes these blueberry crisp cheesecake bars so irresistible? It’s the perfect balance! The creamy cheesecake filling provides a luxurious base, while the sweet and slightly tart blueberries burst with flavor. The buttery, crumbly crisp topping adds a delightful textural contrast that elevates the entire experience. Plus, these bars are incredibly convenient to make and serve, making them ideal for potlucks, parties, or simply a delightful weekend treat. Get ready to experience a dessert that’s both elegant and comforting, all in one delicious bite!

Ingredients:
- For the Crust:
- 1 ½ cups graham cracker crumbs
- 5 tablespoons unsalted butter, melted
- ¼ cup granulated sugar
- ¼ teaspoon ground cinnamon
- For the Cheesecake Filling:
- 24 ounces cream cheese, softened
- 1 cup granulated sugar
- 2 large eggs
- ½ cup sour cream
- 2 teaspoons vanilla extract
- 1 tablespoon lemon juice
- For the Blueberry Crisp Topping:
- 3 cups fresh blueberries
- ½ cup all-purpose flour
- ½ cup rolled oats
- ½ cup packed light brown sugar
- ¼ teaspoon ground cinnamon
- ¼ teaspoon ground nutmeg
- 6 tablespoons unsalted butter, cold and cubed
Preparing the Graham Cracker Crust:
- Preheat your oven to 350°F (175°C). This is crucial for ensuring the crust bakes evenly.
- In a medium bowl, combine the graham cracker crumbs, melted butter, granulated sugar, and ground cinnamon. Mix well until all the crumbs are moistened. I like to use a fork to ensure everything is evenly distributed.
- Press the mixture firmly into the bottom of a 9×13 inch baking pan. I find using the bottom of a measuring cup helps to create a smooth and even crust.
- Bake the crust for 8-10 minutes, or until lightly golden brown. Keep a close eye on it to prevent burning. Once baked, remove from the oven and let it cool completely while you prepare the cheesecake filling.
Making the Creamy Cheesecake Filling:
- In a large bowl, beat the softened cream cheese and granulated sugar together with an electric mixer until smooth and creamy. This is where patience is key! Make sure the cream cheese is truly softened to avoid any lumps in your filling. I usually let mine sit out for at least an hour.
- Add the eggs one at a time, beating well after each addition. Be careful not to overmix at this stage, as overmixing can incorporate too much air and cause the cheesecake to crack during baking.
- Stir in the sour cream, vanilla extract, and lemon juice. Mix until just combined. The sour cream adds a lovely tang and the lemon juice brightens up the flavors.
- Pour the cheesecake filling over the cooled graham cracker crust, spreading it evenly.
Crafting the Delicious Blueberry Crisp Topping:
- In a separate medium bowl, combine the fresh blueberries, all-purpose flour, rolled oats, packed light brown sugar, ground cinnamon, and ground nutmeg.
- Add the cold, cubed butter to the blueberry mixture. Using a pastry blender or your fingertips, cut the butter into the dry ingredients until the mixture resembles coarse crumbs. The cold butter is essential for creating those lovely, buttery clumps in the crisp topping. If the butter gets too warm, the topping will become greasy.
- Sprinkle the blueberry crisp topping evenly over the cheesecake filling. Make sure to distribute it well so that every bite has a bit of that delicious crisp.
Baking the Blueberry Crisp Cheesecake Bars:
- Bake in the preheated oven for 45-55 minutes, or until the cheesecake is set around the edges but still slightly jiggly in the center. The baking time may vary depending on your oven, so keep an eye on it.
- Turn off the oven and let the cheesecake cool in the oven with the door slightly ajar for about an hour. This helps prevent cracking by allowing the cheesecake to cool gradually.
- Remove the cheesecake from the oven and let it cool completely at room temperature.
- Cover the cheesecake with plastic wrap and refrigerate for at least 4 hours, or preferably overnight. This allows the cheesecake to fully set and the flavors to meld together.
Cutting and Serving:
- Once the cheesecake is thoroughly chilled, cut it into bars using a sharp knife. I like to run the knife under hot water and wipe it clean between each cut for neat and even slices.
- Serve the blueberry crisp cheesecake bars cold. They are perfect for a summer dessert, a potluck, or any special occasion.
- Optional: You can garnish the bars with a dollop of whipped cream or a sprinkle of powdered sugar for an extra touch of elegance.
Tips for Success:
- Use room temperature ingredients: Softened cream cheese and room temperature eggs will ensure a smooth and creamy cheesecake filling.
- Don’t overmix: Overmixing the cheesecake filling can incorporate too much air, leading to cracks during baking. Mix until just combined.
- Bake low and slow: Baking at a lower temperature for a longer time helps prevent the cheesecake from cracking.
- Cool gradually: Allowing the cheesecake to cool slowly in the oven helps prevent cracking.
- Chill thoroughly: Chilling the cheesecake for at least 4 hours, or preferably overnight, allows it to fully set and the flavors to meld together.
- Adjust sweetness to taste: If you prefer a less sweet cheesecake, you can reduce the amount of sugar in the filling.
- Use high-quality ingredients: Using high-quality ingredients, especially cream cheese and butter, will result in a richer and more flavorful cheesecake.
- Prevent a soggy crust: Blind baking the crust before adding the filling helps prevent it from becoming soggy.
- Add a water bath: For an even creamier cheesecake, you can bake it in a water bath. Wrap the bottom of the springform pan in aluminum foil and place it in a larger pan. Pour hot water into the larger pan until it reaches about halfway up the sides of the springform pan.
- Experiment with flavors: Feel free to experiment with different flavors in the cheesecake filling or crisp topping. You could add lemon zest, almond extract, or different types of berries.
Troubleshooting:
- Cracked Cheesecake: If your cheesecake cracks, don’t worry! It will still taste delicious. You can cover the cracks with whipped cream or fruit topping. To prevent cracking, try baking the cheesecake in a water bath and cooling it gradually in the oven.
- Soggy Crust: If your crust is soggy, try blind baking it before adding the filling. You can also brush the crust with melted chocolate to create a moisture barrier.
- Lumpy Filling: If your cheesecake filling is lumpy, make sure your cream cheese is fully softened and that you are not overmixing the batter. You can also try using an immersion blender to smooth out the filling.
- Burnt Topping: If your crisp topping is browning too quickly, you can tent it with aluminum foil during the last part of baking.
Variations:
- Different Berries: You can substitute other berries for the blueberries, such as raspberries, strawberries, or blackberries.
- Different Fruits: You can also use other fruits in the crisp topping, such as apples, peaches, or pears.
- Nutty Topping: Add chopped nuts, such as pecans or walnuts, to the crisp topping for extra flavor and texture.
- Chocolate Crust: Use chocolate graham crackers for a chocolatey twist on the crust.
- Lemon Cheesecake: Add lemon zest and lemon extract to the cheesecake filling for a bright and citrusy flavor.
Conclusion:
These Blueberry Crisp Cheesecake Bars are truly something special, a delightful symphony of textures and flavors that will have everyone begging for more. The creamy, tangy cheesecake layer nestled between a buttery, crumbly oat topping and a burst of juicy blueberries creates an unforgettable dessert experience. If you’re looking for a show-stopping treat that’s surprisingly easy to make, look no further – this recipe is an absolute must-try!
Why is this recipe a must-try? Well, beyond the incredible taste, it’s the perfect balance of comfort and elegance. It’s rustic enough to serve at a casual backyard barbecue, yet sophisticated enough to grace the dessert table at a more formal gathering. The combination of the sweet blueberries, the rich cheesecake, and the satisfying crunch of the crisp topping is simply irresistible. Plus, it’s a fantastic way to use up those fresh blueberries you picked at the farmer’s market or even the frozen ones you have stashed away for a rainy day.
But the best part? It’s incredibly versatile! Feel free to experiment with different variations to suit your taste. For a warmer, more comforting flavor profile, try adding a pinch of cinnamon or nutmeg to the oat topping. If you’re a fan of lemon, a little lemon zest in the cheesecake filling will brighten the flavors beautifully. Want to make it even more decadent? Drizzle a white chocolate ganache over the cooled bars for an extra touch of indulgence.
Serving suggestions are endless! These bars are delicious served chilled straight from the refrigerator, making them a perfect make-ahead dessert. For a truly special treat, warm them slightly and serve with a scoop of vanilla ice cream or a dollop of whipped cream. A sprinkle of powdered sugar or a few fresh blueberries on top adds a lovely finishing touch. They’re also fantastic with a cup of coffee or tea, making them the ideal afternoon pick-me-up.
Don’t be intimidated by the multiple layers – this recipe is actually quite straightforward. I’ve provided detailed instructions and helpful tips to guide you through each step of the process. And trust me, the end result is well worth the effort. The aroma that fills your kitchen as these bars bake is simply heavenly, and the first bite will transport you to dessert paradise.
I’m so confident that you’ll love these Blueberry Crisp Cheesecake Bars that I urge you to give them a try. I know you’ll be impressed with how easy they are to make and how delicious they taste. Once you’ve made them, I’d love to hear about your experience! Did you make any variations? What did your family and friends think? Share your photos and comments with me – I can’t wait to see your creations! Happy baking, and enjoy every delicious bite! I’m sure this will become a family favorite, and I can’t wait to hear all about your baking adventures with this recipe. So go ahead, grab your ingredients, and get ready to create a dessert masterpiece! You won’t regret it!
Blueberry Crisp Cheesecake Bars: The Ultimate Dessert Recipe
Creamy cheesecake bars with a buttery, oat-filled blueberry crisp topping. A delightful mix of textures and flavors in every bite.
Ingredients
Instructions
Recipe Notes
- Use room temperature ingredients for the filling.
- Don’t overmix the cheesecake filling.
- Cool the cheesecake gradually to prevent cracking.
- Chill thoroughly for best results.
- Adjust sweetness to taste.
- Experiment with different berries or fruits in the crisp topping.
- For an even creamier cheesecake, bake it in a water bath.