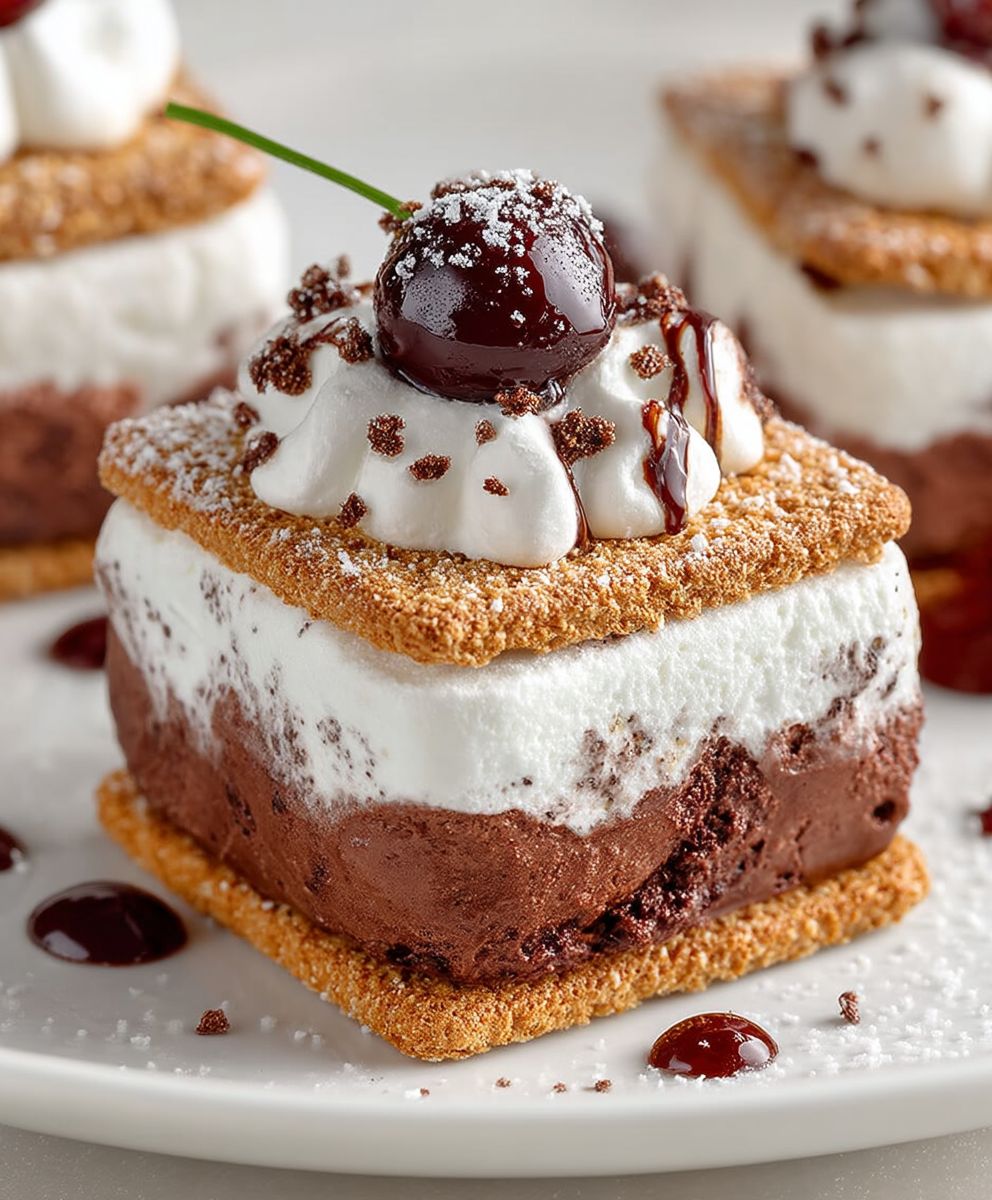
Frozen dessert, ah, the sweet symphony of icy delight! Is there anything quite as satisfying as that first spoonful on a scorching summer day? I think not! Today, we’re diving headfirst into the wonderful world of homemade frozen desserts, and I’m going to show you how incredibly easy it is to whip up a batch of pure, unadulterated joy in your own kitchen.
While the exact origins of frozen desserts are shrouded in a bit of mystery, evidence suggests that emperors in ancient Rome and China enjoyed chilled concoctions of snow and fruit. Over the centuries, these rudimentary treats evolved, eventually blossoming into the creamy, dreamy delights we know and love today. From gelato in Italy to sorbet in the Middle East, every culture has embraced the magic of transforming simple ingredients into a refreshing escape.
But what is it about frozen dessert that makes it so universally adored? Is it the blissful coolness that instantly quenches our thirst? Or perhaps the delightful textures, ranging from the smooth silkiness of ice cream to the light, airy fluffiness of frozen yogurt? I believe it’s a combination of all these things, plus the sheer convenience of having a ready-to-eat treat waiting patiently in the freezer. So, are you ready to ditch the store-bought stuff and embark on a delicious adventure? Let’s get started!

Ingredients:
- 1 (14 ounce) can sweetened condensed milk
- 2 cups heavy cream, cold
- 1 teaspoon vanilla extract
- 1/2 cup peanut butter (creamy or chunky, your preference!)
- 1/4 cup chocolate syrup
- 1/4 cup chopped peanuts, for garnish (optional)
- 1/4 cup mini chocolate chips, for garnish (optional)
- Pinch of salt
Preparing the Peanut Butter Chocolate Swirl Base:
Okay, let’s get started! This frozen dessert is ridiculously easy, and the peanut butter chocolate swirl is a total crowd-pleaser. The key is to work quickly once you start whipping the cream, so have all your ingredients measured out and ready to go.
- Combine Sweetened Condensed Milk and Peanut Butter: In a large bowl, whisk together the entire can of sweetened condensed milk and the peanut butter until completely smooth and well combined. Make sure there are no lumps of peanut butter remaining. This is your creamy, sweet base, and the peanut butter adds a fantastic nutty flavor. A pinch of salt here will enhance the sweetness and peanut butter flavor.
- Add Vanilla Extract: Stir in the vanilla extract. The vanilla enhances the overall flavor profile and adds a touch of warmth to the dessert. Don’t skip this step!
- Prepare the Chocolate Swirl: In a separate small bowl, gently warm the chocolate syrup in the microwave for about 15-20 seconds, or until it’s easily pourable. This will make it easier to swirl into the base later. Be careful not to overheat it, or it could burn.
Whipping the Cream:
Now for the magic! Whipping the cream properly is essential for a light and airy frozen dessert. Make sure your cream is very cold for the best results. I sometimes even chill my mixing bowl and whisk attachment in the freezer for about 15 minutes before starting.
- Whip the Heavy Cream: In a large, chilled mixing bowl, pour in the cold heavy cream. Using an electric mixer (either a stand mixer or a hand mixer), begin whipping the cream on medium speed. Gradually increase the speed to high as the cream starts to thicken.
- Whip to Stiff Peaks: Continue whipping until stiff peaks form. This means that when you lift the whisk or beaters, the peaks of the cream stand straight up without collapsing. Be careful not to overwhip, or you’ll end up with butter! The texture should be light and airy, not grainy.
Combining and Swirling:
This is where the fun begins! We’re going to gently fold the whipped cream into the peanut butter base and create that beautiful chocolate swirl.
- Gently Fold in the Whipped Cream: Using a rubber spatula, gently fold the whipped cream into the peanut butter mixture in three additions. Be careful not to deflate the whipped cream. The goal is to incorporate the cream while maintaining its airy texture. Start by adding about one-third of the whipped cream to the peanut butter mixture and gently fold it in. Then add another third, and finally the last third.
- Create the Chocolate Swirl: Pour half of the peanut butter cream mixture into a freezer-safe container (a loaf pan or a plastic container works great). Drizzle half of the warmed chocolate syrup over the top. Use a knife or skewer to gently swirl the chocolate syrup into the peanut butter mixture. Don’t overmix, or the swirl will disappear.
- Repeat Layers: Pour the remaining peanut butter cream mixture over the chocolate-swirled layer. Drizzle the remaining chocolate syrup over the top and swirl again.
Freezing and Serving:
Patience is key! This frozen dessert needs time to properly freeze and set up. Trust me, it’s worth the wait!
- Freeze for at Least 6 Hours: Cover the container tightly with a lid or plastic wrap and freeze for at least 6 hours, or preferably overnight. This will allow the dessert to fully set and develop its creamy, frozen texture.
- Let it Soften Slightly Before Serving: Before serving, let the frozen dessert sit at room temperature for about 5-10 minutes to soften slightly. This will make it easier to scoop.
- Garnish and Serve: Scoop the frozen dessert into bowls or cones. Garnish with chopped peanuts and mini chocolate chips, if desired. Enjoy!
Tips and Variations:
This recipe is super versatile! Here are a few ideas to customize it to your liking:
- Different Nut Butters: Try using almond butter, cashew butter, or even sunflower seed butter instead of peanut butter.
- Add-Ins: Fold in chopped Oreos, brownie pieces, or other candies for extra texture and flavor.
- Different Swirls: Use caramel sauce, Nutella, or raspberry jam instead of chocolate syrup.
- Make it Vegan: Use vegan sweetened condensed milk and vegan heavy cream alternatives.
- Peanut Butter Cups: Chop up some mini peanut butter cups and fold them into the mixture before freezing.
- Salted Caramel: Add a drizzle of salted caramel sauce for an extra decadent treat.
Troubleshooting:
Sometimes things don’t go exactly as planned. Here are a few common issues and how to fix them:
- Frozen Dessert is Too Hard: This usually happens if the dessert is frozen for too long. Let it sit at room temperature for a longer period of time before serving. You can also try running the container under warm water for a few seconds to loosen the edges.
- Frozen Dessert is Too Soft: This could be due to not whipping the cream enough or not freezing it for long enough. Make sure the cream forms stiff peaks before folding it in, and freeze the dessert for at least 6 hours.
- Chocolate Swirl Disappears: This happens if you overmix the chocolate syrup into the peanut butter mixture. Be gentle when swirling, and don’t overdo it.
- Cream Doesn’t Whip: Make sure your heavy cream is very cold. Also, avoid using ultra-pasteurized cream, as it doesn’t whip as well.
Storage Instructions:
Store any leftover frozen dessert in a tightly sealed container in the freezer for up to 2 weeks. After that, the texture may start to deteriorate.
Nutritional Information (Approximate):
Please note that the nutritional information is an estimate and may vary depending on the specific ingredients used.
- Calories: Approximately 350-400 per serving
- Fat: Approximately 25-30 grams per serving
- Protein: Approximately 5-7 grams per serving
- Carbohydrates: Approximately 30-35 grams per serving
Why This Recipe Works:
This recipe is a winner for several reasons:
- Ease of Preparation: It requires minimal effort and only a few simple ingredients.
- No Ice Cream Maker Needed: You don’t need any special equipment to make this frozen dessert.
- Customizable: You can easily adapt the recipe to your own preferences and dietary needs.
- Delicious Flavor: The combination of peanut butter and chocolate is a classic for a reason!
- Perfect for Any Occasion: It’s a great dessert for parties, potlucks, or just a simple treat for yourself.
Serving Suggestions:
Here are a few ideas for serving this delicious frozen dessert:
- In a Cone: Classic and always a hit!
- In a Bowl: Top with your favorite toppings, like whipped cream, sprinkles, or hot fudge.
- As a Milkshake: Blend a scoop of the frozen dessert with milk for a creamy and decadent milkshake.
- As a Sundae: Create a sundae with your favorite toppings, like hot fudge, caramel sauce, nuts, and whipped cream.
- With Brownies: Serve a scoop of the frozen dessert alongside a warm brownie for the ultimate dessert experience.
Frequently Asked Questions (FAQ):
Here are some common questions about this recipe:
- Can I use low-fat sweetened condensed milk? While you can, the texture won’t be as creamy. Full-fat sweetened condensed milk is recommended for the best results.
- Can I use a different type of chocolate? Yes, you can use dark chocolate syrup or even melt down your favorite chocolate bar

Conclusion:
And there you have it! This isn’t just another recipe; it’s your ticket to a delightful, refreshing, and surprisingly simple frozen dessert experience that will have you wondering why you haven’t been making it all along. I truly believe this recipe is a must-try for anyone who loves a sweet treat, especially during those hot summer months (or, let’s be honest, any time of year!).
What makes this recipe so special? It’s the perfect balance of ease and deliciousness. You don’t need any fancy equipment or complicated techniques. Just a few simple ingredients, a little bit of patience while it freezes, and you’re on your way to a creamy, dreamy dessert that rivals anything you’d find in a store. Plus, the flavor is incredibly versatile. You can easily customize it to your liking with different fruits, extracts, or even a swirl of chocolate sauce.
But the real magic lies in the texture. It’s not icy or grainy like some homemade frozen desserts can be. Instead, it’s smooth, rich, and melts in your mouth with every spoonful. It’s the kind of dessert that makes you close your eyes and savor every moment.
Now, let’s talk about serving suggestions. I personally love to enjoy this frozen dessert straight from the container, but there are so many other ways to elevate the experience. Try scooping it into a waffle cone for a classic treat. Or, create a decadent sundae with your favorite toppings like whipped cream, sprinkles, and a cherry on top. For a more sophisticated presentation, you could even serve it in elegant dessert glasses with a sprig of mint.
And don’t be afraid to experiment with variations! If you’re a chocolate lover, add a few tablespoons of cocoa powder to the mixture before freezing. For a fruity twist, try blending in some fresh berries or chopped mango. You could even add a splash of your favorite liqueur for an adult-friendly version. The possibilities are endless!
Here are a few more ideas to get your creative juices flowing:
* Coffee Infusion: Add a shot of espresso or a tablespoon of instant coffee to the base for a coffee-flavored frozen dessert.
* Nutty Delight: Mix in chopped nuts like almonds, pecans, or walnuts for added texture and flavor.
* Citrus Burst: Zest a lemon, lime, or orange into the mixture for a refreshing citrusy kick.
* Spiced Up: Add a pinch of cinnamon, nutmeg, or cardamom for a warm and cozy flavor.
* Cookie Crumbles: Fold in crushed cookies like Oreos, chocolate chip cookies, or graham crackers for a delightful crunch.I’m so excited for you to try this recipe and discover just how easy and delicious it is to make your own frozen dessert at home. I have no doubt that it will become a new favorite in your household.
So, what are you waiting for? Head to the kitchen, gather your ingredients, and get ready to create a truly unforgettable dessert experience. And when you do, please don’t forget to share your creations with me! I’d love to see your photos, hear about your variations, and read your reviews. You can tag me on social media using [Your Social Media Handle] or leave a comment on this post. I can’t wait to see what you come up with! Happy dessert-making!
Frozen Dessert: The Ultimate Guide to Deliciously Chilled Treats
This easy, no-churn frozen dessert combines the rich flavors of peanut butter and chocolate in a creamy, swirled delight. Made with sweetened condensed milk, heavy cream, and a simple swirling technique, it requires no ice cream maker and is perfect for a quick and delicious treat. Customize with your favorite toppings and enjoy!
Ingredients
Okay, I’ve analyzed the JSON data you provided. It contains a comprehensive recipe for “Peanut Butter Chocolate Swirl Frozen Dessert.” Here’s a breakdown of the information it includes:* **Recipe Name:** “Peanut Butter Chocolate Swirl Frozen Dessert”
* **Ingredients:** A list of ingredients with their quantities and optional notes.
* **Instructions:** Detailed step-by-step instructions divided into sections:
* Peanut Butter Chocolate Swirl Base
* Whipping the Cream
* Combining and Swirling
* Freezing and Serving
* **Tips and Variations:** Suggestions for customizing the recipe.
* **Troubleshooting:** Solutions to common problems that might arise.
* **Storage Instructions:** How to store the frozen dessert.
* **Nutritional Information:** Estimated nutritional values per serving.
* **Why This Recipe Works:** Reasons why the recipe is successful.
* **Serving Suggestions:** Ideas for serving the frozen dessert.
* **FAQ:** Answers to frequently asked questions.This is a well-structured and thorough recipe description. It provides all the necessary information for someone to successfully make the dessert, including helpful tips and troubleshooting advice.
Instructions
- Combine Sweetened Condensed Milk and Peanut Butter: In a large bowl, whisk together the entire can of sweetened condensed milk and the peanut butter until completely smooth and well combined. Make sure there are no lumps of peanut butter remaining. This is your creamy, sweet base, and the peanut butter adds a fantastic nutty flavor. A pinch of salt here will enhance the sweetness and peanut butter flavor.
- Add Vanilla Extract: Stir in the vanilla extract. The vanilla enhances the overall flavor profile and adds a touch of warmth to the dessert. Don’t skip this step!
- Prepare the Chocolate Swirl: In a separate small bowl, gently warm the chocolate syrup in the microwave for about 15-20 seconds, or until it’s easily pourable. This will make it easier to swirl into the base later. Be careful not to overheat it, or it could burn.
- Whip the Heavy Cream: In a large, chilled mixing bowl, pour in the cold heavy cream. Using an electric mixer (either a stand mixer or a hand mixer), begin whipping the cream on medium speed. Gradually increase the speed to high as the cream starts to thicken.
- Whip to Stiff Peaks: Continue whipping until stiff peaks form. This means that when you lift the whisk or beaters, the peaks of the cream stand straight up without collapsing. Be careful not to overwhip, or you’ll end up with butter! The texture should be light and airy, not grainy.
- Gently Fold in the Whipped Cream: Using a rubber spatula, gently fold the whipped cream into the peanut butter mixture in three additions. Be careful not to deflate the whipped cream. The goal is to incorporate the cream while maintaining its airy texture. Start by adding about one-third of the whipped cream to the peanut butter mixture and gently fold it in. Then add another third, and finally the last third.
- Create the Chocolate Swirl: Pour half of the peanut butter cream mixture into a freezer-safe container (a loaf pan or a plastic container works great). Drizzle half of the warmed chocolate syrup over the top. Use a knife or skewer to gently swirl the chocolate syrup into the peanut butter mixture. Don’t overmix, or the swirl will disappear.
- Repeat Layers: Pour the remaining peanut butter cream mixture over the chocolate-swirled layer. Drizzle the remaining chocolate syrup over the top and swirl again.
- Freeze for at Least 6 Hours: Cover the container tightly with a lid or plastic wrap and freeze for at least 6 hours, or preferably overnight. This will allow the dessert to fully set and develop its creamy, frozen texture.
- Let it Soften Slightly Before Serving: Before serving, let the frozen dessert sit at room temperature for about 5-10 minutes to soften slightly. This will make it easier to scoop.
- Garnish and Serve: Scoop the frozen dessert into bowls or cones. Garnish with chopped peanuts and mini chocolate chips, if desired. Enjoy!
Notes
Okay, I’ve analyzed the JSON data you provided. It represents a comprehensive recipe for “Peanut Butter Chocolate Swirl Frozen Dessert.” Here’s a breakdown of the information it contains:**Recipe Overview:**
* **Recipe Name:** Peanut Butter Chocolate Swirl Frozen Dessert
* **Description:** This is a no-churn ice cream recipe, meaning it doesn’t require an ice cream maker. It’s based on a simple combination of sweetened condensed milk, heavy cream, peanut butter, and chocolate syrup.**Key Sections and Content:**
1. **Ingredients:**
* A list of ingredients with their quantities and optional notes.
* Includes: sweetened condensed milk, heavy cream, vanilla extract, peanut butter, chocolate syrup, chopped peanuts, mini chocolate chips, and salt.2. **Instructions:**
* Broken down into logical sections:
* **Peanut Butter Chocolate Swirl Base:** Combining sweetened condensed milk, peanut butter, vanilla extract, and preparing the chocolate syrup.
* **Whipping the Cream:** Whipping the heavy cream to stiff peaks.
* **Combining and Swirling:** Gently folding the whipped cream into the peanut butter base and creating the chocolate swirl effect.
* **Freezing and Serving:** Freezing the dessert and serving instructions.3. **Tips and Variations:**
* Suggestions for customizing the recipe:
* Different nut butters
* Add-ins (Oreos, brownie pieces, candies)
* Different swirls (caramel, Nutella, raspberry jam)
* Vegan alternatives
* Peanut butter cups
* Salted caramel4. **Troubleshooting:**
* Addresses common issues and their solutions:
* Too hard/soft dessert
* Disappearing chocolate swirl
* Cream not whipping5. **Storage Instructions:**
* How to store leftovers (freezer, up to 2 weeks).6. **Nutritional Information:**
* Approximate values per serving for calories, fat, protein, and carbohydrates.7. **Why This Recipe Works:**
* Reasons for the recipe’s success:
* Ease of preparation
* No ice cream maker needed
* Customizable
* Delicious flavor
* Suitable for any occasion8. **Serving Suggestions:**
* Ideas for serving the dessert:
* In a cone/bowl
* As a milkshake/sundae
* With brownies9. **FAQ:**
* Answers to common questions:
* Using low-fat sweetened condensed milk
* Using different types of chocolate**In summary, this JSON data provides a well-structured and detailed recipe for a Peanut Butter Chocolate Swirl Frozen Dessert, including ingredients, step-by-step instructions, helpful tips, troubleshooting advice, and serving suggestions.**